

Accessory Catalog
Page 4
...-use sewing machines www.brother.com Loosen the clamp screw at the back of the presser foot and slide the presser foot so that the needle fits on the opening on the edge of zipper/piping, avoiding the non-flat parts of zipper/piping, and presses the fabric with a screwdriver. 5. Position the... not hit the presser foot, and then tighten the clamp screw with just right pressure. 1. Sew. Screw on either left ). 2. Requires Low Shank Adapter for ULT series, PC-6500, PC-8200 and PC-8500 sewing machines. Brother General Sewing Accessories 05 Sew as you like.
...-use sewing machines www.brother.com Loosen the clamp screw at the back of the presser foot and slide the presser foot so that the needle fits on the opening on the edge of zipper/piping, avoiding the non-flat parts of zipper/piping, and presses the fabric with a screwdriver. 5. Position the... not hit the presser foot, and then tighten the clamp screw with just right pressure. 1. Sew. Screw on either left ). 2. Requires Low Shank Adapter for ULT series, PC-6500, PC-8200 and PC-8500 sewing machines. Brother General Sewing Accessories 05 Sew as you like.

Accessory Catalog
Page 6
...Hold the fabric from the back and front and roll it into the curled part of the foot. 6. Increase upper thread tension. 2. Place the fabric with fabrics such as leather, vinyl and other novelty fabrics. Brother General Sewing Accessories 09 Narrow Hemmer Foot Non Stick Foot Overlock Foot Picot Foot...SA127 GHILOP Skirt Innov-is Project Book (See page 53 for details.) www.brother.com Position the edge of the foot. 5. Hold the fabric from the back and front and roll it into the curled part of the fabric behind the needle and lower the presser foot. 7. Place ...
...Hold the fabric from the back and front and roll it into the curled part of the foot. 6. Increase upper thread tension. 2. Place the fabric with fabrics such as leather, vinyl and other novelty fabrics. Brother General Sewing Accessories 09 Narrow Hemmer Foot Non Stick Foot Overlock Foot Picot Foot...SA127 GHILOP Skirt Innov-is Project Book (See page 53 for details.) www.brother.com Position the edge of the foot. 5. Hold the fabric from the back and front and roll it into the curled part of the fabric behind the needle and lower the presser foot. 7. Place ...
Users Manual - English
Page 2
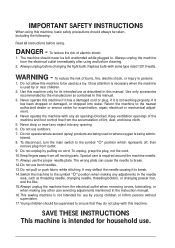
... machine should never be used by young children or infirm persons without supervision. 17.Young children should be taken, including the following: Read all moving parts. Always unplug the machine from the electrical outlet when removing covers, lubricating, or when making any adjustments in the needle area, such as contained in...
... machine should never be used by young children or infirm persons without supervision. 17.Young children should be taken, including the following: Read all moving parts. Always unplug the machine from the electrical outlet when removing covers, lubricating, or when making any adjustments in the needle area, such as contained in...

Users Manual - English
Page 4
... safe operation 1. Be sure to clean the case. Use only neutral soaps or detergents to keep your local authorized Brother dealer. Always consult the operation manual when replacing or installing any other parts to inspect and adjust the machine yourself. For repair or adjustment In the event a malfunction occurs or adjustment is...
... safe operation 1. Be sure to clean the case. Use only neutral soaps or detergents to keep your local authorized Brother dealer. Always consult the operation manual when replacing or installing any other parts to inspect and adjust the machine yourself. For repair or adjustment In the event a malfunction occurs or adjustment is...
Users Manual - English
Page 7
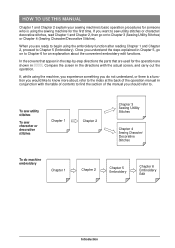
... 1 and Chapter 2, then go on to know more about the convenient embroidery edit functions. When you are shown in the step-by-step directions the parts that appear in operation. . Once you understand the steps explained in Chapter 5, go on to Chapter 6 for an explanation about , refer to the index at...
... 1 and Chapter 2, then go on to know more about the convenient embroidery edit functions. When you are shown in the step-by-step directions the parts that appear in operation. . Once you understand the steps explained in Chapter 5, go on to Chapter 6 for an explanation about , refer to the index at...

Users Manual - English
Page 8
Index CONTENTS WHAT YOU CAN DO WITH THIS MACHINE Special Features HOW TO USE THIS MANUAL Chapter 1 Setting Up PRINCIPAL PARTS AND THEIR OPERATION 1-1 Principal Parts 1-1 s Embroidery Unit 1-2 s Hard Case 1-2 s Embroidery Unit Storage Case ........ 1-2 s Operation Buttons 1-3 s Balance Wheel 1-4 s Presser Foot Lever 1-4 s Sewing Speed Controller 1-4 s Bobbin Winder Button 1-4 s Top Cover 1-5 s Supplemental Spool ...
Index CONTENTS WHAT YOU CAN DO WITH THIS MACHINE Special Features HOW TO USE THIS MANUAL Chapter 1 Setting Up PRINCIPAL PARTS AND THEIR OPERATION 1-1 Principal Parts 1-1 s Embroidery Unit 1-2 s Hard Case 1-2 s Embroidery Unit Storage Case ........ 1-2 s Operation Buttons 1-3 s Balance Wheel 1-4 s Presser Foot Lever 1-4 s Sewing Speed Controller 1-4 s Bobbin Winder Button 1-4 s Top Cover 1-5 s Supplemental Spool ...
Users Manual - English
Page 10
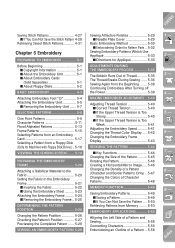
... the Completed Pattern ...... 5-28 SEWING AN EMBROIDERY PATTERN 5-29 Sewing Attractive Finishes 5-29 s Needle Plate Cover 5-29 Basic Embroidery Method 5-30 s Embroidering Order for Pattern Parts .. 5-32 Sewing Embroidery Patterns Which Use Appliqu 5-33 s Directions for Appliqu 5-33 ADJUSTMENTS DURING THE EMBROIDERY PROCESS 5-35 The Bobbin Runs Out of Thread .......... 5-35...
... the Completed Pattern ...... 5-28 SEWING AN EMBROIDERY PATTERN 5-29 Sewing Attractive Finishes 5-29 s Needle Plate Cover 5-29 Basic Embroidery Method 5-30 s Embroidering Order for Pattern Parts .. 5-32 Sewing Embroidery Patterns Which Use Appliqu 5-33 s Directions for Appliqu 5-33 ADJUSTMENTS DURING THE EMBROIDERY PROCESS 5-35 The Bobbin Runs Out of Thread .......... 5-35...
Users Manual - English
Page 11
... 6-32 s If You Can Not Save the Pattern .... 6-33 Retrieving Saved Patterns 6-36 ENTERING STITCH DATA 7-3 Creating Stitch Data 7-3 Editing Stitch Data 7-6 s Moving a Point 7-7 s Moving Part or All of the Design ..... 7-8 s Inserting New Points 7-9 MEMORY FUNCTIONS 7-11 Storing the custom design 7-11 Retrieving a Stitch Design That Has Been Saved 7-13 1 - 2 - 3 -
... 6-32 s If You Can Not Save the Pattern .... 6-33 Retrieving Saved Patterns 6-36 ENTERING STITCH DATA 7-3 Creating Stitch Data 7-3 Editing Stitch Data 7-6 s Moving a Point 7-7 s Moving Part or All of the Design ..... 7-8 s Inserting New Points 7-9 MEMORY FUNCTIONS 7-11 Storing the custom design 7-11 Retrieving a Stitch Design That Has Been Saved 7-13 1 - 2 - 3 -
Users Manual - English
Page 12
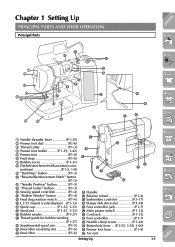
CONTENTS Chapter 1 Setting Up PRINCIPAL PARTS AND THEIR OPERATION Principal Parts 1 - 1 2 3 4 56 J K D C B A = 9 I Bobbin winder P.1-27) J Thread guide for bobbin winding P.1-27) K Supplemental spool pin P.1-5) L Knee lifter mounting slot P.1-6) M Knee lifter P.1-6) P Q R S T Y W V U N Handle O Balance wheel P.1-4) P Embroidery card slot P.5-...
CONTENTS Chapter 1 Setting Up PRINCIPAL PARTS AND THEIR OPERATION Principal Parts 1 - 1 2 3 4 56 J K D C B A = 9 I Bobbin winder P.1-27) J Thread guide for bobbin winding P.1-27) K Supplemental spool pin P.1-5) L Knee lifter mounting slot P.1-6) M Knee lifter P.1-6) P Q R S T Y W V U N Handle O Balance wheel P.1-4) P Embroidery card slot P.5-...
Users Manual - English
Page 19
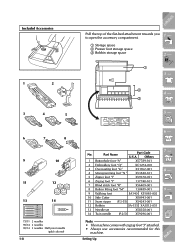
Part Name Part Code U.S.A. Others 1 Buttonhole foot "A" X57789-101 2 Embroidery foot "Q" XC1274-001 3 Overcasting foot "G" X51162-001 4 Monogramming foot "N " X53840-301 5 Zipper foot "I" X59370-051 6 Zigzag foot "J" 137748-...
Part Name Part Code U.S.A. Others 1 Buttonhole foot "A" X57789-101 2 Embroidery foot "Q" XC1274-001 3 Overcasting foot "G" X51162-001 4 Monogramming foot "N " X53840-301 5 Zipper foot "I" X59370-051 6 Zigzag foot "J" 137748-...
Users Manual - English
Page 20
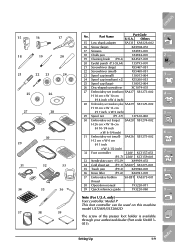
... 16 17 18 19 20 21 22 23 24 25 26 27 28 30 29 31 32 33 34 35 36 37 38 39 No. Part Name Part Code U.S.A. only) Foot controller: Model P This foot controller can be used on this machine model ULT2001/ULT2002D. Others 15 Low shank adapter SA131 XA6126...
... 16 17 18 19 20 21 22 23 24 25 26 27 28 30 29 31 32 33 34 35 36 37 38 39 No. Part Name Part Code U.S.A. only) Foot controller: Model P This foot controller can be used on this machine model ULT2001/ULT2002D. Others 15 Low shank adapter SA131 XA6126...

Users Manual - English
Page 21
... SA520 X81267-001 4 Country bag SA152 X80922-002 5 Multi-thread stand SA503 X81123-001 6 Embroidery unit carrying case SA528 XC1291-002 1 - 2 - 3 - CONTENTS Options 1 2 3 4 5 6 No. Part Name Part Code U.S.A. Pass the thread directly around the thread guide plate. 1 Thread guide of the sewing machine 4 - 5 - 6 - 7 - 1 • Using the Multi-thread Stand When Placed to...
... SA520 X81267-001 4 Country bag SA152 X80922-002 5 Multi-thread stand SA503 X81123-001 6 Embroidery unit carrying case SA528 XC1291-002 1 - 2 - 3 - CONTENTS Options 1 2 3 4 5 6 No. Part Name Part Code U.S.A. Pass the thread directly around the thread guide plate. 1 Thread guide of the sewing machine 4 - 5 - 6 - 7 - 1 • Using the Multi-thread Stand When Placed to...

Users Manual - English
Page 22
Part Name 7 Embroidery card No. 1 Alphabet No. 2 Flower No. 3 Dinosaur No. 6 Moskowitz's World No. 7 Country Life No. 8 Holiday No. 9 Hobby Craft No. 10 Monogram Emblem No. .... 55 Gardening No. 56 Asian No. 57 Large Christmas No. 58 New Quilt Traditions No. 60 Summer Fun 8 Embroidery disk No. 59 Blouse Setting Up Part Code U.S.A. No. Others SA298 SA299 SA300 SA303 SA304 SA305 SA306 SA307 SA311 SA312 SA313 SA314 SA315 SA316 SA319 SA320 SA321 SA322 SA323 SA325 SA327 SA328...
Part Name 7 Embroidery card No. 1 Alphabet No. 2 Flower No. 3 Dinosaur No. 6 Moskowitz's World No. 7 Country Life No. 8 Holiday No. 9 Hobby Craft No. 10 Monogram Emblem No. .... 55 Gardening No. 56 Asian No. 57 Large Christmas No. 58 New Quilt Traditions No. 60 Summer Fun 8 Embroidery disk No. 59 Blouse Setting Up Part Code U.S.A. No. Others SA298 SA299 SA300 SA303 SA304 SA305 SA306 SA307 SA311 SA312 SA313 SA314 SA315 SA316 SA319 SA320 SA321 SA322 SA323 SA325 SA327 SA328...
Users Manual - English
Page 27
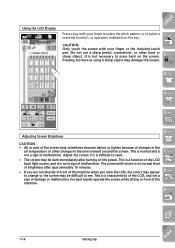
.... • The screen may damage the screen. 2 - 3 - 4 - 5 - For best results operate the screen while sitting in the environment around the screen. CAUTION • All or part of the screen may sometimes become darker or lighter because of changes in front of the machine when you view the LCD, the colors may...
.... • The screen may damage the screen. 2 - 3 - 4 - 5 - For best results operate the screen while sitting in the environment around the screen. CAUTION • All or part of the screen may sometimes become darker or lighter because of changes in front of the machine when you view the LCD, the colors may...

Users Manual - English
Page 31
...- 5 - Five categories are displayed at the top of the machine and their func- 2 - attaching the embroidery unit, feeding fabric, etc. 4 displays information about the main parts of the 1 - Press a key to open the screen shown below.
...- 5 - Five categories are displayed at the top of the machine and their func- 2 - attaching the embroidery unit, feeding fabric, etc. 4 displays information about the main parts of the 1 - Press a key to open the screen shown below.
Users Manual - English
Page 56
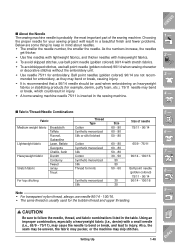
... point needle (golden colored) 90/14 with a small needle (i.e., 65/9 - 75/11), may bend or break, causing injury. • It is probably the most important part of the sewing machine. s Fabric/Thread/Needle Combinations Fabric Medium weight fabric Lightweight fabric Heavyweight fabric Stretch fabric Broadcloth Taffeta Flannel, Gabardine Lawn, Batiste Georgette...
... point needle (golden colored) 90/14 with a small needle (i.e., 65/9 - 75/11), may bend or break, causing injury. • It is probably the most important part of the sewing machine. s Fabric/Thread/Needle Combinations Fabric Medium weight fabric Lightweight fabric Heavyweight fabric Stretch fabric Broadcloth Taffeta Flannel, Gabardine Lawn, Batiste Georgette...

Users Manual - English
Page 58
... speed with the speed control lever. * You can use the correct presser foot. Hold the fabric and thread ends in your hands away from moving parts while the machine is in operation. • Do not stretch or pull the fabric during sewing. Otherwise, the needle may break and cause injury. 1. Chapter...
... speed with the speed control lever. * You can use the correct presser foot. Hold the fabric and thread ends in your hands away from moving parts while the machine is in operation. • Do not stretch or pull the fabric during sewing. Otherwise, the needle may break and cause injury. 1. Chapter...

Users Manual - English
Page 62
... Mode The twin needle can only be sewn in the twin needle mode (see page 3-1 "Quick Reference Table"). Pass the thread through 3-8 for this machine (part code X59296-001). CAUTION The needle threader lever can not be sure to chart on page 3-1 through the needle clamp thread guide on the needle...
... Mode The twin needle can only be sewn in the twin needle mode (see page 3-1 "Quick Reference Table"). Pass the thread through 3-8 for this machine (part code X59296-001). CAUTION The needle threader lever can not be sure to chart on page 3-1 through the needle clamp thread guide on the needle...

Users Manual - English
Page 87
Read the explanations and select the 1 - The screen displays directions for sewing the selected stitch. 6 - 7 - 8 - 9 - ?! 3-14 Sewing Utility Stitches Index appropriate stitch. 2 - 3 - 4 - 5 - 4. The upper part of the screen displays a selection of overcasting stitches with explanations. CONTENTS 3.
Read the explanations and select the 1 - The screen displays directions for sewing the selected stitch. 6 - 7 - 8 - 9 - ?! 3-14 Sewing Utility Stitches Index appropriate stitch. 2 - 3 - 4 - 5 - 4. The upper part of the screen displays a selection of overcasting stitches with explanations. CONTENTS 3.

Users Manual - English
Page 88
Follow the directions to sew the stitch. * Press at any time to return to scroll the screen 1 line at a time, in the direction of the instructions. Press to the selection screen. 1 - 2 - 3 - 4 - 5 - 6 - 7 - 8 - 9 - ?! Press to scroll the screen in the direc- Sewing Utility Stitches 3-15 Index tion of the screen in the direction of arrow selected, and see the next part of the arrow selected. Press to scroll a larger section of the arrow selected. CONTENTS 5.
Follow the directions to sew the stitch. * Press at any time to return to scroll the screen 1 line at a time, in the direction of the instructions. Press to the selection screen. 1 - 2 - 3 - 4 - 5 - 6 - 7 - 8 - 9 - ?! Press to scroll the screen in the direc- Sewing Utility Stitches 3-15 Index tion of the screen in the direction of arrow selected, and see the next part of the arrow selected. Press to scroll a larger section of the arrow selected. CONTENTS 5.


