

Accessory Catalog
Page 4
... non-flat parts of the presser foot and slide the presser foot so that the needle fits on the opening on the presser foot. 4. Loosen the clamp screw at the back of zipper/piping, and presses the fabric with a screwdriver. 5. Adjustable Zipper & Piping Foot Brother General Sewing ...Accessories 06 Adjustable Zipper & Piping Foot Attaches zippers and pipings easily. Brother General Sewing Accessories 05 Sew as you like. Screw on either left ). 2. Requires Low Shank Adapter for ULT series, PC-6500, PC-8200 and PC-8500 sewing machines. Position the presser foot over the...
... non-flat parts of the presser foot and slide the presser foot so that the needle fits on the opening on the presser foot. 4. Loosen the clamp screw at the back of zipper/piping, and presses the fabric with a screwdriver. 5. Adjustable Zipper & Piping Foot Brother General Sewing ...Accessories 06 Adjustable Zipper & Piping Foot Attaches zippers and pipings easily. Brother General Sewing Accessories 05 Sew as you like. Screw on either left ). 2. Requires Low Shank Adapter for ULT series, PC-6500, PC-8200 and PC-8500 sewing machines. Position the presser foot over the...

Accessory Catalog
Page 6
...up under the presser foot. 3. Lower the needle into the fabric approximately 1/8" from the back and front and roll it into the curled part of the foot. 6. SA164 ABCDEFJKMN SA149 GHILOP SA114 ABCDEFGHJKLMNO SA122 IP Travel Jewelr y Portfolio Innov-is Project Book (See page 50 for details... ABCDEFJKMN SA127 GHILOP Skirt Innov-is Project Book (See page 53 for details.) www.brother.com Select a desired stitch and sew. Lower the presser foot so that the foot guide is rolling around the curled part of the foot. 7. Increase upper thread tension. 2. Attach the presser foot. 3....
...up under the presser foot. 3. Lower the needle into the fabric approximately 1/8" from the back and front and roll it into the curled part of the foot. 6. SA164 ABCDEFJKMN SA149 GHILOP SA114 ABCDEFGHJKLMNO SA122 IP Travel Jewelr y Portfolio Innov-is Project Book (See page 50 for details... ABCDEFJKMN SA127 GHILOP Skirt Innov-is Project Book (See page 53 for details.) www.brother.com Select a desired stitch and sew. Lower the presser foot so that the foot guide is rolling around the curled part of the foot. 7. Increase upper thread tension. 2. Attach the presser foot. 3....
Users Manual - English
Page 2
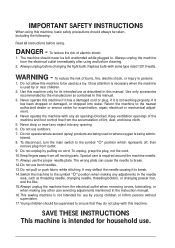
.... Do not use the proper needle plate. Do not allow this machine, basic safety precautions should always be taken, including the following: Read all moving parts. To unplug, grasp the plug, not the cord. 10.Keep fingers away from outlet. 9. Use only accessories recommended by or near children. 2. Do not unplug...
.... Do not use the proper needle plate. Do not allow this machine, basic safety precautions should always be taken, including the following: Read all moving parts. To unplug, grasp the plug, not the cord. 10.Keep fingers away from outlet. 9. Use only accessories recommended by or near children. 2. Do not unplug...

Users Manual - English
Page 4
Do not use or store the machine near a space heater, iron, halogen lamp, or other parts to keep your local authorized Brother dealer. Benzene, thinner, and scouring pow- For repair or adjustment In the event a malfunction occurs or adjustment is completed • ... use • Maintaining the machine • Leaving the machine unattended. 3. For additional product information and updates, visit our web site at www.brother.com Introduction A-3 Be sure to assure correct installation. For a longer service life 1. Do not use extension cords. Remember to turn off the ...
Do not use or store the machine near a space heater, iron, halogen lamp, or other parts to keep your local authorized Brother dealer. Benzene, thinner, and scouring pow- For repair or adjustment In the event a malfunction occurs or adjustment is completed • ... use • Maintaining the machine • Leaving the machine unattended. 3. For additional product information and updates, visit our web site at www.brother.com Introduction A-3 Be sure to assure correct installation. For a longer service life 1. Do not use extension cords. Remember to turn off the ...
Users Manual - English
Page 7
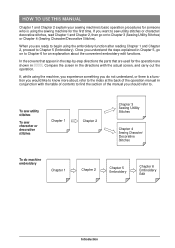
... table of contents to find the section of the manual you should refer to. When you are shown in the step-by-step directions the parts that are used for the operation are ready to begin using the embroidery function after reading Chapter 1 and Chapter 2, proceed to Chapter 5 (Embroidery). To sew...
... table of contents to find the section of the manual you should refer to. When you are shown in the step-by-step directions the parts that are used for the operation are ready to begin using the embroidery function after reading Chapter 1 and Chapter 2, proceed to Chapter 5 (Embroidery). To sew...

Users Manual - English
Page 8
Index CONTENTS WHAT YOU CAN DO WITH THIS MACHINE Special Features HOW TO USE THIS MANUAL Chapter 1 Setting Up PRINCIPAL PARTS AND THEIR OPERATION 1-1 Principal Parts 1-1 s Embroidery Unit 1-2 s Hard Case 1-2 s Embroidery Unit Storage Case ........ 1-2 s Operation Buttons 1-3 s Balance Wheel 1-4 s Presser Foot Lever 1-4 s Sewing Speed Controller 1-4 s Bobbin Winder Button 1-4 s Top Cover 1-5 s Supplemental Spool ...
Index CONTENTS WHAT YOU CAN DO WITH THIS MACHINE Special Features HOW TO USE THIS MANUAL Chapter 1 Setting Up PRINCIPAL PARTS AND THEIR OPERATION 1-1 Principal Parts 1-1 s Embroidery Unit 1-2 s Hard Case 1-2 s Embroidery Unit Storage Case ........ 1-2 s Operation Buttons 1-3 s Balance Wheel 1-4 s Presser Foot Lever 1-4 s Sewing Speed Controller 1-4 s Bobbin Winder Button 1-4 s Top Cover 1-5 s Supplemental Spool ...
Users Manual - English
Page 10
... the Completed Pattern ...... 5-28 SEWING AN EMBROIDERY PATTERN 5-29 Sewing Attractive Finishes 5-29 s Needle Plate Cover 5-29 Basic Embroidery Method 5-30 s Embroidering Order for Pattern Parts .. 5-32 Sewing Embroidery Patterns Which Use Appliqu 5-33 s Directions for Appliqu 5-33 ADJUSTMENTS DURING THE EMBROIDERY PROCESS 5-35 The Bobbin Runs Out of Thread .......... 5-35...
... the Completed Pattern ...... 5-28 SEWING AN EMBROIDERY PATTERN 5-29 Sewing Attractive Finishes 5-29 s Needle Plate Cover 5-29 Basic Embroidery Method 5-30 s Embroidering Order for Pattern Parts .. 5-32 Sewing Embroidery Patterns Which Use Appliqu 5-33 s Directions for Appliqu 5-33 ADJUSTMENTS DURING THE EMBROIDERY PROCESS 5-35 The Bobbin Runs Out of Thread .......... 5-35...
Users Manual - English
Page 11
... 6-32 s If You Can Not Save the Pattern .... 6-33 Retrieving Saved Patterns 6-36 ENTERING STITCH DATA 7-3 Creating Stitch Data 7-3 Editing Stitch Data 7-6 s Moving a Point 7-7 s Moving Part or All of the Design ..... 7-8 s Inserting New Points 7-9 MEMORY FUNCTIONS 7-11 Storing the custom design 7-11 Retrieving a Stitch Design That Has Been Saved 7-13 1 - 2 - 3 - Chapter...
... 6-32 s If You Can Not Save the Pattern .... 6-33 Retrieving Saved Patterns 6-36 ENTERING STITCH DATA 7-3 Creating Stitch Data 7-3 Editing Stitch Data 7-6 s Moving a Point 7-7 s Moving Part or All of the Design ..... 7-8 s Inserting New Points 7-9 MEMORY FUNCTIONS 7-11 Storing the custom design 7-11 Retrieving a Stitch Design That Has Been Saved 7-13 1 - 2 - 3 - Chapter...
Users Manual - English
Page 12
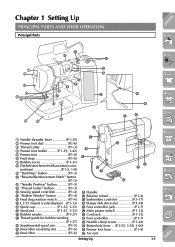
CONTENTS Chapter 1 Setting Up PRINCIPAL PARTS AND THEIR OPERATION Principal Parts 1 - 1 2 3 4 56 J K D C B A = 9 I Bobbin winder P.1-27) J Thread guide for bobbin winding P.1-27) K Supplemental spool pin P.1-5) L Knee lifter mounting slot P.1-6) M Knee lifter P.1-6) P Q R S T Y W V U N Handle O Balance wheel P.1-4) P Embroidery card slot P.5-...
CONTENTS Chapter 1 Setting Up PRINCIPAL PARTS AND THEIR OPERATION Principal Parts 1 - 1 2 3 4 56 J K D C B A = 9 I Bobbin winder P.1-27) J Thread guide for bobbin winding P.1-27) K Supplemental spool pin P.1-5) L Knee lifter mounting slot P.1-6) M Knee lifter P.1-6) P Q R S T Y W V U N Handle O Balance wheel P.1-4) P Embroidery card slot P.5-...
Users Manual - English
Page 19
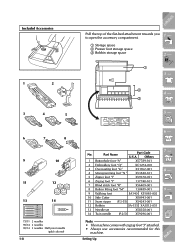
... Twin needle (P.2-5) X59296-001 7 - 8 - 9 - ?! Setting Up Index CONTENTS Note • The machine comes with zigzag foot "J" attached. • Always use accessories recommended for this machine. Part Name Part Code U.S.A. Included Accessories 1 2 3 4 5 6 7 8 9 10 11 12 13 14 75/11 2 needles 90/14 2 needles 90/14 2 needles : Ball point needle (gold colored) 1-8 Pull the...
... Twin needle (P.2-5) X59296-001 7 - 8 - 9 - ?! Setting Up Index CONTENTS Note • The machine comes with zigzag foot "J" attached. • Always use accessories recommended for this machine. Part Name Part Code U.S.A. Included Accessories 1 2 3 4 5 6 7 8 9 10 11 12 13 14 75/11 2 needles 90/14 2 needles 90/14 2 needles : Ball point needle (gold colored) 1-8 Pull the...
Users Manual - English
Page 20
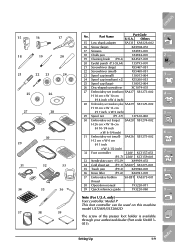
The screw of the presser foot holder is available through your authorized dealer (Part code XA4813051). 1 - 2 - 3 - 4 - 5 - 6 - 7 - 8 - 9 - ?! Index Setting Up 1-9 Part Name Part Code U.S.A. only) Foot controller: Model P This foot controller can be used on this machine model ULT2001/ULT2002D. Others 15 Low shank adapter SA131 XA6126-002 ...
The screw of the presser foot holder is available through your authorized dealer (Part code XA4813051). 1 - 2 - 3 - 4 - 5 - 6 - 7 - 8 - 9 - ?! Index Setting Up 1-9 Part Name Part Code U.S.A. only) Foot controller: Model P This foot controller can be used on this machine model ULT2001/ULT2002D. Others 15 Low shank adapter SA131 XA6126-002 ...

Users Manual - English
Page 21
... pass the thread through the thread guide on the multi-thread stand, or through the thread guide on the sewing machine. CONTENTS Options 1 2 3 4 5 6 No. Part Name Part Code U.S.A. Index 2 1-10 Setting Up Others 1 40 colors embroidery threads SA740 X80928-100 40 colors country threads CYT40 X81078-102 22 colors embroidery threads SA741...
... pass the thread through the thread guide on the multi-thread stand, or through the thread guide on the sewing machine. CONTENTS Options 1 2 3 4 5 6 No. Part Name Part Code U.S.A. Index 2 1-10 Setting Up Others 1 40 colors embroidery threads SA740 X80928-100 40 colors country threads CYT40 X81078-102 22 colors embroidery threads SA741...

Users Manual - English
Page 22
...-001 XA8511-001 XA8936-001 XA9129-001 XA9348-001 XC0025-001 XC0057-001 XC0861-001 XC1168-001 SA359 XC1078-001 1-11 Index CONTENTS 1 - 2 - 3 - 4 - 5 - 6 - 7 - 8 - 9 - ?! Part Name 7 Embroidery card No. 1 Alphabet No. 2 Flower No. 3 Dinosaur No. 6 Moskowitz's World No. 7 Country Life No. 8 Holiday No. 9 Hobby Craft No. 10 Monogram Emblem No...Gardening No. 56 Asian No. 57 Large Christmas No. 58 New Quilt Traditions No. 60 Summer Fun 8 Embroidery disk No. 59 Blouse Setting Up Part Code U.S.A. 7 8 CAUTION Embroidery cards purchased in foreign countries may not work with your machine.
...-001 XA8511-001 XA8936-001 XA9129-001 XA9348-001 XC0025-001 XC0057-001 XC0861-001 XC1168-001 SA359 XC1078-001 1-11 Index CONTENTS 1 - 2 - 3 - 4 - 5 - 6 - 7 - 8 - 9 - ?! Part Name 7 Embroidery card No. 1 Alphabet No. 2 Flower No. 3 Dinosaur No. 6 Moskowitz's World No. 7 Country Life No. 8 Holiday No. 9 Hobby Craft No. 10 Monogram Emblem No...Gardening No. 56 Asian No. 57 Large Christmas No. 58 New Quilt Traditions No. 60 Summer Fun 8 Embroidery disk No. 59 Blouse Setting Up Part Code U.S.A. 7 8 CAUTION Embroidery cards purchased in foreign countries may not work with your machine.
Users Manual - English
Page 27
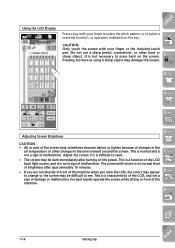
... a sign of the screen may damage the screen. 2 - 3 - 4 - 5 - CAUTION Only touch the screen with your finger or the included touch pen. CAUTION • All or part of malfunction. The screen will return to its normal level of the LCD back light screen, and it is difficult to select a machine function, or...
... a sign of the screen may damage the screen. 2 - 3 - 4 - 5 - CAUTION Only touch the screen with your finger or the included touch pen. CAUTION • All or part of malfunction. The screen will return to its normal level of the LCD back light screen, and it is difficult to select a machine function, or...

Users Manual - English
Page 31
... Press to see more information about that category. 1 displays information about deal- 5 - screen. attaching the embroidery unit, feeding fabric, etc. 4 displays information about the main parts of the 1 -
... Press to see more information about that category. 1 displays information about deal- 5 - screen. attaching the embroidery unit, feeding fabric, etc. 4 displays information about the main parts of the 1 -
Users Manual - English
Page 56
CONTENTS 1 - 2 - 3 - 4 - Also, the seam may be used for embroidery. s About the Needle The sewing machine needle is probably the most important part of needle 75/11 - 90/14 65/9 - 75/11 90/14 - 100/16 Ball point needle (golden colored) 75/11 - 90/14 90/14 - 100/...
CONTENTS 1 - 2 - 3 - 4 - Also, the seam may be used for embroidery. s About the Needle The sewing machine needle is probably the most important part of needle 75/11 - 90/14 65/9 - 75/11 90/14 - 100/16 Ball point needle (golden colored) 75/11 - 90/14 90/14 - 100/...

Users Manual - English
Page 58
... to pull up the bobbin thread. 6. Set the fabric under the presser foot. Hold the fabric and thread ends in your hands away from moving parts while the machine is used, the needle may lead to injury. • Take care that the needle does not strike basting pins or other objects...
... to pull up the bobbin thread. 6. Set the fabric under the presser foot. Hold the fabric and thread ends in your hands away from moving parts while the machine is used, the needle may lead to injury. • Take care that the needle does not strike basting pins or other objects...

Users Manual - English
Page 62
... the needle threader lever may result in damage. • Do not sew with bent needles. CAUTION • Use only twin needles made for this machine (part code X59296-001). Using the Twin Needle Mode The twin needle can not be used for patterns that show after being selected. Before you select...
... the needle threader lever may result in damage. • Do not sew with bent needles. CAUTION • Use only twin needles made for this machine (part code X59296-001). Using the Twin Needle Mode The twin needle can not be used for patterns that show after being selected. Before you select...

Users Manual - English
Page 87
Read the explanations and select the 1 - CONTENTS 3. The screen displays directions for sewing the selected stitch. 6 - 7 - 8 - 9 - ?! 3-14 Sewing Utility Stitches Index appropriate stitch. 2 - 3 - 4 - 5 - 4. The upper part of the screen displays a selection of overcasting stitches with explanations.
Read the explanations and select the 1 - CONTENTS 3. The screen displays directions for sewing the selected stitch. 6 - 7 - 8 - 9 - ?! 3-14 Sewing Utility Stitches Index appropriate stitch. 2 - 3 - 4 - 5 - 4. The upper part of the screen displays a selection of overcasting stitches with explanations.

Users Manual - English
Page 88
Press to scroll the screen in the direction of arrow selected, and see the next part of the instructions. tion of the arrow selected. Press to scroll the screen 1 line at any time to return to sew the stitch. * Press at a time, in the direc- Sewing Utility Stitches 3-15 Index CONTENTS 5. Press to scroll a larger section of the screen in the direction of the arrow selected. Follow the directions to the selection screen. 1 - 2 - 3 - 4 - 5 - 6 - 7 - 8 - 9 - ?!
Press to scroll the screen in the direction of arrow selected, and see the next part of the instructions. tion of the arrow selected. Press to scroll the screen 1 line at any time to return to sew the stitch. * Press at a time, in the direc- Sewing Utility Stitches 3-15 Index CONTENTS 5. Press to scroll a larger section of the screen in the direction of the arrow selected. Follow the directions to the selection screen. 1 - 2 - 3 - 4 - 5 - 6 - 7 - 8 - 9 - ?!


