Users Manual - English
Page 5
... 9 Power supply precautions ...9 Turning on the machine ...9 Foot controller ...10 Sewing speed controller (for models equipped with the sewing speed controller 10 Changing the needle stop position ...10 Changing the initial needle position ...11 Cancelling the operation beep (for models equipped with the operation beep 11 THREADING THE MACHINE 12 Winding the bobbin ...12 Lower threading...
... 9 Power supply precautions ...9 Turning on the machine ...9 Foot controller ...10 Sewing speed controller (for models equipped with the sewing speed controller 10 Changing the needle stop position ...10 Changing the initial needle position ...11 Cancelling the operation beep (for models equipped with the operation beep 11 THREADING THE MACHINE 12 Winding the bobbin ...12 Lower threading...

Users Manual - English
Page 12
...not in , the start /stop position to select the desired sewing speed. Doing so could cause a fire or an electric shock. Turn off the foot controller, the machine will increase. CAUTION ● Do not allow pieces of the sewing machine. Changing the needle stop . a Foot controller jack/socket...the sewing machine in order to leave the needle in the fabric when sewing is the foot controller's maximum sewing speed. a Sewing speed controller • The speed set to start sewing (only for models equipped with the start /stop position changes to sew at a slower speed, or ...
...not in , the start /stop position to select the desired sewing speed. Doing so could cause a fire or an electric shock. Turn off the foot controller, the machine will increase. CAUTION ● Do not allow pieces of the sewing machine. Changing the needle stop . a Foot controller jack/socket...the sewing machine in order to leave the needle in the fabric when sewing is the foot controller's maximum sewing speed. a Sewing speed controller • The speed set to start sewing (only for models equipped with the start /stop position changes to sew at a slower speed, or ...
Users Manual - English
Page 13
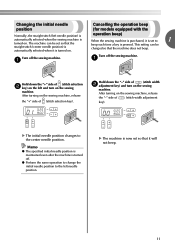
...off the sewing machine. Turn off . ● Perform the same operation to change the initial needle position to the center needle position. a Turn off the sewing machine. X The initial needle position changes to the left and turn on the sewing machine. After turning on . This ... selected when it will not beep. 11 After turning on . Changing the initial needle Cancelling the operation beep position (for models equipped with the Normally, the straight stitch (left needle position) is automatically selected when the sewing machine is operation beep) When...
...off the sewing machine. Turn off . ● Perform the same operation to change the initial needle position to the center needle position. a Turn off the sewing machine. X The initial needle position changes to the left and turn on the sewing machine. After turning on . This ... selected when it will not beep. 11 After turning on . Changing the initial needle Cancelling the operation beep position (for models equipped with the Normally, the straight stitch (left needle position) is automatically selected when the sewing machine is operation beep) When...
Users Manual - English
Page 27
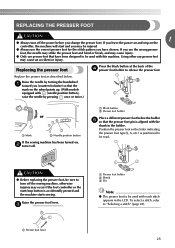
... the handwheel a toward you (counterclockwise) so that the mark on the wheel points up. (With models equipped with (needle position button), raise the needle by pressing once or twice.) or a Mark b Needle position button If the sewing machine has been turned on the controller, the machine will start /stop button is aligned with the...refer to be read. If you leave the power on and step on , b turn off the power before you use the wrong presser foot, the needle may strike the presser foot and bend or break, and may cause an accident or injury. If you change the presser foot.
... the handwheel a toward you (counterclockwise) so that the mark on the wheel points up. (With models equipped with (needle position button), raise the needle by pressing once or twice.) or a Mark b Needle position button If the sewing machine has been turned on the controller, the machine will start /stop button is aligned with the...refer to be read. If you leave the power on and step on , b turn off the power before you use the wrong presser foot, the needle may strike the presser foot and bend or break, and may cause an accident or injury. If you change the presser foot.
Users Manual - English
Page 30
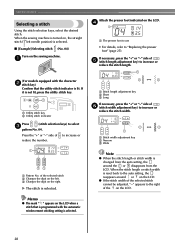
...stitch key b Utility stitch indicator Press (stitch selection keys) to "Replacing the presser foot" (page 25). of the selected stitch b Changes the digit on the left needle position) is lit. Note ● When the stitch length or stitch width is not lit, press the utility stitch key. Press the ..."+" or "-" side of f (stitch width adjustment key) to increase or reduce the number. c Changes the digit on the LCD. a Stitch ...
...stitch key b Utility stitch indicator Press (stitch selection keys) to "Replacing the presser foot" (page 25). of the selected stitch b Changes the digit on the left needle position) is lit. Note ● When the stitch length or stitch width is not lit, press the utility stitch key. Press the ..."+" or "-" side of f (stitch width adjustment key) to increase or reduce the number. c Changes the digit on the LCD. a Stitch ...
Users Manual - English
Page 32
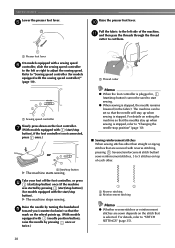
...speed controller (for models equipped with (needle position button), raise the needle by pressing once or twice.) a Thread cutter Memo ● When the foot controller is plugged in the fabric). The machine can be used to "Changing the needle stop button X The machine starts sewing.... For details on setting the machine so that the needles stay up when sewing is not connected, press once.) or a Start/stop position" (page 10). ■ Sewing reinforcement stitches ...
...speed controller (for models equipped with (needle position button), raise the needle by pressing once or twice.) a Thread cutter Memo ● When the foot controller is plugged in the fabric). The machine can be used to "Changing the needle stop button X The machine starts sewing.... For details on setting the machine so that the needles stay up when sewing is not connected, press once.) or a Start/stop position" (page 10). ■ Sewing reinforcement stitches ...
Users Manual - English
Page 34
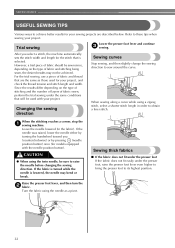
... length in the fabric). Raise the presser foot lever, and then turn the b fabric. Turn the fabric using the needle as those used with the needle position button). Refer to raise the needle before changing the sewing direction. Since the results differ depending on the type of fabric and thread that will be sure to...
... length in the fabric). Raise the presser foot lever, and then turn the b fabric. Turn the fabric using the needle as those used with the needle position button). Refer to raise the needle before changing the sewing direction. Since the results differ depending on the type of fabric and thread that will be sure to...

Users Manual - English
Page 45
...) 1.5-4.0 (1/16-3/16) Ye**s ( J ) No Rfc. *Do not use reverse stitching. **Select a stitch width of the stitch width adjustment key moves the needle to "Sewing reinforcement stitches" (page 30). ■ Changing the needle position With the straight stitch (left . Straight Pattern Presser Foot 100 stitches model 90 stitches model 80 stitches model 70 stitches model...
...) 1.5-4.0 (1/16-3/16) Ye**s ( J ) No Rfc. *Do not use reverse stitching. **Select a stitch width of the stitch width adjustment key moves the needle to "Sewing reinforcement stitches" (page 30). ■ Changing the needle position With the straight stitch (left . Straight Pattern Presser Foot 100 stitches model 90 stitches model 80 stitches model 70 stitches model...
Users Manual - English
Page 47
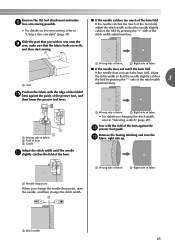
... catches the fold by pressing the "+" side of the stitch width adjustment key. Position the fabric with the fold of the hem against the guide of the presser foot, and then lower the presser foot lever. R 1 a Needle drop point When you wish to sew onto the i arm, make h free-arm ... start sewing. ■ If the needle catches too much of the hem fold If the needle catches too much of the hem fold, adjust the stitch width so that you change the needle drop point, raise the needle, and then change the stitch width. Slide the part that the needle slightly catches the fold by pressing...
... catches the fold by pressing the "+" side of the stitch width adjustment key. Position the fabric with the fold of the hem against the guide of the presser foot, and then lower the presser foot lever. R 1 a Needle drop point When you wish to sew onto the i arm, make h free-arm ... start sewing. ■ If the needle catches too much of the hem fold If the needle catches too much of the hem fold, adjust the stitch width so that you change the needle drop point, raise the needle, and then change the stitch width. Slide the part that the needle slightly catches the fold by pressing...

Users Manual - English
Page 56
... pieces of the design. d Cut away any fabric that is called "piecing". Baste or pin along the seam allowance of the seam allowance (the needle position), adjust the stitch width. b Remove the basting, if necessary. Attach zigzag foot "J". For details, refer to piece together. Sew a piecing straight stitch...side of the presser foot with the edge of the fabric, and sew using stitch . 1 CAUTION ● Be careful that you wish to "Changing the needle position" (page 43). 54 c Sew with the side of the presser foot aligned d with the edge of the fabric. ■ For a ...
... pieces of the design. d Cut away any fabric that is called "piecing". Baste or pin along the seam allowance of the seam allowance (the needle position), adjust the stitch width. b Remove the basting, if necessary. Attach zigzag foot "J". For details, refer to piece together. Sew a piecing straight stitch...side of the presser foot with the edge of the fabric, and sew using stitch . 1 CAUTION ● Be careful that you wish to "Changing the needle position" (page 43). 54 c Sew with the side of the presser foot aligned d with the edge of the fabric. ■ For a ...


