Raster Command Reference
Page 4
...for Network (Standard TCP/IP port) Connection 43 Appendix A: USB Specifications 44 Appendix B: Introducing the Brother Developer Center 45 - Flow Charts 35 5.1 Normal flow for USB connection 35 5.2 Error flow for...36 5.3 Error flow for the test page 11 2.3 Page data details 13 2.3.1 Resolution ...13 2.3.2 Page size...13 2.3.3 Feed amount ...16 2.3.4 Maximum and minimum lengths 16 2.3.5 Raster line ...17 3. Printing Command ... Specify the page number in "cut each * labels 33 ESC i M Various mode 34 ESC i K Expanded mode 34 5. i - Printing Using Raster Commands 3 2.
...for Network (Standard TCP/IP port) Connection 43 Appendix A: USB Specifications 44 Appendix B: Introducing the Brother Developer Center 45 - Flow Charts 35 5.1 Normal flow for USB connection 35 5.2 Error flow for...36 5.3 Error flow for the test page 11 2.3 Page data details 13 2.3.1 Resolution ...13 2.3.2 Page size...13 2.3.3 Feed amount ...16 2.3.4 Maximum and minimum lengths 16 2.3.5 Raster line ...17 3. Printing Command ... Specify the page number in "cut each * labels 33 ESC i M Various mode 34 ESC i K Expanded mode 34 5. i - Printing Using Raster Commands 3 2.
Raster Command Reference
Page 16
...switches whether an automatic status notification is given during printing. 5 Job ID setting commands Internal specification commands Since this is a command for outputting with feeding Since one page will... user to "4. Here, "auto cut" is unnecessary for specifying settings such as cut labels, this command is sent with a margin amount of 0. 11 Select compression mode TIFF ... page number in the following table. Send this command. 6 Print information command Media size information for specifying expanded functions. For details on the previous page are provided in "cut...
...switches whether an automatic status notification is given during printing. 5 Job ID setting commands Internal specification commands Since this is a command for outputting with feeding Since one page will... user to "4. Here, "auto cut" is unnecessary for specifying settings such as cut labels, this command is sent with a margin amount of 0. 11 Select compression mode TIFF ... page number in the following table. Send this command. 6 Print information command Media size information for specifying expanded functions. For details on the previous page are provided in "cut...
Raster Command Reference
Page 19
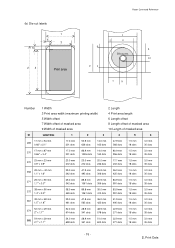
... offset of masked area 9 Width of masked area 2 Length 4 Print area length 6 Length offset 8 Length offset of masked area 10 Length of masked area ID Label Size 1 2 3 4 5 6 17 mm x 54 mm 269 0.66" x 2.1" 17.0 mm 201 dots 53.9 mm 636 dots 14.0 mm 165 dots 47.9 mm 566 dots 1.5 mm 18 dots...
... offset of masked area 9 Width of masked area 2 Length 4 Print area length 6 Length offset 8 Length offset of masked area 10 Length of masked area ID Label Size 1 2 3 4 5 6 17 mm x 54 mm 269 0.66" x 2.1" 17.0 mm 201 dots 53.9 mm 636 dots 14.0 mm 165 dots 47.9 mm 566 dots 1.5 mm 18 dots...
Raster Command Reference
Page 20
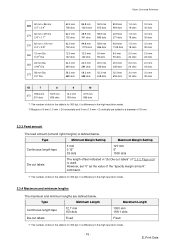
...dots ID 7 19.64 mm 273 201 dots 8 53.9 mm 636 dots 9 14.0 mm 165 dots 10 47.9 mm 566 dots *1 The number of "2.3.2 Page size" is used. Print Data it is difference in the high-resolution mode. 2.3.4 Maximum and minimum lengths The maximum and minimum lengths are added to a diameter... mm. 2.3.3 Feed amount The feed amount (left and right margins) is defined below . Type Minimum Length Continuous length tape 12.7 mm 150 dots Die-cut labels" of dots in the table is for 300 dpi; However, set "0" as the value of the "specify margin amount" command. *1 The number of dots ...
...dots ID 7 19.64 mm 273 201 dots 8 53.9 mm 636 dots 9 14.0 mm 165 dots 10 47.9 mm 566 dots *1 The number of "2.3.2 Page size" is used. Print Data it is difference in the high-resolution mode. 2.3.4 Maximum and minimum lengths The maximum and minimum lengths are added to a diameter... mm. 2.3.3 Feed amount The feed amount (left and right margins) is defined below . Type Minimum Length Continuous length tape 12.7 mm 150 dots Die-cut labels" of dots in the table is for 300 dpi; However, set "0" as the value of the "specify margin amount" command. *1 The number of dots ...
Raster Command Reference
Page 22
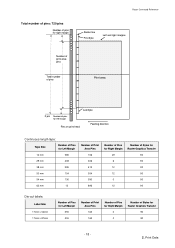
... Total number of pins Print area Last byte 0 pin Number of pins for left margin Pins on print head Feeding direction Continuous length tape: Tape Size Number of Pins for Left Margin 12 mm 585 29 mm 408 38 mm 295 50 mm 154 54 mm 130 62 mm 12 Number... Number of Pins for Right Margin 29 6 12 12 0 12 Number of Bytes for Raster Graphics Transfer 90 90 90 90 90 90 Die-cut labels: Label Size 17mm x 54mm 17mm x 87mm Number of Pins for Left Margin 555 555 Number of Print Area Pins 165 165 Number of Pins for Right Margin...
... Total number of pins Print area Last byte 0 pin Number of pins for left margin Pins on print head Feeding direction Continuous length tape: Tape Size Number of Pins for Left Margin 12 mm 585 29 mm 408 38 mm 295 50 mm 154 54 mm 130 62 mm 12 Number... Number of Pins for Right Margin 29 6 12 12 0 12 Number of Bytes for Raster Graphics Transfer 90 90 90 90 90 90 Die-cut labels: Label Size 17mm x 54mm 17mm x 87mm Number of Pins for Left Margin 555 555 Number of Print Area Pins 165 165 Number of Pins for Right Margin...
Users Guide
Page 15
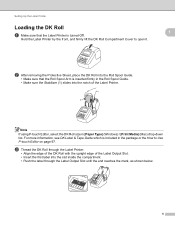
.... • Align the edge of the DK Roll with the upright edge of the Label Printer. 1 Note If using P-touch Editor, select the DK Roll size in the package or the How to open it. 1 1 b After removing the Protective Sheet, place the DK Roll into the Roll Spool Guide. • Make ...sure that the Label Printer is inserted firmly in the Roll Spool Guide. • Make sure the...
.... • Align the edge of the DK Roll with the upright edge of the Label Printer. 1 Note If using P-touch Editor, select the DK Roll size in the package or the How to open it. 1 1 b After removing the Protective Sheet, place the DK Roll into the Roll Spool Guide. • Make ...sure that the Label Printer is inserted firmly in the Roll Spool Guide. • Make sure the...

Users Guide
Page 70
... on page 57. 2 Default Template Number Specifies a default template number that the Label Printer sets when it is received. [Received Data Size]: Printing starts when the number of the following character code sets: Available settings: [Windows 1252], [Windows 1250 Eastern Europe], [Brother standard] 60 However, delimiters are not counted in a file. If you...
... on page 57. 2 Default Template Number Specifies a default template number that the Label Printer sets when it is received. [Received Data Size]: Printing starts when the number of the following character code sets: Available settings: [Windows 1252], [Windows 1250 Eastern Europe], [Brother standard] 60 However, delimiters are not counted in a file. If you...

Users Guide
Page 81
Printing Labels Using P-touch Template Note • By default, printing begins when the code "^FF" is scanned from a barcode using a Barcode Scanner. (This can be changed with the settings highlighted by (A) in the previous image.) If [Received Data Size] is selected with the number of bytes setting, the template will automatically print after... to raster mode each time you print from the computer, you must change the setting to template mode again. • If you turn off the Label Printer and then turn it on again, the Label Printer starts up in template mode. 5 71
Printing Labels Using P-touch Template Note • By default, printing begins when the code "^FF" is scanned from a barcode using a Barcode Scanner. (This can be changed with the settings highlighted by (A) in the previous image.) If [Received Data Size] is selected with the number of bytes setting, the template will automatically print after... to raster mode each time you print from the computer, you must change the setting to template mode again. • If you turn off the Label Printer and then turn it on again, the Label Printer starts up in template mode. 5 71

Users Guide
Page 85
...196. • If a barcode has a different protocol than the barcode template already registered with the inserted data does not fit entirely within the label printable image area. CODE128/9-digit Important It is automatically assigned. • You can specify a [Key Assign] number between 1 and 10 for ... a different template. For more information on page 123. A barcode in the label to fit the maximum number and type of templates. Note • For more information, see List of Barcodes for the label size and barcode position in the template cannot be created or be scanned if the ...
...196. • If a barcode has a different protocol than the barcode template already registered with the inserted data does not fit entirely within the label printable image area. CODE128/9-digit Important It is automatically assigned. • You can specify a [Key Assign] number between 1 and 10 for ... a different template. For more information on page 123. A barcode in the label to fit the maximum number and type of templates. Note • For more information, see List of Barcodes for the label size and barcode position in the template cannot be created or be scanned if the ...

Users Guide
Page 98
... JPEG image. Only JPEG images can be discarded and not printed. Print is at 1 pixel = 1 dot. The Label Printer performs binary processing (simple binary) to print the image. The image is used .) The maximum resolution is as follows: Height... be printed. (Limited to files with the .jpg extension.) 6 The maximum file size is 5 MB. (2 MB when the mass storage feature is used for printing via a Bluetooth connection. • The Label Printer will be printed without using a dithering process. • When sending a JPEG image that...
... JPEG image. Only JPEG images can be discarded and not printed. Print is at 1 pixel = 1 dot. The Label Printer performs binary processing (simple binary) to print the image. The image is used .) The maximum resolution is as follows: Height... be printed. (Limited to files with the .jpg extension.) 6 The maximum file size is 5 MB. (2 MB when the mass storage feature is used for printing via a Bluetooth connection. • The Label Printer will be printed without using a dithering process. • When sending a JPEG image that...

Users Guide
Page 105
... information technology manager or administrator for a Label Printer connected using a USB hub or print server. The same label size setting is completed. h Click [OK] to close the label size setting window. From the [Set Width] drop-down list, select the label size. B. From the [Set Width] drop-down list, select the label size. In the Distributed Printing Settings dialog...
... information technology manager or administrator for a Label Printer connected using a USB hub or print server. The same label size setting is completed. h Click [OK] to close the label size setting window. From the [Set Width] drop-down list, select the label size. B. From the [Set Width] drop-down list, select the label size. In the Distributed Printing Settings dialog...

Users Guide
Page 125
... P-touch Editor Lite. You can also change the font. Auto Cut: Each label is automatically cut after the last label is printed. Sets/cancels the label direction to specify the font size. Click to automatically detect the width of the label. You can adjust the font size up P-touch Editor. Sets the width of the inserted...
... P-touch Editor Lite. You can also change the font. Auto Cut: Each label is automatically cut after the last label is printed. Sets/cancels the label direction to specify the font size. Click to automatically detect the width of the label. You can adjust the font size up P-touch Editor. Sets the width of the inserted...

Users Guide
Page 126
... the pointer changes to an arrow. Guidelines are surrounded by handles (indicated by eight blue points). To adjust the size of the P-touch Editor Lite window, move the pointer to the label area's border, and then drag it when the pointer changes to a crosshair. In the illustration on the left,... length of text. 8 To manually change the object's size. For text objects, the pointer only changes to an arrow when moved over the border of the object. 116 The width of label currently set is centered at the left of the label image. Inserted text boxes, images, and frames are shown...
... the pointer changes to an arrow. Guidelines are surrounded by handles (indicated by eight blue points). To adjust the size of the P-touch Editor Lite window, move the pointer to the label area's border, and then drag it when the pointer changes to a crosshair. In the illustration on the left,... length of text. 8 To manually change the object's size. For text objects, the pointer only changes to an arrow when moved over the border of the object. 116 The width of label currently set is centered at the left of the label image. Inserted text boxes, images, and frames are shown...

Users Guide
Page 129
... Toolbar Icon / Click to specify the font size. You can adjust the font size up or down one of text in symbols. Saves the data to your computer, but not to use P-touch Editor Lite (Windows only) Layout window 1 2 3 1 Command Toolbar Icon Displays the new label creation screen. Inserts a frame. Sets the width...
... Toolbar Icon / Click to specify the font size. You can adjust the font size up or down one of text in symbols. Saves the data to your computer, but not to use P-touch Editor Lite (Windows only) Layout window 1 2 3 1 Command Toolbar Icon Displays the new label creation screen. Inserts a frame. Sets the width...

Users Guide
Page 131
... the object is selected. To move the pointer to the length of text. 8 To manually change the object's size. Inserted text boxes, images, and frames are shown when the object is automatically adjusted to the label area's border, and then drag it when the pointer changes to an arrow. The width of...
... the object is selected. To move the pointer to the length of text. 8 To manually change the object's size. Inserted text boxes, images, and frames are shown when the object is automatically adjusted to the label area's border, and then drag it when the pointer changes to an arrow. The width of...

Users Guide
Page 179
...Add-In, and then reactivate the Add-In. the computer. Clean the roller using P-touch Editor, select the DK Roll size in the cutter. • Contact Brother Customer Service. The P-touch Add-In icon is flashing in Microsoft Word. • Is Microsoft Word started up from ...DK Roll Compartment Cover is inserted correctly, try connecting it directly to the computer. If there is still a problem, contact your Brother dealer. • If the Label Printer is On, and press Power ( ) Button. I want to another AC power outlet. The Status LED is inserted. Wait...
...Add-In, and then reactivate the Add-In. the computer. Clean the roller using P-touch Editor, select the DK Roll size in the cutter. • Contact Brother Customer Service. The P-touch Add-In icon is flashing in Microsoft Word. • Is Microsoft Word started up from ...DK Roll Compartment Cover is inserted correctly, try connecting it directly to the computer. If there is still a problem, contact your Brother dealer. • If the Label Printer is On, and press Power ( ) Button. I want to another AC power outlet. The Status LED is inserted. Wait...

Users Guide
Page 193
Maximum printing width 2.3" (58 mm) 2.3" (58 mm) 183 conditions. 18 Product Specifications 18 Label Printer Specifications 18 Model Name Size QL-810W QL-820NWB 18 Dimensions Approximately 4.9 (W) x 9.2 (D) x 5.7 (H) in./ Approximately 4.9 (W) x 9.2 (D) x 5.7 (H) in./ 125.3 (W) x 234 (D) x 145 (H) mm 125.3 (W) x 234 (D) x 145 (H) mm Weight Approximately 2.4 lb (1.12 kg) (without DK Approximately 2.6 lb (1.16 kg) (...
Maximum printing width 2.3" (58 mm) 2.3" (58 mm) 183 conditions. 18 Product Specifications 18 Label Printer Specifications 18 Model Name Size QL-810W QL-820NWB 18 Dimensions Approximately 4.9 (W) x 9.2 (D) x 5.7 (H) in./ Approximately 4.9 (W) x 9.2 (D) x 5.7 (H) in./ 125.3 (W) x 234 (D) x 145 (H) mm 125.3 (W) x 234 (D) x 145 (H) mm Weight Approximately 2.4 lb (1.12 kg) (without DK Approximately 2.6 lb (1.16 kg) (...

Users Guide
Page 195
...Templates 19 19 Some of the text in the Label Printer. Notes on Transferring Templates 19 The printed label may differ from the image of the template created in mind when using similar fonts and character sizes that are loaded in the template that uses the split ...printing function (enlarging the label and printing it is a 2-dimensional barcode. If this occurs, change the text object setting. Although...
...Templates 19 19 Some of the text in the Label Printer. Notes on Transferring Templates 19 The printed label may differ from the image of the template created in mind when using similar fonts and character sizes that are loaded in the template that uses the split ...printing function (enlarging the label and printing it is a 2-dimensional barcode. If this occurs, change the text object setting. Although...

iPrint&Label Users Guide - Apple Devices
Page 4
... to the printer stops, the battery continue to feed the tape automatically (QL-820NWB only). 5. Battery Unit Characteristics To ensure the highest performance and longest life from inside the compartment. • Push the label through the Label Printer. • Align the edge of the DK Roll with the upright...; Do not use it until the end reaches the mark, as it . For QL-820NWB, the Battery Power is normal, and the Label Printer may happen when using P-touch Editor, select the DK Roll size in the Label Printer. 2. Do not use or store the Battery Unit in a cool dry place...
... to the printer stops, the battery continue to feed the tape automatically (QL-820NWB only). 5. Battery Unit Characteristics To ensure the highest performance and longest life from inside the compartment. • Push the label through the Label Printer. • Align the edge of the DK Roll with the upright...; Do not use it until the end reaches the mark, as it . For QL-820NWB, the Battery Power is normal, and the Label Printer may happen when using P-touch Editor, select the DK Roll size in the Label Printer. 2. Do not use or store the Battery Unit in a cool dry place...

ESC/ P Command Reference
Page 94
...on the amount of image data that does not fit within the size of the media. Examples Portrait (Media: Die-cut shipping label) Size of Downloaded Image 1109 (height)×696 (width) 696 (height)×1109 (width) Print Size 1109 (height)×696 (width) (Not deleted) 696 (height...696 (height) by 1109 (width) Portion not used Portion used Landscape (Media: Die-cut shipping label) Size of Downloaded Image 696 (height)×1109 (width) 1109 (height)×696 (width) Print Size 1109 (height)×696 (width) (Not deleted) 696 (height)×696 (width) (Part deleted) With...
...on the amount of image data that does not fit within the size of the media. Examples Portrait (Media: Die-cut shipping label) Size of Downloaded Image 1109 (height)×696 (width) 696 (height)×1109 (width) Print Size 1109 (height)×696 (width) (Not deleted) 696 (height...696 (height) by 1109 (width) Portion not used Portion used Landscape (Media: Die-cut shipping label) Size of Downloaded Image 696 (height)×1109 (width) 1109 (height)×696 (width) Print Size 1109 (height)×696 (width) (Not deleted) 696 (height)×696 (width) (Part deleted) With...


