Raster Command Reference
Page 4
...) Connection 43 Appendix A: USB Specifications 44 Appendix B: Introducing the Brother Developer Center 45 - Printing Command Details 21 NULL Invalidate 21 ESC i S Status information request 21 ESC @ Initialize...27 ESC i d Specify margin amount (feed amount 27 ESC i a Switch dynamic command mode 28 ESC i ! Print Command List 20 4. Raster Command Reference Contents Introduction 1 About Raster...
...) Connection 43 Appendix A: USB Specifications 44 Appendix B: Introducing the Brother Developer Center 45 - Printing Command Details 21 NULL Invalidate 21 ESC i S Status information request 21 ESC @ Initialize...27 ESC i d Specify margin amount (feed amount 27 ESC i a Switch dynamic command mode 28 ESC i ! Print Command List 20 4. Raster Command Reference Contents Introduction 1 About Raster...

Raster Command Reference
Page 6
..." is useful in the following situations. When printing from an operating system other than Windows (Example: When printing from a Linux computer or mobile terminal) When adding print functions to an existing system In addition, printing can be performed with raster data to the QL-XXX printer (hereafter, referred to binary bitmap data (collection...
..." is useful in the following situations. When printing from an operating system other than Windows (Example: When printing from a Linux computer or mobile terminal) When adding print functions to an existing system In addition, printing can be performed with raster data to the QL-XXX printer (hereafter, referred to binary bitmap data (collection...

Raster Command Reference
Page 7
Flow Charts". Printing Command Details". (1) Open the port Port (2) Receive the status (Confirm the printer status (3) Send the print data At your side Computer, mobile terminal, etc. (5) Receive the status (Confirm that printing is described below. For detailed flow charts, refer to "4. Printing Using Raster Commands The printing procedure is completed.) Your printer (6) Close the port (4) Print - 3 1. For details on each command, refer to "5. Raster Command Reference 1. Printing Using Raster Commands
Flow Charts". Printing Command Details". (1) Open the port Port (2) Receive the status (Confirm the printer status (3) Send the print data At your side Computer, mobile terminal, etc. (5) Receive the status (Confirm that printing is described below. For detailed flow charts, refer to "4. Printing Using Raster Commands The printing procedure is completed.) Your printer (6) Close the port (4) Print - 3 1. For details on each command, refer to "5. Raster Command Reference 1. Printing Using Raster Commands
Raster Command Reference
Page 8
... a USB port is considered finished. For the processing flow, for a print command (concurrent printing). The structure of waiting for example when managing errors, refer to confirm that printing is completed, printing one page is used to send uncompressed raster data, the Brother QL-XXX starts printing when it starts to "Status information request" in the operating environment...
... a USB port is considered finished. For the processing flow, for a print command (concurrent printing). The structure of waiting for example when managing errors, refer to confirm that printing is completed, printing one page is used to send uncompressed raster data, the Brother QL-XXX starts printing when it starts to "Status information request" in the operating environment...
Raster Command Reference
Page 9
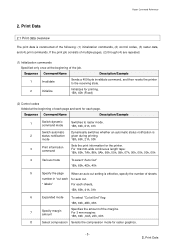
... "cut . * labels" For each for the printer. Print Data Print Data 2.1 Print data overview The print data is 2 status notification given during printing. mode 1Bh, 69h, 21h, 00h 3 Print information command Sets the print information for auto cut each sheets, 1Bh, 69h, 41h,... Added at the beginning of the following: (1) initialization commands, (2) control codes, (3) raster data, and (4) print commands. Raster Command Reference 2. If the print job consists of multiple pages, (2) through (4) are repeated. (1) Initialization commands Specified only once at the beginning of...
... "cut . * labels" For each for the printer. Print Data Print Data 2.1 Print data overview The print data is 2 status notification given during printing. mode 1Bh, 69h, 21h, 00h 3 Print information command Sets the print information for auto cut each sheets, 1Bh, 69h, 41h,... Added at the beginning of the following: (1) initialization commands, (2) control codes, (3) raster data, and (4) print commands. Raster Command Reference 2. If the print job consists of multiple pages, (2) through (4) are repeated. (1) Initialization commands Specified only once at the beginning of...

Raster Command Reference
Page 10
Print Data mode Raster Command Reference To send the data compressed to TIFF format: 4Dh, 02h - 6 2.
Print Data mode Raster Command Reference To send the data compressed to TIFF format: 4Dh, 02h - 6 2.

Raster Command Reference
Page 11
Sends image data for 1 blank line as commands for each page in the print job. Print command - Raster Command Reference (3) Raster data Repeated for red-black printing. Two-color raster graphics transfer Sends image data as a compression command. - Zero raster graphics (Valid only when TIFF ...is not the last page. 0Ch Specifies at the end of the page. Sequence Command Name Description/Example - Print command with feeding Description/Example Specifies at the end of the last page. 1Ah (Fixed) - 7 2. Raster graphics transfer Sends image data ...
Sends image data for 1 blank line as commands for each page in the print job. Print command - Raster Command Reference (3) Raster data Repeated for red-black printing. Two-color raster graphics transfer Sends image data as a compression command. - Zero raster graphics (Valid only when TIFF ...is not the last page. 0Ch Specifies at the end of the page. Sequence Command Name Description/Example - Print command with feeding Description/Example Specifies at the end of the last page. 1Ah (Fixed) - 7 2. Raster graphics transfer Sends image data ...
Raster Command Reference
Page 12
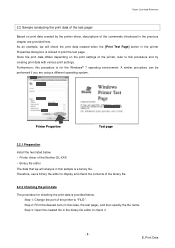
...in this case, the test page), and then specify the file name. Step 2: Print the desired item (in this sample is for checking the print data is provided below . ・ Printer driver of the Brother QL-XXX ・ Binary file editor The data that we will analyze in the printer ...Properties dialog box is clicked to display and check the contents of the printer to "FILE:". Therefore, use a binary file editor to print the test page. Step 1: Change ...
...in this case, the test page), and then specify the file name. Step 2: Print the desired item (in this sample is for checking the print data is provided below . ・ Printer driver of the Brother QL-XXX ・ Binary file editor The data that we will analyze in the printer ...Properties dialog box is clicked to display and check the contents of the printer to "FILE:". Therefore, use a binary file editor to print the test page. Step 1: Change ...
Raster Command Reference
Page 13
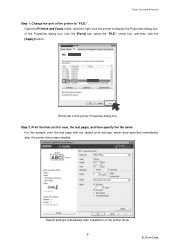
... the "FILE:" check box, and then click the [Apply] button. [Ports] tab of the printer Properties dialog box Step 2: Print the item (in this sample, print the test page with the default print settings, which were specified immediately after installation of the printer to display the Properties dialog box. For this case, the... printer driver - 9 - 2. Open the Printers and Faxes folder, and then right-click the printer to "FILE:". Default settings immediately after the printer driver was installed. Print Data
... the "FILE:" check box, and then click the [Apply] button. [Ports] tab of the printer Properties dialog box Step 2: Print the item (in this sample, print the test page with the default print settings, which were specified immediately after installation of the printer to display the Properties dialog box. For this case, the... printer driver - 9 - 2. Open the Printers and Faxes folder, and then right-click the printer to "FILE:". Default settings immediately after the printer driver was installed. Print Data
Raster Command Reference
Page 14
... name. Open the saved file in the binary file editor. The rows of print data for specifying the file name Step 3: Open the print data in the binary file editor. For details on the print data, refer to "2.2.3 Explanation of numbers that the file name can be specified... file name is typed in and the [OK] button is constructed of the following: (1) initialization commands, (2) control codes, (3) raster data and (4) print commands, which were described in "2.1 Print data overview". Print Data Dialog box for the test page". (1) Initialization commands (2) Control codes (3) Raster data...
... name. Open the saved file in the binary file editor. The rows of print data for specifying the file name Step 3: Open the print data in the binary file editor. For details on the print data, refer to "2.2.3 Explanation of numbers that the file name can be specified... file name is typed in and the [OK] button is constructed of the following: (1) initialization commands, (2) control codes, (3) raster data and (4) print commands, which were described in "2.1 Print data overview". Print Data Dialog box for the test page". (1) Initialization commands (2) Control codes (3) Raster data...

Raster Command Reference
Page 15
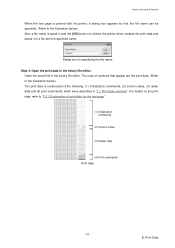
The following illustration shows the print data created in section "2.2.1 Preparation" opened in the previous section is described below. Print Data Raster Command Reference 2.2.3 Explanation of print data for the test page The print data for the test page outputted in the binary file editor. 1 2 3 4 5 6 7 8 9 10 11 12 13 Print data - 11 - 2.
The following illustration shows the print data created in section "2.2.1 Preparation" opened in the previous section is described below. Print Data Raster Command Reference 2.2.3 Explanation of print data for the test page The print data for the test page outputted in the binary file editor. 1 2 3 4 5 6 7 8 9 10 11 12 13 Print data - 11 - 2.
Raster Command Reference
Page 16
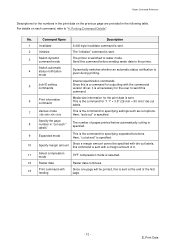
... such as cut each command, refer to "4. Here, "cut at end" is specified. 10 Specify margin amount Since a margin amount cannot be printed, this is the command for "1.1" × 3.5" (29 mm × 90 mm)" die-cut labels. 7 Various mode (1Bh+69h+4Dh+...9 Expanded mode This is the command for the print data is switched to raster mode. Print Data Switch automatic 4 status notification mode Dynamically switches whether an automatic status notification is given during printing. 5 Job ID setting commands Internal specification commands Since this is a command for outputting ...
... such as cut each command, refer to "4. Here, "cut at end" is specified. 10 Specify margin amount Since a margin amount cannot be printed, this is the command for "1.1" × 3.5" (29 mm × 90 mm)" die-cut labels. 7 Various mode (1Bh+69h+4Dh+...9 Expanded mode This is the command for the print data is switched to raster mode. Print Data Switch automatic 4 status notification mode Dynamically switches whether an automatic status notification is given during printing. 5 Job ID setting commands Internal specification commands Since this is a command for outputting ...

Raster Command Reference
Page 18
Raster Command Reference 264 38mm 262 50 mm 261 54 mm 259 62 mm 38 mm 1.4" 50 mm 1.9" 54 mm 2.1" 62 mm 2.4" 38.0 mm 449 dots 50.0 mm 590 dots 53.8 mm 636 dots 62.0 mm 732 dots →2.3.4 →2.3.4 →2.3.4 →2.3.4 35.0 mm 413 dots 46.9 mm 554 dots 50.0 mm 590 dots 58.9 mm 696 dots →2.3.4 →2.3.4 →2.3.4 →2.3.4 1.5 mm 18 dots 1.5 mm 18 dots 1.9 mm 23 dots 1.5 mm 18 dots →2.3.3 →2.3.3 →2.3.3 →2.3.3 - 14 - 2. Print Data
Raster Command Reference 264 38mm 262 50 mm 261 54 mm 259 62 mm 38 mm 1.4" 50 mm 1.9" 54 mm 2.1" 62 mm 2.4" 38.0 mm 449 dots 50.0 mm 590 dots 53.8 mm 636 dots 62.0 mm 732 dots →2.3.4 →2.3.4 →2.3.4 →2.3.4 35.0 mm 413 dots 46.9 mm 554 dots 50.0 mm 590 dots 58.9 mm 696 dots →2.3.4 →2.3.4 →2.3.4 →2.3.4 1.5 mm 18 dots 1.5 mm 18 dots 1.9 mm 23 dots 1.5 mm 18 dots →2.3.3 →2.3.3 →2.3.3 →2.3.3 - 14 - 2. Print Data
Raster Command Reference
Page 19
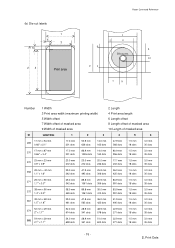
...) 5 Width offset 7 Width offset of masked area 9 Width of masked area 2 Length 4 Print area length 6 Length offset 8 Length offset of masked area 10 Length of masked area ID Label Size 1 2 3 4 5 6 17 mm x 54 mm 269 0.66" x 2.1" 17.0 mm ... mm 382 2.1" x 1.1" 54.0 mm 638 dots 28.9 mm 341 dots 51.0 mm 602 dots 22.9 mm 271 dots 1.5 mm 18 dots 3.0 mm 35 dots - 15 - 2. Print Data
...) 5 Width offset 7 Width offset of masked area 9 Width of masked area 2 Length 4 Print area length 6 Length offset 8 Length offset of masked area 10 Length of masked area ID Label Size 1 2 3 4 5 6 17 mm x 54 mm 269 0.66" x 2.1" 17.0 mm ... mm 382 2.1" x 1.1" 54.0 mm 638 dots 28.9 mm 341 dots 51.0 mm 602 dots 22.9 mm 271 dots 1.5 mm 18 dots 3.0 mm 35 dots - 15 - 2. Print Data
Raster Command Reference
Page 20
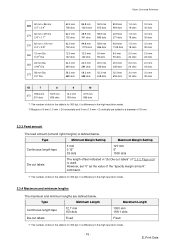
... of 16 mm. 2.3.3 Feed amount The feed amount (left and right margins) is defined below . it is difference in the table is for 300 dpi; Print Data Type Minimum Length Continuous length tape 12.7 mm 150 dots Die-cut labels" of "2.3.2 Page size" is used. it is difference in the high...
... of 16 mm. 2.3.3 Feed amount The feed amount (left and right margins) is defined below . it is difference in the table is for 300 dpi; Print Data Type Minimum Length Continuous length tape 12.7 mm 150 dots Die-cut labels" of "2.3.2 Page size" is used. it is difference in the high...

Raster Command Reference
Page 21
... 1stB MSB LSB 2ndB MSB LSB 3rdB MSB LSB 4thB ... - 17 - 2. Print Data Raster Command Reference 2.3.5 Raster line As shown below, the parts with data to be printed are converted with "raster graphics transfer", and the parts with no data are added...converted with "various mode" at the beginning and the end. Feeding direction Expansion direction Print area Rasterized RasterLine 4 Zero Raster 1 Zero Raster 1 RasterLine 3 RasterLine 2 RasterLine 1 Feeding direction Print area Print head The following shows the relationship between the raster graphics parameters and the pixels.
... 1stB MSB LSB 2ndB MSB LSB 3rdB MSB LSB 4thB ... - 17 - 2. Print Data Raster Command Reference 2.3.5 Raster line As shown below, the parts with data to be printed are converted with "raster graphics transfer", and the parts with no data are added...converted with "various mode" at the beginning and the end. Feeding direction Expansion direction Print area Rasterized RasterLine 4 Zero Raster 1 Zero Raster 1 RasterLine 3 RasterLine 2 RasterLine 1 Feeding direction Print area Print head The following shows the relationship between the raster graphics parameters and the pixels.
Raster Command Reference
Page 22
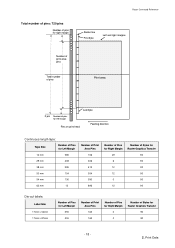
... Raster line First byte Left and right margins Number of print area pins Total number of pins Print area Last byte 0 pin Number of pins for left margin Pins on print head Feeding direction Continuous length tape: Tape Size Number of... 12 mm 585 29 mm 408 38 mm 295 50 mm 154 54 mm 130 62 mm 12 Number of Print Area Pins 106 306 413 554 590 696 Number of Pins for Right Margin 29 6 12 12 0 12... 17mm x 54mm 17mm x 87mm Number of Pins for Left Margin 555 555 Number of Print Area Pins 165 165 Number of Pins for Right Margin 0 0 Number of Bytes for Raster Graphics Transfer 90 90 -...
... Raster line First byte Left and right margins Number of print area pins Total number of pins Print area Last byte 0 pin Number of pins for left margin Pins on print head Feeding direction Continuous length tape: Tape Size Number of... 12 mm 585 29 mm 408 38 mm 295 50 mm 154 54 mm 130 62 mm 12 Number of Print Area Pins 106 306 413 554 590 696 Number of Pins for Right Margin 29 6 12 12 0 12... 17mm x 54mm 17mm x 87mm Number of Pins for Left Margin 555 555 Number of Print Area Pins 165 165 Number of Pins for Right Margin 0 0 Number of Bytes for Raster Graphics Transfer 90 90 -...
Raster Command Reference
Page 23
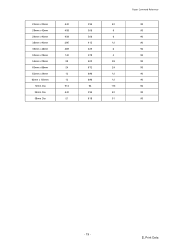
Raster Command Reference 23mm x 23mm 442 236 42 90 29mm x 42mm 408 306 6 90 29mm x 90mm 408 306 6 90 38mm x 90mm 295 413 12 90 39mm x 48mm 289 425 6 90 52mm x 29mm 142 578 0 90 54mm x 29mm 59 602 59 90 60mm x 86mm 24 672 24 90 62mm x 29mm 12 696 12 90 62mm x 100mm 12 696 12 90 12mm Dia 513 94 113 90 24mm Dia 442 236 42 90 58mm Dia 51 618 51 90 - 19 - 2. Print Data
Raster Command Reference 23mm x 23mm 442 236 42 90 29mm x 42mm 408 306 6 90 29mm x 90mm 408 306 6 90 38mm x 90mm 295 413 12 90 39mm x 48mm 289 425 6 90 52mm x 29mm 142 578 0 90 54mm x 29mm 59 602 59 90 60mm x 86mm 24 672 24 90 62mm x 29mm 12 696 12 90 62mm x 100mm 12 696 12 90 12mm Dia 513 94 113 90 24mm Dia 442 236 42 90 58mm Dia 51 618 51 90 - 19 - 2. Print Data

Raster Command Reference
Page 24
... margin amount (feed amount) Switch dynamic command mode Switch automatic status notification mode Raster graphics transfer (for monochromatic printing) Two-color raster graphics transfer (for two-color printing) Zero raster graphics Print command Print command with feeding Print information command Select compression mode Specify the page number in "cut each * labels" Various mode Expanded mode...
... margin amount (feed amount) Switch dynamic command mode Switch automatic status notification mode Raster graphics transfer (for monochromatic printing) Two-color raster graphics transfer (for two-color printing) Zero raster graphics Print command Print command with feeding Print information command Select compression mode Specify the page number in "cut each * labels" Various mode Expanded mode...

Raster Command Reference
Page 25
... is sent to the printer, a fixed size of the status, refer to the following page. Printing Command Details Note Before sending print data to the printer, this command while printing. ESC i S Status information request ASCII: ESC i S Hexadecimal: 1B 69 53 Description When a status ...information request is cleared. For details on transmission of 32 bytes is automatically sent by the printer during printing, do not send this command should be stopped midway, send the "initialize" command after sending the "invalidate" command for the appropriate...
... is sent to the printer, a fixed size of the status, refer to the following page. Printing Command Details Note Before sending print data to the printer, this command while printing. ESC i S Status information request ASCII: ESC i S Hexadecimal: 1B 69 53 Description When a status ...information request is cleared. For details on transmission of 32 bytes is automatically sent by the printer during printing, do not send this command should be stopped midway, send the "initialize" command after sending the "invalidate" command for the appropriate...


