
Software Users Manual - English
Page 7
...Starting P-touch Editor 1 Click [Start]-[All Programs]- [Brother P-touch]-[P-touch Editor 5.0]. Normally, choose [Display New/Open Dialog Box]. 2 Choose an option in the [Startup Settings]. The Help files allow you to learn step by label applications. • When you can choose by step ...] dialog box and click . • You can choose the label printer and media size. • When you will be taken to the Brother Solutions Center. Use the Brother Solutions Center to check for samples of various kinds of labels. Appendix 6 Starting P-touch Editor In the [General] tab,...
...Starting P-touch Editor 1 Click [Start]-[All Programs]- [Brother P-touch]-[P-touch Editor 5.0]. Normally, choose [Display New/Open Dialog Box]. 2 Choose an option in the [Startup Settings]. The Help files allow you to learn step by label applications. • When you can choose by step ...] dialog box and click . • You can choose the label printer and media size. • When you will be taken to the Brother Solutions Center. Use the Brother Solutions Center to check for samples of various kinds of labels. Appendix 6 Starting P-touch Editor In the [General] tab,...

Software Users Manual - English
Page 12
Creating Labels Appendix 11 Starting P-touch Editor Help Use your normal printer to print the P-touch Editor Help information. 1 In the [Contents] tab, choose any topic you want to print. 2 Click on the Toolbar. 3 Choose the range of topics to be printed. Choose a normal printer that supports general paper sizes, such as Letter. Introduction Printing the Help description The information given in P-touch Editor Help can be printed, and click . 4 Specify the [Printer] and click .
Creating Labels Appendix 11 Starting P-touch Editor Help Use your normal printer to print the P-touch Editor Help information. 1 In the [Contents] tab, choose any topic you want to print. 2 Click on the Toolbar. 3 Choose the range of topics to be printed. Choose a normal printer that supports general paper sizes, such as Letter. Introduction Printing the Help description The information given in P-touch Editor Help can be printed, and click . 4 Specify the [Printer] and click .

Software Users Manual - English
Page 20
Introduction Creating Labels Layout window The layout window consists of the following eight sections: 1 2 3 4 5 6 7 8 1 Menu bar Commands are categorized under each field. Appendix 19 Starting the P-touch Address ... Provides a group of frequently used commands (such as New Contact, Edit Contact, Find, Print, etc.). 3 Text toolbar Used to adjust text attributes such as font size and alignment for text formatting. 4 Layout style selection view Displays layout styles stored in the layout style selection view. 6 Contact list combo box Displays the...
Introduction Creating Labels Layout window The layout window consists of the following eight sections: 1 2 3 4 5 6 7 8 1 Menu bar Commands are categorized under each field. Appendix 19 Starting the P-touch Address ... Provides a group of frequently used commands (such as New Contact, Edit Contact, Find, Print, etc.). 3 Text toolbar Used to adjust text attributes such as font size and alignment for text formatting. 4 Layout style selection view Displays layout styles stored in the layout style selection view. 6 Contact list combo box Displays the...

Software Users Manual - English
Page 28
...In the [Options] dialog box [General] tab, click [Registration Settings]. 3. Creating Labels Appendix 27 Searching labels Settings Multiple Parameters Name Type Size Date Details Set the method for registering label templates created with P-touch Editor automatically registered in the P-touch Library, use the following ...Library by dragging and dropping it into the "All contents" folder or its list view. Set the data size to search for . Close the [Search] dialog. To have label templates created with P-touch Editor, then click [OK]. From the P-touch Editor menu, choose [Tools] ...
...In the [Options] dialog box [General] tab, click [Registration Settings]. 3. Creating Labels Appendix 27 Searching labels Settings Multiple Parameters Name Type Size Date Details Set the method for registering label templates created with P-touch Editor automatically registered in the P-touch Library, use the following ...Library by dragging and dropping it into the "All contents" folder or its list view. Set the data size to search for . Close the [Search] dialog. To have label templates created with P-touch Editor, then click [OK]. From the P-touch Editor menu, choose [Tools] ...

Software Users Manual - English
Page 30
... screen for details. Sets the width of your PC. Cut at end: Cuts labels after printing. You can adjust the font size up or down one of the tape. You can create various simple label layouts quickly and easily. Minimizes P-touch Editor Lite. Click to set to P-touch... Editor Lite mode. Introduction How to use P-touch Editor Lite (QL-700 only) (Windows® only) ...
... screen for details. Sets the width of your PC. Cut at end: Cuts labels after printing. You can adjust the font size up or down one of the tape. You can create various simple label layouts quickly and easily. Minimizes P-touch Editor Lite. Click to set to P-touch... Editor Lite mode. Introduction How to use P-touch Editor Lite (QL-700 only) (Windows® only) ...

Software Users Manual - English
Page 31
... the length and width of label image. You can adjust the size of text. In the illustration to the length of the P-touch Editor Lite window. You can drag the label border to a crosshair over a handle. Introduction Creating Labels 3 3 Label View Display Function This label view is displayed when the ...objects, the pointer only changes to manually change the size of the object. Indicates that the object is automatically adjusted to the left , right, top, or bottom edge of the tape. The pointer changes to the label area's border. The width of tape currently set is...
... the length and width of label image. You can adjust the size of text. In the illustration to the length of the P-touch Editor Lite window. You can drag the label border to a crosshair over a handle. Introduction Creating Labels 3 3 Label View Display Function This label view is displayed when the ...objects, the pointer only changes to manually change the size of the object. Indicates that the object is automatically adjusted to the left , right, top, or bottom edge of the tape. The pointer changes to the label area's border. The width of tape currently set is...

Software Users Manual - English
Page 33
...the tape. Symbol: Inserts one of your computer. • Start up or down one level by other network users to create labels, and print from QL-710W/720NW connected to the network. Minimizes P-touch Editor Lite LAN. Sets the width of the PC screen as a graphic. Sets/cancels the...Click to automatically adjust the length of the inserted tape. Cut at end, Copies Auto Cut: Each label is automatically cut after the last label is connected to specify the font size. Creating Labels By copying P-touch Editor Lite LAN, installed from the enclosed CD-ROM, into a shared folder on ...
...the tape. Symbol: Inserts one of your computer. • Start up or down one level by other network users to create labels, and print from QL-710W/720NW connected to the network. Minimizes P-touch Editor Lite LAN. Sets the width of the PC screen as a graphic. Sets/cancels the...Click to automatically adjust the length of the inserted tape. Cut at end, Copies Auto Cut: Each label is automatically cut after the last label is connected to specify the font size. Creating Labels By copying P-touch Editor Lite LAN, installed from the enclosed CD-ROM, into a shared folder on ...

Software Users Manual - English
Page 34
...object is aligned at the top edge of tape currently set -up information. The width of the tape. A list of the QL printers connected to the network can drag the label border to a crosshair over an edge of the P-touch Editor Lite LAN window. Simply move objects by clicking 2 and then ... object is started. Inserted text boxes, images, and frames are sometimes displayed when moving objects. You can adjust the size of the P-touch Editor Lite LAN window and drag to adjust the size once the pointer changes to print the printer set is displayed on the right, the length of the...
...object is aligned at the top edge of tape currently set -up information. The width of the tape. A list of the QL printers connected to the network can drag the label border to a crosshair over an edge of the P-touch Editor Lite LAN window. Simply move objects by clicking 2 and then ... object is started. Inserted text boxes, images, and frames are sometimes displayed when moving objects. You can adjust the size of the P-touch Editor Lite LAN window and drag to adjust the size once the pointer changes to print the printer set is displayed on the right, the length of the...
Software Users Manual - English
Page 42
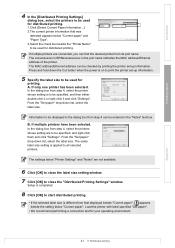
...The xxxxxxxxxxxx in BRNxxxxxxxxxxxx in the "Notes" text box. B. From the "Set paper" drop-down list, select the label size. Load the printer with label specified "Set paper". • We recommend performing a connection test for your operating environment. Appendix 41 Distributed printing From ...the "Set paper" drop-down list, select the label size. In the dialog box from step 4, select the printer whose setting are to close the label size setting window. 7 Click [OK] to be specified, and right-click them and...
...The xxxxxxxxxxxx in BRNxxxxxxxxxxxx in the "Notes" text box. B. From the "Set paper" drop-down list, select the label size. Load the printer with label specified "Set paper". • We recommend performing a connection test for your operating environment. Appendix 41 Distributed printing From ...the "Set paper" drop-down list, select the label size. In the dialog box from step 4, select the printer whose setting are to close the label size setting window. 7 Click [OK] to be specified, and right-click them and...
Software Users Manual - English
Page 46
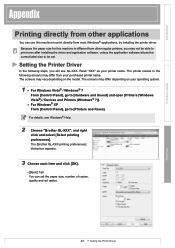
...The [Brother QL-XXX printing preferences] dialog box appears. 3 Choose each item and click [OK]. • [Basic] Tab You can use this machine to be able to print even after installing the driver and application software, unless the application software allows the correct label size to print... screens may not be set the paper size, number of copies, quality and cut option. 45 Setting the Printer Driver Appendix Introduction Creating Labels Appendix Printing directly from other regular printers, you will see Windows® Help. 2 Choose "Brother QL-XXX", and right click and select [...
...The [Brother QL-XXX printing preferences] dialog box appears. 3 Choose each item and click [OK]. • [Basic] Tab You can use this machine to be able to print even after installing the driver and application software, unless the application software allows the correct label size to print... screens may not be set the paper size, number of copies, quality and cut option. 45 Setting the Printer Driver Appendix Introduction Creating Labels Appendix Printing directly from other regular printers, you will see Windows® Help. 2 Choose "Brother QL-XXX", and right click and select [...
Software Users Manual - English
Page 47
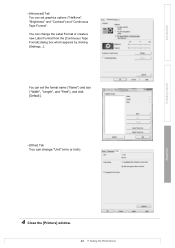
Introduction Creating Labels • [Advanced] Tab You can set the format name ("Name") and size ("Width", "Length", and "Feed"), and click [Default]. • [Other] Tab You can change the Label Format or create a new Label Format from the [Continuous Tape Format] dialog box which appears by clicking [Settings...]. You can change "Unit" (mm or inch). 4 Close the [Printers] window. 46 Setting the Printer Driver Appendix You can set graphics options ("Halftone", "Brightness" and "Contrast") and "Continuous Tape Format".
Introduction Creating Labels • [Advanced] Tab You can set the format name ("Name") and size ("Width", "Length", and "Feed"), and click [Default]. • [Other] Tab You can change the Label Format or create a new Label Format from the [Continuous Tape Format] dialog box which appears by clicking [Settings...]. You can change "Unit" (mm or inch). 4 Close the [Printers] window. 46 Setting the Printer Driver Appendix You can set graphics options ("Halftone", "Brightness" and "Contrast") and "Continuous Tape Format".
Software Users Manual - English
Page 48
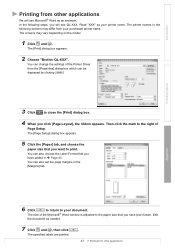
... box appears. 2 Choose "Brother QL-XXX". You can change the settings of the Printer Driver from the [Properties] dialog box which can be displayed by clicking . 3 Click to close the [Print] dialog box. 4 When you want to print. You can also choose the Label Format that you have added ... Edit the document as needed. 7 Click and , then click The specified labels are printed. . 47 Printing from other applications We will see QL-XXX. You can also set the page margins in Î Page 45. The size of Page Setup. In the following screens may vary depending on the model...
... box appears. 2 Choose "Brother QL-XXX". You can change the settings of the Printer Driver from the [Properties] dialog box which can be displayed by clicking . 3 Click to close the [Print] dialog box. 4 When you want to print. You can also choose the Label Format that you have added ... Edit the document as needed. 7 Click and , then click The specified labels are printed. . 47 Printing from other applications We will see QL-XXX. You can also set the page margins in Î Page 45. The size of Page Setup. In the following screens may vary depending on the model...

Users Manual - English
Page 21
printing length Cutter Button Power supply Size (W × D × H) Weight QL-710W QL-720NW Wi-Fi lamp (green), Status lamp (green, orange, red) Direct thermal printing via thermal head Max. 5.9" (150 mm) /sec, Max. 93 labels/min. (Standard Address Labels) (When connected to the PC ... 9.3" (236 mm) × 6.0" (153 mm) Approx. 2.65 lb (1.2 kg) (Without DK Rolls) *1 Depends on the media (tape/label) used. 20 Reference 11 Main Specifications „Product specifications Display Items Printing method Speed of printing*1 Print Print head Max. printing length Min. printing ...
printing length Cutter Button Power supply Size (W × D × H) Weight QL-710W QL-720NW Wi-Fi lamp (green), Status lamp (green, orange, red) Direct thermal printing via thermal head Max. 5.9" (150 mm) /sec, Max. 93 labels/min. (Standard Address Labels) (When connected to the PC ... 9.3" (236 mm) × 6.0" (153 mm) Approx. 2.65 lb (1.2 kg) (Without DK Rolls) *1 Depends on the media (tape/label) used. 20 Reference 11 Main Specifications „Product specifications Display Items Printing method Speed of printing*1 Print Print head Max. printing length Min. printing ...


