
Quick Setup Guide - English and Spanish
Page 29
...down your wireless network settings in locating your network security settings. We cannot assist you in the area below. • Please do not contact Brother Customer Service for this method. MEMO Item Setting SSID (Network Name) Network Key (Security Key/ Encryption Key) * The Network Key may also be... described as the Password, Security Key or Encryption Key. • If you do not know the SSID and Network Key of your WLAN access point/router before you ...
...down your wireless network settings in locating your network security settings. We cannot assist you in the area below. • Please do not contact Brother Customer Service for this method. MEMO Item Setting SSID (Network Name) Network Key (Security Key/ Encryption Key) * The Network Key may also be... described as the Password, Security Key or Encryption Key. • If you do not know the SSID and Network Key of your WLAN access point/router before you ...
Quick Setup Guide - English and Spanish
Page 40
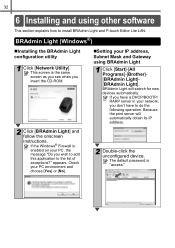
... explains how to install BRAdmin Light and P-touch Editor Lite LAN. Because the print server will search for new devices automatically. The default password is the same screen as you see when you insert the CD-ROM. „Setting your network, you wish to add this application ...PC environment and choose [Yes] or [No]. 2 Double-click the unconfigured device. 32 6 Installing and using BRAdmin Light 1 Click [Start]-[All Programs]-[Brother][BRAdmin Light][BRAdmin Light]. BRAdmin Light (Windows®) „Installing the BRAdmin Light configuration utility 1 Click [Network Utility].
... explains how to install BRAdmin Light and P-touch Editor Lite LAN. Because the print server will search for new devices automatically. The default password is the same screen as you see when you insert the CD-ROM. „Setting your network, you wish to add this application ...PC environment and choose [Yes] or [No]. 2 Double-click the unconfigured device. 32 6 Installing and using BRAdmin Light 1 Click [Start]-[All Programs]-[Brother][BRAdmin Light][BRAdmin Light]. BRAdmin Light (Windows®) „Installing the BRAdmin Light configuration utility 1 Click [Network Utility].
Quick Setup Guide - English and Spanish
Page 41
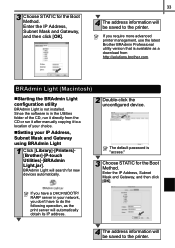
...folder of the CD, run it after manually copying it to the printer. The default password is in your IP Address, Subnet Mask and Gateway using BRAdmin Light 1 Click [Library]-[Printers][Brother]-[P-touch Utilities]-[BRAdmin Light.jar]. BRAdmin Light will be saved to a location of your ...choice. „Setting your network, you require more advanced printer management, use the latest Brother BRAdmin Professional utility version that is not installed. If you don't have to the printer. BRAdmin Light (Macintosh) „Starting the BRAdmin...
...folder of the CD, run it after manually copying it to the printer. The default password is in your IP Address, Subnet Mask and Gateway using BRAdmin Light 1 Click [Library]-[Printers][Brother]-[P-touch Utilities]-[BRAdmin Light.jar]. BRAdmin Light will be saved to a location of your ...choice. „Setting your network, you require more advanced printer management, use the latest Brother BRAdmin Professional utility version that is not installed. If you don't have to the printer. BRAdmin Light (Macintosh) „Starting the BRAdmin...

Software Users Manual - English
Page 26
Introduction Creating Labels Transferring templates to the printer via the network (QL-580N / 1060N / 720NW only) To transfer the templates to the printer via the network (QL-580N / 1060N / 720NW only) The printer names and pictures in .blf format. 3 Start BRAdmin Professional. BRAdmin Professional can be ...it to use BRAdmin Professional. The screens may differ from our website at http://solutions.brother.com. Press and hold down the Cut button when the power is "access". The default password is on the model. 1 Create the template you can be downloaded from your ...
Introduction Creating Labels Transferring templates to the printer via the network (QL-580N / 1060N / 720NW only) To transfer the templates to the printer via the network (QL-580N / 1060N / 720NW only) The printer names and pictures in .blf format. 3 Start BRAdmin Professional. BRAdmin Professional can be ...it to use BRAdmin Professional. The screens may differ from our website at http://solutions.brother.com. Press and hold down the Cut button when the power is "access". The default password is on the model. 1 Create the template you can be downloaded from your ...

Network Users Manual - English
Page 7
...'s MAC Address / Ethernet Address.) • The default password for Brother print servers is only available for Brother products in the current BRAdmin Light window. It can download the latest Brother BRAdmin Light version from http://solutions.brother.com/. • If you are using firewall, anti-... name appears in a TCP/IP environment, show the status and configure basic network settings, such as a download from http://solutions.brother.com/. Close any running applications before installing. If the language screen appears, choose your printer. c Insert the supplied CD-ROM ...
...'s MAC Address / Ethernet Address.) • The default password for Brother print servers is only available for Brother products in the current BRAdmin Light window. It can download the latest Brother BRAdmin Light version from http://solutions.brother.com/. • If you are using firewall, anti-... name appears in a TCP/IP environment, show the status and configure basic network settings, such as a download from http://solutions.brother.com/. Close any running applications before installing. If the language screen appears, choose your printer. c Insert the supplied CD-ROM ...
Network Users Manual - English
Page 19
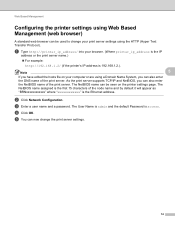
...http://printer_ip_address/ into your print server settings using the HTTP (Hyper Text Transfer Protocol). d Click OK. The User Name is admin and the default Password is the Ethernet address. As the print server supports TCP/IP and NetBIOS, you can also enter the DNS name of the print server. c ...Enter a user name and a password. e You can be used to change the print server settings. 14 The NetBIOS name can now change your browser. (Where printer_ip_address is the IP...
...http://printer_ip_address/ into your print server settings using the HTTP (Hyper Text Transfer Protocol). d Click OK. The User Name is admin and the default Password is the Ethernet address. As the print server supports TCP/IP and NetBIOS, you can also enter the DNS name of the print server. c ...Enter a user name and a password. e You can be used to change the print server settings. 14 The NetBIOS name can now change your browser. (Where printer_ip_address is the IP...

Network Users Manual - English
Page 41
... that other users cannot access. Do not send the command file to the Network Setting Tool. Saved command files contain authentication keys and passwords. Take necessary measures to protect saved command files such as when settings are only intended to be imported to a printer whose model was not specified...
... that other users cannot access. Do not send the command file to the Network Setting Tool. Saved command files contain authentication keys and passwords. Take necessary measures to protect saved command files such as when settings are only intended to be imported to a printer whose model was not specified...

Network Users Manual - English
Page 42
... import data. • Only settings values (SSID, authentication method, encryption method, and authentication key) from the computer. Because exported files may contain authentication keys and passwords, take necessary measures to protect exported files by clearing this check box is set to import Imports settings that it does not duplicate the IP...
... import data. • Only settings values (SSID, authentication method, encryption method, and authentication key) from the computer. Because exported files may contain authentication keys and passwords, take necessary measures to protect exported files by clearing this check box is set to import Imports settings that it does not duplicate the IP...
Network Users Manual - English
Page 46
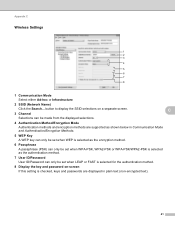
button to display the SSID selections on -screen If this setting is checked, keys and passwords are displayed in Communication Mode and Authentication/Encryption Methods. 5 WEP Key A WEP key can only be set when WEP is selected as the encryption method. 6 ... Selections can be made from the displayed selections. 4 Authentication Method/Encryption Mode Authentication methods and encryption methods are supported as the authentication method. 7 User ID/Password User ID/Password can only be set when LEAP or FAST is selected for the authentication method. 8 Display the key and...
button to display the SSID selections on -screen If this setting is checked, keys and passwords are displayed in Communication Mode and Authentication/Encryption Methods. 5 WEP Key A WEP key can only be set when WEP is selected as the encryption method. 6 ... Selections can be made from the displayed selections. 4 Authentication Method/Encryption Mode Authentication methods and encryption methods are supported as the authentication method. 7 User ID/Password User ID/Password can only be set when LEAP or FAST is selected for the authentication method. 8 Display the key and...
Users Manual - English
Page 6
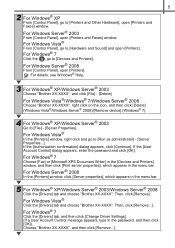
...to [File] - [Server Properties]. If the [User Account Control] dialog appears, enter the password and click [OK]. For details, see Windows® Help. 3 For Windows® XP/Windows Server® 2003 Choose "Brother XX-XXXX", and click [File] - [Delete]. For Windows® 7 Choose [Fax] ... click [Print server properties], which appears in the password, and then click [OK]). For Windows Vista® Click the [Drivers] tab and choose "Brother XX-XXXX". For Windows Server® 2003 From [Control Panel], open [Printers]. Choose "Brother XX-XXXX", and then click [Remove...]. Then, ...
...to [File] - [Server Properties]. If the [User Account Control] dialog appears, enter the password and click [OK]. For details, see Windows® Help. 3 For Windows® XP/Windows Server® 2003 Choose "Brother XX-XXXX", and click [File] - [Delete]. For Windows® 7 Choose [Fax] ... click [Print server properties], which appears in the password, and then click [OK]). For Windows Vista® Click the [Drivers] tab and choose "Brother XX-XXXX". For Windows Server® 2003 From [Control Panel], open [Printers]. Choose "Brother XX-XXXX", and then click [Remove...]. Then, ...