
Users Manual - English and Spanish
Page 8
... 24 3 Print the label. Refer to the P-touch machine. By creating a simple label, you have created. P. 43 You can check the layout of editing functions. Creating a label with the P-touch 1 Prepare the P-touch. Set a tape cassette. INTRODUCTION Creating Your First Label This section introduces... you to the methods used to create simple labels with your label before printing prevents wasting tape on . Install and charge the battery...
... 24 3 Print the label. Refer to the P-touch machine. By creating a simple label, you have created. P. 43 You can check the layout of editing functions. Creating a label with the P-touch 1 Prepare the P-touch. Set a tape cassette. INTRODUCTION Creating Your First Label This section introduces... you to the methods used to create simple labels with your label before printing prevents wasting tape on . Install and charge the battery...

Users Manual - English and Spanish
Page 12
...P-touch for any location exposed to failure or repair of time. • If battery fluid comes into contact with skin or clothes, wash the affected areas thoroughly with your hands. Memory • Any data stored in any extended period of the tape may otherwise be transferred ... disconnecting the power cord from the power outlet. When removing labels, adhesive may remain, the tape's color may be damaged. Tape cutter • Do not touch the tape cutter with clean water. Tape • Depending on the intended surface and material before affixing the label. 6 Safety Precautions ...
...P-touch for any location exposed to failure or repair of time. • If battery fluid comes into contact with skin or clothes, wash the affected areas thoroughly with your hands. Memory • Any data stored in any extended period of the tape may otherwise be transferred ... disconnecting the power cord from the power outlet. When removing labels, adhesive may remain, the tape's color may be damaged. Tape cutter • Do not touch the tape cutter with clean water. Tape • Depending on the intended surface and material before affixing the label. 6 Safety Precautions ...
Users Manual - English and Spanish
Page 13
...bend it. • The software on the CD-ROM is intended for use with the P-touch and may result in accidents or damage the machine. • Use only genuine TZ tapes, with your P-touch, and then keep it nearby for any purpose not described in any location exposed to extremely high...result in damage or injury if 4 : This symbol indicates information or the P-touch more than one PC. • We strongly recommend that you read this User's Guide carefully before using an empty tape cassette or without a tape cassette set in any location exposed to high or low temperatures. Doing so ...
...bend it. • The software on the CD-ROM is intended for use with the P-touch and may result in accidents or damage the machine. • Use only genuine TZ tapes, with your P-touch, and then keep it nearby for any purpose not described in any location exposed to extremely high...result in damage or injury if 4 : This symbol indicates information or the P-touch more than one PC. • We strongly recommend that you read this User's Guide carefully before using an empty tape cassette or without a tape cassette set in any location exposed to high or low temperatures. Doing so ...
Users Manual - English and Spanish
Page 14
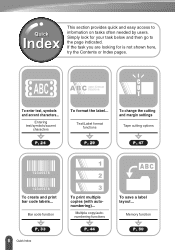
... by users. Bar code function P. 33 8 Quick Index 1 2 3 To print multiple copies (with autonumbering)... Text/Label format functions To change the cutting and margin settings Tape cutting options P. 24 P. 29 P. 47 12345678 12345678 To create and print bar code labels... ABC A B C auto-format function To enter text, symbols and accent characters...
... by users. Bar code function P. 33 8 Quick Index 1 2 3 To print multiple copies (with autonumbering)... Text/Label format functions To change the cutting and margin settings Tape cutting options P. 24 P. 29 P. 47 12345678 12345678 To create and print bar code labels... ABC A B C auto-format function To enter text, symbols and accent characters...
Users Manual - English and Spanish
Page 15
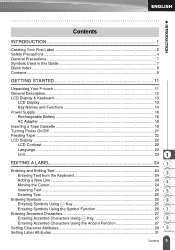
... 7 Quick Index ...8 Contents ...9 GETTING STARTED 11 Unpacking Your P-touch 11 General Description...12 LCD Display & Keyboard 13 LCD Display ...13 Key Names and Functions 14 Power Supply ...16 Rechargeable Battery 16 AC Adapter ...19 Inserting a Tape Cassette 19 Turning Power On/Off 21 Feeding Tape ...22 LCD Display ...22 LCD Contrast ...22 Language...
... 7 Quick Index ...8 Contents ...9 GETTING STARTED 11 Unpacking Your P-touch 11 General Description...12 LCD Display & Keyboard 13 LCD Display ...13 Key Names and Functions 14 Power Supply ...16 Rechargeable Battery 16 AC Adapter ...19 Inserting a Tape Cassette 19 Turning Power On/Off 21 Feeding Tape ...22 LCD Display ...22 LCD Contrast ...22 Language...

Users Manual - English and Spanish
Page 16
...43 Label Preview...43 Printing a Label ...43 Printing a Single Copy 43 Printing Multiple Copies 44 Auto-numbering Labels 45 Mirror Printing ...46 Tape Cutting Options 47 Attaching Labels...49 USING THE FILE MEMORY 50 Storing a Label into Memory 50 Opening a Stored Label File 51 Deleting a... Stored Label File 52 MAINTAINING YOUR P-touch 53 Resetting the P-touch 53 Maintenance...53 Cleaning the Main Unit 53 Cleaning the Print Head 53 Cleaning the Tape Cutter 54 Cleaning the Charging Terminals 54 TROUBLESHOOTING 55 What to do when...55 Error...
...43 Label Preview...43 Printing a Label ...43 Printing a Single Copy 43 Printing Multiple Copies 44 Auto-numbering Labels 45 Mirror Printing ...46 Tape Cutting Options 47 Attaching Labels...49 USING THE FILE MEMORY 50 Storing a Label into Memory 50 Opening a Stored Label File 51 Deleting a... Stored Label File 52 MAINTAINING YOUR P-touch 53 Resetting the P-touch 53 Maintenance...53 Cleaning the Main Unit 53 Cleaning the Print Head 53 Cleaning the Tape Cutter 54 Cleaning the Charging Terminals 54 TROUBLESHOOTING 55 What to do when...55 Error...
Users Manual - English and Spanish
Page 17
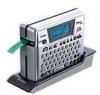
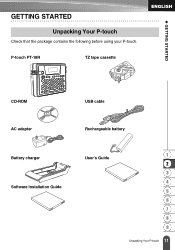
GETTING STARTED GETTING STARTED Unpacking Your P-touch Check that the package contains the following before using your P-touch. P-touch PT-18R TZ tape cassette CD-ROM USB cable AC adapter Rechargeable battery Battery charger Software Installation Guide User's Guide 1 2 3 4 5 6 7 8 9 11 Unpacking Your P-touch
GETTING STARTED GETTING STARTED Unpacking Your P-touch Check that the package contains the following before using your P-touch. P-touch PT-18R TZ tape cassette CD-ROM USB cable AC adapter Rechargeable battery Battery charger Software Installation Guide User's Guide 1 2 3 4 5 6 7 8 9 11 Unpacking Your P-touch

Users Manual - English and Spanish
Page 18
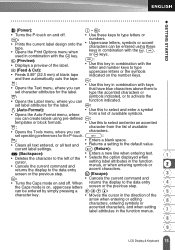
Charging terminals Back cover Tape viewer Tape exit slot AC power lamp Back cover opening grip Battery charger Rechargeable battery Release lever Tape cutter Print head Rechargeable battery Tape cassette case cover case AC adapter connector Charging terminals 12 General Description GETTING STARTED General Description Keyboard LCD display AC adapter connector USB port When shipped from the factory, the LCD display is covered with a protective sheet to prevent damage. Remove this sheet before using the P-touch.
Charging terminals Back cover Tape viewer Tape exit slot AC power lamp Back cover opening grip Battery charger Rechargeable battery Release lever Tape cutter Print head Rechargeable battery Tape cassette case cover case AC adapter connector Charging terminals 12 General Description GETTING STARTED General Description Keyboard LCD display AC adapter connector USB port When shipped from the factory, the LCD display is covered with a protective sheet to prevent damage. Remove this sheet before using the P-touch.

Users Manual - English and Spanish
Page 19
Cursor Indicates the current position of text. 4. Tape length 2 Indicates the tape length for the text entered. 10.Cursor selection 3 Indicates that the Caps mode is pressed. 3. Return mark Indicates the end of a line of the cursor. ...
Cursor Indicates the current position of text. 4. Tape length 2 Indicates the tape length for the text entered. 10.Cursor selection 3 Indicates that the Caps mode is pressed. 3. Return mark Indicates the end of a line of the cursor. ...
Users Manual - English and Spanish
Page 21
...Format): • Use this to type uppercase letters or the symbols • Feeds 0.89" (22.5 mm) of blank tape indicated on the number keys. and then automatically cuts the tape. : : • Use this key in combination with the letter and number keys to select and enter an accented :...; Turns the Caps mode on , uppercase letters returns the display to the data entry screen or the previous step. 4 can set operating preferences for the P-touch. : : • Clears all text entered, or all text and current label settings. • Enters a blank space. • Returns a setting to ...
...Format): • Use this to type uppercase letters or the symbols • Feeds 0.89" (22.5 mm) of blank tape indicated on the number keys. and then automatically cuts the tape. : : • Use this key in combination with the letter and number keys to select and enter an accented :...; Turns the Caps mode on , uppercase letters returns the display to the data entry screen or the previous step. 4 can set operating preferences for the P-touch. : : • Clears all text entered, or all text and current label settings. • Enters a blank space. • Returns a setting to ...
Users Manual - English and Spanish
Page 25
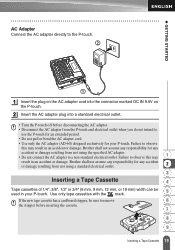
...outlet when you do not intend to observe this may 1 result in your P-touch. Use only tape cassettes with the mark. 5 If the new tape cassette has a cardboard stopper, be used in an accident or damage. Brother shall not assume any accident or damage resulting from not using the specified AC adapter.... • Do not connect the AC adapter to observe this may result in an accident or damage. WATNLATION 7 8 9 19 Inserting a Tape Cassette Failure to a non-standard electrical outlet. Brother shall not assume any responsibility for any responsibility for your...
...outlet when you do not intend to observe this may 1 result in your P-touch. Use only tape cassettes with the mark. 5 If the new tape cassette has a cardboard stopper, be used in an accident or damage. Brother shall not assume any accident or damage resulting from not using the specified AC adapter.... • Do not connect the AC adapter to observe this may result in an accident or damage. WATNLATION 7 8 9 19 Inserting a Tape Cassette Failure to a non-standard electrical outlet. Brother shall not assume any responsibility for any responsibility for your...
Users Manual - English and Spanish
Page 26
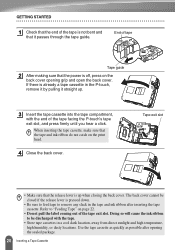
... as possible after inserting the tape cassette. End of the tape facing the P-touch's tape exit slot, and press firmly until you hear a click. If there is already a tape cassette in the P-touch, remove it by pulling it passes through the tape guide. When inserting the tape cassette, make sure that the... release lever is off, press on the back cover opening the sealed package. 20 Inserting a Tape Cassette The back cover cannot be...
... as possible after inserting the tape cassette. End of the tape facing the P-touch's tape exit slot, and press firmly until you hear a click. If there is already a tape cassette in the P-touch, remove it by pulling it passes through the tape guide. When inserting the tape cassette, make sure that the... release lever is off, press on the back cover opening the sealed package. 20 Inserting a Tape Cassette The back cover cannot be...

Users Manual - English and Spanish
Page 28
... the or key. Press while "Feed & Cut?" is displayed to the default value "0". 22 Feeding Tape Please Wait" appears while the tape is fed, and then the tape is "0". 1 Press the key to feed tape. LCD Display LCD Contrast You can change the contrast setting of the LCD display to one of... the tape exit slot. "Feed & Cut?" appears on the contrast setting screen sets the contrast to cancel tape feeding. The message "Feeding Tape... The default setting is cut. Doing so will cause the ink ribbon to jam. ...
... the or key. Press while "Feed & Cut?" is displayed to the default value "0". 22 Feeding Tape Please Wait" appears while the tape is fed, and then the tape is "0". 1 Press the key to feed tape. LCD Display LCD Contrast You can change the contrast setting of the LCD display to one of... the tape exit slot. "Feed & Cut?" appears on the contrast setting screen sets the contrast to cancel tape feeding. The message "Feeding Tape... The default setting is cut. Doing so will cause the ink ribbon to jam. ...
Users Manual - English and Spanish
Page 30
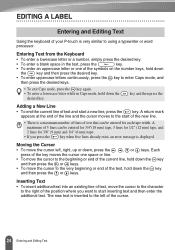
... moves to the start of the new line. • There is displayed. EDITING A LABEL Entering and Editing Text Using the keyboard of your P-touch is inserted to the left , right, up or down the desired key. Inserting Text • To insert additional text into an existing line of...cursor left of the text, hold down , press the , or keys. A maximum of 5 lines can be entered for 3/4"(18 mm) tape, 3 lines for 1/2" (12 mm) tape, and 2 lines for each tape width. Entering Text from the Keyboard • To enter a lowercase letter or a number, simply press the desired key. • To...
... moves to the start of the new line. • There is displayed. EDITING A LABEL Entering and Editing Text Using the keyboard of your P-touch is inserted to the left , right, up or down the desired key. Inserting Text • To insert additional text into an existing line of...cursor left of the text, hold down , press the , or keys. A maximum of 5 lines can be entered for 3/4"(18 mm) tape, 3 lines for 1/2" (12 mm) tape, and 2 lines for each tape width. Entering Text from the Keyboard • To enter a lowercase letter or a number, simply press the desired key. • To...

Users Manual - English and Spanish
Page 35
... current settings are applied (e.g. Shadow + Italic). • When selecting "S", "M" and "L" in the text size attributes, the actual size when printed will differ depending on the tape cassette width installed, and the number of all available settings. • Small characters may be difficult to read when certain styles are displayed. 2 Select an...
... current settings are applied (e.g. Shadow + Italic). • When selecting "S", "M" and "L" in the text size attributes, the actual size when printed will differ depending on the tape cassette width installed, and the number of all available settings. • Small characters may be difficult to read when certain styles are displayed. 2 Select an...

Users Manual - English and Spanish
Page 39
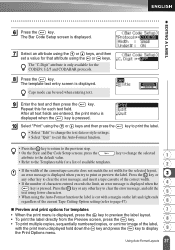
... exclusively for creating bar code labels. Setting Bar Code Parameters 1 Press the key to display the Tools menu, select "Bar Code Setup" using colored tape or ink. • Use the "Large" setting for "Width" whenever possible. Characters may not be able to read bar code labels created using ... be read by the bar code reader. • For best results, print bar code labels in black ink on the 1 tape width being used in an asset management system. • The P-touch is only available for the CODE39, I -2/5 (ITF), CODABAR 33 Creating a Bar Code Label EDITING A LABEL Creating a Bar ...
... exclusively for creating bar code labels. Setting Bar Code Parameters 1 Press the key to display the Tools menu, select "Bar Code Setup" using colored tape or ink. • Use the "Large" setting for "Width" whenever possible. Characters may not be able to read bar code labels created using ... be read by the bar code reader. • For best results, print bar code labels in black ink on the 1 tape width being used in an asset management system. • The P-touch is only available for the CODE39, I -2/5 (ITF), CODABAR 33 Creating a Bar Code Label EDITING A LABEL Creating a Bar ...
Users Manual - English and Spanish
Page 43
...Edit" to change the selected 1 • Refer to the Templates table for a list of available templates. 2 • If the width of the current Tape Cutting Option setting (refer to page 47). 6 Preview and print options for templates 7 • When the print menu is pressed. After all text fields are... CODE39, I-2/5 and CODABAR protocols. 8 Press the key. Press the key or 3 any other key to clear the error message, and insert a tape cassette of the correct width. • If the number of characters entered exceeds the limit, an error message is displayed when the 4 key is ...
...Edit" to change the selected 1 • Refer to the Templates table for a list of available templates. 2 • If the width of the current Tape Cutting Option setting (refer to page 47). 6 Preview and print options for templates 7 • When the print menu is pressed. After all text fields are... CODE39, I-2/5 and CODABAR protocols. 8 Press the key. Press the key or 3 any other key to clear the error message, and insert a tape cassette of the correct width. • If the number of characters entered exceeds the limit, an error message is displayed when the 4 key is ...
Users Manual - English and Spanish
Page 45
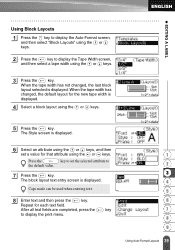
...6 Select an attribute using the or keys, and then set the selected attribute to the default value. 7 Press the key. Repeat for the new tape width is displayed. The Style screen is displayed. Caps mode can be used when entering text. 8 Enter text and then press the key. EDITING...using the or keys. 2 Press the key to display the Tape Width screen, and then select a tape width using the or keys. 5 Press the key. When the tape width has not changed , the default layout for each text field. When the tape width has changed , the last block layout selected is displayed...
...6 Select an attribute using the or keys, and then set the selected attribute to the default value. 7 Press the key. Repeat for the new tape width is displayed. The Style screen is displayed. Caps mode can be used when entering text. 8 Enter text and then press the key. EDITING...using the or keys. 2 Press the key to display the Tape Width screen, and then select a tape width using the or keys. 5 Press the key. When the tape width has not changed , the default layout for each text field. When the tape width has changed , the last block layout selected is displayed...

Users Manual - English and Spanish
Page 46
... try to print or preview the label. Press the key to delete all text, or press the key to clear the error message, and insert a tape cassette of the correct width. • If the number of characters entered exceeds the limit, an error message is displayed when the key is pressed... pressed while entering text. Press the key or any other key to not delete the text. • If the width of the current tape cassette does not match the set width for a list of the current Tape Cutting Option setting (refer to display 40 Using Auto-Format Layouts key to page 47).
... try to print or preview the label. Press the key to delete all text, or press the key to clear the error message, and insert a tape cassette of the correct width. • If the number of characters entered exceeds the limit, an error message is displayed when the key is pressed... pressed while entering text. Press the key or any other key to not delete the text. • If the width of the current tape cassette does not match the set width for a list of the current Tape Cutting Option setting (refer to display 40 Using Auto-Format Layouts key to page 47).

Users Manual - English and Spanish
Page 47
Attribute Block layout (3/4" [18 mm] tape) Block layout (1/2" [12 mm] tape) Block Layouts Value 2 Line A 2 Line B 3 Line 1+2 Line A 1+2 Line B 1+3 Line 1+4 Line 1+5 Line 2 Line A 2 Line B 3 Line 1+2 Line Details 1 2 3 4 5 6 7 8 9 41 Using Auto-Format Layouts EDITING A LABEL
Attribute Block layout (3/4" [18 mm] tape) Block layout (1/2" [12 mm] tape) Block Layouts Value 2 Line A 2 Line B 3 Line 1+2 Line A 1+2 Line B 1+3 Line 1+4 Line 1+5 Line 2 Line A 2 Line B 3 Line 1+2 Line Details 1 2 3 4 5 6 7 8 9 41 Using Auto-Format Layouts EDITING A LABEL


