
Users Manual - English
Page 1
... a database document Reference P-touch Editor Environment Layout document window Record view window Pop-Up menu commands Menu bar commands 1. Starting up P-touch Editor Basic Operation Layout area Creating a new layout document Working with text objects Working with graphics objects Modifying objects Using the Auto Format Wizard Printing a layout Saving a layout document Databases Creating a database Maintaining the database Using database data in and to this software product and the materials...
... a database document Reference P-touch Editor Environment Layout document window Record view window Pop-Up menu commands Menu bar commands 1. Starting up P-touch Editor Basic Operation Layout area Creating a new layout document Working with text objects Working with graphics objects Modifying objects Using the Auto Format Wizard Printing a layout Saving a layout document Databases Creating a database Maintaining the database Using database data in and to this software product and the materials...
Users Manual - English
Page 6
Creating a text object A text object is automatically created as soon as you wish to change the text, you can now type in using the insert mode. Click on your computer keyboard to switch to the overwrite mode. This is always typed in text. 3. You cannot use the insert key on the draw toolbar. q The cursor ( ) flashes in the layout area to indicate that you type text into the layout area...
Creating a text object A text object is automatically created as soon as you wish to change the text, you can now type in using the insert mode. Click on your computer keyboard to switch to the overwrite mode. This is always typed in text. 3. You cannot use the insert key on the draw toolbar. q The cursor ( ) flashes in the layout area to indicate that you type text into the layout area...

Users Manual - English
Page 7
..., let's use the Font Properties to appear. 4. Click the arrow button on the right side of the size setting. q You can modify the appearance of your text by changing its font, size, style, or the effects applied to the characters. Select 48. q The size of the text you to make many changes to display the Font Properties. 3. Modifying the appearance of text You can select settings and click on other letters. 1.
..., let's use the Font Properties to appear. 4. Click the arrow button on the right side of the size setting. q You can modify the appearance of your text by changing its font, size, style, or the effects applied to the characters. Select 48. q The size of the text you to make many changes to display the Font Properties. 3. Modifying the appearance of text You can select settings and click on other letters. 1.
Users Manual - English
Page 19
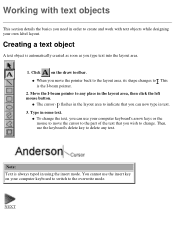
... to the currently selected page size. Note: When the "Use the Current Page Size" option is turned on , the size of the new document created using the Auto Format Wizard is automatically adjusted to the P-touch model being used. 8. 7. In the "Input:" edit box, change the title to "Manager" and the name to "BILL REYNOLDS". 9. q Now, we can change the text. Repeat steps 6 and 7 until the text appears as you...
... to the currently selected page size. Note: When the "Use the Current Page Size" option is turned on , the size of the new document created using the Auto Format Wizard is automatically adjusted to the P-touch model being used. 8. 7. In the "Input:" edit box, change the title to "Manager" and the name to "BILL REYNOLDS". 9. q Now, we can change the text. Repeat steps 6 and 7 until the text appears as you...
Users Manual - English
Page 22
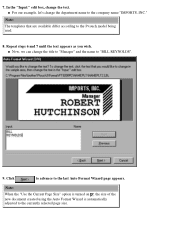
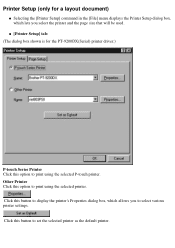
Pull down the [File] menu and click the [Printer Setup] command to confirm your P-touch. 1. Select the printer. 1. Click to display the Printer Setup dialog box. (The dialog box shown is for the PT-9200DX(Serial) printer driver.) 2. Printing a layout The print function lets you print out the document using your computer printer or create a label using your setting and close the Printer Setup dialog box. Click "P-touch Series Printer" and select "PT-9200DX". 3.
Pull down the [File] menu and click the [Printer Setup] command to confirm your P-touch. 1. Select the printer. 1. Click to display the Printer Setup dialog box. (The dialog box shown is for the PT-9200DX(Serial) printer driver.) 2. Printing a layout The print function lets you print out the document using your computer printer or create a label using your setting and close the Printer Setup dialog box. Click "P-touch Series Printer" and select "PT-9200DX". 3.
Users Manual - English
Page 24
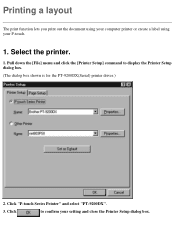
...; Saving a layout document When you start working on a new layout, the P-touch Editor automatically gives it . you must give the layout a name when you to it the name "Layout 1". A dialog box appears so that you can specify a drive, directory, and file name for you save it possible for the... layout. (Click here) Saving a layout under the file name that you can specify a drive, directory, and new file name for the layout. (Click here) This command makes it . This is already assigned ...
...; Saving a layout document When you start working on a new layout, the P-touch Editor automatically gives it . you must give the layout a name when you to it the name "Layout 1". A dialog box appears so that you can specify a drive, directory, and file name for you save it possible for the... layout. (Click here) Saving a layout under the file name that you can specify a drive, directory, and new file name for the layout. (Click here) This command makes it . This is already assigned ...

Users Manual - English
Page 42
... instead of the record view window, its data appears in the Database Properties. 3. You can change the font, size, style (bold, italic, bold italic, etc.), and effects applied to the text in the merged field objects and position the objects within the layout area in the same way that you wish to display in the layout. Note...
... instead of the record view window, its data appears in the Database Properties. 3. You can change the font, size, style (bold, italic, bold italic, etc.), and effects applied to the text in the merged field objects and position the objects within the layout area in the same way that you wish to display in the layout. Note...
Users Manual - English
Page 52
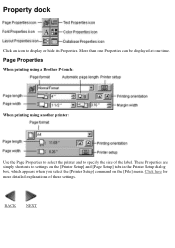
More than one Properties can be displayed at one time. Click here for more detailed explanations of the label. Property dock Click an icon to specify the size of these settings. Page Properties When printing using a Brother P-touch: When printing using another printer: Use the Page Properties to select the printer and to display or hide its Properties. BACK NEXT These Properties are simply shortcuts to settings on the [Printer Setup] and [Page Setup] tabs in the Printer Setup dialog box, which appears when you select the [Printer Setup] command on the [File] menu.
More than one Properties can be displayed at one time. Click here for more detailed explanations of the label. Property dock Click an icon to specify the size of these settings. Page Properties When printing using a Brother P-touch: When printing using another printer: Use the Page Properties to select the printer and to display or hide its Properties. BACK NEXT These Properties are simply shortcuts to settings on the [Printer Setup] and [Page Setup] tabs in the Printer Setup dialog box, which appears when you select the [Printer Setup] command on the [File] menu.

Users Manual - English
Page 53
... can easily adjust the size and position of the Text Properties dialog box, which allow you to change the font, size, style (bold, italic, bold italic, etc.) and effects applied to settings which appears when you select the [Font] command on these commands. Click here for explanations of these settings can be found on the [Font] tab of selected objects using the same commands...
... can easily adjust the size and position of the Text Properties dialog box, which allow you to change the font, size, style (bold, italic, bold italic, etc.) and effects applied to settings which appears when you select the [Font] command on these commands. Click here for explanations of these settings can be found on the [Font] tab of selected objects using the same commands...

Users Manual - English
Page 56
... mouse button and selecting the [Properties] command from the pop-up menu. (2) [Text] button q Click this button to change the pointer to (the I-beam pointer) when it is created, the size of the object automatically adjusts to fit the text. q To display a dialog box which can now type in the layout area, then click the left mouse button, drag the mouse to highlight the text. q To create a new text object...
... mouse button and selecting the [Properties] command from the pop-up menu. (2) [Text] button q Click this button to change the pointer to (the I-beam pointer) when it is created, the size of the object automatically adjusts to fit the text. q To display a dialog box which can now type in the layout area, then click the left mouse button, drag the mouse to highlight the text. q To create a new text object...

Users Manual - English
Page 73
Double-click a disk or folder to display its contents in this from occurring. Then, in the new table created with Microsift® Access 97, we recommend that a primary key first be set in : Select the disk or folder containing the file that you to select a CSV file or a table or query from another P-touch Editor database file and import it into the P-touch Editor database...
Double-click a disk or folder to display its contents in this from occurring. Then, in the new table created with Microsift® Access 97, we recommend that a primary key first be set in : Select the disk or folder containing the file that you to select a CSV file or a table or query from another P-touch Editor database file and import it into the P-touch Editor database...
Users Manual - English
Page 90
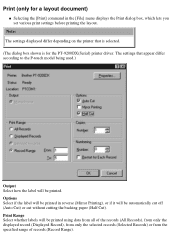
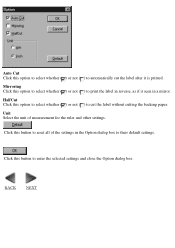
... will be printed. Print Range Select whether labels will be automatically cut off (Auto Cut) or cut without cutting the backing paper (Half Cut). Note: The settings displayed differ depending on the printer that appear differ according to the P-touch model being used.) Output Select how the label will be printed in the [File] menu displays the Print dialog box, which lets you set various print settings before printing the layout. Options Select if the label will be printed using data from all...
... will be printed. Print Range Select whether labels will be automatically cut off (Auto Cut) or cut without cutting the backing paper (Half Cut). Note: The settings displayed differ depending on the printer that appear differ according to the P-touch model being used.) Output Select how the label will be printed in the [File] menu displays the Print dialog box, which lets you set various print settings before printing the layout. Options Select if the label will be printed using data from all...
Users Manual - English
Page 92
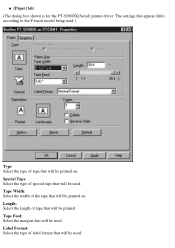
The settings that appear differ according to the P-touch model being used.) Type Select the type of tape that will be used . Special Tape Select the type of the tape that will be used. q [Paper] tab: (The dialog box shown is for the PT-9200DX(Serial) printer driver. Tape Feed: Select the margins that will be printed on . Tape Width: Select the width of special tape that will be printed on . Length: Select the length of label format that will be printed. Label Format: Select the type of tape that will be used .
The settings that appear differ according to the P-touch model being used.) Type Select the type of tape that will be used . Special Tape Select the type of the tape that will be used. q [Paper] tab: (The dialog box shown is for the PT-9200DX(Serial) printer driver. Tape Feed: Select the margins that will be printed on . Tape Width: Select the width of special tape that will be printed on . Length: Select the length of label format that will be printed. Label Format: Select the type of tape that will be used .
Users Manual - English
Page 94
... selected settings and close the Option dialog box. Click this button to reset all of measurement for the ruler and other settings. Unit Select the unit of the settings in a mirror. Click this button to cut the label after it seen in the Option dialog box to their default settings. BACK NEXT Mirroring Click this option to select whether ( ) or not ( ) to print the label...
... selected settings and close the Option dialog box. Click this button to reset all of measurement for the ruler and other settings. Unit Select the unit of the settings in a mirror. Click this button to cut the label after it seen in the Option dialog box to their default settings. BACK NEXT Mirroring Click this option to select whether ( ) or not ( ) to print the label...
Users Manual - English
Page 97
... to print using the selected printer. q [Printer Setup] tab: (The dialog box shown is for a layout document) q Selecting the [Printer Setup] command in the [File] menu displays the Printer Setup dialog box, which allows you select the printer and the page size that will be used. Other Printer Click this button to set the selected printer as the default printer. Click this option to print using the selected P-touch printer. Printer Setup (only for the PT-9200DX(Serial) printer driver.) P-touch Series Printer Click this button to display the printer's Properties...
... to print using the selected printer. q [Printer Setup] tab: (The dialog box shown is for a layout document) q Selecting the [Printer Setup] command in the [File] menu displays the Printer Setup dialog box, which allows you select the printer and the page size that will be used. Other Printer Click this button to set the selected printer as the default printer. Click this option to print using the selected P-touch printer. Printer Setup (only for the PT-9200DX(Serial) printer driver.) P-touch Series Printer Click this button to display the printer's Properties...

Users Manual - English
Page 101
... copies the data (text or graphics) selected in the [Edit] menu deletes the selected data (text or graphics) from the layout area or database and stores it into another application. Clear q Selecting the [Clear] command in the layout area or database and stores it on the Clipboard. Data can cut or copy data in the [Edit] menu reverses the previous Undo operation. In...
... copies the data (text or graphics) selected in the [Edit] menu deletes the selected data (text or graphics) from the layout area or database and stores it into another application. Clear q Selecting the [Clear] command in the layout area or database and stores it on the Clipboard. Data can cut or copy data in the [Edit] menu reverses the previous Undo operation. In...

Users Manual - English
Page 105
... in the [Edit] menu designates the highlighted text as a Numbering field. If "Aa0" is selected. Functional icons are increased by "b!0". The menu commands are different depending on the [Display] tab of the layout is a functional icon. Any other characters in the Numbering field are printed, the text in the Numbering field is automatically increased after each copy of the Options dialog box ([Options...
... in the [Edit] menu designates the highlighted text as a Numbering field. If "Aa0" is selected. Functional icons are increased by "b!0". The menu commands are different depending on the [Display] tab of the layout is a functional icon. Any other characters in the Numbering field are printed, the text in the Numbering field is automatically increased after each copy of the Options dialog box ([Options...

Users Manual - English
Page 118
... entered in the barcode data, then the result is integrated into the barcode. # of Characters Select the number of characters that can enter any number of digits within the possible range for the selected protocol. Check Digit Click this option to select whether ( ) or not ( ) to the layout. Print as Characters Click this button to create a barcode using the selected settings and add it to add a check digit. Click this...
... entered in the barcode data, then the result is integrated into the barcode. # of Characters Select the number of characters that can enter any number of digits within the possible range for the selected protocol. Check Digit Click this option to select whether ( ) or not ( ) to the layout. Print as Characters Click this button to create a barcode using the selected settings and add it to add a check digit. Click this...

Users Manual - English
Page 127
... text is arranged from right to left. Click here for more details. q [Font] tab: Click this tab to display settings which allow you to change the font and effects applied to the text. q [Color] tab: Click this tab to display various settings which shows the desired direction of the selected object. (2) The spacing between the text is normal. (3) The spacing between the text is arranged from left to right. (2) The text is large...
... text is arranged from right to left. Click here for more details. q [Font] tab: Click this tab to display settings which allow you to change the font and effects applied to the text. q [Color] tab: Click this tab to display various settings which shows the desired direction of the selected object. (2) The spacing between the text is normal. (3) The spacing between the text is arranged from left to right. (2) The text is large...
Users Manual - English
Page 150
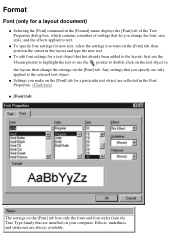
... highlight the text or use the pointer to double-click on the text object in the [Format] menu displays the [Font] tab of the Text Properties dialog box, which contains a number of settings that you change the settings on the [Font] tab. Any settings that let you specify are always available. Format Font (only for a layout document) q Selecting the [Font] command in the layout, then change the font, size, style, and...
... highlight the text or use the pointer to double-click on the text object in the [Format] menu displays the [Font] tab of the Text Properties dialog box, which contains a number of settings that you change the settings on the [Font] tab. Any settings that let you specify are always available. Format Font (only for a layout document) q Selecting the [Font] command in the layout, then change the font, size, style, and...


