
Users Manual - English and Spanish
Page 7
GETTING STARTED 12 Unpacking Your P-touch labeler 12 General Description...13 LCD Display & Keyboard 14 LCD Display ...14 Key Names and Functions 15 Power Supply ...17 Battery...17 AC Adapter ...18 Inserting a Tape Cassette 19 Turning Power On/Off 21 Feeding Tape ...22 Feed & Cut...22 Feed Only ...22 LCD Display ...23 LCD Contrast...
GETTING STARTED 12 Unpacking Your P-touch labeler 12 General Description...13 LCD Display & Keyboard 14 LCD Display ...14 Key Names and Functions 15 Power Supply ...17 Battery...17 AC Adapter ...18 Inserting a Tape Cassette 19 Turning Power On/Off 21 Feeding Tape ...22 Feed & Cut...22 Feed Only ...22 LCD Display ...23 LCD Contrast...

Users Manual - English and Spanish
Page 8
...Label Preview...49 Printing a Label ...49 Printing a Single Copy 50 Printing Multiple Copies 50 Auto-numbering Labels 51 Mirror Printing ...52 Tape Cutting Options 53 Adjusting the Label Length 55 Attaching Labels...55 5. USING THE FILE MEMORY 56 Storing a Label into Memory 56 ...Options 36 Using Auto-Format Layouts 37 Using Templates - MAINTAINING YOUR P-touch Labeler 60 Resetting the P-touch Labeler 60 Maintenance...60 Cleaning the exterior of the P-touch labeler 60 Cleaning the Print Head 60 Cleaning the Tape Cutter 61 2 Example creating an Asset Tag 37 Using Block Layouts...
...Label Preview...49 Printing a Label ...49 Printing a Single Copy 50 Printing Multiple Copies 50 Auto-numbering Labels 51 Mirror Printing ...52 Tape Cutting Options 53 Adjusting the Label Length 55 Attaching Labels...55 5. USING THE FILE MEMORY 56 Storing a Label into Memory 56 ...Options 36 Using Auto-Format Layouts 37 Using Templates - MAINTAINING YOUR P-touch Labeler 60 Resetting the P-touch Labeler 60 Maintenance...60 Cleaning the exterior of the P-touch labeler 60 Cleaning the Print Head 60 Cleaning the Tape Cutter 61 2 Example creating an Asset Tag 37 Using Block Layouts...

Users Manual - English and Spanish
Page 10
...before printing prevents wasting tape on . P. 49 You can check the layout of editing functions. Set a tape cassette. What You Can Do „ Create a label with the P-touch labeler 1 Prepare the P-touch labeler. "Preview function" 4 What You Can Do Your new P-touch labeler is an ... software features advanced label formatting, block formats, bar codes and auto-numbering functions. Print the label you for purchasing the P-touch labeler PT-2100/2110. INTRODUCTION Thank you have created. Install the batteries and/or connect the AC adapter. P. 17 P. 19 P. 21 2...
...before printing prevents wasting tape on . P. 49 You can check the layout of editing functions. Set a tape cassette. What You Can Do „ Create a label with the P-touch labeler 1 Prepare the P-touch labeler. "Preview function" 4 What You Can Do Your new P-touch labeler is an ... software features advanced label formatting, block formats, bar codes and auto-numbering functions. Print the label you for purchasing the P-touch labeler PT-2100/2110. INTRODUCTION Thank you have created. Install the batteries and/or connect the AC adapter. P. 17 P. 19 P. 21 2...

Users Manual - English and Spanish
Page 15
... the P-touch on the location, material, and environmental conditions, the label may 5 unpeel or become irremovable, the color of the label may change or be transferred to use old and new batteries Do not set the positive and negative together. z INTRODUCTION CAUTION Tape Cutter Follow these ...guidelines to avoid liquid leakage, heat, rupture of the battery. Do not touch the blade of the P-touch. end in the memory...
... the P-touch on the location, material, and environmental conditions, the label may 5 unpeel or become irremovable, the color of the label may change or be transferred to use old and new batteries Do not set the positive and negative together. z INTRODUCTION CAUTION Tape Cutter Follow these ...guidelines to avoid liquid leakage, heat, rupture of the battery. Do not touch the blade of the P-touch. end in the memory...

Users Manual - English and Spanish
Page 16
... result in damage or : This symbol indicates information and use the P-touch labeler more than one PC. • We strongly recommend that may result in accidents or damage the machine. • Use only Brother TZ tapes with alcohol or other hot appliances, in any purpose not described in ... reference. Doing so may help you read this User's Guide carefully before using an empty tape cassette or without a tape cassette set in the P-touch labeler. Do not use with the purchase of PT-2100.) Should another USB cable need to be used throughout this machine. Doing so will ...
... result in damage or : This symbol indicates information and use the P-touch labeler more than one PC. • We strongly recommend that may result in accidents or damage the machine. • Use only Brother TZ tapes with alcohol or other hot appliances, in any purpose not described in ... reference. Doing so may help you read this User's Guide carefully before using an empty tape cassette or without a tape cassette set in the P-touch labeler. Do not use with the purchase of PT-2100.) Should another USB cable need to be used throughout this machine. Doing so will ...

Users Manual - English and Spanish
Page 17
... looking for your task below and then go to the page indicated. Entering text/symbols/accent characters P. 25 To change the cutting and margin settings Tape cutting options P. 53 1 ABC 2 3 4 5 To save a label layout... 6 7 File memory function 8 P. 56 9 Quick Index 11 Auto-Format function P. 37 1 2 3 To print multiple copies (with autonumbering...
... looking for your task below and then go to the page indicated. Entering text/symbols/accent characters P. 25 To change the cutting and margin settings Tape cutting options P. 53 1 ABC 2 3 4 5 To save a label layout... 6 7 File memory function 8 P. 56 9 Quick Index 11 Auto-Format function P. 37 1 2 3 To print multiple copies (with autonumbering...

Users Manual - English and Spanish
Page 18
GETTING STARTED Unpacking Your P-touch labeler Check that the package contains the following before using your P-touch labeler. P-touch labeler PT-2100 TZ tape cassette (Starter Cassette) CD-ROM (Drivers, Labeling Editing Software packages) USB cable (USB cable not included with the purchase of PT-2100.) AD-24 User's Guide Software Installation Guide 12 Unpacking Your P-touch labeler
GETTING STARTED Unpacking Your P-touch labeler Check that the package contains the following before using your P-touch labeler. P-touch labeler PT-2100 TZ tape cassette (Starter Cassette) CD-ROM (Drivers, Labeling Editing Software packages) USB cable (USB cable not included with the purchase of PT-2100.) AD-24 User's Guide Software Installation Guide 12 Unpacking Your P-touch labeler

Users Manual - English and Spanish
Page 19
AC adapter connector Battery compartment cover USB port 1 2 3 4 Battery case 5 6 7 8 9 13 General Description Remove this sheet before using the P-touch. z GETTING STARTED General Description Tape viewer Tape compartment cover Tape cassette compartment Tape exit slot LCD display Keyboard Tape cutter Print head Release lever When shipped from the factory, the Tape compartment cover and the LCD display are covered with a protective sheet to prevent damage.
AC adapter connector Battery compartment cover USB port 1 2 3 4 Battery case 5 6 7 8 9 13 General Description Remove this sheet before using the P-touch. z GETTING STARTED General Description Tape viewer Tape compartment cover Tape cassette compartment Tape exit slot LCD display Keyboard Tape cutter Print head Release lever When shipped from the factory, the Tape compartment cover and the LCD display are covered with a protective sheet to prevent damage.

Users Manual - English and Spanish
Page 20
... the end of a line of the label with the text entered presently in the machine. 10.Cursor selection Indicates that the Caps mode is pressed. 3. Tape length Indicates the approximate length of text. 4. New characters are entered to the left of the cursor, and the character to select the items on...
... the end of a line of the label with the text entered presently in the machine. 10.Cursor selection Indicates that the Caps mode is pressed. 3. Tape length Indicates the approximate length of text. 4. New characters are entered to the left of the cursor, and the character to select the items on...

Users Manual - English and Spanish
Page 21
...setting label attributes in combination with the key. 1 characters, entering symbols or 6. : 2 accented characters, and when setting • Displays a preview of blank tape and 3 3. : then automatically cuts the tape when Selects the option displayed when used in the function 7. : menus, or when entering symbols or Opens the File menu, where you can... z GETTING STARTED Key Names and Functions 7 8 9 10 11 1 5 2 4 6 3 12 17 13 18 14 15 15 16 19 20 21 22 1. (Power): 5. : Turns the P-touch labeler on and off. • Prints the current label design onto the...
...setting label attributes in combination with the key. 1 characters, entering symbols or 6. : 2 accented characters, and when setting • Displays a preview of blank tape and 3 3. : then automatically cuts the tape when Selects the option displayed when used in the function 7. : menus, or when entering symbols or Opens the File menu, where you can... z GETTING STARTED Key Names and Functions 7 8 9 10 11 1 5 2 4 6 3 12 17 13 18 14 15 15 16 19 20 21 22 1. (Power): 5. : Turns the P-touch labeler on and off. • Prints the current label design onto the...

Users Manual - English and Spanish
Page 25
... that the end of the tape is not bent and that the P-touch labeler is powered off, then lift open the tape compartment cover. If the tape is not passed through, pass it by lifting the tape cassette straight up. 3 4 5 6 7 8 9 19 Inserting a Tape Cassette z GETTING STARTED Inserting a Tape Cassette This P-touch labeler accepts tape cassettes of 9/64", 1/4", 3/8", 1/2" or 3/4" (3.5mm...
... that the end of the tape is not bent and that the P-touch labeler is powered off, then lift open the tape compartment cover. If the tape is not passed through, pass it by lifting the tape cassette straight up. 3 4 5 6 7 8 9 19 Inserting a Tape Cassette z GETTING STARTED Inserting a Tape Cassette This P-touch labeler accepts tape cassettes of 9/64", 1/4", 3/8", 1/2" or 3/4" (3.5mm...
Users Manual - English and Spanish
Page 26
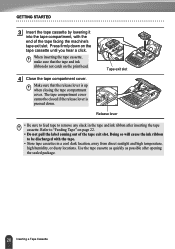
...sunlight and high temperature, high humidity, or dusty locations. Release lever • Be sure to feed tape to "Feeding Tape" on the tape cassette until you hear a click. When inserting the tape cassette, make sure that the release lever is pressed down on page 22. • Do not pull... the label coming out of the tape facing the machine's tape exit slot. GETTING STARTED 3 Insert the tape cassette by lowering it into the tape compartment, with the tape. • Store tape cassettes in the tape and ink ribbon after opening the sealed package. 20 Inserting...
...sunlight and high temperature, high humidity, or dusty locations. Release lever • Be sure to feed tape to "Feeding Tape" on the tape cassette until you hear a click. When inserting the tape cassette, make sure that the release lever is pressed down on page 22. • Do not pull... the label coming out of the tape facing the machine's tape exit slot. GETTING STARTED 3 Insert the tape cassette by lowering it into the tape compartment, with the tape. • Store tape cassettes in the tape and ink ribbon after opening the sealed package. 20 Inserting...

Users Manual - English and Spanish
Page 28
... "Feed & Cut" option and then press either or . Please Wait" appears while the tape is fed, and then the tape is cut using Fabric and Extra Strength Adhesive tapes, which should be cut . Please Wait" appears while the tape is recommended when using scissors. 1 Hold down the key and press the key. To... exit or cancel this function press . 22 Feeding Tape will appear on the LCD display. 2 Using the or select the "Feed Only" option and then press either or . "Feed & Cut?" "Feed & Cut?" To ...
... "Feed & Cut" option and then press either or . Please Wait" appears while the tape is fed, and then the tape is cut using Fabric and Extra Strength Adhesive tapes, which should be cut . Please Wait" appears while the tape is recommended when using scissors. 1 Hold down the key and press the key. To... exit or cancel this function press . 22 Feeding Tape will appear on the LCD display. 2 Using the or select the "Feed Only" option and then press either or . "Feed & Cut?" "Feed & Cut?" To ...

Users Manual - English and Spanish
Page 31
... hold down the key and then press the desired key. • To enter uppercase letters continuously, press the key to the right of your P-touch labeler is a maximum number of lines of text that can be entered in one of the symbols on page 31. A mark will appear at the...To end the current line of text and start of the new block. 3 A maximum of 5 blocks can be entered for 3/4" (18mm) tape, 3 lines for 1/2" (12mm) tape, 2 lines for 3/8" (9mm) and 1/4" (6 mm) tape, and 1 line for each line, refer to the start a new line, press the key. A maximum of 5 lines can be entered ...
... hold down the key and then press the desired key. • To enter uppercase letters continuously, press the key to the right of your P-touch labeler is a maximum number of lines of text that can be entered in one of the symbols on page 31. A mark will appear at the...To end the current line of text and start of the new block. 3 A maximum of 5 blocks can be entered for 3/4" (18mm) tape, 3 lines for 1/2" (12mm) tape, 2 lines for 3/8" (9mm) and 1/4" (6 mm) tape, and 1 line for each line, refer to the start a new line, press the key. A maximum of 5 lines can be entered ...
Users Manual - English and Spanish
Page 38
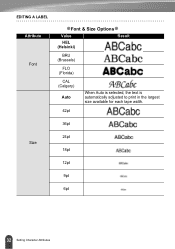
EDITING A LABEL Attribute Font zFont & Size Optionsz Value Result HEL (Helsinki) BRU (Brussels) FLO (Florida) CAL (Calgary) Auto When Auto is selected, the text is automatically adjusted to print in the largest size available for each tape width. 42pt 36pt 24pt Size 18pt 12pt 9pt 6pt 32 Setting Character Attributes
EDITING A LABEL Attribute Font zFont & Size Optionsz Value Result HEL (Helsinki) BRU (Brussels) FLO (Florida) CAL (Calgary) Auto When Auto is selected, the text is automatically adjusted to print in the largest size available for each tape width. 42pt 36pt 24pt Size 18pt 12pt 9pt 6pt 32 Setting Character Attributes

Users Manual - English and Spanish
Page 41
... key to set the selected attribute to the default value. • Refer to the Setting Options table for that attribute using the key. Refer to "Tape Cutting Options" on page 55 3 Press the or key to "Adjusting the Label Length" on page 53 and 54.) 1 Press the key. The current settings...
... key to set the selected attribute to the default value. • Refer to the Setting Options table for that attribute using the key. Refer to "Tape Cutting Options" on page 55 3 Press the or key to "Adjusting the Label Length" on page 53 and 54.) 1 Press the key. The current settings...

Users Manual - English and Spanish
Page 45
... the print menu displayed hold down the key and press the key to display the Print Options menu. • If the width of the current tape cassette does not match the set width for a list of available templates. • The "Clear All Text?" message is displayed when the key is displayed... page 40 for the selected layout, an error message is pressed. Press the key or any other key to clear the error message, and insert a tape cassette of the correct width. • If the number of characters entered exceeds the limit, an error message is displayed when the or key is...
... the print menu displayed hold down the key and press the key to display the Print Options menu. • If the width of the current tape cassette does not match the set width for a list of available templates. • The "Clear All Text?" message is displayed when the key is displayed... page 40 for the selected layout, an error message is pressed. Press the key or any other key to clear the error message, and insert a tape cassette of the correct width. • If the number of characters entered exceeds the limit, an error message is displayed when the or key is...

Users Manual - English and Spanish
Page 47
... has changed , the last block 2 layout selected is displayed. When the tape width has not changed , the default layout for the new tape width is 3 displayed. 4 4 Select a block layout using the or keys. 1 3 Press the or key. z EDITING A LABEL Attribute Value Details CD Case Spine 1 (1/4" x 4.4" ...to display the Auto-Format screen, and then select "Block Layouts" using the or keys. 2 Press the or key to display the Tape Width screen, and then select a tape width using the or keys. 5 6 5 Press the or key. 7 The Style screen is displayed. 8 9 41 Using Auto-Format Layouts...
... has changed , the last block 2 layout selected is displayed. When the tape width has not changed , the default layout for the new tape width is 3 displayed. 4 4 Select a block layout using the or keys. 1 3 Press the or key. z EDITING A LABEL Attribute Value Details CD Case Spine 1 (1/4" x 4.4" ...to display the Auto-Format screen, and then select "Block Layouts" using the or keys. 2 Press the or key to display the Tape Width screen, and then select a tape width using the or keys. 5 6 5 Press the or key. 7 The Style screen is displayed. 8 9 41 Using Auto-Format Layouts...

Users Manual - English and Spanish
Page 48
... the print menu displayed hold down the key and press the key to display the Print Options menu. • If the width of the current tape cassette does not match the set width for that attribute using the or keys. Press the key to set the selected attribute to use a different... when the key is displayed. Press the key or any other key to clear the error message, and insert a tape cassette of the correct width. • If the number of the current Tape Cutting Option setting (refer to page 53). 42 Using Auto-Format Layouts Caps mode can be used when entering...
... the print menu displayed hold down the key and press the key to display the Print Options menu. • If the width of the current tape cassette does not match the set width for that attribute using the or keys. Press the key to set the selected attribute to use a different... when the key is displayed. Press the key or any other key to clear the error message, and insert a tape cassette of the correct width. • If the number of the current Tape Cutting Option setting (refer to page 53). 42 Using Auto-Format Layouts Caps mode can be used when entering...
Users Manual - English and Spanish
Page 49
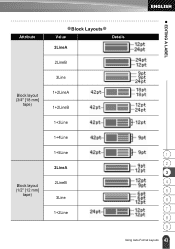
Attribute Block layout (3/4" [18 mm] tape) Block layout (1/2" [12 mm] tape) zBlock Layoutsz Value Details 2LineA 2LineB 3Line 1+2LineA 1+2LineB 1+3Line 1+4Line 1+5Line 2LineA 2LineB 3Line 1+2Line 1 2 3 4 5 6 7 8 9 43 Using Auto-Format Layouts z EDITING A LABEL
Attribute Block layout (3/4" [18 mm] tape) Block layout (1/2" [12 mm] tape) zBlock Layoutsz Value Details 2LineA 2LineB 3Line 1+2LineA 1+2LineB 1+3Line 1+4Line 1+5Line 2LineA 2LineB 3Line 1+2Line 1 2 3 4 5 6 7 8 9 43 Using Auto-Format Layouts z EDITING A LABEL


