
Users Manual - English and Spanish
Page 2
...this document are trademarks or registered trademarks of tape colors allow you to print personalized labels, useful for purchasing the P-touch 1950/1960! If this User's Guide, we suggest ...determined by choosing from a variety of Conformity (For USA Only) Responsible Party : Brother International Corporation 100 Somerset Corporate Boulevard Bridgewater, NJ 08807-0911 USA TEL : (908) ...received,including interference that the product Product Name Model Number : Brother P-touch Electronic Labeling System : PT-1950/1960 complies with Part 15 of other software or products used ...
...this document are trademarks or registered trademarks of tape colors allow you to print personalized labels, useful for purchasing the P-touch 1950/1960! If this User's Guide, we suggest ...determined by choosing from a variety of Conformity (For USA Only) Responsible Party : Brother International Corporation 100 Somerset Corporate Boulevard Bridgewater, NJ 08807-0911 USA TEL : (908) ...received,including interference that the product Product Name Model Number : Brother P-touch Electronic Labeling System : PT-1950/1960 complies with Part 15 of other software or products used ...
Users Manual - English and Spanish
Page 6
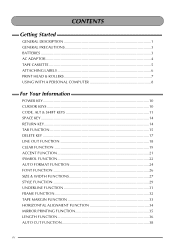
CONTENTS Getting Started GENERAL DESCRIPTION 1 GENERAL PRECAUTIONS 3 BATTERIES ...3 AC ADAPTOR ...4 TAPE CASSETTE 5 ATTACHING LABELS 6 PRINT HEAD & ROLLERS 7 USING WITH A PERSONAL COMPUTER 8 For Your Information POWER KEY...10 CURSOR KEYS 10 CODE, ALT & SHIFT KEYS 11 SPACE ... FUNCTION 21 SYMBOL FUNCTION 22 AUTO FORMAT FUNCTION 24 FONT FUNCTION 26 SIZE & WIDTH FUNCTIONS 27 STYLE FUNCTION 29 UNDERLINE FUNCTION 31 FRAME FUNCTION 32 TAPE MARGIN FUNCTION 33 HORIZONTAL ALIGNMENT FUNCTION 34 MIRROR PRINTING FUNCTION 35 LENGTH FUNCTION 36 AUTO CUT FUNCTION 38 iv
CONTENTS Getting Started GENERAL DESCRIPTION 1 GENERAL PRECAUTIONS 3 BATTERIES ...3 AC ADAPTOR ...4 TAPE CASSETTE 5 ATTACHING LABELS 6 PRINT HEAD & ROLLERS 7 USING WITH A PERSONAL COMPUTER 8 For Your Information POWER KEY...10 CURSOR KEYS 10 CODE, ALT & SHIFT KEYS 11 SPACE ... FUNCTION 21 SYMBOL FUNCTION 22 AUTO FORMAT FUNCTION 24 FONT FUNCTION 26 SIZE & WIDTH FUNCTIONS 27 STYLE FUNCTION 29 UNDERLINE FUNCTION 31 FRAME FUNCTION 32 TAPE MARGIN FUNCTION 33 HORIZONTAL ALIGNMENT FUNCTION 34 MIRROR PRINTING FUNCTION 35 LENGTH FUNCTION 36 AUTO CUT FUNCTION 38 iv

Users Manual - English and Spanish
Page 9
Getting Started TOP VIEW GENERAL DESCRIPTION Tape compartment cover Keyboard AC adaptor connector USB port LCD display BOTTOM VIEW Tape exit slot Battery compartment cover 1
Getting Started TOP VIEW GENERAL DESCRIPTION Tape compartment cover Keyboard AC adaptor connector USB port LCD display BOTTOM VIEW Tape exit slot Battery compartment cover 1

Users Manual - English and Spanish
Page 11
...P-touch. Doing so may damage the tape cassette. Do not try to avoid damage. BATTERIES This portable machine can delete all six at the same time. Use a soft, dry cloth only. To change the batteries, always replace all text files in the back of time. Use only Brother TZ tapes ...with the AC adaptor). 3 Do not use tapes that their positive and negative poles pointing in the display and any rubber or vinyl on the...
...P-touch. Doing so may damage the tape cassette. Do not try to avoid damage. BATTERIES This portable machine can delete all six at the same time. Use a soft, dry cloth only. To change the batteries, always replace all text files in the back of time. Use only Brother TZ tapes ...with the AC adaptor). 3 Do not use tapes that their positive and negative poles pointing in the display and any rubber or vinyl on the...
Users Manual - English and Spanish
Page 13
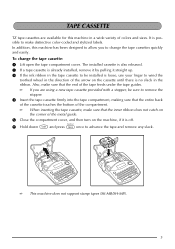
... on the machine, if it straight up. 3 If the ink ribbon in the tape cassette to be sure to remove the stopper. 4 Insert the tape cassette firmly into the tape compartment, making sure that the entire back of the cassette touches the bottom of the arrow on the cassette until there is no slack... in the ribbon. Also, make distinctive color-coded and stylized labels. When inserting the tape cassette, make sure that the end of the metal guide. 5 Close the compartment cover...
... on the machine, if it straight up. 3 If the ink ribbon in the tape cassette to be sure to remove the stopper. 4 Insert the tape cassette firmly into the tape compartment, making sure that the entire back of the cassette touches the bottom of the arrow on the cassette until there is no slack... in the ribbon. Also, make distinctive color-coded and stylized labels. When inserting the tape cassette, make sure that the end of the metal guide. 5 Close the compartment cover...
Users Manual - English and Spanish
Page 14
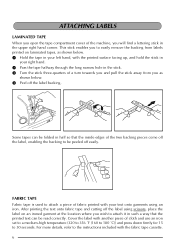
... the printed surface facing up, and hold the stick in your right hand. 2 Pass the tape halfway through the long narrow hole in the stick. 3 Turn the stick three-quarters of a... the printed text can be folded in the upper right hand corner. After printing the text onto fabric tape and cutting off the label using an iron. Cover the label with another piece of cloth and use...and press down firmly for 15 to easily remove the backing from labels printed on laminated tapes, as shown below . 1 Hold the tape in your text onto garments using scissors, place the label on an ironed garment at ...
... the printed surface facing up, and hold the stick in your right hand. 2 Pass the tape halfway through the long narrow hole in the stick. 3 Turn the stick three-quarters of a... the printed text can be folded in the upper right hand corner. After printing the text onto fabric tape and cutting off the label using an iron. Cover the label with another piece of cloth and use...and press down firmly for 15 to easily remove the backing from labels printed on laminated tapes, as shown below . 1 Hold the tape in your text onto garments using scissors, place the label on an ironed garment at ...
Users Manual - English and Spanish
Page 15
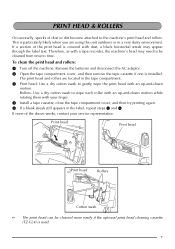
... Cotton swab The print head can be cleaned from time to time. Remove the batteries and disconnect the AC adaptor. 2 Open the tape compartment cover, and then remove the tape cassette if one is used. 7 To clean the print head and rollers: 1 Turn off the machine. If none of dust or ...dirt become attached to be cleaned more easily if the optional print head cleaning cassette (TZ-CL4) is installed. This is covered with a tape recorder, the machine's head may appear through the label text. If a section of the print head is particularly likely when you are located in the...
... Cotton swab The print head can be cleaned from time to time. Remove the batteries and disconnect the AC adaptor. 2 Open the tape compartment cover, and then remove the tape cassette if one is used. 7 To clean the print head and rollers: 1 Turn off the machine. If none of dust or ...dirt become attached to be cleaned more easily if the optional print head cleaning cassette (TZ-CL4) is installed. This is covered with a tape recorder, the machine's head may appear through the label text. If a section of the print head is particularly likely when you are located in the...
Users Manual - English and Spanish
Page 17
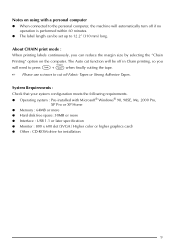
... following requirements. Notes on the computer. About CHAIN print mode : When printing labels continuously, you will be set up to press c + _ when finally cutting the tape. Operating system : Pre-installed with a personal computer When connected to cut function will need to 12.2" (310 mm) long. The Auto cut off in Chain...;cation Monitor : 800 x 600 dot (SVGA / Higher color or higher graphics card) Other : CD-ROM drive for installation 9 The label length can be off Fabric Tapes or Strong Adhesive...
... following requirements. Notes on the computer. About CHAIN print mode : When printing labels continuously, you will be set up to press c + _ when finally cutting the tape. Operating system : Pre-installed with a personal computer When connected to cut function will need to 12.2" (310 mm) long. The Auto cut off in Chain...;cation Monitor : 800 x 600 dot (SVGA / Higher color or higher graphics card) Other : CD-ROM drive for installation 9 The label length can be off Fabric Tapes or Strong Adhesive...

Users Manual - English and Spanish
Page 23
... you have the same length and are measured from either the beginning of the line or the previous tab, if there is like answering "yes". Tape widths 1/4" (6 mm) 3/8" (9 mm) 1/2" (12 mm) 3/4" (18 mm) Maximum number of lines that you to confirm a command may appear on page 17. To add a new line...
... you have the same length and are measured from either the beginning of the line or the previous tab, if there is like answering "yes". Tape widths 1/4" (6 mm) 3/8" (9 mm) 1/2" (12 mm) 3/4" (18 mm) Maximum number of lines that you to confirm a command may appear on page 17. To add a new line...

Users Manual - English and Spanish
Page 27
... text, the Clear function can be used to choose whether all of the text and return all format functions (Font, Size, Width, Style, Underline, Frame, Tape margin, Alignment, Tab length, Mirror printing, and Length) are returned to their default settings: 1 Hold down c and press *. 2 Press h until TXT&FORMAT is selected (flashing...
... text, the Clear function can be used to choose whether all of the text and return all format functions (Font, Size, Width, Style, Underline, Frame, Tape margin, Alignment, Tab length, Mirror printing, and Length) are returned to their default settings: 1 Hold down c and press *. 2 Press h until TXT&FORMAT is selected (flashing...

Users Manual - English and Spanish
Page 32
... a variety of preset formats perfect for your specific need. The following preset formats are available: Auto Format Setting DEFAULT 3.5" FLOPPY Label Length Setting OFF 2.8" (7.0 cm) Tape Margin Setting FULL NARROW Horizontal Alignment Setting LEFT CENTER miniDV VHS SPINE VHS 1.7" (4.3 cm) 5.5" (14.0 cm) 3.0" (7.7 cm) NARROW NARROW NARROW CENTER CENTER CENTER VCR8mm CASE...
... a variety of preset formats perfect for your specific need. The following preset formats are available: Auto Format Setting DEFAULT 3.5" FLOPPY Label Length Setting OFF 2.8" (7.0 cm) Tape Margin Setting FULL NARROW Horizontal Alignment Setting LEFT CENTER miniDV VHS SPINE VHS 1.7" (4.3 cm) 5.5" (14.0 cm) 3.0" (7.7 cm) NARROW NARROW NARROW CENTER CENTER CENTER VCR8mm CASE...

Users Manual - English and Spanish
Page 35
... sentence also containing lowercase letters (i.e., 29 points for 1/2" (12-mm) wide tape and 52 points for 3/4" (18-mm) wide tape). With the AUTO setting selected and 1/2" (12-mm) or 3/4" (18-mm) wide tape installed, text consisting of just one line of only uppercase letters (and no accented... characters to the largest possible size. However, seven other point sizes are also available, and each can be printed with each tape width. The currently selected size setting is OFF. Tape Widths 1/4" (6 mm) 3/8" (9 mm) 1/2" (12 mm) 3/4" (18 mm) Sizes (in points) Width Setting Off Width Setting On...
... sentence also containing lowercase letters (i.e., 29 points for 1/2" (12-mm) wide tape and 52 points for 3/4" (18-mm) wide tape). With the AUTO setting selected and 1/2" (12-mm) or 3/4" (18-mm) wide tape installed, text consisting of just one line of only uppercase letters (and no accented... characters to the largest possible size. However, seven other point sizes are also available, and each can be printed with each tape width. The currently selected size setting is OFF. Tape Widths 1/4" (6 mm) 3/8" (9 mm) 1/2" (12 mm) 3/4" (18 mm) Sizes (in points) Width Setting Off Width Setting On...
Users Manual - English and Spanish
Page 41
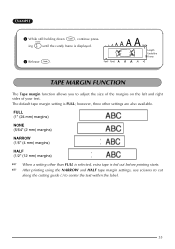
... (4 mm) margins) HALF (1/2" (12 mm) margins) When a setting other settings are also available. The default tape margin setting is fed out before printing starts. After printing using the NARROW and HALF tape margin settings, use scissors to cut along the cutting guide (:) to adjust the size of the margins on... the left and right sides of your text. TAPE MARGIN FUNCTION The Tape margin function allows you to center the text within the label. 33 EXAMPLE 2 While still holding down c, continue pressing 6 until the ...
... (4 mm) margins) HALF (1/2" (12 mm) margins) When a setting other settings are also available. The default tape margin setting is fed out before printing starts. After printing using the NARROW and HALF tape margin settings, use scissors to cut along the cutting guide (:) to adjust the size of the margins on... the left and right sides of your text. TAPE MARGIN FUNCTION The Tape margin function allows you to center the text within the label. 33 EXAMPLE 2 While still holding down c, continue pressing 6 until the ...

Users Manual - English and Spanish
Page 42
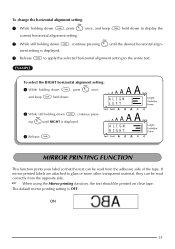
... the length of three ways. In addition, if the Length function was used to display the current tape margin setting. 2 While still holding down c, continue pressing E until HALF is displayed. 3 Release c. To change the tape margin setting: 1 While holding down c, press E once, and keep c held down to set...within the label according to the entire text. ting is LEFT; The default setting is displayed. 3 Release c to apply the selected tape margin setting to the selected horizontal alignment setting. LEFT RIGHT CENTER 34 however, two other settings are also available.
... the length of three ways. In addition, if the Length function was used to display the current tape margin setting. 2 While still holding down c, continue pressing E until HALF is displayed. 3 Release c. To change the tape margin setting: 1 While holding down c, press E once, and keep c held down to set...within the label according to the entire text. ting is LEFT; The default setting is displayed. 3 Release c to apply the selected tape margin setting to the selected horizontal alignment setting. LEFT RIGHT CENTER 34 however, two other settings are also available.
Users Manual - English and Spanish
Page 43
...be read from the opposite side. When using the Mirror printing function, the text should be read correctly from the adhesive side of the tape. ment setting is OFF. ALIGN LEFT 2 While still holding down c, continue pressing R until the desired horizontal align- If mirror-printed... labels are attached to glass or some other transparent material, they can be printed on clear tape. ON 35 To change the horizontal alignment setting: 1 While holding down c, press R once, and keep c held down to display the current...
...be read from the opposite side. When using the Mirror printing function, the text should be read correctly from the adhesive side of the tape. ment setting is OFF. ALIGN LEFT 2 While still holding down c, continue pressing R until the desired horizontal align- If mirror-printed... labels are attached to glass or some other transparent material, they can be printed on clear tape. ON 35 To change the horizontal alignment setting: 1 While holding down c, press R once, and keep c held down to display the current...
Users Manual - English and Spanish
Page 46
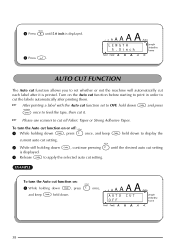
.... 2 While still holding down c, press Z once, and keep c held down c, continue pressing Z until 5.0 inch is displayed. 3 Release c to feed the tape, then cut function on or off Fabric Tapes or Strong Adhesive Tapes. Turn on : 1 While holding down . After printing a label with the Auto cut function set whether or not the machine will...
.... 2 While still holding down c, press Z once, and keep c held down c, continue pressing Z until 5.0 inch is displayed. 3 Release c to feed the tape, then cut function on or off Fabric Tapes or Strong Adhesive Tapes. Turn on : 1 While holding down . After printing a label with the Auto cut function set whether or not the machine will...
Users Manual - English and Spanish
Page 47
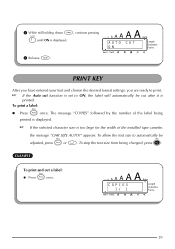
... selected character size is too large for the width of the label being changed, press *. The message "COPIES" followed by the number of the installed tape cassette, the message "CHR SIZE AUTO?" appears. To allow the text size to ON, the label will automatically be cut after it is set to...
... selected character size is too large for the width of the label being changed, press *. The message "COPIES" followed by the number of the installed tape cassette, the message "CHR SIZE AUTO?" appears. To allow the text size to ON, the label will automatically be cut after it is set to...
Users Manual - English and Spanish
Page 48
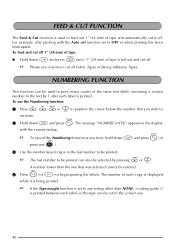
... to any time, hold down c and press O (or press just * ). 3 Use the number keys to type in the text by pressing h or e. If the Tape margin function is set to OFF or when printing has been interrupted. To feed and cut off . Please use the Numbering function: 1 Press f, w, h or e to... position the cursor below the number that was selected cannot be used to feed out 1" (24 mm) of tape and automatically cut it is being printed. To cancel the Numbering function at any setting other than the one that you wish to increase. 2 Hold...
... to any time, hold down c and press O (or press just * ). 3 Use the number keys to type in the text by pressing h or e. If the Tape margin function is set to OFF or when printing has been interrupted. To feed and cut off . Please use the Numbering function: 1 Press f, w, h or e to... position the cursor below the number that was selected cannot be used to feed out 1" (24 mm) of tape and automatically cut it is being printed. To cancel the Numbering function at any setting other than the one that you wish to increase. 2 Hold...
Users Manual - English and Spanish
Page 49
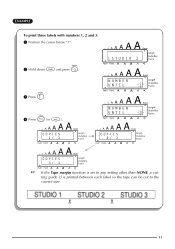
COPIES 1/ 3 1: S T U D I O _1 NUMBER UNTIL 1 NUMBER UNTIL 3 COPIES 2/ 3 COPIES 3/ 3 If the Tape margin function is set to any setting other than NONE, a cutting guide (:) is printed between each label so the tape can be cut to the correct size. ✂ ✂ 41 EXAMPLE To print three labels with numbers 1, 2 and 3: 1 Position the cursor below "1". 2 Hold down c and press O. 3 Press 3. 4 Press p (or r ).
COPIES 1/ 3 1: S T U D I O _1 NUMBER UNTIL 1 NUMBER UNTIL 3 COPIES 2/ 3 COPIES 3/ 3 If the Tape margin function is set to any setting other than NONE, a cutting guide (:) is printed between each label so the tape can be cut to the correct size. ✂ ✂ 41 EXAMPLE To print three labels with numbers 1, 2 and 3: 1 Position the cursor below "1". 2 Hold down c and press O. 3 Press 3. 4 Press p (or r ).
Users Manual - English and Spanish
Page 50
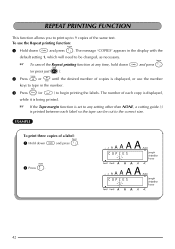
... desired number of the same text. The number of a label: 1 Hold down c and press I. 2 Press 3. EXAMPLE To print three copies of each label so the tape can be changed, as necessary. To use the number keys to type in the display with the default setting 1, which will need to be cut... to begin printing the labels. If the Tape margin function is being printed. The message "COPIES" appears in the number. 3 Press p (or r ) to the correct size. COPIES 1 COPIES 3 42...
... desired number of the same text. The number of a label: 1 Hold down c and press I. 2 Press 3. EXAMPLE To print three copies of each label so the tape can be changed, as necessary. To use the number keys to type in the display with the default setting 1, which will need to be cut... to begin printing the labels. If the Tape margin function is being printed. The message "COPIES" appears in the number. 3 Press p (or r ) to the correct size. COPIES 1 COPIES 3 42...


