
Users Manual - English and Spanish
Page 2
...a trademark of the FCC Rules. IBM is connected. - In addition, the four tape widths (1/4" (6 mm), 3/8" (9 mm), 1/2" (12 mm) and 3/4" (18 mm)) and variety of tape colors allow you to print personalized labels, useful for Home or Office Use This Class...of Conformity (For USA Only) Responsible Party : Brother International Corporation 100 Somerset Corporate Boulevard Bridgewater, NJ 08807-0911 USA TEL : (908) 704-1700 declares that the product Product Name Model Number : Brother P-touch Electronic Labeling System : PT-1950/1960 complies with the instructions, may not cause harmful...
...a trademark of the FCC Rules. IBM is connected. - In addition, the four tape widths (1/4" (6 mm), 3/8" (9 mm), 1/2" (12 mm) and 3/4" (18 mm)) and variety of tape colors allow you to print personalized labels, useful for Home or Office Use This Class...of Conformity (For USA Only) Responsible Party : Brother International Corporation 100 Somerset Corporate Boulevard Bridgewater, NJ 08807-0911 USA TEL : (908) 704-1700 declares that the product Product Name Model Number : Brother P-touch Electronic Labeling System : PT-1950/1960 complies with the instructions, may not cause harmful...
Users Manual - English and Spanish
Page 6
CONTENTS Getting Started GENERAL DESCRIPTION 1 GENERAL PRECAUTIONS 3 BATTERIES ...3 AC ADAPTOR ...4 TAPE CASSETTE 5 ATTACHING LABELS 6 PRINT HEAD & ROLLERS 7 USING WITH A PERSONAL COMPUTER 8 For Your Information POWER KEY...10 CURSOR KEYS 10 CODE, ALT & SHIFT KEYS 11 SPACE ... FUNCTION 21 SYMBOL FUNCTION 22 AUTO FORMAT FUNCTION 24 FONT FUNCTION 26 SIZE & WIDTH FUNCTIONS 27 STYLE FUNCTION 29 UNDERLINE FUNCTION 31 FRAME FUNCTION 32 TAPE MARGIN FUNCTION 33 HORIZONTAL ALIGNMENT FUNCTION 34 MIRROR PRINTING FUNCTION 35 LENGTH FUNCTION 36 AUTO CUT FUNCTION 38 iv
CONTENTS Getting Started GENERAL DESCRIPTION 1 GENERAL PRECAUTIONS 3 BATTERIES ...3 AC ADAPTOR ...4 TAPE CASSETTE 5 ATTACHING LABELS 6 PRINT HEAD & ROLLERS 7 USING WITH A PERSONAL COMPUTER 8 For Your Information POWER KEY...10 CURSOR KEYS 10 CODE, ALT & SHIFT KEYS 11 SPACE ... FUNCTION 21 SYMBOL FUNCTION 22 AUTO FORMAT FUNCTION 24 FONT FUNCTION 26 SIZE & WIDTH FUNCTIONS 27 STYLE FUNCTION 29 UNDERLINE FUNCTION 31 FRAME FUNCTION 32 TAPE MARGIN FUNCTION 33 HORIZONTAL ALIGNMENT FUNCTION 34 MIRROR PRINTING FUNCTION 35 LENGTH FUNCTION 36 AUTO CUT FUNCTION 38 iv

Users Manual - English and Spanish
Page 9
Getting Started TOP VIEW GENERAL DESCRIPTION Tape compartment cover Keyboard AC adaptor connector USB port LCD display BOTTOM VIEW Tape exit slot Battery compartment cover 1
Getting Started TOP VIEW GENERAL DESCRIPTION Tape compartment cover Keyboard AC adaptor connector USB port LCD display BOTTOM VIEW Tape exit slot Battery compartment cover 1

Users Manual - English and Spanish
Page 11
... Insert six new AA alkaline batteries, making sure that do not touch the cutter's edge. Do not put any rubber or vinyl on the tape being used anywhere by the use the machine in dusty places, ... disassemble the AC adaptor. Do not clean the machine with their poles point in this machine. Brother cannot be lost (unless the machine is not being fed from leaking and damaging the machine. ...for this machine. GENERAL PRECAUTIONS To avoid injuries, do not have the mark. Do not use tapes that their positive and negative poles pointing in the back of any text files stored in...
... Insert six new AA alkaline batteries, making sure that do not touch the cutter's edge. Do not put any rubber or vinyl on the tape being used anywhere by the use the machine in dusty places, ... disassemble the AC adaptor. Do not clean the machine with their poles point in this machine. Brother cannot be lost (unless the machine is not being fed from leaking and damaging the machine. ...for this machine. GENERAL PRECAUTIONS To avoid injuries, do not have the mark. Do not use tapes that their positive and negative poles pointing in the back of any text files stored in...
Users Manual - English and Spanish
Page 13
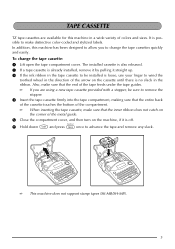
... sure to remove the stopper. 4 Insert the tape cassette firmly into the tape compartment, making sure that the entire back of the cassette touches the bottom of the compartment. To change the tape cassettes quickly and easily. If you to change the tape cassette: 1 Lift open the tape compartment cover. In addition, this machine in a wide...
... sure to remove the stopper. 4 Insert the tape cassette firmly into the tape compartment, making sure that the entire back of the cassette touches the bottom of the compartment. To change the tape cassettes quickly and easily. If you to change the tape cassette: 1 Lift open the tape compartment cover. In addition, this machine in a wide...
Users Manual - English and Spanish
Page 14
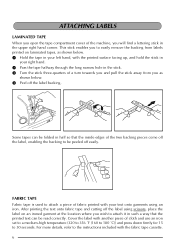
... temperature (320 to 356 ˚F (160 to 180 ˚C)) and press down firmly for 15 to the instructions included with your right hand. 2 Pass the tape halfway through the long narrow hole in the stick. 3 Turn the stick three-quarters of a turn towards you and pull the stick away from labels... to easily remove the backing from you as shown below . 4 Peel off easily. For more details, refer to 30 seconds. ATTACHING LABELS LAMINATED TAPE When you open the tape compartment cover of the machine, you to attach it in such a way that the printed text can be folded in half so that...
... temperature (320 to 356 ˚F (160 to 180 ˚C)) and press down firmly for 15 to the instructions included with your right hand. 2 Pass the tape halfway through the long narrow hole in the stick. 3 Turn the stick three-quarters of a turn towards you and pull the stick away from labels... to easily remove the backing from you as shown below . 4 Peel off easily. For more details, refer to 30 seconds. ATTACHING LABELS LAMINATED TAPE When you open the tape compartment cover of the machine, you to attach it in such a way that the printed text can be folded in half so that...
Users Manual - English and Spanish
Page 15
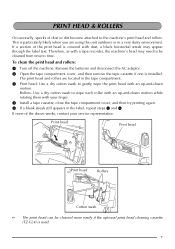
...up-and-down motion while rotating them with your service representative. Remove the batteries and disconnect the AC adaptor. 2 Open the tape compartment cover, and then remove the tape cassette if one is used. 7 Print head Print head Print head Rollers Cotton swab The print head can be cleaned from ...time to be cleaned more easily if the optional print head cleaning cassette (TZ-CL4) is installed. This is covered with a tape recorder, the machine's head may appear through the label text. The print head and rollers are using the unit outdoors or in a very dusty...
...up-and-down motion while rotating them with your service representative. Remove the batteries and disconnect the AC adaptor. 2 Open the tape compartment cover, and then remove the tape cassette if one is used. 7 Print head Print head Print head Rollers Cotton swab The print head can be cleaned from ...time to be cleaned more easily if the optional print head cleaning cassette (TZ-CL4) is installed. This is covered with a tape recorder, the machine's head may appear through the label text. The print head and rollers are using the unit outdoors or in a very dusty...
Users Manual - English and Spanish
Page 17
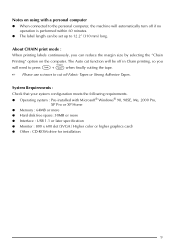
...: Pre-installed with a personal computer When connected to the personal computer, the machine will need to press c + _ when finally cutting the tape. The label length can be off in Chain printing, so you can reduce the margin size by selecting the "Chain Printing" option on using ...drive for installation 9 Notes on the computer. About CHAIN print mode : When printing labels continuously, you will automatically turn off Fabric Tapes or Strong Adhesive Tapes. The Auto cut function will be set up to cut off if no operation is performed within 60 minutes. System Requirements : ...
...: Pre-installed with a personal computer When connected to the personal computer, the machine will need to press c + _ when finally cutting the tape. The label length can be off in Chain printing, so you can reduce the margin size by selecting the "Chain Printing" option on using ...drive for installation 9 Notes on the computer. About CHAIN print mode : When printing labels continuously, you will automatically turn off Fabric Tapes or Strong Adhesive Tapes. The Auto cut function will be set up to cut off if no operation is performed within 60 minutes. System Requirements : ...

Users Manual - English and Spanish
Page 23
... "TAB LIMIT!" The tab length can also be set between 0.0" and 11.8" (0.0 and 30.0 cm). appears. 15 The text cannot contain more than 50 tabs. Tape widths 1/4" (6 mm) 3/8" (9 mm) 1/2" (12 mm) 3/4" (18 mm) Maximum number of lines that you have the same length and are measured from a list (e.g., add a symbol or...
... "TAB LIMIT!" The tab length can also be set between 0.0" and 11.8" (0.0 and 30.0 cm). appears. 15 The text cannot contain more than 50 tabs. Tape widths 1/4" (6 mm) 3/8" (9 mm) 1/2" (12 mm) 3/4" (18 mm) Maximum number of lines that you have the same length and are measured from a list (e.g., add a symbol or...

Users Manual - English and Spanish
Page 27
... text, the Clear function can be used to choose whether all of the text and return all format functions (Font, Size, Width, Style, Underline, Frame, Tape margin, Alignment, Tab length, Mirror printing, and Length) are returned to their default settings: 1 Hold down c and press *. 2 Press h until TXT&FORMAT is selected (flashing...
... text, the Clear function can be used to choose whether all of the text and return all format functions (Font, Size, Width, Style, Underline, Frame, Tape margin, Alignment, Tab length, Mirror printing, and Length) are returned to their default settings: 1 Hold down c and press *. 2 Press h until TXT&FORMAT is selected (flashing...

Users Manual - English and Spanish
Page 32
The following preset formats are available: Auto Format Setting DEFAULT 3.5" FLOPPY Label Length Setting OFF 2.8" (7.0 cm) Tape Margin Setting FULL NARROW Horizontal Alignment Setting LEFT CENTER miniDV VHS SPINE VHS 1.7" (4.3 cm) 5.5" (14.0 cm) 3.0" (7.7 cm) NARROW NARROW ... CENTER FILE LONG FILE SHORT 7.2" (18.3 cm) 3.7" (9.4 cm) NARROW NARROW CENTER CENTER 24 This function automatically adjusts the label length, tape margins and horizontal alignment without changing the text or any other formats, allowing you can select from a variety of preset formats perfect for your ...
The following preset formats are available: Auto Format Setting DEFAULT 3.5" FLOPPY Label Length Setting OFF 2.8" (7.0 cm) Tape Margin Setting FULL NARROW Horizontal Alignment Setting LEFT CENTER miniDV VHS SPINE VHS 1.7" (4.3 cm) 5.5" (14.0 cm) 3.0" (7.7 cm) NARROW NARROW ... CENTER FILE LONG FILE SHORT 7.2" (18.3 cm) 3.7" (9.4 cm) NARROW NARROW CENTER CENTER 24 This function automatically adjusts the label length, tape margins and horizontal alignment without changing the text or any other formats, allowing you can select from a variety of preset formats perfect for your ...

Users Manual - English and Spanish
Page 35
... 6, 9, 12, 18, 24, 36, 42 The default size setting is AUTO and the default width setting is always shown by the indicator above the display. Tape Widths 1/4" (6 mm) 3/8" (9 mm) 1/2" (12 mm) 3/4" (18 mm) Sizes (in points) Width Setting Off Width Setting On 6 9 12 18 24 36 42 27 With... the AUTO setting selected and 1/2" (12-mm) or 3/4" (18-mm) wide tape installed, text consisting of just one line of the installed tape and automatically adjusts the characters to the largest possible size. With the AUTO size setting, the machine compares your text...
... 6, 9, 12, 18, 24, 36, 42 The default size setting is AUTO and the default width setting is always shown by the indicator above the display. Tape Widths 1/4" (6 mm) 3/8" (9 mm) 1/2" (12 mm) 3/4" (18 mm) Sizes (in points) Width Setting Off Width Setting On 6 9 12 18 24 36 42 27 With... the AUTO setting selected and 1/2" (12-mm) or 3/4" (18-mm) wide tape installed, text consisting of just one line of the installed tape and automatically adjusts the characters to the largest possible size. With the AUTO size setting, the machine compares your text...
Users Manual - English and Spanish
Page 41
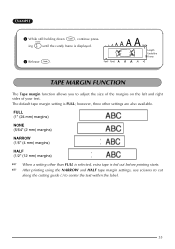
... setting is displayed. 3 Release c. however, three other than FULL is selected, extra tape is fed out before printing starts. TAPE MARGIN FUNCTION The Tape margin function allows you to center the text within the label. 33 FULL (1" (24 mm) margins) NONE (5/64" (2 mm) margins) NARROW (1/6" (4 ...mm) margins) HALF (1/2" (12 mm) margins) When a setting other settings are also available. After printing using the NARROW and HALF tape margin settings, use scissors to cut along the cutting guide (:) to adjust the size of the margins on the left and right sides of your...
... setting is displayed. 3 Release c. however, three other than FULL is selected, extra tape is fed out before printing starts. TAPE MARGIN FUNCTION The Tape margin function allows you to center the text within the label. 33 FULL (1" (24 mm) margins) NONE (5/64" (2 mm) margins) NARROW (1/6" (4 ...mm) margins) HALF (1/2" (12 mm) margins) When a setting other settings are also available. After printing using the NARROW and HALF tape margin settings, use scissors to cut along the cutting guide (:) to adjust the size of the margins on the left and right sides of your...

Users Manual - English and Spanish
Page 42
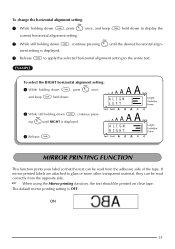
To change the tape margin setting: 1 While holding down c, press E once, and keep c held down c, continue pressing E until HALF is displayed. 3 Release c. however, two other settings are also available. ... LEFT; The default setting is displayed. 3 Release c to apply the selected tape margin setting to display the current tape margin setting. 2 While still holding down c, continue pressing E until the desired tape margin set the length of three ways. EXAMPLE To select the HALF tape margin setting: 1 While holding down c, press E once, and keep c held...
To change the tape margin setting: 1 While holding down c, press E once, and keep c held down c, continue pressing E until HALF is displayed. 3 Release c. however, two other settings are also available. ... LEFT; The default setting is displayed. 3 Release c to apply the selected tape margin setting to display the current tape margin setting. 2 While still holding down c, continue pressing E until the desired tape margin set the length of three ways. EXAMPLE To select the HALF tape margin setting: 1 While holding down c, press E once, and keep c held...
Users Manual - English and Spanish
Page 43
... c to apply the selected horizontal alignment setting to glass or some other transparent material, they can be read correctly from the adhesive side of the tape. ALIGN RIGHT MIRROR PRINTING FUNCTION This function prints your label so that the text can be printed on clear...
... c to apply the selected horizontal alignment setting to glass or some other transparent material, they can be read correctly from the adhesive side of the tape. ALIGN RIGHT MIRROR PRINTING FUNCTION This function prints your label so that the text can be printed on clear...
Users Manual - English and Spanish
Page 46
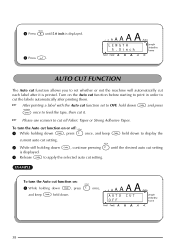
AUTO CUT OFF 38 EXAMPLE To turn the Auto cut function on or off Fabric Tapes or Strong Adhesive Tapes. After printing a label with the Auto cut function set whether or not the machine will automatically cut each label after printing them. 4 Press h until the ..., and keep c held down c and press _ once to cut off : 1 While holding down c, continue pressing Z until 5.0 inch is printed. Please use scissors to feed the tape, then cut the labels automatically after it . To turn the Auto cut function on the Auto cut function before starting to print in order to...
AUTO CUT OFF 38 EXAMPLE To turn the Auto cut function on or off Fabric Tapes or Strong Adhesive Tapes. After printing a label with the Auto cut function set whether or not the machine will automatically cut each label after printing them. 4 Press h until the ..., and keep c held down c and press _ once to cut off : 1 While holding down c, continue pressing Z until 5.0 inch is printed. Please use scissors to feed the tape, then cut the labels automatically after it . To turn the Auto cut function on the Auto cut function before starting to print in order to...
Users Manual - English and Spanish
Page 47
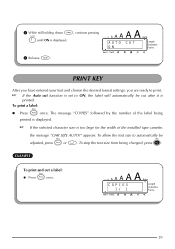
... being changed, press *. appears. COPIES 1/ 1 39 EXAMPLE To print and cut after it is displayed. The message "COPIES" followed by the number of the installed tape cassette, the message "CHR SIZE AUTO?" To stop the text size from being printed is printed. To print a label: Press p once. If the Auto cut...
... being changed, press *. appears. COPIES 1/ 1 39 EXAMPLE To print and cut after it is displayed. The message "COPIES" followed by the number of the installed tape cassette, the message "CHR SIZE AUTO?" To stop the text size from being printed is printed. To print a label: Press p once. If the Auto cut...
Users Manual - English and Spanish
Page 48
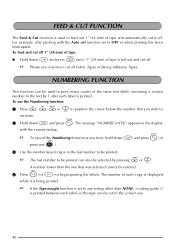
..." appears in the display with the Auto cut function set to any time, hold down c and press _ once. 1" (24 mm) of tape is fed out and cut off . The number of tape: Hold down c and press O (or press just * ). 3 Use the number keys to type in the text by pressing h or e. Please... also be cut to begin printing the labels. FEED & CUT FUNCTION The Feed & Cut function is used to cut off Fabric Tapes or Strong Adhesive Tapes. For example, after each copy is set to OFF or when printing has been interrupted. To cancel the Numbering function at any setting other than ...
..." appears in the display with the Auto cut function set to any time, hold down c and press _ once. 1" (24 mm) of tape is fed out and cut off . The number of tape: Hold down c and press O (or press just * ). 3 Use the number keys to type in the text by pressing h or e. Please... also be cut to begin printing the labels. FEED & CUT FUNCTION The Feed & Cut function is used to cut off Fabric Tapes or Strong Adhesive Tapes. For example, after each copy is set to OFF or when printing has been interrupted. To cancel the Numbering function at any setting other than ...
Users Manual - English and Spanish
Page 49
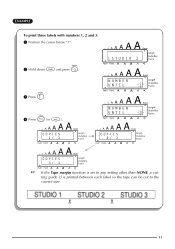
COPIES 1/ 3 1: S T U D I O _1 NUMBER UNTIL 1 NUMBER UNTIL 3 COPIES 2/ 3 COPIES 3/ 3 If the Tape margin function is set to any setting other than NONE, a cutting guide (:) is printed between each label so the tape can be cut to the correct size. ✂ ✂ 41 EXAMPLE To print three labels with numbers 1, 2 and 3: 1 Position the cursor below "1". 2 Hold down c and press O. 3 Press 3. 4 Press p (or r ).
COPIES 1/ 3 1: S T U D I O _1 NUMBER UNTIL 1 NUMBER UNTIL 3 COPIES 2/ 3 COPIES 3/ 3 If the Tape margin function is set to any setting other than NONE, a cutting guide (:) is printed between each label so the tape can be cut to the correct size. ✂ ✂ 41 EXAMPLE To print three labels with numbers 1, 2 and 3: 1 Position the cursor below "1". 2 Hold down c and press O. 3 Press 3. 4 Press p (or r ).
Users Manual - English and Spanish
Page 50
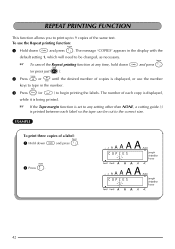
... setting 1, which will need to begin printing the labels. REPEAT PRINTING FUNCTION This function allows you to print up to the correct size. If the Tape margin function is set to any time, hold down c and press I (or press just * ). 2 Press h or e until the desired number of the same text. The... displayed, while it is displayed, or use the Repeat printing function: 1 Hold down c and press I . EXAMPLE To print three copies of each label so the tape can be changed, as necessary. The number of a label: 1 Hold down c and press I . 2 Press 3.
... setting 1, which will need to begin printing the labels. REPEAT PRINTING FUNCTION This function allows you to print up to the correct size. If the Tape margin function is set to any time, hold down c and press I (or press just * ). 2 Press h or e until the desired number of the same text. The... displayed, while it is displayed, or use the Repeat printing function: 1 Hold down c and press I . EXAMPLE To print three copies of each label so the tape can be changed, as necessary. The number of a label: 1 Hold down c and press I . 2 Press 3.


