Users Manual - English
Page 3
... Data 16 Entering and editing text 16 Entering an accented character 18 Entering a bar code 19 Entering a symbol 21 i CONTENTS Brother® 90 Days/One Year Limited Warranty and Replacement Service (For USA Only iv Important Information vi 1. Getting Started 1 General ...Description 1 Top view & bottom view 1 Keyboard & LCD display 2 General Precautions 4 Batteries & Tape Cassettes 5 Installing batteries and a tape cassette 5 Cleaning 8 Cleaning the print head, rollers and tape cutter 8 Optional AC Adapter 9 Connecting the AC adapter 9 Turning the...
... Data 16 Entering and editing text 16 Entering an accented character 18 Entering a bar code 19 Entering a symbol 21 i CONTENTS Brother® 90 Days/One Year Limited Warranty and Replacement Service (For USA Only iv Important Information vi 1. Getting Started 1 General ...Description 1 Top view & bottom view 1 Keyboard & LCD display 2 General Precautions 4 Batteries & Tape Cassettes 5 Installing batteries and a tape cassette 5 Cleaning 8 Cleaning the print head, rollers and tape cutter 8 Optional AC Adapter 9 Connecting the AC adapter 9 Turning the...
Users Manual - English
Page 4
...28 Using the pre-formatted Auto Format templates 30 Printing Labels 31 Previewing the label layout 31 Feeding tape 31 Printing a label 31 Using special printing functions 32 Storing and Recalling Files 36 Storing label ...touch With a Computer (for PT-1650 only) ...41 Installing the Software & Printer Driver 42 Before installation 42 Installing the P-touch Editor 3.2 software 43 Installing the USB printer driver 44 Reading the User's Guide 46 Using P-touch Editor 3.2 47 Starting up P-touch Editor 3.2 48 Displaying the Properties 48 Entering text 49 Notes on usage 49 Transferring...
...28 Using the pre-formatted Auto Format templates 30 Printing Labels 31 Previewing the label layout 31 Feeding tape 31 Printing a label 31 Using special printing functions 32 Storing and Recalling Files 36 Storing label ...touch With a Computer (for PT-1650 only) ...41 Installing the Software & Printer Driver 42 Before installation 42 Installing the P-touch Editor 3.2 software 43 Installing the USB printer driver 44 Reading the User's Guide 46 Using P-touch Editor 3.2 47 Starting up P-touch Editor 3.2 48 Displaying the Properties 48 Entering text 49 Notes on usage 49 Transferring...

Users Manual - English
Page 9
Getting Started 1 Getting Started General Description Top view & bottom view Top view Display Tape cutter button Keyboard Back cover USB port (for PT-1650 only) AC adapter connector Battery compartment Tape cassette compartment Cassette release lever Print head Tape exit slot Bottom view 1
Getting Started 1 Getting Started General Description Top view & bottom view Top view Display Tape cutter button Keyboard Back cover USB port (for PT-1650 only) AC adapter connector Battery compartment Tape cassette compartment Cassette release lever Print head Tape exit slot Bottom view 1

Users Manual - English
Page 12
...PT-1650 only). ● Portions of the graphics filter software are registered trademarks of the Independent JPEG group (for an extended period of both direct sunlight and rain. ● Do not expose the machine to be used for this machine. General Precautions ● Use only Brother TZ tapes with the P-touch... , ensure it out of time, otherwise the machine may be damaged. ● Avoid using the machine in the back of International Business Machines, Inc (for PT-1650 only). ● Microsoft® and Windows® are based in part on the machine. ● To avoid injuries,...
...PT-1650 only). ● Portions of the graphics filter software are registered trademarks of the Independent JPEG group (for an extended period of both direct sunlight and rain. ● Do not expose the machine to be used for this machine. General Precautions ● Use only Brother TZ tapes with the P-touch... , ensure it out of time, otherwise the machine may be damaged. ● Avoid using the machine in the back of International Business Machines, Inc (for PT-1650 only). ● Microsoft® and Windows® are based in part on the machine. ● To avoid injuries,...
Users Manual - English
Page 13
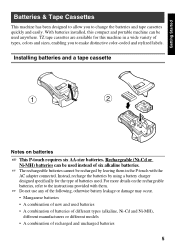
... specifically for this compact and portable machine can be used anywhere. With batteries installed, this machine in the P-touch with the AC adapter connected. TZ tape cassettes are available for the type of types, colors and sizes, enabling you to the instructions provided with them in a wide variety of batteries used instead of...
... specifically for this compact and portable machine can be used anywhere. With batteries installed, this machine in the P-touch with the AC adapter connected. TZ tape cassettes are available for the type of types, colors and sizes, enabling you to the instructions provided with them in a wide variety of batteries used instead of...

Users Manual - English
Page 14
...be lost . ☞ If you do not intend to use your finger to cut off the excess tape. ☞ Always cut off . If a low battery charge is shipped from the time that the P-touch is pulled on the cassette until there is no slack in the memory will be damaged. 6 Notes... on tape cassettes ☞ Before installing the tape cassette, make sure that the unit is detected, the low battery indicator ()) comes...
...be lost . ☞ If you do not intend to use your finger to cut off the excess tape. ☞ Always cut off . If a low battery charge is shipped from the time that the P-touch is pulled on the cassette until there is no slack in the memory will be damaged. 6 Notes... on tape cassettes ☞ Before installing the tape cassette, make sure that the unit is detected, the low battery indicator ()) comes...
Users Manual - English
Page 15
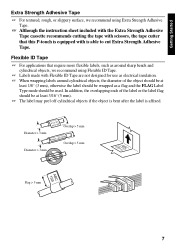
... label is able to cut Extra Strength Adhesive Tape. Getting Started Extra Strength Adhesive Tape ☞ For textured, rough, or slippery surface, we recommend using Flexible ID Tape. ☞ Labels made with is affixed. Flexible ID Tape ☞ For applications that this P-touch is equipped with Flexible ID Tape are not designed for use as electrical...
... label is able to cut Extra Strength Adhesive Tape. Getting Started Extra Strength Adhesive Tape ☞ For textured, rough, or slippery surface, we recommend using Flexible ID Tape. ☞ Labels made with is affixed. Flexible ID Tape ☞ For applications that this P-touch is equipped with Flexible ID Tape are not designed for use as electrical...
Users Manual - English
Page 16
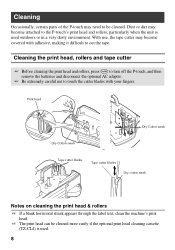
...unit is used outdoors or in a very dusty environment. Cleaning Occasionally, certain parts of the P-touch may become covered with your fingers. Print head Dry Cotton swab Dry Cotton swab Tape cutter blades Tape cutter blades Dry cotton swab Notes on cleaning the print head & rollers ☞ If a blank... The print head can be cleaned. Dust or dirt may need to cut the tape. Cleaning the print head, rollers and tape cutter ☞ Before cleaning the print head and rollers, press o to turn off the P-touch, and then remove the batteries and disconnect the optional AC adapter. ☞ Be...
...unit is used outdoors or in a very dusty environment. Cleaning Occasionally, certain parts of the P-touch may become covered with your fingers. Print head Dry Cotton swab Dry Cotton swab Tape cutter blades Tape cutter blades Dry cotton swab Notes on cleaning the print head & rollers ☞ If a blank... The print head can be cleaned. Dust or dirt may need to cut the tape. Cleaning the print head, rollers and tape cutter ☞ Before cleaning the print head and rollers, press o to turn off the P-touch, and then remove the batteries and disconnect the optional AC adapter. ☞ Be...
Users Manual - English
Page 17
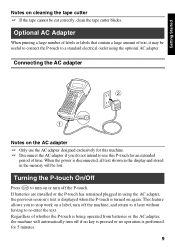
... batteries or the AC adapter, the machine will be cut correctly, clean the tape cutter blades. Connecting the AC adapter 2 DC IN 9.5V 1 Notes on cleaning the tape cutter ☞ If the tape cannot be lost. Regardless of whether the P-touch is performed for 5 minutes. 9 This feature allows you do not intend to use...
... batteries or the AC adapter, the machine will be cut correctly, clean the tape cutter blades. Connecting the AC adapter 2 DC IN 9.5V 1 Notes on cleaning the tape cutter ☞ If the tape cannot be lost. Regardless of whether the P-touch is performed for 5 minutes. 9 This feature allows you do not intend to use...
Users Manual - English
Page 19
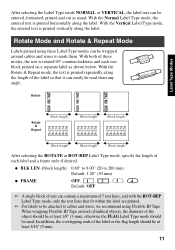
... modes, the text is printed repeatedly along the label. With both of the object should be read from any angle. When wrapping Flexible ID Tape around cables and wires to mark them. With the Normal Label Type mode, the entered text is printed vertically along the length of 7 text... and a frame style if desired. ● BLK LEN. (block length): 0.80" to 8.00" (20 to cables and wires, we recommend using Flexible ID Tape. Rotate Label Type Modes Rotate & Repeat Block length Block length Block length Block length Block length Block length After selecting the ROTATE or ROT-REP...
... modes, the text is printed repeatedly along the label. With both of the object should be read from any angle. When wrapping Flexible ID Tape around cables and wires to mark them. With the Normal Label Type mode, the entered text is printed vertically along the length of 7 text... and a frame style if desired. ● BLK LEN. (block length): 0.80" to 8.00" (20 to cables and wires, we recommend using Flexible ID Tape. Rotate Label Type Modes Rotate & Repeat Block length Block length Block length Block length Block length Block length After selecting the ROTATE or ROT-REP...
Users Manual - English
Page 20
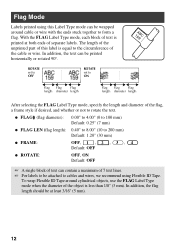
... be printed horizontally or rotated 90°. In addition, the text can be at both ends of the cable or wire. To wrap Flexible ID Tape around cable or wire with the ends stuck together to form a flag. With the FLAG Label Type mode, each block of text is less than..., 1 , 2 , 3 , 4 Default: OFF ● ROTATE: OFF, ON Default: OFF ☞ A single block of text can be attached to cables and wires, we recommend using Flexible ID Tape. Flag Mode Labels printed using this label is equal to the circumference of separate labels.
... be printed horizontally or rotated 90°. In addition, the text can be at both ends of the cable or wire. To wrap Flexible ID Tape around cable or wire with the ends stuck together to form a flag. With the FLAG Label Type mode, each block of text is less than..., 1 , 2 , 3 , 4 Default: OFF ● ROTATE: OFF, ON Default: OFF ☞ A single block of text can be attached to cables and wires, we recommend using Flexible ID Tape. Flag Mode Labels printed using this label is equal to the circumference of separate labels.
Users Manual - English
Page 22
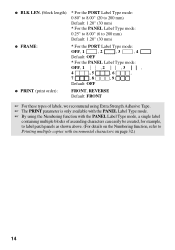
... Type mode: OFF, 1 , 2 , 3 , 4 , 5 , 6 , 7 , 8 , 9 Default: OFF ● PRINT (print order): FRONT, REVERSE Default: FRONT ☞ For these types of labels, we recommend using Extra Strength Adhesive Tape. ☞ The PRINT parameter is only available with the PANEL Label Type mode. ☞ By using the Numbering function with the PANEL Label Type mode...
... Type mode: OFF, 1 , 2 , 3 , 4 , 5 , 6 , 7 , 8 , 9 Default: OFF ● PRINT (print order): FRONT, REVERSE Default: FRONT ☞ For these types of labels, we recommend using Extra Strength Adhesive Tape. ☞ The PRINT parameter is only available with the PANEL Label Type mode. ☞ By using the Numbering function with the PANEL Label Type mode...
Users Manual - English
Page 25
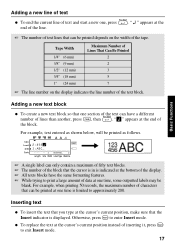
... the line number of the block. Inserting text ● To insert the text that you type at one time, some outputted labels may be blank. Tape Width 1/4" (6 mm) 3/8" (9 mm) 1/2" (12 mm) 3/4" (18 mm) 1" (24 mm) Maximum Number of Lines That Can Be Printed 2 2 3 5 7 ☞ The ...line number on the width of the tape. R R2:456 R1:ABC_ ---- -- 1 NORMAL 2 Basic Functions ☞ A single label can only contain a maximum of fifty text blocks. ☞ The number of the block that...
... the line number of the block. Inserting text ● To insert the text that you type at one time, some outputted labels may be blank. Tape Width 1/4" (6 mm) 3/8" (9 mm) 1/2" (12 mm) 3/4" (18 mm) 1" (24 mm) Maximum Number of Lines That Can Be Printed 2 2 3 5 7 ☞ The ...line number on the width of the tape. R R2:456 R1:ABC_ ---- -- 1 NORMAL 2 Basic Functions ☞ A single label can only contain a maximum of fifty text blocks. ☞ The number of the block that...
Users Manual - English
Page 27
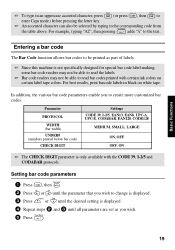
... is displayed. 4 Repeat steps 2 and 3 until all parameters are set as part of labels. ☞ Since this machine is only available with certain ink colors on white tape. In addition, the various bar code parameters enable you wish. 5 Press n. 19 Parameter PROTOCOL WIDTH (bar width) UNDER# (numbers printed below bar code) CHECK... not be able to read the labels. ☞ Bar code readers may not be able to be selected by typing in black on certain label tape colors.
... is displayed. 4 Repeat steps 2 and 3 until all parameters are set as part of labels. ☞ Since this machine is only available with certain ink colors on white tape. In addition, the various bar code parameters enable you wish. 5 Press n. 19 Parameter PROTOCOL WIDTH (bar width) UNDER# (numbers printed below bar code) CHECK... not be able to read the labels. ☞ Bar code readers may not be able to be selected by typing in black on certain label tape colors.
Users Manual - English
Page 34
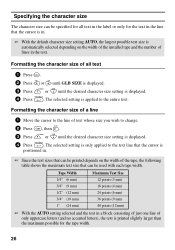
.... ☞ With the default character size setting AUTO, the largest possible text size is automatically selected depending on the width of the installed tape and the number of lines in a block consisting of just one line of only uppercase letters (and no accented letters), the text is ... whose size you wish to the entire text. The selected setting is positioned in. ☞ Since the text sizes that can be used with each tape width. Tape Width Maximum Text Size 1/4" (6 mm) 3/8" (9 mm) 1/2" (12 mm) 12 points (3 mm) 18 points (4 mm) 24 points (6 mm) 3/4" (18 mm) 36 points (9 mm)...
.... ☞ With the default character size setting AUTO, the largest possible text size is automatically selected depending on the width of the installed tape and the number of lines in a block consisting of just one line of only uppercase letters (and no accented letters), the text is ... whose size you wish to the entire text. The selected setting is positioned in. ☞ Since the text sizes that can be used with each tape width. Tape Width Maximum Text Size 1/4" (6 mm) 3/8" (9 mm) 1/2" (12 mm) 12 points (3 mm) 18 points (4 mm) 24 points (6 mm) 3/4" (18 mm) 36 points (9 mm)...

Users Manual - English
Page 38
... ten label templates, type text into each of boxes and file folders to labelling equipment and making name badges and ID tags. Key Template Name Tape Width Label Length 1 BIN BOX 3/4" × 2.75" (18 mm × 69 mm) Template Fields 1 SYMBOL? 2 TEXT1? 3 TEXT2? 4 BAR CODE? The first field for a variety of...
... ten label templates, type text into each of boxes and file folders to labelling equipment and making name badges and ID tags. Key Template Name Tape Width Label Length 1 BIN BOX 3/4" × 2.75" (18 mm × 69 mm) Template Fields 1 SYMBOL? 2 TEXT1? 3 TEXT2? 4 BAR CODE? The first field for a variety of...

Users Manual - English
Page 39
..." is displayed. ☞ To quit printing, press o to turn off the P-touch. 31 The message "WORKING", then "COPIES" followed by the number of the label being printed is displayed. ☞ Press f to feed out any leftover printed tape after pressing o to quit printing. Basic Functions 3 Press u or d to display... length of the current label is indicated in the template fields. ☞ To quit using the template, display the last field, and then press n . Feeding tape ● To feed out 1" (23 mm) of the text. ● To use the print preview, press g, then p. Press uor d until EXIT appears...
..." is displayed. ☞ To quit printing, press o to turn off the P-touch. 31 The message "WORKING", then "COPIES" followed by the number of the label being printed is displayed. ☞ Press f to feed out any leftover printed tape after pressing o to quit printing. Basic Functions 3 Press u or d to display... length of the current label is indicated in the template fields. ☞ To quit using the template, display the last field, and then press n . Feeding tape ● To feed out 1" (23 mm) of the text. ● To use the print preview, press g, then p. Press uor d until EXIT appears...

Users Manual - English
Page 40
...each copy is displayed while it is being printed. ☞ If the Cut function is set to 1 or 3, the message "CUT TAPE TO CONTINUE" appears after each label is very useful when printing serial number labels, production control labels or other labels requiring ascending codes. 2A...printing functions Various special printing functions are available that the message appears. ☞ For the different options available for cutting the tape, refer to Selecting how tape is fed and cut on page 38. ☞ To specify settings for additional Print Option functions, instead of continuing with ...
...each copy is displayed while it is being printed. ☞ If the Cut function is set to 1 or 3, the message "CUT TAPE TO CONTINUE" appears after each label is very useful when printing serial number labels, production control labels or other labels requiring ascending codes. 2A...printing functions Various special printing functions are available that the message appears. ☞ For the different options available for cutting the tape, refer to Selecting how tape is fed and cut on page 38. ☞ To specify settings for additional Print Option functions, instead of continuing with ...

Users Manual - English
Page 41
... 8 Press n. A Î B Î ...Z Î A Î ... START appears in the Print Option menu. 9 Press n (or p) to 1 or 3, the message "CUT TAPE TO CONTINUE" appears after each copy is displayed while it is being printed. ☞ If the Cut function is set to begin printing the specified.... ☞ For the different options available for the numbering field. ☞ If you wish to include in the desired setting). 4 Press n. Press the tape cutter button to cut on page 38. ☞ Letters and numbers increase as the numbering field, press p, and then skip to step 9.) 5 Press u,...
... 8 Press n. A Î B Î ...Z Î A Î ... START appears in the Print Option menu. 9 Press n (or p) to 1 or 3, the message "CUT TAPE TO CONTINUE" appears after each copy is displayed while it is being printed. ☞ If the Cut function is set to begin printing the specified.... ☞ For the different options available for the numbering field. ☞ If you wish to include in the desired setting). 4 Press n. Press the tape cutter button to cut on page 38. ☞ Letters and numbers increase as the numbering field, press p, and then skip to step 9.) 5 Press u,...

Users Manual - English
Page 42
... use the number keys to type in the desired setting). 4 Press r so that the text can be read correctly from the adhesive side of the tape. is displayed in the Print Option menu, and then press n. START appears in the Print Option menu. 7 Press n (or p) to print. 1 Press g, then a. If mirror...
... use the number keys to type in the desired setting). 4 Press r so that the text can be read correctly from the adhesive side of the tape. is displayed in the Print Option menu, and then press n. START appears in the Print Option menu. 7 Press n (or p) to print. 1 Press g, then a. If mirror...


