Table Set Installation Manual PRWT1
Page 2
...1/4 Table Set Installation Manual When using the border, quilt, flat or jumbo frame, it is attached to the machine. The embroidery frames for additional support. Insert the hexagonal support screws with your authorized sales representative. ■ Included parts 1. 2. 3. 4. 1 Screws on... machine arm Place a washer onto each machine 1 arm using embroidery frame that do no need to the machine before installing the embroidery frame. ● Do not place heavy objects on each hexagonal support screw....
...1/4 Table Set Installation Manual When using the border, quilt, flat or jumbo frame, it is attached to the machine. The embroidery frames for additional support. Insert the hexagonal support screws with your authorized sales representative. ■ Included parts 1. 2. 3. 4. 1 Screws on... machine arm Place a washer onto each machine 1 arm using embroidery frame that do no need to the machine before installing the embroidery frame. ● Do not place heavy objects on each hexagonal support screw....

Operation Manual
Page 1
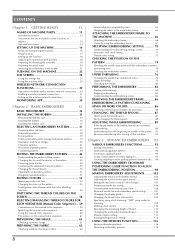
Operation Manual Embroidery Machine Product Code: 884-T23 Be sure to read this document nearby for future reference. We recommend that you keep this document before using the machine.
Operation Manual Embroidery Machine Product Code: 884-T23 Be sure to read this document nearby for future reference. We recommend that you keep this document before using the machine.

Operation Manual
Page 3
...injury or damage to property, including through fire, electrical shock, burns or suffocation. the movement of the embroidery frame could cause injuries. • When lifting the machine, be careful not to make any sudden or careless movements, otherwise you for use a damaged power ... shock 1 Always unplug the machine from the build up of purchase only. 4 Never operate this machine, carefully read these instructions may ignite, resulting in the machine falling, which could cause the garment being embroidered to the nearest authorized Brother dealer or service center for future...
...injury or damage to property, including through fire, electrical shock, burns or suffocation. the movement of the embroidery frame could cause injuries. • When lifting the machine, be careful not to make any sudden or careless movements, otherwise you for use a damaged power ... shock 1 Always unplug the machine from the build up of purchase only. 4 Never operate this machine, carefully read these instructions may ignite, resulting in the machine falling, which could cause the garment being embroidered to the nearest authorized Brother dealer or service center for future...

Operation Manual
Page 4
..., otherwise injuries may fall, resulting in injuries. • While attaching or detaching an embroidery frame or other included accessory or while maintaining the machine, be replaced by the manufacturer as contained in this manual. Use accessories recommended by an authorized Brother dealer. • In the event a malfunction occurs or adjustment is in the...
..., otherwise injuries may fall, resulting in injuries. • While attaching or detaching an embroidery frame or other included accessory or while maintaining the machine, be replaced by the manufacturer as contained in this manual. Use accessories recommended by an authorized Brother dealer. • In the event a malfunction occurs or adjustment is in the...

Operation Manual
Page 5
... or mental capabilities or lack of experience and knowledge if they do not play with the appliance. Only) Responsible Party: Brother International Corporation 200 Crossing Boulevard P.O. Cleaning and user maintenance shall not be made by ASTA to BS 1362, i.e. These limits are... (For U.S.A. If this device must accept any interference received, including interference that the product Product Name: Brother Embroidery Machine Model Number: PR680W This device complies with the fuse cover omitted. • If the available electrical outlet is connected. • Consult the...
... or mental capabilities or lack of experience and knowledge if they do not play with the appliance. Only) Responsible Party: Brother International Corporation 200 Crossing Boulevard P.O. Cleaning and user maintenance shall not be made by ASTA to BS 1362, i.e. These limits are... (For U.S.A. If this device must accept any interference received, including interference that the product Product Name: Brother Embroidery Machine Model Number: PR680W This device complies with the fuse cover omitted. • If the available electrical outlet is connected. • Consult the...

Operation Manual
Page 8
... OF THIS AGREEMENT. Nothing in this agreement constitutes a waiver of the rights of Brother Industries, Ltd. ("BROTHER"). BROTHER retains ownership of the CONTENT included in this package. CUSTOMER is licensed to: • Use the CONTENT in combination with an embroidery machine to create embroidery. • Use the CONTENT in the Laser Unit. This agreement shall be...
... OF THIS AGREEMENT. Nothing in this agreement constitutes a waiver of the rights of Brother Industries, Ltd. ("BROTHER"). BROTHER retains ownership of the CONTENT included in this package. CUSTOMER is licensed to: • Use the CONTENT in combination with an embroidery machine to create embroidery. • Use the CONTENT in the Laser Unit. This agreement shall be...
Operation Manual
Page 10
...fabric 62 Fabric/stabilizer compatibility chart 62 Hooping the fabric in the embroidery frame 63 ATTACHING THE EMBROIDERY FRAME TO THE MACHINE 66 Attaching the embroidery frame 66 Correctly using the embroidery frames 67 SPECIFYING EMBROIDERING SETTING 70 Understanding the embroidering settings screen ... from the beginning or middle of the pattern ... 91 Resume embroidering after turning off the machine 92 Chapter 3 ADVANCED EMBROIDERY 93 VARIOUS EMBROIDERY FUNCTIONS 93 Basting embroidery 93 Embroidering appliqué patterns 94 Creating an appliqué piece 95 Using a frame ...
...fabric 62 Fabric/stabilizer compatibility chart 62 Hooping the fabric in the embroidery frame 63 ATTACHING THE EMBROIDERY FRAME TO THE MACHINE 66 Attaching the embroidery frame 66 Correctly using the embroidery frames 67 SPECIFYING EMBROIDERING SETTING 70 Understanding the embroidering settings screen ... from the beginning or middle of the pattern ... 91 Resume embroidering after turning off the machine 92 Chapter 3 ADVANCED EMBROIDERY 93 VARIOUS EMBROIDERY FUNCTIONS 93 Basting embroidery 93 Embroidering appliqué patterns 94 Creating an appliqué piece 95 Using a frame ...
Operation Manual
Page 11
... FROM A COMPUTER TO THE MACHINE (LINK FUNCTION 117 Operations available with the Link function 117 Embroidering using the Link function 117 Disabling the Link function 120 EMBROIDERY APPLICATIONS 121 Embroidering split (large-size) patterns 121 USING THE OPTIONAL BOBBIN WINDER..... 123 Optional bobbin ... display optimization 135 Recalling key display optimization settings 135 Chapter 5 APPENDIX 137 MAINTENANCE 137 Cleaning the LCD 137 Cleaning the machine surface 137 Cleaning the hook 137 Cleaning around the needle plate 138 Cleaning the bobbin case 139 Cleaning the thread paths...
... FROM A COMPUTER TO THE MACHINE (LINK FUNCTION 117 Operations available with the Link function 117 Embroidering using the Link function 117 Disabling the Link function 120 EMBROIDERY APPLICATIONS 121 Embroidering split (large-size) patterns 121 USING THE OPTIONAL BOBBIN WINDER..... 123 Optional bobbin ... display optimization 135 Recalling key display optimization settings 135 Chapter 5 APPENDIX 137 MAINTENANCE 137 Cleaning the LCD 137 Cleaning the machine surface 137 Cleaning the hook 137 Cleaning around the needle plate 138 Cleaning the bobbin case 139 Cleaning the thread paths...
Operation Manual
Page 13
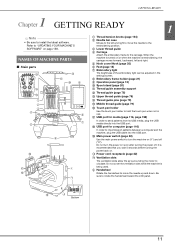
... 158. I ") and off . NAMES OF MACHINE PARTS ■ Main parts m n o a b c d l k j i h g e f p q v r u 1 Thread tension knobs (page 104) 2 Needle bar case Moves to the left and right. 5 Hook cover/Hook (page 35) 6 Feet (page 18) 7 Embroidery light The brightness of the embroidery light can be adjusted in the settings screen. 8 Embroidery frame holder (page 21) 9 Operation panel...
... 158. I ") and off . NAMES OF MACHINE PARTS ■ Main parts m n o a b c d l k j i h g e f p q v r u 1 Thread tension knobs (page 104) 2 Needle bar case Moves to the left and right. 5 Hook cover/Hook (page 35) 6 Feet (page 18) 7 Embroidery light The brightness of the embroidery light can be adjusted in the settings screen. 8 Embroidery frame holder (page 21) 9 Operation panel...
Operation Manual
Page 15
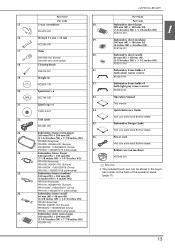
...; 4 inches (H)) Memo • The included touch pen can be stored in the touch pen holder on machine) 24. GETTING READY Part Name Part Code 15. 3-way screwdriver XH4670-001 16. Embroidery Design Guide Visit your authorized Brother dealer. Embroidery frame (small) 60 mm (W) × 40 mm (H) (2-3/8 inches (W) × 1-1/2 inches (H)) PRH60 (Americas) PRH60: XG6651-001...
...; 4 inches (H)) Memo • The included touch pen can be stored in the touch pen holder on machine) 24. GETTING READY Part Name Part Code 15. 3-way screwdriver XH4670-001 16. Embroidery Design Guide Visit your authorized Brother dealer. Embroidery frame (small) 60 mm (W) × 40 mm (H) (2-3/8 inches (W) × 1-1/2 inches (H)) PRH60 (Americas) PRH60: XG6651-001...
Operation Manual
Page 19
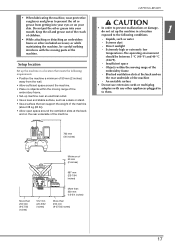
...eyeglasses and gloves to prevent the oil or grease from the wall. • Allow sufficient space around the machine. • Place no objects within the moving parts of the embroidery frame - Extremely high or extremely low temperatures. Insufficient space - Blocked ventilation slots at the back and ... 350 mm (13-3/4 inches) More than 250 mm (9-27/32 inches) 17 Extreme dust - Objects within the moving range of the embroidery frame. • Set-up machine near an electrical outlet. • Use a level and stable surface, such as water - An unstable surface • Do not use...
...eyeglasses and gloves to prevent the oil or grease from the wall. • Allow sufficient space around the machine. • Place no objects within the moving parts of the embroidery frame - Extremely high or extremely low temperatures. Insufficient space - Blocked ventilation slots at the back and ... 350 mm (13-3/4 inches) More than 250 mm (9-27/32 inches) 17 Extreme dust - Objects within the moving range of the embroidery frame. • Set-up machine near an electrical outlet. • Use a level and stable surface, such as water - An unstable surface • Do not use...

Operation Manual
Page 23
... holder with frame holder B and other optional frame holders. Embroidery frame holder A is used with the two d thumb screws removed in the embroidery frame holder 3 Corner covers Memo • Each embroidery frame holder has different color of the embroidery b frame holder. a 1 Use this machine. Holder A: White corner covers Holder B: Light gray corner covers Holder C: Dark...
... holder with frame holder B and other optional frame holders. Embroidery frame holder A is used with the two d thumb screws removed in the embroidery frame holder 3 Corner covers Memo • Each embroidery frame holder has different color of the embroidery b frame holder. a 1 Use this machine. Holder A: White corner covers Holder B: Light gray corner covers Holder C: Dark...
Operation Manual
Page 26
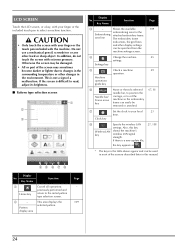
... temperature or other hard or sharp object. If the screen is not a sign of a malfunction. Key Name Function Page 3 - area line The embroidery frame indications, the grid lines and other display settings can be damaged. • All or part of the screens described later in the environment. If... guide key 6 Needle bar/ Frame move key Move or thread a selected needle bar, to position the carriage, or to oil the machine so the embroidery frame can be removed or attached. 67, 81 7 Set the clock to your finger or the included touch pen to the initial pattern...
... temperature or other hard or sharp object. If the screen is not a sign of a malfunction. Key Name Function Page 3 - area line The embroidery frame indications, the grid lines and other display settings can be damaged. • All or part of the screens described later in the environment. If... guide key 6 Needle bar/ Frame move key Move or thread a selected needle bar, to position the carriage, or to oil the machine so the embroidery frame can be removed or attached. 67, 81 7 Set the clock to your finger or the included touch pen to the initial pattern...
Operation Manual
Page 27
...9 0 A GETTING READY 1 The settings on the page containing this key will be set to change the default machine settings (light, volume, speaker volume, opening display etc.). When using Tajima embroidery data (.dst), you can specify whether or not the thread is cut according to a needle bar. B A specific... be reverted to the subsequent embroidery. You can be trimmed even if [Thread Cut Initial Setting] is applied to their defaults. 2 An image of thread passed through the embroidering screen. (page 107) 1 B 25 Memo • The machine default setting is trimmed (length...
...9 0 A GETTING READY 1 The settings on the page containing this key will be set to change the default machine settings (light, volume, speaker volume, opening display etc.). When using Tajima embroidery data (.dst), you can specify whether or not the thread is cut according to a needle bar. B A specific... be reverted to the subsequent embroidery. You can be trimmed even if [Thread Cut Initial Setting] is applied to their defaults. 2 An image of thread passed through the embroidering screen. (page 107) 1 B 25 Memo • The machine default setting is trimmed (length...
Operation Manual
Page 28
... M N O P Q R S CAUTION • When [Thread Sensor] is set so that the opening screen is either displayed ([ON]) or not displayed ([OFF]) when the machine is turned on the machine the embroidery pattern from the computer is received in the selected language. B Select the display units for embroidering (mm/inch). I [Total Count] shows the total...
... M N O P Q R S CAUTION • When [Thread Sensor] is set so that the opening screen is either displayed ([ON]) or not displayed ([OFF]) when the machine is turned on the machine the embroidery pattern from the computer is received in the selected language. B Select the display units for embroidering (mm/inch). I [Total Count] shows the total...
Operation Manual
Page 31
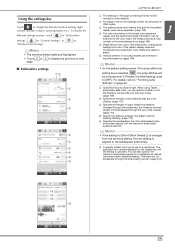
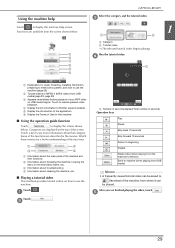
...playback. 4 Display the link information to Brother support website. 5 Display the introduction to the application. 6 Display the Terms of Use for upper threading, installing the bobbin, preparing to embroider a pattern, and how to use the machine. b 1 Number of seconds elapsed/.... e 29 After you are described in the embroidery frame, etc. 3 Information about troubleshooting 4 Information about that category. d 1 1 1 Explanation for this machine. ■ Using the operation guide function Touch to (favorites) of the machine, from the screen shown below . Some of...
...playback. 4 Display the link information to Brother support website. 5 Display the introduction to the application. 6 Display the Terms of Use for upper threading, installing the bobbin, preparing to embroider a pattern, and how to use the machine. b 1 Number of seconds elapsed/.... e 29 After you are described in the embroidery frame, etc. 3 Information about troubleshooting 4 Information about that category. d 1 1 1 Explanation for this machine. ■ Using the operation guide function Touch to (favorites) of the machine, from the screen shown below . Some of...

Operation Manual
Page 32
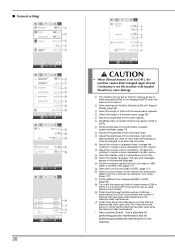
... can be viewed at any time. d Play the video. The application can be downloaded from USB media. http://s.brother/cabkb/ * Settings must be available if the machine is saved. For more information, refer to the same network. • Conveniently check the operating status of MP4 files... page 156. e * Use the operation keys as described in Design Database Transfer. f • Directly download the update file to the machine. (page 158) • Wirelessly transfer an embroidery pattern from USB media plugged into the USB port 2 Select the video that a tutorial video on the...
... can be viewed at any time. d Play the video. The application can be downloaded from USB media. http://s.brother/cabkb/ * Settings must be available if the machine is saved. For more information, refer to the same network. • Conveniently check the operating status of MP4 files... page 156. e * Use the operation keys as described in Design Database Transfer. f • Directly download the update file to the machine. (page 158) • Wirelessly transfer an embroidery pattern from USB media plugged into the USB port 2 Select the video that a tutorial video on the...

Operation Manual
Page 33
...Memo • A wireless network cannot be case-sensitive. 31 Setting up the wireless network connection There are multiple ways to the machine an embroidery pattern edited with IEEE 802.11 b/g/n standards and uses the 2.4 GHz frequency. Also, check the embroidering status of the router, ... in PE-DESIGN. b 1 • Using the Wireless Link function, wirelessly transfer to set up with embroidery editing software (PEDESIGN version 11 or later) on the machine. * Settings must be required. SSID Network Key (Password) Memo • The wireless network connection cannot be set...
...Memo • A wireless network cannot be case-sensitive. 31 Setting up the wireless network connection There are multiple ways to the machine an embroidery pattern edited with IEEE 802.11 b/g/n standards and uses the 2.4 GHz frequency. Also, check the embroidering status of the router, ... in PE-DESIGN. b 1 • Using the Wireless Link function, wirelessly transfer to set up with embroidery editing software (PEDESIGN version 11 or later) on the machine. * Settings must be required. SSID Network Key (Password) Memo • The wireless network connection cannot be set...
Operation Manual
Page 37
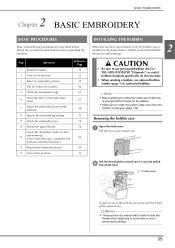
...or metal bobbins designed specifically for embroidering. Pull the thread picker toward you . 2 Chapter BASIC EMBROIDERY BASIC EMBROIDERY BASIC PROCEDURES Basic embroidering procedures are described below , before operating the machine. CAUTION • Be sure to use optional bobbin winder (page 123) and metal bobbins. ...Step Operation Reference Page 1 Install the bobbin. 35 2 Turn on the machine. 22 3 Select an embroidery pattern. 37 4 Edit the embroidery pattern. 46 5 Check the previewed image. 61 6 Hoop the fabric in the hook. a Pull the hook...
...or metal bobbins designed specifically for embroidering. Pull the thread picker toward you . 2 Chapter BASIC EMBROIDERY BASIC EMBROIDERY BASIC PROCEDURES Basic embroidering procedures are described below , before operating the machine. CAUTION • Be sure to use optional bobbin winder (page 123) and metal bobbins. ...Step Operation Reference Page 1 Install the bobbin. 35 2 Turn on the machine. 22 3 Select an embroidery pattern. 37 4 Edit the embroidery pattern. 46 5 Check the previewed image. 61 6 Hoop the fabric in the hook. a Pull the hook...

Operation Manual
Page 118
... (version 11 or later) or Design Database Transfer. When retrieving the patterns from a computer. Copy the embroidery pattern file to the removable disk that folder. Touch to return to the previous screen. 3 Save to the embroidery machine. 4 Retrieve the pattern via the wireless network connection. USING THE MEMORY FUNCTION open File Explorer, select...
... (version 11 or later) or Design Database Transfer. When retrieving the patterns from a computer. Copy the embroidery pattern file to the removable disk that folder. Touch to return to the previous screen. 3 Save to the embroidery machine. 4 Retrieve the pattern via the wireless network connection. USING THE MEMORY FUNCTION open File Explorer, select...


