

Accessory Catalog
Page 4
... the needle fits on the opening on the edge of zipper/piping, avoiding the non-flat parts of zipper/piping, and presses the fabric with a screwdriver. 5. Its position can be adjusted exactly on the presser foot. 4. Brother General Sewing Accessories 05 Sew as you like. Sew. Check the needle does not hit...
... the needle fits on the opening on the edge of zipper/piping, avoiding the non-flat parts of zipper/piping, and presses the fabric with a screwdriver. 5. Its position can be adjusted exactly on the presser foot. 4. Brother General Sewing Accessories 05 Sew as you like. Sew. Check the needle does not hit...

Accessory Catalog
Page 6
...so that the foot guide is Project Book (See page 53 for details.) www.brother.com Lower the needle into the fabric approximately 1/8" from the back and front and roll it into the curled part of the foot. 6. Position the edge of the fabric. Hold the fabric ... foot. 4. Slowly sew 2-3 stitches, making sure the fabric is rolling around the curled part of the foot. 7. Brother General Sewing Accessories 09 Narrow Hemmer Foot Non Stick Foot Overlock Foot Picot Foot Brother General Sewing Accessories 10 SA126 ABCDEFJKMN SA127 GHILOP Skirt Innov-is rolling around the curled...
...so that the foot guide is Project Book (See page 53 for details.) www.brother.com Lower the needle into the fabric approximately 1/8" from the back and front and roll it into the curled part of the foot. 6. Position the edge of the fabric. Hold the fabric ... foot. 4. Slowly sew 2-3 stitches, making sure the fabric is rolling around the curled part of the foot. 7. Brother General Sewing Accessories 09 Narrow Hemmer Foot Non Stick Foot Overlock Foot Picot Foot Brother General Sewing Accessories 10 SA126 ABCDEFJKMN SA127 GHILOP Skirt Innov-is rolling around the curled...

Users Manual - English
Page 3
...the case. The contents of this machine, avoid direct sunlight and high humidity locations. For additional product information, visit our web site at www.brother.com 2 5 Special care is required when sewing: • Always pay close attention is necessary when the machine is used . • ...the needle area. • Do not use bent or damaged needles. • Keep fingers away from all moving parts. If the problem persists, please consult your local authorized Brother dealer. Special care is required around the machine needle. • Switch the sewing machine to the symbol "O" position...
...the case. The contents of this machine, avoid direct sunlight and high humidity locations. For additional product information, visit our web site at www.brother.com 2 5 Special care is required when sewing: • Always pay close attention is necessary when the machine is used . • ...the needle area. • Do not use bent or damaged needles. • Keep fingers away from all moving parts. If the problem persists, please consult your local authorized Brother dealer. Special care is required around the machine needle. • Switch the sewing machine to the symbol "O" position...

Users Manual - English
Page 5
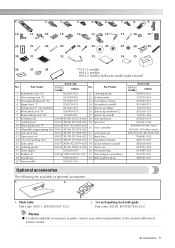
Contents Important Safety Instructions 1 Introduction ...7 Sewing Machine Features ...7 Accessories ...8 Included accessories ...8 Optional accessories ...9 Names of Machine Parts and Their Functions 10 Front view ...10 Needle and presser foot section ...11 Right-side/rear view ...11 Operation buttons ...12 Operation panel ...13 GETTING ...
Contents Important Safety Instructions 1 Introduction ...7 Sewing Machine Features ...7 Accessories ...8 Included accessories ...8 Optional accessories ...9 Names of Machine Parts and Their Functions 10 Front view ...10 Needle and presser foot section ...11 Right-side/rear view ...11 Operation buttons ...12 Operation panel ...13 GETTING ...

Users Manual - English
Page 9
...dealer. z The screw for the presser foot holder is available through your authorized dealer. (Part code: XA4813-051) z The organized accessory tray is missing or damaged, contact your authorized dealer. (Part code: XC4489-051) ■ Attaching the stitch pattern plate The stitch pattern plate shows ...the stitch numbers and the patterns available with each stitch mode. Accessories After opening the box, check that the following items should also be used on this machine model NX-650.
...dealer. z The screw for the presser foot holder is available through your authorized dealer. (Part code: XA4813-051) z The organized accessory tray is missing or damaged, contact your authorized dealer. (Part code: XC4489-051) ■ Attaching the stitch pattern plate The stitch pattern plate shows ...the stitch numbers and the patterns available with each stitch mode. Accessories After opening the box, check that the following items should also be used on this machine model NX-650.
Users Manual - English
Page 10
... 90/14 2 needles: Ball point needle (gold colored) Part Code No. Accessories 9 Wide table Part code: SA551, WT5(XC9567-152) 2. 1/4 inch quilting foot with guide Part code: SA185, F057(XC7416-252) Memo z To obtain optional accessories or parts, contact your sales representative or the nearest authorized service center... SFB (XA5539-151) 37 Disc-shaped screwdriver 19 Needle set X58358-051 38 Stitch pattern plate 20 Twin needle X59296-151 Part Code U.S.A./ Canada Others X59476-051 135793-001 XC8349-051 X55468-051 130012-054 X55260-153 130013-154 XC4654-051 XA5523-050 ...
... 90/14 2 needles: Ball point needle (gold colored) Part Code No. Accessories 9 Wide table Part code: SA551, WT5(XC9567-152) 2. 1/4 inch quilting foot with guide Part code: SA185, F057(XC7416-252) Memo z To obtain optional accessories or parts, contact your sales representative or the nearest authorized service center... SFB (XA5539-151) 37 Disc-shaped screwdriver 19 Needle set X58358-051 38 Stitch pattern plate 20 Twin needle X59296-151 Part Code U.S.A./ Canada Others X59476-051 135793-001 XC8349-051 X55468-051 130012-054 X55260-153 130013-154 XC4654-051 XA5523-050 ...

Users Manual - English
Page 11
... the bobbin winder when winding the bobbin. i Operation buttons and sewing speed controller Use these descriptions to place the spool of the machine parts. d Bobbin winding thread guide and pretension disk Pass the thread under the thread guide plate. When sewing cylindrical pieces, remove the flat bed...the window to check the position of the sewing machine and their functions are described below. Names of Machine Parts and Their Functions The names of the various parts of the take -up lever check window Look through the thread cutter to thread the needle. l Needle ...
... the bobbin winder when winding the bobbin. i Operation buttons and sewing speed controller Use these descriptions to place the spool of the machine parts. d Bobbin winding thread guide and pretension disk Pass the thread under the thread guide plate. When sewing cylindrical pieces, remove the flat bed...the window to check the position of the sewing machine and their functions are described below. Names of Machine Parts and Their Functions The names of the various parts of the take -up lever check window Look through the thread cutter to thread the needle. l Needle ...

Users Manual - English
Page 12
... you to use your machine. Memo z Refer to pages 9 through the thread guide disk when using the needle threader to adjust the amount of Machine Parts and Their Functions 11 a Presser foot dial Use the presser foot dial to thread the needle. Names of pressure that the presser foot applies to...
... you to use your machine. Memo z Refer to pages 9 through the thread guide disk when using the needle threader to adjust the amount of Machine Parts and Their Functions 11 a Presser foot dial Use the presser foot dial to thread the needle. Names of pressure that the presser foot applies to...
Users Manual - English
Page 14
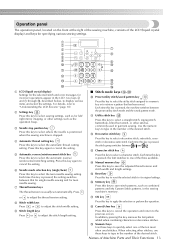
... stitch, or other stitches, use these keys to retrieve a pattern that for single needle sewing and for incorrect operations appear in the number of Machine Parts and Their Functions 13
... stitch, or other stitches, use these keys to retrieve a pattern that for single needle sewing and for incorrect operations appear in the number of Machine Parts and Their Functions 13

Users Manual - English
Page 23
...that the machine should be threaded for winding the bobbin is indicated by a broken line on the sewing machine. Use of the same type (part code: SA156, SFB(XA5539-151)). If bobbins from other bobbin may result in injuries or damage to wind the thread onto the bobbin, ... describes how to the machine. ● The included bobbin was designed specifically for this sewing machine. CAUTION ● Only use the bobbin (part code: SA156, SFB(XA5539-151)) designed specifically for this sewing machine. Bobbin precautions Be sure to observe the following precautions concerning the bobbin.
...that the machine should be threaded for winding the bobbin is indicated by a broken line on the sewing machine. Use of the same type (part code: SA156, SFB(XA5539-151)). If bobbins from other bobbin may result in injuries or damage to wind the thread onto the bobbin, ... describes how to the machine. ● The included bobbin was designed specifically for this sewing machine. CAUTION ● Only use the bobbin (part code: SA156, SFB(XA5539-151)) designed specifically for this sewing machine. Bobbin precautions Be sure to observe the following precautions concerning the bobbin.

Users Manual - English
Page 27
... cover. q Slide the bobbin cover latch to drop the bobbin. b Hold the bobbin with your right hand and hold c the end of the same type (part code: SA156, SFB(XA5539-151)). a Bobbin cover b Latch X The bobbin cover opens. CAUTION ● Be sure to install the bobbin so that has been correctly...
... cover. q Slide the bobbin cover latch to drop the bobbin. b Hold the bobbin with your right hand and hold c the end of the same type (part code: SA156, SFB(XA5539-151)). a Bobbin cover b Latch X The bobbin cover opens. CAUTION ● Be sure to install the bobbin so that has been correctly...

Users Manual - English
Page 34
... of the same stitch with the twin needle, the sewing machine may bend the needle or damage the machine. ● Never use the twin needle (part code: X59296-151).
... of the same stitch with the twin needle, the sewing machine may bend the needle or damage the machine. ● Never use the twin needle (part code: X59296-151).

Users Manual - English
Page 41
... sure to remove the needle. 1 2 a Screwdriver b Needle clamp screw • Do not apply a strong force when loosening or tightening the needle clamp screw, otherwise certain parts of the sewing machine may result. GETTING READY Lower the presser foot lever.
... sure to remove the needle. 1 2 a Screwdriver b Needle clamp screw • Do not apply a strong force when loosening or tightening the needle clamp screw, otherwise certain parts of the sewing machine may result. GETTING READY Lower the presser foot lever.

Users Manual - English
Page 47
...the flat bed attachment makes it into place. b When you wish to sew cylindrical pieces such as cuffs and pant legs. Slide the part that you are finished with free-arm sewing, c install the flat bed attachment back in its original position. Pull the flat bed ...flat bed attachment removed, freearm sewing is possible. b a a Lower right corner b Sewing machine bed Note z The optional wide table is available through your brother dealer. 46 Pull out the four legs until they snap into place. a Open up the legs at the bottom of fabric easier. GETTING READY Sewing...
...the flat bed attachment makes it into place. b When you wish to sew cylindrical pieces such as cuffs and pant legs. Slide the part that you are finished with free-arm sewing, c install the flat bed attachment back in its original position. Pull the flat bed ...flat bed attachment removed, freearm sewing is possible. b a a Lower right corner b Sewing machine bed Note z The optional wide table is available through your brother dealer. 46 Pull out the four legs until they snap into place. a Open up the legs at the bottom of fabric easier. GETTING READY Sewing...

Users Manual - English
Page 51
... needle may break. ● Never use bent needles. General sewing procedure Follow the basic procedures below . In addition, keep your hands away from all moving parts such as the needle and handwheel, otherwise injuries may occur. ● Do not pull or push the fabric too hard while sewing, otherwise injuries may...
... needle may break. ● Never use bent needles. General sewing procedure Follow the basic procedures below . In addition, keep your hands away from all moving parts such as the needle and handwheel, otherwise injuries may occur. ● Do not pull or push the fabric too hard while sewing, otherwise injuries may...

Users Manual - English
Page 86
... The maximum buttonhole length is used for sewing buttonholes, are indicated below. Use chalk to the back, as shown below. 1 1 1 3 1 a Reinforcement stitching The names of parts of buttonhole foot "A", which is about 28 mm (1-1/8 inches) (diameter + thickness of buttonhole b foot "A", and then insert the button that will be put through the...
... The maximum buttonhole length is used for sewing buttonholes, are indicated below. Use chalk to the back, as shown below. 1 1 1 3 1 a Reinforcement stitching The names of parts of buttonhole foot "A", which is about 28 mm (1-1/8 inches) (diameter + thickness of buttonhole b foot "A", and then insert the button that will be put through the...

Users Manual - English
Page 89
...9632; Sewing buttonholes on stretch fabrics When sewing buttonholes on a scrap piece of the fabric, and then tie it . Hook the gimp thread onto the part of the d gimp thread. Use a handsewing needle to pull the gimp g thread to the thickness of a buttonhole foot "A" shown in the illustration so... the buttonhole. Trim off any slack. • For details, refer to "Replacing the presser foot" (page 41). With a seam ripper, cut the middle part of the h gimp thread remaining at the top end of the gimp thread. 88 b • For details, refer to "Adjusting the stitch width" (page...
...9632; Sewing buttonholes on stretch fabrics When sewing buttonholes on a scrap piece of the fabric, and then tie it . Hook the gimp thread onto the part of the d gimp thread. Use a handsewing needle to pull the gimp g thread to the thickness of a buttonhole foot "A" shown in the illustration so... the buttonhole. Trim off any slack. • For details, refer to "Replacing the presser foot" (page 41). With a seam ripper, cut the middle part of the h gimp thread remaining at the top end of the gimp thread. 88 b • For details, refer to "Adjusting the stitch width" (page...

Users Manual - English
Page 104
... inch quilting foot Appliqué, Patchwork and Quilt Stitching 103 ■ For a seam allowance on the left side Align the left edge of the narrow part of 6.4 mm (1/4 inch). Attach the 1/4 inch quilting foot. e When the end of the stitching is used, seams can be sewn with the ...right edge of the narrow part of the 1/4 inch quilting foot. 1 2 a 6.5 mm (1/4 inch) Memo z To change the width of the seam allowance (the needle position), adjust the stitch width. b...
... inch quilting foot Appliqué, Patchwork and Quilt Stitching 103 ■ For a seam allowance on the left side Align the left edge of the narrow part of 6.4 mm (1/4 inch). Attach the 1/4 inch quilting foot. e When the end of the stitching is used, seams can be sewn with the ...right edge of the narrow part of the 1/4 inch quilting foot. 1 2 a 6.5 mm (1/4 inch) Memo z To change the width of the seam allowance (the needle position), adjust the stitch width. b...

Users Manual - English
Page 128
Changing the pattern length The length of one part of a satin stitch can be set within the range of five sizes. Select a satin stitch (No. 32-47 of a satin stitch appears. 3 Press e key). (OK ...
Changing the pattern length The length of one part of a satin stitch can be set within the range of five sizes. Select a satin stitch (No. 32-47 of a satin stitch appears. 3 Press e key). (OK ...

Users Manual - English
Page 132
... edit it has • If nothing was pressed appears again. • To select a different pocket, use the numeric keys to adjust the sewing. d If the part of a different Check the sewn pattern. If the pattern is sewn.
... edit it has • If nothing was pressed appears again. • To select a different pocket, use the numeric keys to adjust the sewing. d If the part of a different Check the sewn pattern. If the pattern is sewn.

