Users Manual - English
Page 11
... time has passed, stop charging it, otherwise fire, electric shock or damage may result. ! Do not operate the printer while holding only the paper cassette cover. Keep the printer and its accessories (rechargeable battery, consumables, plastic bags, labels, etc.) out of the reach of the... printer can be used . ! Stop operating the printer if it at least every six months. If the printer is slightly charged so that the...
... time has passed, stop charging it, otherwise fire, electric shock or damage may result. ! Do not operate the printer while holding only the paper cassette cover. Keep the printer and its accessories (rechargeable battery, consumables, plastic bags, labels, etc.) out of the reach of the... printer can be used . ! Stop operating the printer if it at least every six months. If the printer is slightly charged so that the...
Users Manual - English
Page 15
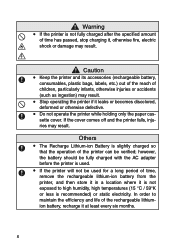
..., extreme dust, or extreme vibrations, otherwise the printer may be damaged or malfunction. ! " When the printer is charging or printing. " Do not block the paper output slot. Operating precautions " Operate this printer in a location exposed to the characteristics of prints possible. Do not operate or store this printer in the printer being damaged or malfunctioning. ! Humidity: 20 - 80...
..., extreme dust, or extreme vibrations, otherwise the printer may be damaged or malfunction. ! " When the printer is charging or printing. " Do not block the paper output slot. Operating precautions " Operate this printer in a location exposed to the characteristics of prints possible. Do not operate or store this printer in the printer being damaged or malfunctioning. ! Humidity: 20 - 80...
Users Manual - English
Page 16
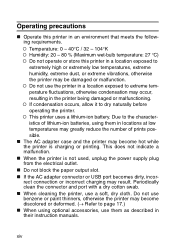
... Precautions " Use thermal paper with this may be damaged. " Concerning the paper cassette and the handling of direct sunlight, otherwise the paper may become discolored or a malfunction may become discolored. Do not use folded, curled, cut, wet or damp paper, otherwise a paper misfeed or a malfunction may result. ! Do not leave paper cassettes in the paper while the printer is written...
... Precautions " Use thermal paper with this may be damaged. " Concerning the paper cassette and the handling of direct sunlight, otherwise the paper may become discolored or a malfunction may become discolored. Do not use folded, curled, cut, wet or damp paper, otherwise a paper misfeed or a malfunction may result. ! Do not leave paper cassettes in the paper while the printer is written...

Users Manual - English
Page 17
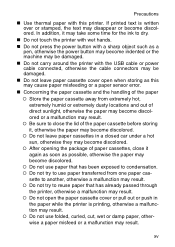
...possessions without permission. Do not touch paper cassettes or paper with wet hands, otherwise a malfunction may result. ! Do not affix the adhesive-backed paper to an inconspicuous area of the material that the adhesive-backed paper is attached to, the adhesive-backed paper may become discolored, peel off, ...be difficult to remove, leave adhesive behind or damage the surface that it to . Before using the adhesive-backed paper, test it by affixing a small piece...
...possessions without permission. Do not touch paper cassettes or paper with wet hands, otherwise a malfunction may result. ! Do not affix the adhesive-backed paper to an inconspicuous area of the material that the adhesive-backed paper is attached to, the adhesive-backed paper may become discolored, peel off, ...be difficult to remove, leave adhesive behind or damage the surface that it to . Before using the adhesive-backed paper, test it by affixing a small piece...

Users Manual - English
Page 18
Contents Contents Introduction i Precautions v Operating precautions xiv Contents 1 1 General Description 2 2 Operating Procedures 3 Removing the protective film 3 Inserting/removing the rechargeable battery 3 Charging 4 Using IrDA (infrared 6 Using Bluetooth 6 Turning on/off the printer 7 Bluetooth Functions Guide 8 Preparing the paper 9 Installing the paper cassette 11 Sending data from a Pocket PC or computer ..........13 Feeding paper 15 Using the paper guide 16 Maintenance 17 3 Appendix 19 Product specifications 19 Troubleshooting 20 Indicator lights 24 1
Contents Contents Introduction i Precautions v Operating precautions xiv Contents 1 1 General Description 2 2 Operating Procedures 3 Removing the protective film 3 Inserting/removing the rechargeable battery 3 Charging 4 Using IrDA (infrared 6 Using Bluetooth 6 Turning on/off the printer 7 Bluetooth Functions Guide 8 Preparing the paper 9 Installing the paper cassette 11 Sending data from a Pocket PC or computer ..........13 Feeding paper 15 Using the paper guide 16 Maintenance 17 3 Appendix 19 Product specifications 19 Troubleshooting 20 Indicator lights 24 1

Users Manual - English
Page 20
...the rechargeable battery 1 Slide the rechargeable battery cover (at the back of the printer) in the directions shown at a. 2 Insert your finger at b, and then remove the cover.... 3 Perform step 2, then step 1 to attach the cover. #When handling the rechargeable battery, refer to and observe the precautions on page x. 3 Before using the printer...the rechargeable battery cover (at the Lithium-ion battery b back of the printer) in the a directions shown at a. 2 Insert your finger at b, and c then remove the...
...the rechargeable battery 1 Slide the rechargeable battery cover (at the back of the printer) in the directions shown at a. 2 Insert your finger at b, and then remove the cover.... 3 Perform step 2, then step 1 to attach the cover. #When handling the rechargeable battery, refer to and observe the precautions on page x. 3 Before using the printer...the rechargeable battery cover (at the Lithium-ion battery b back of the printer) in the a directions shown at a. 2 Insert your finger at b, and c then remove the...

Users Manual - English
Page 26
To prepare the paper cassette Prepare the paper cassette before installing it into the slit (2) at the back of any paper while the paper cassette is being prepared. 1 Firmly fold the lid back along the fold (1). Use of the cassette. 9 Operating Procedures Preparing the paper Use only the paper cassette designed exclusively for this printer. Front Back 2 Insert the tab on the lid into the printer. • Be careful not to drop any other paper will result in damage.
To prepare the paper cassette Prepare the paper cassette before installing it into the slit (2) at the back of any paper while the paper cassette is being prepared. 1 Firmly fold the lid back along the fold (1). Use of the cassette. 9 Operating Procedures Preparing the paper Use only the paper cassette designed exclusively for this printer. Front Back 2 Insert the tab on the lid into the printer. • Be careful not to drop any other paper will result in damage.

Users Manual - English
Page 27
... become discolored. 10 After all of the paper is made of direct sunlight. ! Do not touch paper cassettes or paper with wet hands, otherwise a malfunction may result. ! Use the paper as quickly as possible, otherwise it may result. ! " Handling the paper cassette ! This printer determines the paper type depending on the installed paper cassette, then automatically selects the settings...
... become discolored. 10 After all of the paper is made of direct sunlight. ! Do not touch paper cassettes or paper with wet hands, otherwise a malfunction may result. ! Use the paper as quickly as possible, otherwise it may result. ! " Handling the paper cassette ! This printer determines the paper type depending on the installed paper cassette, then automatically selects the settings...

Users Manual - English
Page 28
Paper type indication • When loading the paper cassette, make sure that it is not folded, otherwise a paper misfeed may result. 11 Operating Procedures Installing the paper cassette 1 Slide the paper cassette cover (on the paper cassette should point toward you. The end of the paper should face up. The paper type indication on the top of the paper is correctly aligned and that the end of the printer) in direction 1. → The paper cassette cover will open in the direction indicated by 2. 2 Insert the paper cassette.
Paper type indication • When loading the paper cassette, make sure that it is not folded, otherwise a paper misfeed may result. 11 Operating Procedures Installing the paper cassette 1 Slide the paper cassette cover (on the paper cassette should point toward you. The end of the paper should face up. The paper type indication on the top of the paper is correctly aligned and that the end of the printer) in direction 1. → The paper cassette cover will open in the direction indicated by 2. 2 Insert the paper cassette.

Users Manual - English
Page 29
... If the paper cassette is printing, do not apply pressure to the paper output slot or place anything on the cassette can be seen through the paper check window, and the paper cassette cover will be locked. Paper check window Paper type indication • Do not remove the paper from the paper cassette and load it directly into the printer. •...
... If the paper cassette is printing, do not apply pressure to the paper output slot or place anything on the cassette can be seen through the paper check window, and the paper cassette cover will be locked. Paper check window Paper type indication • Do not remove the paper from the paper cassette and load it directly into the printer. •...

Users Manual - English
Page 32
If the paper has fed out of the paper output slot: 1 Pull the paper out from the paper output slot. • When pulling out the paper, be sure not to tear it . If the paper has not fed out of the printer. 15 sette. 3 Pull out the misfed paper. • When pulling out the paper, be sure not to the following procedure. Operating Procedures Feeding paper If a paper misfeed occurs, remove the paper according to tear it . • Pulling out the paper will not affect the operation of the paper output slot: 1 Open the paper cassette cover. 2 Remove the paper cas-
If the paper has fed out of the paper output slot: 1 Pull the paper out from the paper output slot. • When pulling out the paper, be sure not to tear it . If the paper has not fed out of the printer. 15 sette. 3 Pull out the misfed paper. • When pulling out the paper, be sure not to the following procedure. Operating Procedures Feeding paper If a paper misfeed occurs, remove the paper according to tear it . • Pulling out the paper will not affect the operation of the paper output slot: 1 Open the paper cassette cover. 2 Remove the paper cas-

Users Manual - English
Page 33
...paper guide may damage the printer or cause the cover or paper guide to unhook the paper guide tabs near the areas shown by 1 below. ① 16 Removing the paper guide 1 Open the paper cassette cover. 2 One side at a time, use a standard (slotted) screwdriver to warp. Using the paper guide Installing the paper guide *The paper... guide (PG-200) is sold separately. 1 Position the paper guide so that the paper check window is visible. 2 Align the tabs on the left and right sides...
...paper guide may damage the printer or cause the cover or paper guide to unhook the paper guide tabs near the areas shown by 1 below. ① 16 Removing the paper guide 1 Open the paper cassette cover. 2 One side at a time, use a standard (slotted) screwdriver to warp. Using the paper guide Installing the paper guide *The paper... guide (PG-200) is sold separately. 1 Position the paper guide so that the paper check window is visible. 2 Align the tabs on the left and right sides...

Users Manual - English
Page 34
... or other dirt from the printer by wiping it . If the printer is dirty, it with a slightly damp cloth. ! Cleaning the printer Clean the front of the printer. 1 Clean off the printer before cleaning it with a dry cotton swab. Paper cassette sensor 17 Maintenance Operating ...Procedures ! Be sure to correctly detect the paper cassette, and a malfunction may become discolored ...
... or other dirt from the printer by wiping it . If the printer is dirty, it with a slightly damp cloth. ! Cleaning the printer Clean the front of the printer. 1 Clean off the printer before cleaning it with a dry cotton swab. Paper cassette sensor 17 Maintenance Operating ...Procedures ! Be sure to correctly detect the paper cassette, and a malfunction may become discolored ...

Users Manual - English
Page 35
Rotate the pick-up roller and repeat the procedure to the pick-up roller. Cleaning the pick-up roller If the pick-up roller is removed with the tape. Cellophane tape → Any dirt on the pick-up roller. Pick-up roller 2 Remove the cellophane tape from the pick-up roller is dirty, paper may not be fed correctly. 1 Affix a piece of cellophane tape to clean the entire surface of the roller. 18
Rotate the pick-up roller and repeat the procedure to the pick-up roller. Cleaning the pick-up roller If the pick-up roller is removed with the tape. Cellophane tape → Any dirt on the pick-up roller. Pick-up roller 2 Remove the cellophane tape from the pick-up roller is dirty, paper may not be fed correctly. 1 Affix a piece of cellophane tape to clean the entire surface of the roller. 18
Users Manual - English
Page 36
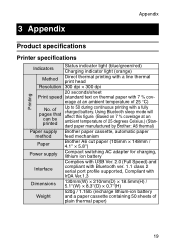
... 25 degrees Celsius.) (Standard paper manufactured by Brother: A6 thermal) Paper supply Brother paper cassette, automatic paper method feed mechanism Paper Brother A6 cut paper (105mm × 148mm /...paper cassette containing 50 sheets of plain thermal paper) 19 Using Bluetooth sleep mode will affect this figure. (Based on thermal paper with a fully charged battery. 3 Appendix Appendix Product specifications Printer specifications Printing Indicators Status indicator light (blue/green/red) Charging indicator light (orange) Method Direct thermal printing with a line thermal print...
... 25 degrees Celsius.) (Standard paper manufactured by Brother: A6 thermal) Paper supply Brother paper cassette, automatic paper method feed mechanism Paper Brother A6 cut paper (105mm × 148mm /...paper cassette containing 50 sheets of plain thermal paper) 19 Using Bluetooth sleep mode will affect this figure. (Based on thermal paper with a fully charged battery. 3 Appendix Appendix Product specifications Printer specifications Printing Indicators Status indicator light (blue/green/red) Charging indicator light (orange) Method Direct thermal printing with a line thermal print...
Users Manual - English
Page 37
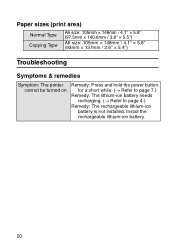
for a short while. (→ Refer to page 7.) Remedy: The lithium-ion battery needs recharging. (→ Refer to page 4.) Remedy: The rechargeable lithium-ion battery is not installed. Install the rechargeable lithium-ion battery. 20 Paper sizes (print area) Normal Type Copying Type A6 size: 105mm × 148mm / 4.1'' × 5.8'' (97.5mm × 140.6mm / 3.8'' × 5.5'') A6 size: 105mm × 148mm / 4.1'' × 5.8'' (93mm × 137mm / 3.6'' × 5.4'') Troubleshooting Symptoms & remedies Symptom: The printer Remedy: Press and hold the power button cannot be turned on.
for a short while. (→ Refer to page 7.) Remedy: The lithium-ion battery needs recharging. (→ Refer to page 4.) Remedy: The rechargeable lithium-ion battery is not installed. Install the rechargeable lithium-ion battery. 20 Paper sizes (print area) Normal Type Copying Type A6 size: 105mm × 148mm / 4.1'' × 5.8'' (97.5mm × 140.6mm / 3.8'' × 5.5'') A6 size: 105mm × 148mm / 4.1'' × 5.8'' (93mm × 137mm / 3.6'' × 5.4'') Troubleshooting Symptoms & remedies Symptom: The printer Remedy: Press and hold the power button cannot be turned on.
Users Manual - English
Page 39
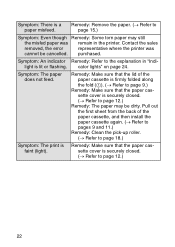
...printer. cator lights" on page 24. Pull out the first sheet from the back of the paper cassette is firmly folded along the fold (1). (→ Refer to page 9.) Remedy: Make sure that the paper cassette cover is securely closed . (→ Refer to page 18.) Symptom: The print is a paper... Refer to page 12.) 22 purchased. Remedy: Remove the paper. (→ Refer to page 12.) Remedy: The paper may still the misfed paper was cannot be dirty. Contact the sales removed, the error representative where the printer was remain in "Indilight is securely closed . (→ Refer...
...printer. cator lights" on page 24. Pull out the first sheet from the back of the paper cassette is firmly folded along the fold (1). (→ Refer to page 9.) Remedy: Make sure that the paper cassette cover is securely closed . (→ Refer to page 18.) Symptom: The print is a paper... Refer to page 12.) 22 purchased. Remedy: Remove the paper. (→ Refer to page 12.) Remedy: The paper may still the misfed paper was cannot be dirty. Contact the sales removed, the error representative where the printer was remain in "Indilight is securely closed . (→ Refer...

Users Manual - English
Page 40
... the areas off. B 23 Refer to the illustration and use the tip of the arrow to form a "V". Appendix Symptom: The paper cassette cover cannot be closed. The pin snaps in the direction of a ball-point pen to slide the indicated part in more easily if the two parts are angled to free... it . 1 2 Free the part on the opposite side using the same method Symptom: The paper Remedy: Insert the pins into place. Remedy: The...
... the areas off. B 23 Refer to the illustration and use the tip of the arrow to form a "V". Appendix Symptom: The paper cassette cover cannot be closed. The pin snaps in the direction of a ball-point pen to slide the indicated part in more easily if the two parts are angled to free... it . 1 2 Free the part on the opposite side using the same method Symptom: The paper Remedy: Insert the pins into place. Remedy: The...

Users Manual - English
Page 41
... the wrong direction. The paper cassette is no more paper. The inside of the interfaces, data cannot be received using the other interface until it is complete. However, once a connection is established using one of the printer has started to overheat. Wait until printing is possible ...to receive data using both the Bluetooth and USB interfaces. A paper misfeed occurred. If an error has occurred, check for the following causes....
... the wrong direction. The paper cassette is no more paper. The inside of the interfaces, data cannot be received using the other interface until it is complete. However, once a connection is established using one of the printer has started to overheat. Wait until printing is possible ...to receive data using both the Bluetooth and USB interfaces. A paper misfeed occurred. If an error has occurred, check for the following causes....

Users Manual - English
Page 44
...on the communication speed, it cannot send data to process multiple functions, like a PC, they do not include printing features. Abbreviation for "personal digital assistants"; Since the protocol allows communication between a USB host (mainly a PC with...PC 2003 SE or Windows MobileTM 5.0 operating system. The Brother Mobile Software, included with this printer. Since they are not equipped to this printer, was assumed that electronic devices would be used instead of...device about the size of paper notepads, the original devices entering the mainstream were not equipped with 480 Mbps.
...on the communication speed, it cannot send data to process multiple functions, like a PC, they do not include printing features. Abbreviation for "personal digital assistants"; Since the protocol allows communication between a USB host (mainly a PC with...PC 2003 SE or Windows MobileTM 5.0 operating system. The Brother Mobile Software, included with this printer. Since they are not equipped to this printer, was assumed that electronic devices would be used instead of...device about the size of paper notepads, the original devices entering the mainstream were not equipped with 480 Mbps.


