
Operation Manual
Page 5
... threading (for models equipped with a quick-set bobbin 16 Upper threading 17 Using the needle threader (for models equipped with a twin needle (Option 25 Thread tension 27 3. APPENDIX 40 MAINTENANCE 40 Restrictions on oiling 40 Precautions on storing the machine 40 Cleaning 40 TROUBLESHOOTING 42 INDEX 45 4 CONTENTS IMPORTANT SAFETY INSTRUCTIONS...
... threading (for models equipped with a quick-set bobbin 16 Upper threading 17 Using the needle threader (for models equipped with a twin needle (Option 25 Thread tension 27 3. APPENDIX 40 MAINTENANCE 40 Restrictions on oiling 40 Precautions on storing the machine 40 Cleaning 40 TROUBLESHOOTING 42 INDEX 45 4 CONTENTS IMPORTANT SAFETY INSTRUCTIONS...
Operation Manual
Page 7
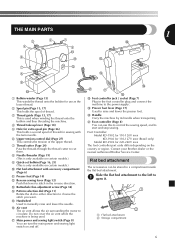
...only available on certain models.) 0 Flat bed attachment with the twin needle. 6 Upper tension-control dial (Page 27) This controls the tension of thread for 220-240V area The foot controller part code differs depending on certain models.)... country or region. G Main power and sewing light switch (Page 8) You can be stored in a compartment inside the flat bed attachment. Contact your Brother dealer or the nearest authorized Brother Service Center. E Handwheel Used to 1 open it. 1 2 1 Flat bed attachment 2 Storage compartment 6 THE MAIN PARTS 3 2 1 1 J 4 5 D 6 C E...
...only available on certain models.) 0 Flat bed attachment with the twin needle. 6 Upper tension-control dial (Page 27) This controls the tension of thread for 220-240V area The foot controller part code differs depending on certain models.)... country or region. G Main power and sewing light switch (Page 8) You can be stored in a compartment inside the flat bed attachment. Contact your Brother dealer or the nearest authorized Brother Service Center. E Handwheel Used to 1 open it. 1 2 1 Flat bed attachment 2 Storage compartment 6 THE MAIN PARTS 3 2 1 1 J 4 5 D 6 C E...

Operation Manual
Page 14
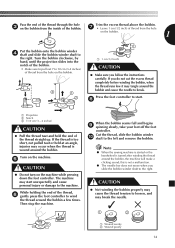
...incorrectly, the thread may cause damage to the machine. Using other models, the machine will not work properly. Then, pass the thread around the pre-tension disk and pull the thread in completely. 13 CAUTION ● If the spool of the same type (part code: SA156, SFB: XA5539-151). ... size 11.5 mm (7/16 inch) This model Other models 1 1 Pull the thread in the groove on the spool pin. If you , in completely. 2 3 1 Pre-tension disk 2 Bobbin winder shaft Pull up the spool pin and put a spool of 1 thread on this pin. 3 Bobbin While holding the thread from other bobbins...
...incorrectly, the thread may cause damage to the machine. Using other models, the machine will not work properly. Then, pass the thread around the pre-tension disk and pull the thread in completely. 13 CAUTION ● If the spool of the same type (part code: SA156, SFB: XA5539-151). ... size 11.5 mm (7/16 inch) This model Other models 1 1 Pull the thread in the groove on the spool pin. If you , in completely. 2 3 1 Pre-tension disk 2 Bobbin winder shaft Pull up the spool pin and put a spool of 1 thread on this pin. 3 Bobbin While holding the thread from other bobbins...
Operation Manual
Page 15
... shaft to the right. If you slide the bobbin winder shaft to the right. CAUTION ● Not winding the bobbin properly may cause the thread tension to break. The machine may occur when the thread is not a malfunction. ● The needle bar does not move when you do not cut the...
... shaft to the right. If you slide the bobbin winder shaft to the right. CAUTION ● Not winding the bobbin properly may cause the thread tension to break. The machine may occur when the thread is not a malfunction. ● The needle bar does not move when you do not cut the...
Operation Manual
Page 16
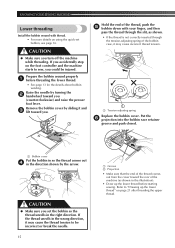
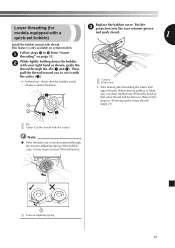
... set bobbin, see page 16. KNOWING YOUR SEWING MACHINE Lower threading Install the bobbin wound with your finger, and then pass the thread through the tension-adjusting spring of the thread, push the 5 bobbin down with thread. • For more details on page 21 after threading the upper thread....right direction. Refer to be injured. CAUTION ● Make sure you . 1 Hold the end of the bobbin case, it may cause the thread tension to "Drawing up the lower thread before threading the lower thread. • See page 13 for the details about bobbin winding. Remove the bobbin cover...
... set bobbin, see page 16. KNOWING YOUR SEWING MACHINE Lower threading Install the bobbin wound with your finger, and then pass the thread through the tension-adjusting spring of the thread, push the 5 bobbin down with thread. • For more details on page 21 after threading the upper thread....right direction. Refer to be injured. CAUTION ● Make sure you . 1 Hold the end of the bobbin case, it may cause the thread tension to "Drawing up the lower thread before threading the lower thread. • See page 13 for the details about bobbin winding. Remove the bobbin cover...
Operation Manual
Page 17
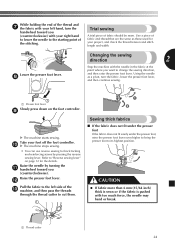
... after threading the lower and upper thread. When sewing gathers or darts, you to cut it may cause incorrect thread tension. 1 1 Tension-adjusting spring 16 This feature is not correctly inserted through the tension-adjusting spring of the bobbin case, it with your right hand as shown, guide the thread through the slit...
... after threading the lower and upper thread. When sewing gathers or darts, you to cut it may cause incorrect thread tension. 1 1 Tension-adjusting spring 16 This feature is not correctly inserted through the tension-adjusting spring of the bobbin case, it with your right hand as shown, guide the thread through the slit...
Operation Manual
Page 25
... Take your foot off the foot controller. 0 The machine stops sewing. • You can use reverse sewing for your project, and check the thread tension and stitch length and width. While holding the end of the thread and 7 the fabric with your left side of the c machine, and then pass...
... Take your foot off the foot controller. 0 The machine stops sewing. • You can use reverse sewing for your project, and check the thread tension and stitch length and width. While holding the end of the thread and 7 the fabric with your left side of the c machine, and then pass...
Operation Manual
Page 28
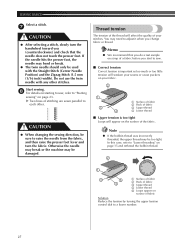
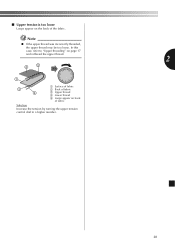
... 5 Loops appear on your fabric. 2 1 3 4 1 Surface of fabric 2 Back of fabric 3 Upper thread 4 Lower thread ■ Upper tension is important as too much or too little tension will weaken your stitches. Otherwise the needle may break or the machine may need to a lower number. 27 Note ● If...bend or break. ● The twin needle should only be damaged. Thread tension The tension of the thread will appear on page 23. Two lines of fabric Solution Reduce the tension by turning the upper tension control dial to adjust it when you (counterclockwise) and check that you ...
... 5 Loops appear on your fabric. 2 1 3 4 1 Surface of fabric 2 Back of fabric 3 Upper thread 4 Lower thread ■ Upper tension is important as too much or too little tension will weaken your stitches. Otherwise the needle may break or the machine may need to a lower number. 27 Note ● If...bend or break. ● The twin needle should only be damaged. Thread tension The tension of the thread will appear on page 23. Two lines of fabric Solution Reduce the tension by turning the upper tension control dial to adjust it when you (counterclockwise) and check that you ...
Operation Manual
Page 29
■ Upper tension is too loose Loops appear on back of the fabric. In this case, refer to "Upper threading" on page 17 and rethread the upper thread. 2 25 1 3 4 1 Surface of fabric 2 Back of fabric 3 Upper thread 4 Lower thread 5 Loops appear on the back of fabric Solution Increase the tension by turning the upper tension control dial to a higher number. 28 Note ● If the upper thread was incorrectly threaded, the upper thread may be too loose.
■ Upper tension is too loose Loops appear on back of the fabric. In this case, refer to "Upper threading" on page 17 and rethread the upper thread. 2 25 1 3 4 1 Surface of fabric 2 Back of fabric 3 Upper thread 4 Lower thread 5 Loops appear on the back of fabric Solution Increase the tension by turning the upper tension control dial to a higher number. 28 Note ● If the upper thread was incorrectly threaded, the upper thread may be too loose.
Operation Manual
Page 30
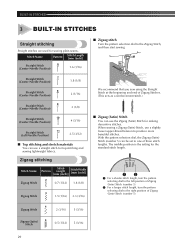
... 10 (Center Needle Position) 4 (3/16) Straight Stitch 11 (Left Needle Position) 2.5 (3/32) ■ Top stitching and stretch materials You can use a slightly looser upper-thread tension to the right position of Zigzag (Satin) Stitch (number 5). 4 Zigzag Stitch 2 (1/16) 5 (3/16) Zigzag (Satin) 5 Stitch 0.5 (1/32) 5 (3/16) 29 Zigzag stitching Stitch Name Zigzag Stitch...
... 10 (Center Needle Position) 4 (3/16) Straight Stitch 11 (Left Needle Position) 2.5 (3/32) ■ Top stitching and stretch materials You can use a slightly looser upper-thread tension to the right position of Zigzag (Satin) Stitch (number 5). 4 Zigzag Stitch 2 (1/16) 5 (3/16) Zigzag (Satin) 5 Stitch 0.5 (1/32) 5 (3/16) 29 Zigzag stitching Stitch Name Zigzag Stitch...

Operation Manual
Page 37
Carefully sew around the edge of the material. Loosen the tension of the upper thread so 1 that the lower thread lies on the underside of the 2 design with a zigzag stitch. 36 If the needle hits the ...
Carefully sew around the edge of the material. Loosen the tension of the upper thread so 1 that the lower thread lies on the underside of the 2 design with a zigzag stitch. 36 If the needle hits the ...

Operation Manual
Page 43
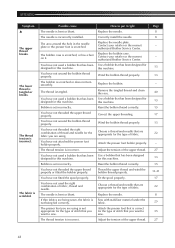
...needle plate. The needle want to - Lightly guide the fabric. Replace the needle plate. authorized Brother Service Center. for this machine. Loosen the upper thread tension. 27 42 TROUBLESHOOTING If the machine stops operating correctly, check the following possible problems before requesting ...the upper thread properly. (For example, you need additional help, the Brother Solutions Center offers the latest FAQs and troubleshooting tips. The upper thread tension is scratched. Loosen the upper thread tension. 27 You are fabric, thread and needle. You have not used ...
...needle plate. The needle want to - Lightly guide the fabric. Replace the needle plate. authorized Brother Service Center. for this machine. Loosen the upper thread tension. 27 42 TROUBLESHOOTING If the machine stops operating correctly, check the following possible problems before requesting ...the upper thread properly. (For example, you need additional help, the Brother Solutions Center offers the latest FAQs and troubleshooting tips. The upper thread tension is scratched. Loosen the upper thread tension. 27 You are fabric, thread and needle. You have not used ...
Operation Manual
Page 44
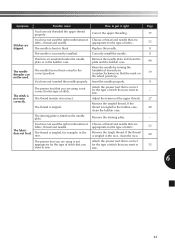
... used the right combination of stitch that has been designed for this machine. The thread tension is bent or blunt. Contact your retailer or the nearest authorized Brother Service Center. Reset the bobbin thread correctly. Sew with stabilizer material under the fabric. ...spool properly. Correctly install the needle. Contact your retailer or the nearest authorized Brother Service Center. The presser foot you want to put it . Replace the needle plate. Adjust the tension of the upper thread. You have not threaded the right combination of fabric...
... used the right combination of stitch that has been designed for this machine. The thread tension is bent or blunt. Contact your retailer or the nearest authorized Brother Service Center. Reset the bobbin thread correctly. Sew with stabilizer material under the fabric. ...spool properly. Correctly install the needle. Contact your retailer or the nearest authorized Brother Service Center. The presser foot you want to put it . Replace the needle plate. Adjust the tension of the upper thread. You have not threaded the right combination of fabric...
Operation Manual
Page 45
...tangled. Replace the needle. Remove the needle plate and clean the plate and the bobbin case. The needle is incorrect. The thread tension is incorrectly installed. Correctly install the needle. Insert the needle properly. You have not used the right combination of fabric. Adjust the... tension of fabric. The needle threader can not be used. Attach the presser foot that is correct for the type of stitch that ...
...tangled. Replace the needle. Remove the needle plate and clean the plate and the bobbin case. The needle is incorrect. The thread tension is incorrectly installed. Correctly install the needle. Insert the needle properly. You have not used the right combination of fabric. Adjust the... tension of fabric. The needle threader can not be used. Attach the presser foot that is correct for the type of stitch that ...
Operation Manual
Page 46
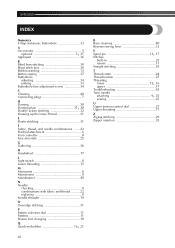
... 45 R Race cleaning 40 Reverse sewing lever 12 , S Spool pin 13 17 Stitches built-in 29 names 11 Straight stitching 29 T Thread cutter 24 Thread tension 27 , Threading lower 15 16 upper 17 Troubleshooting 42 , Twin needle attaching 9 25 sewing 25 U Upper...
... 45 R Race cleaning 40 Reverse sewing lever 12 , S Spool pin 13 17 Stitches built-in 29 names 11 Straight stitching 29 T Thread cutter 24 Thread tension 27 , Threading lower 15 16 upper 17 Troubleshooting 42 , Twin needle attaching 9 25 sewing 25 U Upper...


