
Operation Manual
Page 5
...13 Winding the bobbin 13 Lower threading 15 Lower threading (for models equipped with a quick-set bobbin 16 Upper threading 17 Using the needle threader (for models equipped with a twin needle (Option 25 Thread tension 27 3. USING ATTACHMENTS AND APPLICATIONS... 37 Darning 38 Using the blind stitch foot 39 6. SEWING BUTTONHOLES ........ 33 Making a buttonhole 33 Adjusting buttonholes 34 5. BUILT-IN STITCHES 29 Straight stitching 29 Zigzag stitching 29 Blind hem stitching 30 Overedge stitching 31 Elastic stitching 31 Double action stitching 32 4. SEWING BASICS 23 Please ...
...13 Winding the bobbin 13 Lower threading 15 Lower threading (for models equipped with a quick-set bobbin 16 Upper threading 17 Using the needle threader (for models equipped with a twin needle (Option 25 Thread tension 27 3. USING ATTACHMENTS AND APPLICATIONS... 37 Darning 38 Using the blind stitch foot 39 6. SEWING BUTTONHOLES ........ 33 Making a buttonhole 33 Adjusting buttonholes 34 5. BUILT-IN STITCHES 29 Straight stitching 29 Zigzag stitching 29 Blind hem stitching 30 Overedge stitching 31 Elastic stitching 31 Double action stitching 32 4. SEWING BASICS 23 Please ...
Operation Manual
Page 7
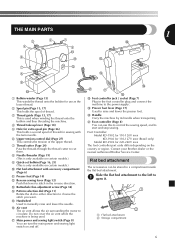
...) Push this to control the sewing speed, and to start and stop sewing. I Presser foot lever (Page 17) Used to circulate. E Handwheel Used to choose the stitch you want. Contact your Brother dealer or the nearest authorized Brother Service Center. THE MAIN PARTS 3 2 1 1 J 4 5 D 6 C E 7 B 8 F 9 0 A 1 Bobbin winder (Page 13) This winds the thread onto the bobbin...
...) Push this to control the sewing speed, and to start and stop sewing. I Presser foot lever (Page 17) Used to circulate. E Handwheel Used to choose the stitch you want. Contact your Brother dealer or the nearest authorized Brother Service Center. THE MAIN PARTS 3 2 1 1 J 4 5 D 6 C E 7 B 8 F 9 0 A 1 Bobbin winder (Page 13) This winds the thread onto the bobbin...

Operation Manual
Page 12
..., 38 2 (1/16) - 29, 38 3 (1/8) - 29, 35, 36, 38, 39 11 If the needle is in either direction. 2 1 1 Pattern selection dial 2 Chosen pattern number Patterns and stitch names 1 23 4 5 67 *1 *1 *1 8 9 10 11 12 13 14 15 16 17 *1 : Stitch nos. 15-17 are only available on the wheel points up.
..., 38 2 (1/16) - 29, 38 3 (1/8) - 29, 35, 36, 38, 39 11 If the needle is in either direction. 2 1 1 Pattern selection dial 2 Chosen pattern number Patterns and stitch names 1 23 4 5 67 *1 *1 *1 8 9 10 11 12 13 14 15 16 17 *1 : Stitch nos. 15-17 are only available on the wheel points up.
Operation Manual
Page 13
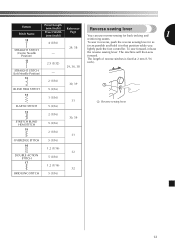
... Preset Width (mm (inch)) Page You can use reverse sewing for back tacking and 1 10 STRAIGHT STITCH (Center Needle Position) 4 (3/16) - 29, 38 reinforcing seams. To sew in reverse, push the reverse sewing lever in as far ... fixed at 2 mm (1/16 inch). 29, 36, 38 STRAIGHT STITCH (Left Needle Position) - 12 2 (1/16) 30, 39 1 BLIND HEM STITCH 5 (3/16) 13 1 (1/16) 31 ELASTIC STITCH 5 (3/16) 1 Reverse sewing lever 14 STRETCH BLIND HEM STITCH 15 OVEREDGE STITCH 16 DOUBLE ACTION STITCH 17 BRIDGING STITCH 2 (1/16) 5 (3/16) 2 (1/16) 5 (3/16) 1.2 (1/16) 5 (3/16) 1.2 (1/16) 5 (3/16) ...
... Preset Width (mm (inch)) Page You can use reverse sewing for back tacking and 1 10 STRAIGHT STITCH (Center Needle Position) 4 (3/16) - 29, 38 reinforcing seams. To sew in reverse, push the reverse sewing lever in as far ... fixed at 2 mm (1/16 inch). 29, 36, 38 STRAIGHT STITCH (Left Needle Position) - 12 2 (1/16) 30, 39 1 BLIND HEM STITCH 5 (3/16) 13 1 (1/16) 31 ELASTIC STITCH 5 (3/16) 1 Reverse sewing lever 14 STRETCH BLIND HEM STITCH 15 OVEREDGE STITCH 16 DOUBLE ACTION STITCH 17 BRIDGING STITCH 2 (1/16) 5 (3/16) 2 (1/16) 5 (3/16) 1.2 (1/16) 5 (3/16) 1.2 (1/16) 5 (3/16) ...
Operation Manual
Page 33
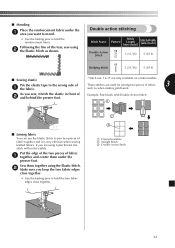
...pins to hold the reinforcement fabric. As you are using 2 the Elastic Stitch as when making patchwork. Double action stitching Stitch Name Pattern Stitch Length [mm (inch)] Stitch Width [mm (inch)] Double Action 16 Stitch 1.2 (1/16) 5 (3/16) 17 Bridging Stitch 1.2 (1/16) 5 (3/16) ■ Sewing elastic Pin the elastic ...of 2 and behind the presser foot. Example: Patchwork with Double Action Stitch 1 ■ Joining fabric You can use the Elastic Stitch to the wrong side of 1 the fabric. * Stitch nos. 16-17 are used for joining two pieces of fabric 1 together and center them...
...pins to hold the reinforcement fabric. As you are using 2 the Elastic Stitch as when making patchwork. Double action stitching Stitch Name Pattern Stitch Length [mm (inch)] Stitch Width [mm (inch)] Double Action 16 Stitch 1.2 (1/16) 5 (3/16) 17 Bridging Stitch 1.2 (1/16) 5 (3/16) ■ Sewing elastic Pin the elastic ...of 2 and behind the presser foot. Example: Patchwork with Double Action Stitch 1 ■ Joining fabric You can use the Elastic Stitch to the wrong side of 1 the fabric. * Stitch nos. 16-17 are used for joining two pieces of fabric 1 together and center them...

Operation Manual
Page 43
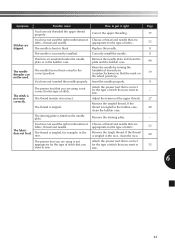
...being sewn with the machine Thread is correct appropriate for the type of stitch that you for the type of stitch. 22 ▼ The upper thread tension is too tight. appropriate for the type of stitch that is tangled below it right Page The main power switch is pushed... If you have not threaded the upper thread properly. (For example, you need additional help, the Brother Solutions Center offers the latest FAQs and troubleshooting tips. Fit the spool properly. - 17 6 The area around the hole in the thread. Loosen the upper thread tension. 27 42 The ...
...being sewn with the machine Thread is correct appropriate for the type of stitch that you for the type of stitch. 22 ▼ The upper thread tension is too tight. appropriate for the type of stitch that is tangled below it right Page The main power switch is pushed... If you have not threaded the upper thread properly. (For example, you need additional help, the Brother Solutions Center offers the latest FAQs and troubleshooting tips. Fit the spool properly. - 17 6 The area around the hole in the thread. Loosen the upper thread tension. 27 42 The ...
Operation Manual
Page 44
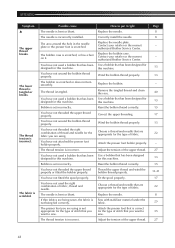
...is scratched or does not turn smoothly. The bobbin is wrinkled. The thread is incorrect. You have not threaded the right combination of stitch that has been designed for this machine. You have not threaded the upper thread properly or fitted the bobbin properly. Bobbin is set ...-21 17 22 8 25 35 27 43 You have not wound the bobbin thread properly. Wind the bobbin thread properly. Attach the presser foot holder properly. Choose a thread and needle that has been designed for the type of fabric. Contact your retailer or the nearest authorized Brother Service ...
...is scratched or does not turn smoothly. The bobbin is wrinkled. The thread is incorrect. You have not threaded the right combination of stitch that has been designed for this machine. You have not threaded the upper thread properly or fitted the bobbin properly. Bobbin is set ...-21 17 22 8 25 35 27 43 You have not wound the bobbin thread properly. Wind the bobbin thread properly. Attach the presser foot holder properly. Choose a thread and needle that has been designed for the type of fabric. Contact your retailer or the nearest authorized Brother Service ...
Operation Manual
Page 45
...want to sew. Insert the needle properly. Attach the presser foot that is not appropriate for the type of stitch that the mark on the needle plate. The needle threader can not be used the right combination of fabric,... The fabric does not feed. Correctly install the needle. Remove the darning plate. Remove the tangle thread. Symptom Stitches are appropriate for the type of fabric. The thread is tangled in the race. Remove the needle plate and ... needle that you are appropriate for the type of the upper thread. Page 17 22 8 8 40 19 8 - 27 40 - 22 40 35 6 44
...want to sew. Insert the needle properly. Attach the presser foot that is not appropriate for the type of stitch that the mark on the needle plate. The needle threader can not be used the right combination of fabric,... The fabric does not feed. Correctly install the needle. Remove the darning plate. Remove the tangle thread. Symptom Stitches are appropriate for the type of fabric. The thread is tangled in the race. Remove the needle plate and ... needle that you are appropriate for the type of the upper thread. Page 17 22 8 8 40 19 8 - 27 40 - 22 40 35 6 44
Operation Manual
Page 46
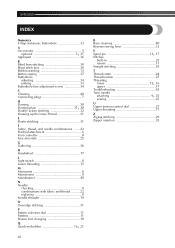
... 8 Needle threader 19 O Overedge stitching 31 P Pattern selection dial 11 Patterns 11 Presser foot changing 10 , Q Quick-set bobbin 16 21 45 R Race cleaning 40 Reverse sewing lever 12 , S Spool pin 13 17 Stitches built-in 29 names 11 Straight stitching 29 T Thread cutter 24 Thread ...tension 27 , Threading lower 15 16 upper 17 Troubleshooting 42 , Twin needle attaching 9 25 sewing 25 U Upper tension control dial ...
... 8 Needle threader 19 O Overedge stitching 31 P Pattern selection dial 11 Patterns 11 Presser foot changing 10 , Q Quick-set bobbin 16 21 45 R Race cleaning 40 Reverse sewing lever 12 , S Spool pin 13 17 Stitches built-in 29 names 11 Straight stitching 29 T Thread cutter 24 Thread ...tension 27 , Threading lower 15 16 upper 17 Troubleshooting 42 , Twin needle attaching 9 25 sewing 25 U Upper tension control dial ...


