Users Manual - English
Page 6
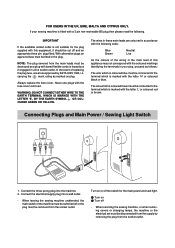
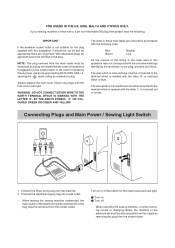
... if engaged in a live socket outlet. Always replace the fuse cover. The wire which is marked with the fuse cover removed. Connecting Plugs and Main Power / Sewing Light Switch 1 2 1. Connect the three-prong plug into a wall outlet. - Turn on or off - In the event of this equipment, it...the electrical set must be destroyed as a plug with the following . The wires in these main leads are coloured in accordance with bared flexible cords is fitted with a 3 pin non-rewireable BS plug then please read the following code: Blue Brown Neutral Live As the colours of the...
... if engaged in a live socket outlet. Always replace the fuse cover. The wire which is marked with the fuse cover removed. Connecting Plugs and Main Power / Sewing Light Switch 1 2 1. Connect the three-prong plug into a wall outlet. - Turn on or off - In the event of this equipment, it...the electrical set must be destroyed as a plug with the following . The wires in these main leads are coloured in accordance with bared flexible cords is fitted with a 3 pin non-rewireable BS plug then please read the following code: Blue Brown Neutral Live As the colours of the...
Users Manual - English
Page 7
... STRAIGHT AND ZIGZAG BUILT-IN STITCHES STITCHING KNOWING YOUR SEWING MACHINE PRINCIPAL PARTS 2 ACCESSORIES 3 OPERATING YOUR SEWING MACHINE 4 Connecting Plugs 4 Main Power and Sewing Light Switches 5 Foot Controller 5 Inserting the Needle 6 Checking the Needle 6 Changing the Presser Foot 7 Converting to Free-Arm ...Zipper Insertion 42 Gathering 44 Darning 45 Attaching Lace 46 Appliques 47 Blind Hem Stitch 48 Over Edge Stitch 49 Cording 50 Monogramming and Embroidering 51 MAINTENANCE Changing the Bulb 53 Oiling 54 Cleaning 55 Performance Checklist 57 Repacking the Machine...
... STRAIGHT AND ZIGZAG BUILT-IN STITCHES STITCHING KNOWING YOUR SEWING MACHINE PRINCIPAL PARTS 2 ACCESSORIES 3 OPERATING YOUR SEWING MACHINE 4 Connecting Plugs 4 Main Power and Sewing Light Switches 5 Foot Controller 5 Inserting the Needle 6 Checking the Needle 6 Changing the Presser Foot 7 Converting to Free-Arm ...Zipper Insertion 42 Gathering 44 Darning 45 Attaching Lace 46 Appliques 47 Blind Hem Stitch 48 Over Edge Stitch 49 Cording 50 Monogramming and Embroidering 51 MAINTENANCE Changing the Bulb 53 Oiling 54 Cleaning 55 Performance Checklist 57 Repacking the Machine...
Users Manual - English
Page 76
...Stitch 11 Buttonhole Sewing 36 Button Sewing 40 C Chart of Sewing Fabrics, Needles and Thread Combinations ... 23 Cleaning 55 Connecting Plugs 4 Cording 50 D Darning 45 Drawing Up The Bobbin Thread 18 E Embroidering 51 F Feed Dog Cleaning 55 Finishing a Seam 26 Foot Controller... 5 Operating 5 Free-Arm Sewing 8 G Gathering 44 Guiding the Fabric 30 L Light Bulb Replacement 53 Lower (bobbin) Threading 15 M Main Power Switch 5 Monogramming 51 N Needle Inspection 6 Position selector 12 Replacement 6 Threading 16 Page O Oiling 54 Over Edge Stitch 49 P Performance Checklist ...
...Stitch 11 Buttonhole Sewing 36 Button Sewing 40 C Chart of Sewing Fabrics, Needles and Thread Combinations ... 23 Cleaning 55 Connecting Plugs 4 Cording 50 D Darning 45 Drawing Up The Bobbin Thread 18 E Embroidering 51 F Feed Dog Cleaning 55 Finishing a Seam 26 Foot Controller... 5 Operating 5 Free-Arm Sewing 8 G Gathering 44 Guiding the Fabric 30 L Light Bulb Replacement 53 Lower (bobbin) Threading 15 M Main Power Switch 5 Monogramming 51 N Needle Inspection 6 Position selector 12 Replacement 6 Threading 16 Page O Oiling 54 Over Edge Stitch 49 P Performance Checklist ...
User Manual - French
Page 6
... the plug from the main leads must be destroyed as a plug with the coloured markings identifying the terminals in the plug. Connecting Plugs and Main Power / Sewing Light Switch 1 2 1. When leaving the sewing machine unattended, the main switch of this equipment, it should be fitted in your sewing .... If your plug, proceed as marked on or off the switch for the plug supplied with this appliance may not correspond with bared flexible cords is marked with the letter 'L' or coloured red or brown. carrying the ASA mark, rating as follows: The wire which is coloured blue...
... the plug from the main leads must be destroyed as a plug with the coloured markings identifying the terminals in the plug. Connecting Plugs and Main Power / Sewing Light Switch 1 2 1. When leaving the sewing machine unattended, the main switch of this equipment, it should be fitted in your sewing .... If your plug, proceed as marked on or off the switch for the plug supplied with this appliance may not correspond with bared flexible cords is marked with the letter 'L' or coloured red or brown. carrying the ASA mark, rating as follows: The wire which is coloured blue...
User Manual - French
Page 7
CONTENTS KNOWING YOUR SEWING MACHINE PRINCIPAL PARTS 2 ACCESSORIES 3 OPERATING YOUR SEWING MACHINE 4 Connecting Plugs 4 Main Power and Sewing Light Switches 5 Foot Controller 5 Inserting the Needle 6 Checking the Needle 6 Changing the Presser Foot 7 Converting to Free-Arm Style 8 Steadying ... APPLICATIONS Zipper Insertion 42 Gathering 44 Darning 45 Attaching Lace 46 Appliques 47 Blind Hem Stitch 48 Over Edge Stitch 49 Cording 50 Monogramming and Embroidering 51 MAINTENANCE Changing the Bulb 53 Oiling 54 Cleaning 55 Performance Checklist 57 Repacking the Machine 65 INDEX
CONTENTS KNOWING YOUR SEWING MACHINE PRINCIPAL PARTS 2 ACCESSORIES 3 OPERATING YOUR SEWING MACHINE 4 Connecting Plugs 4 Main Power and Sewing Light Switches 5 Foot Controller 5 Inserting the Needle 6 Checking the Needle 6 Changing the Presser Foot 7 Converting to Free-Arm Style 8 Steadying ... APPLICATIONS Zipper Insertion 42 Gathering 44 Darning 45 Attaching Lace 46 Appliques 47 Blind Hem Stitch 48 Over Edge Stitch 49 Cording 50 Monogramming and Embroidering 51 MAINTENANCE Changing the Bulb 53 Oiling 54 Cleaning 55 Performance Checklist 57 Repacking the Machine 65 INDEX
User Manual - French
Page 76
...Winding 14 Buttonhole Sewing 36 Button Sewing 40 C Chart of Sewing Fabrics, Needles and Thread Combinations ... 23 Cleaning 55 Connecting Plugs 4 Cording 50 D Darning 45 Drawing Up The Bobbin Thread 18 E Embroidering 51 F Feed Dog Cleaning 55 Finishing a Seam 26 Foot Controller... 5 Operating 5 Free-Arm Sewing 8 G Gathering 44 Guiding the Fabric 30 L Light Bulb Replacement 53 Lower (bobbin) Threading 15 M Main Power Switch 5 Monogramming 51 N Needle Inspection 6 Position selector 12 Replacement 6 Threading 16 Page O Oiling 54 Over Edge Stitch 49 P Performance Checklist...
...Winding 14 Buttonhole Sewing 36 Button Sewing 40 C Chart of Sewing Fabrics, Needles and Thread Combinations ... 23 Cleaning 55 Connecting Plugs 4 Cording 50 D Darning 45 Drawing Up The Bobbin Thread 18 E Embroidering 51 F Feed Dog Cleaning 55 Finishing a Seam 26 Foot Controller... 5 Operating 5 Free-Arm Sewing 8 G Gathering 44 Guiding the Fabric 30 L Light Bulb Replacement 53 Lower (bobbin) Threading 15 M Main Power Switch 5 Monogramming 51 N Needle Inspection 6 Position selector 12 Replacement 6 Threading 16 Page O Oiling 54 Over Edge Stitch 49 P Performance Checklist...

