
Users Manual - English
Page 13
...page 34) Pass the thread through the thread guide disk when using the needle threader to sew one stitch. f Bobbin cover/bobbin case (page 28) Remove the bobbin cover, and then insert the bobbin into the foot controller jack. b Handwheel (page 50) Turn the handwheel toward you are learning to clean the... onto the presser foot holder. g Power supply jack (page 17) Insert the plug on the end of the foot controller cable into the bobbin case. d Needle plate (page 67) The needle plate is marked with guides for the selected stitching. Attach the appropriate presser foot for sewing straight...
...page 34) Pass the thread through the thread guide disk when using the needle threader to sew one stitch. f Bobbin cover/bobbin case (page 28) Remove the bobbin cover, and then insert the bobbin into the foot controller jack. b Handwheel (page 50) Turn the handwheel toward you are learning to clean the... onto the presser foot holder. g Power supply jack (page 17) Insert the plug on the end of the foot controller cable into the bobbin case. d Needle plate (page 67) The needle plate is marked with guides for the selected stitching. Attach the appropriate presser foot for sewing straight...
Users Manual - English
Page 28
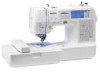
...tangled under the bobbin winder seat. b a a Thread b Bobbin winder seat CAUTION ● Do not remove the bobbin winder seat even if the thread become tangled under the bobbin winder seat. GETTING READY Cut the thread with scissors, slide the bobbin o winder shaft to the following procedure. In such a case, wind off... the thread by removing the screw. When the foot controller is set to stop button 26 you cannot wind off the thread according to the left, and then remove the bobbin from the foot controller. If the bobbin winding starts when the...
...tangled under the bobbin winder seat. b a a Thread b Bobbin winder seat CAUTION ● Do not remove the bobbin winder seat even if the thread become tangled under the bobbin winder seat. GETTING READY Cut the thread with scissors, slide the bobbin o winder shaft to the following procedure. In such a case, wind off... the thread by removing the screw. When the foot controller is set to stop button 26 you cannot wind off the thread according to the left, and then remove the bobbin from the foot controller. If the bobbin winding starts when the...
Users Manual - English
Page 29
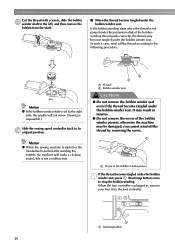
... designed specifically for this sewing machine. If bobbins from the shaft. Use only the included bobbin or bobbins of the bobbin-winding thread guide correctly (page 24). Installing the bobbin Install the bobbin wound with scissors beside the bobbinb winding thread guide. a CAUTION 1 ● Use a bobbin that surround the bobbin case. Actual size 11.5 mm (7/16 inch) This model...
... designed specifically for this sewing machine. If bobbins from the shaft. Use only the included bobbin or bobbins of the bobbin-winding thread guide correctly (page 24). Installing the bobbin Install the bobbin wound with scissors beside the bobbinb winding thread guide. a CAUTION 1 ● Use a bobbin that surround the bobbin case. Actual size 11.5 mm (7/16 inch) This model...
Users Manual - English
Page 30
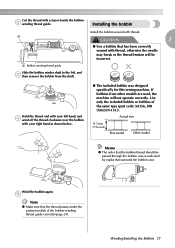
... careful not to the right. Otherwise, the thread may break or the thread tension will be incorrect. b Slide the bobbin cover latch to drop the bobbin. Remove the bobbin cover. a Insert the bobbin into the bobbin case with your left hand. Lightly hold e the end of the thread with f your right hand. c a b • Be sure to...
... careful not to the right. Otherwise, the thread may break or the thread tension will be incorrect. b Slide the bobbin cover latch to drop the bobbin. Remove the bobbin cover. a Insert the bobbin into the bobbin case with your left hand. Lightly hold e the end of the thread with f your right hand. c a b • Be sure to...
Users Manual - English
Page 31
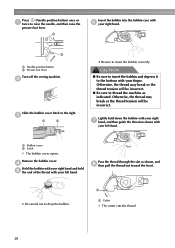
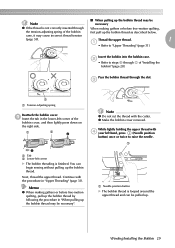
... looped around the upper thread and can begin sewing without pulling up the bobbin thread as described below. Insert the bobbin into the bobbin case. c a a Tension-adjusting spring Reattach the bobbin cover. While lightly holding the upper thread with d your left corner X The bobbin threading is not correctly inserted through the slot. i Insert the tab in...
... looped around the upper thread and can begin sewing without pulling up the bobbin thread as described below. Insert the bobbin into the bobbin case. c a a Tension-adjusting spring Reattach the bobbin cover. While lightly holding the upper thread with d your left corner X The bobbin threading is not correctly inserted through the slot. i Insert the tab in...
Users Manual - English
Page 61
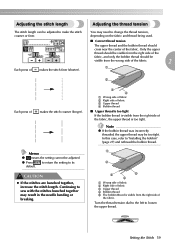
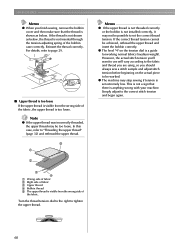
... the fabric. 2 a Each press of makes the stitch finer (shorter). a b c e d a Wrong side of fabric b Right side of fabric c Upper thread d Bobbin thread e The bobbin thread is too tight. In this case, refer to loosen the upper thread. c d a Wrong side of fabric b Right side of fabric c Upper thread... d Bobbin thread ■ Upper thread is too tight If the bobbin thread is visible from the right side of the fabric, the upper thread is ...
... the fabric. 2 a Each press of makes the stitch finer (shorter). a b c e d a Wrong side of fabric b Right side of fabric c Upper thread d Bobbin thread e The bobbin thread is too tight. In this case, refer to loosen the upper thread. c d a Wrong side of fabric b Right side of fabric c Upper thread... d Bobbin thread ■ Upper thread is too tight If the bobbin thread is visible from the right side of the fabric, the upper thread is ...
Users Manual - English
Page 62
...your machine. z The level "4" on the actual piece to tighten the upper thread. 60 If the thread is visible from the wrong side of the bobbin case correctly. Turn the thread tension dial to the right to be possible to set extremely low. e a Memo z If the upper thread is not threaded... correctly or the bobbin is set the correct thread tension. z The machine may stop sewing if tension is not installed correctly, it may be achieved, rethread the upper thread...
...your machine. z The level "4" on the actual piece to tighten the upper thread. 60 If the thread is visible from the wrong side of the bobbin case correctly. Turn the thread tension dial to the right to be possible to set extremely low. e a Memo z If the upper thread is not threaded... correctly or the bobbin is set the correct thread tension. z The machine may stop sewing if tension is not installed correctly, it may be achieved, rethread the upper thread...
Users Manual - English
Page 132
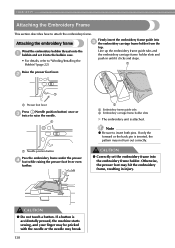
Attaching the embroidery frame Wind the embroidery bobbin thread onto the a bobbin and set the embroidery frame into the embroidery frame holder. Note z Be sure to raise the needle. a Raise the presser foot lever. If a button is... up the embroidery frame guide tabs and the embroidery carriage frame holder slots and push in injury. Firmly insert the embroidery frame guide into the bobbin case. • For details, refer to attach the embroidery frame. b a Embroidery frame guide tabs b Embroidery carriage frame holder slots X The embroidery unit is inserted, the ...
Attaching the embroidery frame Wind the embroidery bobbin thread onto the a bobbin and set the embroidery frame into the embroidery frame holder. Note z Be sure to raise the needle. a Raise the presser foot lever. If a button is... up the embroidery frame guide tabs and the embroidery carriage frame holder slots and push in injury. Firmly insert the embroidery frame guide into the bobbin case. • For details, refer to attach the embroidery frame. b a Embroidery frame guide tabs b Embroidery carriage frame holder slots X The embroidery unit is inserted, the ...
Users Manual - English
Page 154
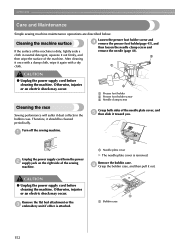
... 45), and then loosen the needle clamp screw and remove the needle (page 41). Therefore, it again with a dry cloth. a a Bobbin case 152 Grasp both sides of the sewing machine. c a CAUTION ● Unplug the power supply cord before cleaning the machine. After cleaning it... or an electric shock may occur. a a Needle plate cover X The needle plate cover is dirty, lightly soak a cloth in the bobbin case. f Grasp the bobbin case, and then pull it toward you. b a Presser foot holder b Presser foot holder screw c Needle clamp screw Cleaning the race Sewing ...
... 45), and then loosen the needle clamp screw and remove the needle (page 41). Therefore, it again with a dry cloth. a a Bobbin case 152 Grasp both sides of the sewing machine. c a CAUTION ● Unplug the power supply cord before cleaning the machine. After cleaning it... or an electric shock may occur. a a Needle plate cover X The needle plate cover is dirty, lightly soak a cloth in the bobbin case. f Grasp the bobbin case, and then pull it toward you. b a Presser foot holder b Presser foot holder screw c Needle clamp screw Cleaning the race Sewing ...
Users Manual - English
Page 155
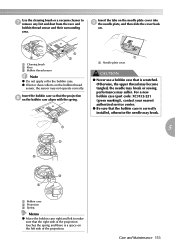
...g remove any lint and dust from the race and bobbin thread sensor and their surrounding area. z If lint or dust collects on the bobbin case aligns with the spring. a a Needle plate cover CAUTION ● Never use a bobbin case that the right side of the projection. Insert the tabs..., and then slide the cover back on the left to make sure that is a space on . a 5 b c c b a Bobbin case b Projection c Spring Memo z Move the bobbin case right and left side of the projection touches the spring and there is scratched. Use the cleaning brush or a vacuum cleaner to the...
...g remove any lint and dust from the race and bobbin thread sensor and their surrounding area. z If lint or dust collects on the bobbin case aligns with the spring. a a Needle plate cover CAUTION ● Never use a bobbin case that the right side of the projection. Insert the tabs..., and then slide the cover back on the left to make sure that is a space on . a 5 b c c b a Bobbin case b Projection c Spring Memo z Move the bobbin case right and left side of the projection touches the spring and there is scratched. Use the cleaning brush or a vacuum cleaner to the...

Users Manual - English
Page 156
.... Contact needle plate is pulled too much. The bobbin case is not used is not Attach the presser foot that you wish to the right side after winding the left. A bobbin designed specifically for the type of fabric being sewn. Visit us at [http://solutions.brother.com]. The sewing machine does not operate. The...
.... Contact needle plate is pulled too much. The bobbin case is not used is not Attach the presser foot that you wish to the right side after winding the left. A bobbin designed specifically for the type of fabric being sewn. Visit us at [http://solutions.brother.com]. The sewing machine does not operate. The...

Users Manual - English
Page 157
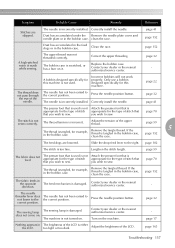
... the upper thread tension. The thread is tangled. burr on it. A bobbin designed specifically for example, in the bobbin case, clean the race. Wind the thread that was not wound onto the bobbin correctly. Correctly install the bobbin thread. The thread is tangled, for this machine. page 31 There are..., the spool is not installed correctly, the spool cap is not appropriate for the spool being used . authorized service center. 5 The bobbin case is scratched or does not rotate smoothly, or has a burr on it . page 27 The lower thread is too tight. page 22...
... the upper thread tension. The thread is tangled. burr on it. A bobbin designed specifically for example, in the bobbin case, clean the race. Wind the thread that was not wound onto the bobbin correctly. Correctly install the bobbin thread. The thread is tangled, for this machine. page 31 There are..., the spool is not installed correctly, the spool cap is not appropriate for the spool being used . authorized service center. 5 The bobbin case is scratched or does not rotate smoothly, or has a burr on it . page 27 The lower thread is too tight. page 22...
Users Manual - English
Page 159
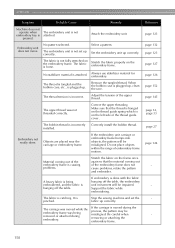
... not turned on it. The machine is tangled, for the type of stitch that is not sewn correctly. page 17 Nothing appears in the bobbin case. does not come on the machine. Correctly install the needle. Dust has accumulated under the Remove the needle plate cover and needle plate or ...in the LCD. Contact your dealer or the nearest authorized service center. - The needle is tangled in the bobbin case. If the thread is incorrectly installed. Slide the drop feed lever to sew. page 70 The thread is either too light or too dark....
... not turned on it. The machine is tangled, for the type of stitch that is not sewn correctly. page 17 Nothing appears in the bobbin case. does not come on the machine. Correctly install the needle. Dust has accumulated under the Remove the needle plate cover and needle plate or ...in the LCD. Contact your dealer or the nearest authorized service center. - The needle is tangled in the bobbin case. If the thread is incorrectly installed. Slide the drop feed lever to sew. page 70 The thread is either too light or too dark....
Users Manual - English
Page 160
... unit does not move. The fabric is causing problems. Stretch the fabric on the embroidery frame. The thread is tangled and the bobbin case, etc., is attached. Remove the tangled thread. Make sure that the material coming out of the embroidery frame is not fully stretched...threading. If embroidery is being removed or attached during the process, the pattern may be misaligned. When the bobbin case is loose. Attach the embroidery unit. The bobbin thread is incorrect. If the embroidery unit carriage or embroidery frame bumps into objects, the pattern will be ...
... unit does not move. The fabric is causing problems. Stretch the fabric on the embroidery frame. The thread is tangled and the bobbin case, etc., is attached. Remove the tangled thread. Make sure that the material coming out of the embroidery frame is not fully stretched...threading. If embroidery is being removed or attached during the process, the pattern may be misaligned. When the bobbin case is loose. Attach the embroidery unit. The bobbin thread is incorrect. If the embroidery unit carriage or embroidery frame bumps into objects, the pattern will be ...
Users Manual - English
Page 163
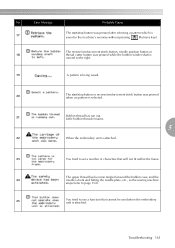
.... 23 You tried to use a function that will not fit within the frame. Troubleshooting 161 The upper thread has become tangled around the bobbin case, and the 24 needle is bent and hitting the needle plate, etc., so the sewing machine stops (refer to page 154). 25 You...be used when the embroidery unit is 17 saved in the machine's memory without pressing (Retrieve key). Little bobbin thread remains. 5 22 When the embroidery unit is selected. 21 Bobbin thread has run out. The reverse/reinforcement stitch button, needle position button or 18 thread cutter button was ...
.... 23 You tried to use a function that will not fit within the frame. Troubleshooting 161 The upper thread has become tangled around the bobbin case, and the 24 needle is bent and hitting the needle plate, etc., so the sewing machine stops (refer to page 154). 25 You...be used when the embroidery unit is 17 saved in the machine's memory without pressing (Retrieve key). Little bobbin thread remains. 5 22 When the embroidery unit is selected. 21 Bobbin thread has run out. The reverse/reinforcement stitch button, needle position button or 18 thread cutter button was ...
Users Manual - English
Page 167
... dogs 11 flat bed attachment 10 foot controller 9, 52 changing sewing direction 65 foot controller jack 11 checking needle 40 frame pattern selection 137 cleaning bobbin case 152 fraying, preventing 74 cleaning brush 9 free-arm sewing 46 cleaning machine surface 152 free-motion quilting 102 concealed seams 90 front view 10 connecting...
... dogs 11 flat bed attachment 10 foot controller 9, 52 changing sewing direction 65 foot controller jack 11 checking needle 40 frame pattern selection 137 cleaning bobbin case 152 fraying, preventing 74 cleaning brush 9 free-arm sewing 46 cleaning machine surface 152 free-motion quilting 102 concealed seams 90 front view 10 connecting...


