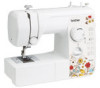
Users Manual - English and Spanish
Page 2
...cloth. • Do not store objects on the unit. Return the machine to the nearest authorized dealer or service center for examination, repair, electrical or mechanical adjustment. • While the machine is required when sewing: • Always pay close attention to use bent or damaged needles.... 1 Lifting the machine by its handle. Do not pull on the cord. • Plug the machine directly into any object into the electrical outlet...
...cloth. • Do not store objects on the unit. Return the machine to the nearest authorized dealer or service center for examination, repair, electrical or mechanical adjustment. • While the machine is required when sewing: • Always pay close attention to use bent or damaged needles.... 1 Lifting the machine by its handle. Do not pull on the cord. • Plug the machine directly into any object into the electrical outlet...
Users Manual - English and Spanish
Page 3
...the operation manual to break. • Do not push or pull the fabric when sewing, and follow the troubleshooting table in this manual. If the problem persists, please consult your local authorized Brother dealer. Cleaning and user maintenance shall not be used by children without notice. Do... pressing down the foot controller. For additional product information, visit our web site at www.brother.com SAVE THESE INSTRUCTIONS This machine is required around the machine needle. • Do not turn it off when making any assemblies, the presser feet, needle, or other parts to assure ...
...the operation manual to break. • Do not push or pull the fabric when sewing, and follow the troubleshooting table in this manual. If the problem persists, please consult your local authorized Brother dealer. Cleaning and user maintenance shall not be used by children without notice. Do... pressing down the foot controller. For additional product information, visit our web site at www.brother.com SAVE THESE INSTRUCTIONS This machine is required around the machine needle. • Do not turn it off when making any assemblies, the presser feet, needle, or other parts to assure ...
Users Manual - English and Spanish
Page 4
... for models equipped with this equipment, you should contact your authorized dealer to BS 1362, i.e. KNOWING YOUR SEWING MACHINE 4 ACCESSORIES 4 Optional accessories 4 THE MAIN PARTS 5 Flat bed attachment 5 USING YOUR SEWING MACHINE 6 Connecting plugs 6 Main power and sewing light switch 7 Foot controller 7 Checking the needle 7 Replacing the needle 7 Changing the presser foot 8 THE CONTROLS 9 Pattern...
... for models equipped with this equipment, you should contact your authorized dealer to BS 1362, i.e. KNOWING YOUR SEWING MACHINE 4 ACCESSORIES 4 Optional accessories 4 THE MAIN PARTS 5 Flat bed attachment 5 USING YOUR SEWING MACHINE 6 Connecting plugs 6 Main power and sewing light switch 7 Foot controller 7 Checking the needle 7 Replacing the needle 7 Changing the presser foot 8 THE CONTROLS 9 Pattern...
Users Manual - English and Spanish
Page 5
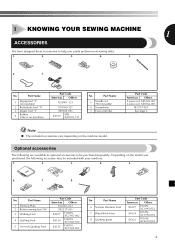
... XC1976-052 SA132 F016N: XC2215-052 4 Part Name 1 Zigzag foot "J" (on machine) 2 Buttonhole foot "A" 3 Zipper foot "I" 4 Bobbin (One is on the machine model. No. Part Name 1 Darning Plate 2 Button sewing foot "M" 3 Walking Foot 4 Quilting Foot 5 1/4-inch Quilting Foot Part Code Americas ...XF3557-001 See page 5 Note ● The included accessories vary depending on machine) Part Code Americas Others XC4901-121 X59369-321 XE9369-001 SA156 SFB: XA5539-151 No. 1 KNOWING YOUR SEWING MACHINE 1 ACCESSORIES We have designed these accessories to be included with your...
... XC1976-052 SA132 F016N: XC2215-052 4 Part Name 1 Zigzag foot "J" (on machine) 2 Buttonhole foot "A" 3 Zipper foot "I" 4 Bobbin (One is on the machine model. No. Part Name 1 Darning Plate 2 Button sewing foot "M" 3 Walking Foot 4 Quilting Foot 5 1/4-inch Quilting Foot Part Code Americas ...XF3557-001 See page 5 Note ● The included accessories vary depending on machine) Part Code Americas Others XC4901-121 X59369-321 XE9369-001 SA156 SFB: XA5539-151 No. 1 KNOWING YOUR SEWING MACHINE 1 ACCESSORIES We have designed these accessories to be included with your...
Users Manual - English and Spanish
Page 6
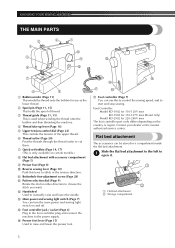
KNOWING YOUR SEWING MACHINE THE MAIN PARTS 3 2 1 4 B 5 A C 6 0 7 8 9 1 Bobbin winder (Page 11) This winds the thread onto the bobbin for 220-240V area The foot controller part code differs depending on the country or region. D Main power and sewing light switch (Page 7) You can be stored in the reverse direction. F Presser foot lever (Page 15...
KNOWING YOUR SEWING MACHINE THE MAIN PARTS 3 2 1 4 B 5 A C 6 0 7 8 9 1 Bobbin winder (Page 11) This winds the thread onto the bobbin for 220-240V area The foot controller part code differs depending on the country or region. D Main power and sewing light switch (Page 7) You can be stored in the reverse direction. F Presser foot lever (Page 15...
Users Manual - English and Spanish
Page 7
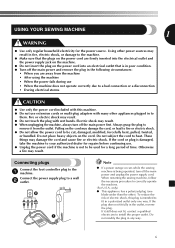
... time. If the plug does not fit fully in any way. 6 USING YOUR SEWING MACHINE 1 WARNING ● Use only regular household electricity for repairs before continuing use • When the machine does not operate correctly due to a bad connection or a disconnection • During ... the plug on the cord. Connecting plugs Connect the foot controller plug to correctly operate the machine. (For U.S.A. When restarting the sewing machine, follow the necessary procedure to the 1 machine. Electric shock may result. ● Do not touch the plug with many other appliances plugged...
... time. If the plug does not fit fully in any way. 6 USING YOUR SEWING MACHINE 1 WARNING ● Use only regular household electricity for repairs before continuing use • When the machine does not operate correctly due to a bad connection or a disconnection • During ... the plug on the cord. Connecting plugs Connect the foot controller plug to correctly operate the machine. (For U.S.A. When restarting the sewing machine, follow the necessary procedure to the 1 machine. Electric shock may result. ● Do not touch the plug with many other appliances plugged...
Users Manual - English and Spanish
Page 8
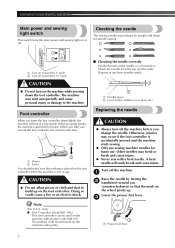
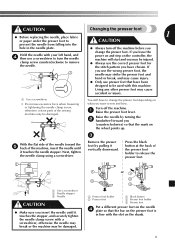
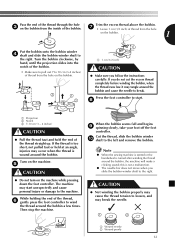
...or an electric shock. Note (For U.S.A. The product code is accidentally pressed and the machine starts sewing. ● Only use sewing machine needles for smooth sewing. 1 2 1 Turn on (toward the 'I' mark) 2 Turn off the machine before you change the needle. Lower the presser foot lever. 3 1 1 Presser ... When you press the foot controller down the foot controller. KNOWING YOUR SEWING MACHINE Main power and sewing light switch This switch turns the main power and sewing light on or off the machine. 1 Raise the needle by turning the 2 handwheel toward you (counterclockwise...
...or an electric shock. Note (For U.S.A. The product code is accidentally pressed and the machine starts sewing. ● Only use sewing machine needles for smooth sewing. 1 2 1 Turn on (toward the 'I' mark) 2 Turn off the machine before you change the needle. Lower the presser foot lever. 3 1 1 Presser ... When you press the foot controller down the foot controller. KNOWING YOUR SEWING MACHINE Main power and sewing light switch This switch turns the main power and sewing light on or off the machine. 1 Raise the needle by turning the 2 handwheel toward you (counterclockwise...
Users Manual - English and Spanish
Page 9
... be damaged. 3 Remove the presser | Press the black foot by turning the 2 handwheel toward the 5 back of the sewing machine may cause injury. ● Only use presser feet that the mark on the wheel points up. Next, tighten the needle clamp using a screwdriver. 2 3 1 1 Use a ... the needle until it | button at the back of vertically downward. | the presser foot | holder to sew and how. Raise the needle by pulling it touches the needle stopper. Turn off the machine before you Hold the needle with your left hand, and 4 then use a screwdriver to turn off the...
... be damaged. 3 Remove the presser | Press the black foot by turning the 2 handwheel toward the 5 back of the sewing machine may cause injury. ● Only use presser feet that the mark on the wheel points up. Next, tighten the needle clamp using a screwdriver. 2 3 1 1 Use a ... the needle until it | button at the back of vertically downward. | the presser foot | holder to sew and how. Raise the needle by pulling it touches the needle stopper. Turn off the machine before you Hold the needle with your left hand, and 4 then use a screwdriver to turn off the...
Users Manual - English and Spanish
Page 10
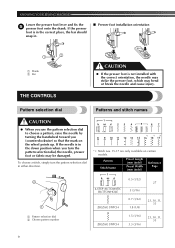
... choose a stitch, simply turn the pattern selection dial, the needle, presser foot or fabric may bend or break the needle and cause injury. KNOWING YOUR SEWING MACHINE Lower the presser foot lever and fix the 5 presser foot onto the shank. Pattern Stitch Name Preset Length (mm (inch)) Preset Width (mm (inch)) Reference...
... choose a stitch, simply turn the pattern selection dial, the needle, presser foot or fabric may bend or break the needle and cause injury. KNOWING YOUR SEWING MACHINE Lower the presser foot lever and fix the 5 presser foot onto the shank. Pattern Stitch Name Preset Length (mm (inch)) Preset Width (mm (inch)) Reference...
Users Manual - English and Spanish
Page 11
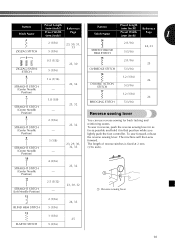
The machine will then sew forward. The length of reverse stitches is fixed at 2 mm (1/16 inch). 10 4 (3/16) 23, 32 STRAIGHT STITCH (Center Needle - Position) 1 11 STRAIGHT STITCH (Left Needle Position) 2.5 (3/32) - 23, 30, 32 1 Reverse sewing lever 12 2 (1/16) 24, 33 BLIND HEM STITCH 5 (3/16) 13... ACTION STITCH 5 (3/16) 17 1.2 (1/16) 26 BRIDGING STITCH 5 (3/16) Reverse sewing lever You can use reverse sewing for back tacking and reinforcing seams. To sew in reverse, push the reverse sewing lever in as far as possible and hold it in that position while you lightly push ...
The machine will then sew forward. The length of reverse stitches is fixed at 2 mm (1/16 inch). 10 4 (3/16) 23, 32 STRAIGHT STITCH (Center Needle - Position) 1 11 STRAIGHT STITCH (Left Needle Position) 2.5 (3/32) - 23, 30, 32 1 Reverse sewing lever 12 2 (1/16) 24, 33 BLIND HEM STITCH 5 (3/16) 13... ACTION STITCH 5 (3/16) 17 1.2 (1/16) 26 BRIDGING STITCH 5 (3/16) Reverse sewing lever You can use reverse sewing for back tacking and reinforcing seams. To sew in reverse, push the reverse sewing lever in as far as possible and hold it in that position while you lightly push ...
Users Manual - English and Spanish
Page 12
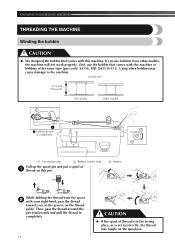
... XA5539-151). Only use bobbins from the spool 2 with your right hand, pass the thread toward you use the bobbin that comes with this machine or bobbins of 1 thread on this machine. If you , in the wrong place, or is set incorrectly, the thread may cause damage to the... pull the thread in completely. 11 CAUTION ● If the spool of thread is in the groove on the spool pin. KNOWING YOUR SEWING MACHINE THREADING THE MACHINE Winding the bobbin CAUTION ● We designed the bobbin that comes with this pin. 3 Bobbin While holding the thread from other bobbins may...
... XA5539-151). Only use bobbins from the spool 2 with your right hand, pass the thread toward you use the bobbin that comes with this machine or bobbins of 1 thread on this machine. If you , in the wrong place, or is set incorrectly, the thread may cause damage to the... pull the thread in completely. 11 CAUTION ● If the spool of thread is in the groove on the spool pin. KNOWING YOUR SEWING MACHINE THREADING THE MACHINE Winding the bobbin CAUTION ● We designed the bobbin that comes with this pin. 3 Bobbin While holding the thread from other bobbins may...
Users Manual - English and Spanish
Page 13
... 7 • Leave 1 cm (1/2 inch) of thread from the hole on the machine while pressing down the foot controller. If you slide the bobbin winder shaft to the right. Note ● When the sewing machine is started or the handwheel is wound around the bobbin a few times. Then stop the... machine. Cut the thread, slide the bobbin winder 0 shaft to break. Turn the bobbin clockwise, by ...
... 7 • Leave 1 cm (1/2 inch) of thread from the hole on the machine while pressing down the foot controller. If you slide the bobbin winder shaft to the right. Note ● When the sewing machine is started or the handwheel is wound around the bobbin a few times. Then stop the... machine. Cut the thread, slide the bobbin winder 0 shaft to break. Turn the bobbin clockwise, by ...
Users Manual - English and Spanish
Page 14
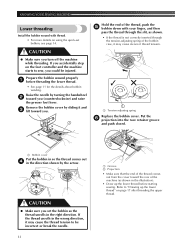
... CAUTION ● Make sure you . 1 Hold the end of the bobbin case, it and 3 lift toward you set bobbin, see page 14. KNOWING YOUR SEWING MACHINE Lower threading Install the bobbin wound with your finger, and then pass the thread through the slit, as shown in the illustration). • Draw up... the lower thread" on the foot controller and the machine starts to sew, you could be incorrect or break the needle. 13 1 2 1 Groove 2 Projection • Make sure that the end of the thread comes out ...
... CAUTION ● Make sure you . 1 Hold the end of the bobbin case, it and 3 lift toward you set bobbin, see page 14. KNOWING YOUR SEWING MACHINE Lower threading Install the bobbin wound with your finger, and then pass the thread through the slit, as shown in the illustration). • Draw up... the lower thread" on the foot controller and the machine starts to sew, you could be incorrect or break the needle. 13 1 2 1 Groove 2 Projection • Make sure that the end of the thread comes out ...
Users Manual - English and Spanish
Page 16
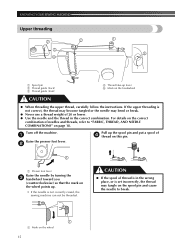
... or the needle may tangle on the spool pin and cause the needle to "FABRIC, THREAD, AND NEEDLE COMBINATIONS" on the wheel 15 KNOWING YOUR SEWING MACHINE Upper threading 2 2 3 4 1 5 1 Spool pin 2 Thread guide (back) 3 Thread guide (front) 4 Thread take-up lever 5 Mark on the wheel points up the spool pin and put... the mark on the handwheel CAUTION ● When threading the upper thread, carefully follow the instructions. If the upper threading is not correctly raised, the sewing machine can not be threaded.
... or the needle may tangle on the spool pin and cause the needle to "FABRIC, THREAD, AND NEEDLE COMBINATIONS" on the wheel 15 KNOWING YOUR SEWING MACHINE Upper threading 2 2 3 4 1 5 1 Spool pin 2 Thread guide (back) 3 Thread guide (front) 4 Thread take-up lever 5 Mark on the wheel points up the spool pin and put... the mark on the handwheel CAUTION ● When threading the upper thread, carefully follow the instructions. If the upper threading is not correctly raised, the sewing machine can not be threaded.
Users Manual - English and Spanish
Page 18
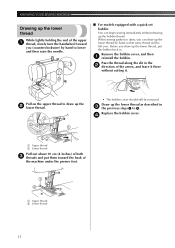
...cover should still be left over. Pull on the upper thread to draw up the lower thread, put them toward you can begin sewing immediately without cutting it. When sewing gathers or darts, you (counterclockwise) by hand so that some thread will be removed. Pass the thread along the slit in ... 10 cm (4 inches) of both 3 threads and put the bobbin back in. Remove the bobbin cover, and then 1 reinstall the bobbin. KNOWING YOUR SEWING MACHINE Drawing up the lower thread While lightly holding the end of the upper 1 thread, slowly turn the handwheel toward the back of the...
...cover should still be left over. Pull on the upper thread to draw up the lower thread, put them toward you can begin sewing immediately without cutting it. When sewing gathers or darts, you (counterclockwise) by hand so that some thread will be removed. Pass the thread along the slit in ... 10 cm (4 inches) of both 3 threads and put the bobbin back in. Remove the bobbin cover, and then 1 reinstall the bobbin. KNOWING YOUR SEWING MACHINE Drawing up the lower thread While lightly holding the end of the upper 1 thread, slowly turn the handwheel toward the back of the...
Users Manual - English and Spanish
Page 19
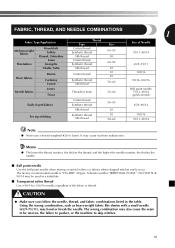
...18 Memo ● The lower the thread number, the thicker the thread; Schmetz needles "JERSEY BALL POINT" 130/705H SUK 90/14 may cause machine malfunction. The wrong combination may bend or break the needle. The factory recommended needle is "HG-4BR" (Organ). FABRIC, THREAD, AND NEEDLE COMBINATIONS ...fabric or thread. and the higher the needle number, the thicker the needle. ■ Ball point needle Use the ball point needle when sewing on stretch fabrics or fabrics where skipped stitches easily occur. CAUTION ● Make sure you follow the needle, thread, and fabric combinations ...
...18 Memo ● The lower the thread number, the thicker the thread; Schmetz needles "JERSEY BALL POINT" 130/705H SUK 90/14 may cause machine malfunction. The wrong combination may bend or break the needle. The factory recommended needle is "HG-4BR" (Organ). FABRIC, THREAD, AND NEEDLE COMBINATIONS ...fabric or thread. and the higher the needle number, the thicker the needle. ■ Ball point needle Use the ball point needle when sewing on stretch fabrics or fabrics where skipped stitches easily occur. CAUTION ● Make sure you follow the needle, thread, and fabric combinations ...
Users Manual - English and Spanish
Page 20
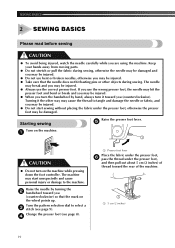
... placing the fabric under the presser foot, and then pull out about 5 cm (2 inches) of the machine. 1 1 5 cm (2 inches) 19 Raise the needle by hand, always turn it the other objects during sewing. SEWING BASICS 2 SEWING BASICS Please read before sewing CAUTION ● To avoid being injured, watch the needle carefully while you (counterclockwise). Starting...
... placing the fabric under the presser foot, and then pull out about 5 cm (2 inches) of the machine. 1 1 5 cm (2 inches) 19 Raise the needle by hand, always turn it the other objects during sewing. SEWING BASICS 2 SEWING BASICS Please read before sewing CAUTION ● To avoid being injured, watch the needle carefully while you (counterclockwise). Starting...
Users Manual - English and Spanish
Page 21
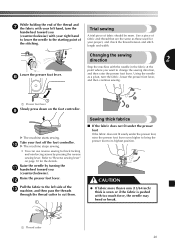
...is sewn or if the fabric is pushed with the needle in the fabric at the point where you (counterclockwise). Refer to "Reverse sewing lever" on the foot controller. 9 X The machine starts sewing. b Pull the fabric to the left hand, turn the fabric, lower the presser foot lever, and then continue... page 10 for your project, and check the thread tension and stitch length and width. Lower the presser foot lever. 8 Changing the sewing direction 2 Stop the machine with too much force, the needle may bend or break. 1 Thread cutter 20 Use a piece of fabric and thread that are the...
...is sewn or if the fabric is pushed with the needle in the fabric at the point where you (counterclockwise). Refer to "Reverse sewing lever" on the foot controller. 9 X The machine starts sewing. b Pull the fabric to the left hand, turn the fabric, lower the presser foot lever, and then continue... page 10 for your project, and check the thread tension and stitch length and width. Lower the presser foot lever. 8 Changing the sewing direction 2 Stop the machine with too much force, the needle may bend or break. 1 Thread cutter 20 Use a piece of fabric and thread that are the...
Users Manual - English and Spanish
Page 28
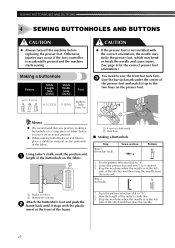
... on the fabric. 2 1 CAUTION ● If the presser foot is accidentally pressed and the machine starts sewing. SEWING BUTTONHOLES AND BUTTONS 4 SEWING BUTTONHOLES AND BUTTONS CAUTION ● Always turn off the machine before you practice making buttonholes on soft fabrics, place a stabilizer material on fabric 2 Buttonhole... sewing Attach the buttonhole foot and push the 2 frame back until it stops with the correct ...
... on the fabric. 2 1 CAUTION ● If the presser foot is accidentally pressed and the machine starts sewing. SEWING BUTTONHOLES AND BUTTONS 4 SEWING BUTTONHOLES AND BUTTONS CAUTION ● Always turn off the machine before you practice making buttonholes on soft fabrics, place a stabilizer material on fabric 2 Buttonhole... sewing Attach the buttonhole foot and push the 2 frame back until it stops with the correct ...
Users Manual - English and Spanish
Page 29
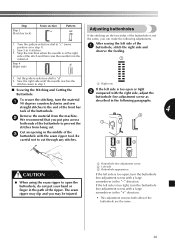
...open the buttonhole, do not put pins across both sides of the stitch and then raise the needle from the machine. 2 2 We recommend that you can make the following paragraphs. Sew the right side until the needle reaches the stitches sewn in step 1. 1 Right row ■ Securing the Stitching... slip and you may be injured. 1 Buttonhole fine-adjustment screw 2 Left side 3 Buttonhole appearance If the left side of the ripper. Stop the machine when the needle is too open or tight 2 compared with a large screwdriver in the "+" direction. • This adjustment ensures both ends of the...
...open the buttonhole, do not put pins across both sides of the stitch and then raise the needle from the machine. 2 2 We recommend that you can make the following paragraphs. Sew the right side until the needle reaches the stitches sewn in step 1. 1 Right row ■ Securing the Stitching... slip and you may be injured. 1 Buttonhole fine-adjustment screw 2 Left side 3 Buttonhole appearance If the left side of the ripper. Stop the machine when the needle is too open or tight 2 compared with a large screwdriver in the "+" direction. • This adjustment ensures both ends of the...


