Users Manual - English and Spanish
Page 2
...drop or insert any opening. • Do not operate where aerosol (spray) products are leaving the machine unattended. otherwise, the machine, power cord or garment being used or where oxygen is required when sewing: • Always pay close attention to use extension cords. Do not use if you are being ...sewn may ignite, resulting in this machine if it has a damaged cord or plug, if it is not working properly, ...
...drop or insert any opening. • Do not operate where aerosol (spray) products are leaving the machine unattended. otherwise, the machine, power cord or garment being used or where oxygen is required when sewing: • Always pay close attention to use extension cords. Do not use if you are being ...sewn may ignite, resulting in this machine if it has a damaged cord or plug, if it is not working properly, ...
Users Manual - English and Spanish
Page 3
...of the appliance by children aged from all moving parts. For additional product information, visit our web site at www.brother.com SAVE THESE INSTRUCTIONS This machine is required around the machine needle. • Do not turn it must be made by or near a space heater, iron, halogen lamp,...to break. • Do not push or pull the fabric when sewing, and follow the troubleshooting table in this manual. Use this machine, avoid direct sunlight and high humidity locations. This appliance can damage the case and machine, and should never be used by a person responsible for use ...
...of the appliance by children aged from all moving parts. For additional product information, visit our web site at www.brother.com SAVE THESE INSTRUCTIONS This machine is required around the machine needle. • Do not turn it must be made by or near a space heater, iron, halogen lamp,...to break. • Do not push or pull the fabric when sewing, and follow the troubleshooting table in this manual. Use this machine, avoid direct sunlight and high humidity locations. This appliance can damage the case and machine, and should never be used by a person responsible for use ...
Users Manual - English and Spanish
Page 4
... replace the fuse cover. carrying the mark, rating as marked on storing the machine 34 Cleaning 34 TROUBLESHOOTING 36 INDEX 39 3 KNOWING YOUR SEWING MACHINE 4 ACCESSORIES 4 Optional accessories 4 THE MAIN PARTS 5 Flat bed attachment 5 USING YOUR SEWING MACHINE 6 Connecting plugs 6 Main power and sewing light switch 7 Foot controller 7 Checking the needle 7 Replacing the needle 7 Changing the...
... replace the fuse cover. carrying the mark, rating as marked on storing the machine 34 Cleaning 34 TROUBLESHOOTING 36 INDEX 39 3 KNOWING YOUR SEWING MACHINE 4 ACCESSORIES 4 Optional accessories 4 THE MAIN PARTS 5 Flat bed attachment 5 USING YOUR SEWING MACHINE 6 Connecting plugs 6 Main power and sewing light switch 7 Foot controller 7 Checking the needle 7 Replacing the needle 7 Changing the...
Users Manual - English and Spanish
Page 5
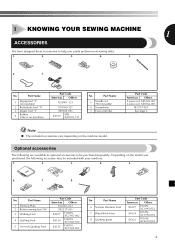
... XE5328-001 2-piece set: XE7064-001 XF3557-001 See page 5 Note ● The included accessories vary depending on machine) Part Code Americas Others XC4901-121 X59369-321 XE9369-001 SA156 SFB: XA5539-151 No. No. Depending on the model you ... F016N: XC2215-052 4 Part Name 1 Zigzag foot "J" (on machine) 2 Buttonhole foot "A" 3 Zipper foot "I" 4 Bobbin (One is on the machine model. Optional accessories The following accessory may be purchased separately. 1 KNOWING YOUR SEWING MACHINE 1 ACCESSORIES We have designed these accessories to help you purchased, the...
... XE5328-001 2-piece set: XE7064-001 XF3557-001 See page 5 Note ● The included accessories vary depending on machine) Part Code Americas Others XC4901-121 X59369-321 XE9369-001 SA156 SFB: XA5539-151 No. No. Depending on the model you ... F016N: XC2215-052 4 Part Name 1 Zigzag foot "J" (on machine) 2 Buttonhole foot "A" 3 Zipper foot "I" 4 Bobbin (One is on the machine model. Optional accessories The following accessory may be purchased separately. 1 KNOWING YOUR SEWING MACHINE 1 ACCESSORIES We have designed these accessories to help you purchased, the...
Users Manual - English and Spanish
Page 6
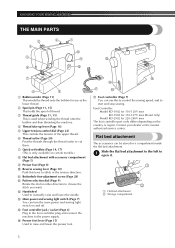
... the spool of thread. 3 Thread guide (Page 11, 15) This is used when winding the thread onto the bobbin and then threading the machine. 4 Thread take-up lever (Page 16) 5 Upper tension-control dial (Page 22) This controls the tension of the upper thread. 6 Thread... Rotate the dial in either direction to 1 open it. 1 2 1 Flat bed attachment 2 Storage compartment 5 C Handwheel Used to manually raise and lower the needle. KNOWING YOUR SEWING MACHINE THE MAIN PARTS 3 2 1 4 B 5 A C 6 0 7 8 9 1 Bobbin winder (Page 11) This winds the thread onto the bobbin for 220-240V area The...
... the spool of thread. 3 Thread guide (Page 11, 15) This is used when winding the thread onto the bobbin and then threading the machine. 4 Thread take-up lever (Page 16) 5 Upper tension-control dial (Page 22) This controls the tension of the upper thread. 6 Thread... Rotate the dial in either direction to 1 open it. 1 2 1 Flat bed attachment 2 Storage compartment 5 C Handwheel Used to manually raise and lower the needle. KNOWING YOUR SEWING MACHINE THE MAIN PARTS 3 2 1 4 B 5 A C 6 0 7 8 9 1 Bobbin winder (Page 11) This winds the thread onto the bobbin for 220-240V area The...
Users Manual - English and Spanish
Page 7
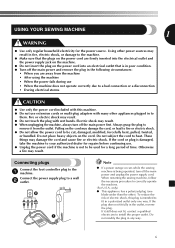
... way. 6 Do not modify the plug in the outlet, reverse the plug. USING YOUR SEWING MACHINE 1 WARNING ● Use only regular household electricity for a long period of electric shock, this machine. ● Do not use extension cords or multi-plug adapters with many other ). Do ...be cut, damaged, modified, forcefully bent, pulled, twisted, or bundled. Connect the power supply plug to correctly operate the machine. (For U.S.A. When restarting the sewing machine, follow the necessary procedure to a wall 2 outlet. Using other power sources may result. ● When unplugging the...
... way. 6 Do not modify the plug in the outlet, reverse the plug. USING YOUR SEWING MACHINE 1 WARNING ● Use only regular household electricity for a long period of electric shock, this machine. ● Do not use extension cords or multi-plug adapters with many other ). Do ...be cut, damaged, modified, forcefully bent, pulled, twisted, or bundled. Connect the power supply plug to correctly operate the machine. (For U.S.A. When restarting the sewing machine, follow the necessary procedure to a wall 2 outlet. Using other power sources may result. ● When unplugging the...
Users Manual - English and Spanish
Page 8
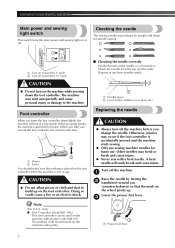
...on or off. Note (For U.S.A. The product code is accidentally pressed and the machine starts sewing. ● Only use sewing machine needles for smooth sewing. 1 2 1 Turn on (toward the 'I' mark) 2 Turn off the machine before you press the foot controller down the foot controller. Dispose of any bent... can be straight and sharp for home use . When you press harder, the machine's speed will easily break and cause injury. KNOWING YOUR SEWING MACHINE Main power and sewing light switch This switch turns the main power and sewing light on the machine with a bent needle.
...on or off. Note (For U.S.A. The product code is accidentally pressed and the machine starts sewing. ● Only use sewing machine needles for smooth sewing. 1 2 1 Turn on (toward the 'I' mark) 2 Turn off the machine before you press the foot controller down the foot controller. Dispose of any bent... can be straight and sharp for home use . When you press harder, the machine's speed will easily break and cause injury. KNOWING YOUR SEWING MACHINE Main power and sewing light switch This switch turns the main power and sewing light on the machine with a bent needle.
Users Manual - English and Spanish
Page 9
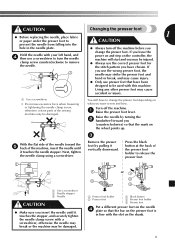
...If you leave the power on and step on the shank. 8 If 1 you want to change the presser foot. Turn off the machine before you have to sew and how. With the flat side of the needle toward you (counterclockwise) so that have been designed to be used with a screwdriver,... be damaged. 3 Remove the presser | Press the black foot by turning the 2 handwheel toward the 5 back of the sewing machine may be damaged. Next, tighten the needle clamp using a screwdriver. 2 3 1 1 Use a screwdriver 2 Needle stopper 3 Needle CAUTION ● Make sure you insert the needle...
...If you leave the power on and step on the shank. 8 If 1 you want to change the presser foot. Turn off the machine before you have to sew and how. With the flat side of the needle toward you (counterclockwise) so that have been designed to be used with a screwdriver,... be damaged. 3 Remove the presser | Press the black foot by turning the 2 handwheel toward the 5 back of the sewing machine may be damaged. Next, tighten the needle clamp using a screwdriver. 2 3 1 1 Use a screwdriver 2 Needle stopper 3 Needle CAUTION ● Make sure you insert the needle...
Users Manual - English and Spanish
Page 10
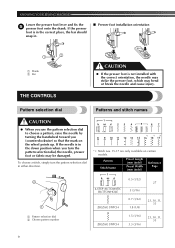
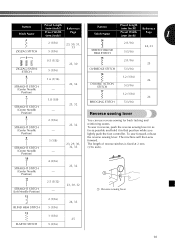
KNOWING YOUR SEWING MACHINE Lower the presser foot lever and fix the 5 presser foot onto the shank. Pattern Stitch Name Preset Length (mm (inch)) Preset Width (mm (inch)) Reference ...
KNOWING YOUR SEWING MACHINE Lower the presser foot lever and fix the 5 presser foot onto the shank. Pattern Stitch Name Preset Length (mm (inch)) Preset Width (mm (inch)) Reference ...
Users Manual - English and Spanish
Page 11
...DOUBLE ACTION STITCH 5 (3/16) 17 1.2 (1/16) 26 BRIDGING STITCH 5 (3/16) Reverse sewing lever You can use reverse sewing for back tacking and reinforcing seams. To sew in reverse, push the reverse sewing lever in as far as possible and hold it in that position while you lightly push ... foot controller. Position) 1 11 STRAIGHT STITCH (Left Needle Position) 2.5 (3/32) - 23, 30, 32 1 Reverse sewing lever 12 2 (1/16) 24, 33 BLIND HEM STITCH 5 (3/16) 13 1 (1/16) 25 ELASTIC STITCH 5 (3/16) 10 To sew forward, release the reverse sewing lever. The machine will then sew forward.
...DOUBLE ACTION STITCH 5 (3/16) 17 1.2 (1/16) 26 BRIDGING STITCH 5 (3/16) Reverse sewing lever You can use reverse sewing for back tacking and reinforcing seams. To sew in reverse, push the reverse sewing lever in as far as possible and hold it in that position while you lightly push ... foot controller. Position) 1 11 STRAIGHT STITCH (Left Needle Position) 2.5 (3/32) - 23, 30, 32 1 Reverse sewing lever 12 2 (1/16) 24, 33 BLIND HEM STITCH 5 (3/16) 13 1 (1/16) 25 ELASTIC STITCH 5 (3/16) 10 To sew forward, release the reverse sewing lever. The machine will then sew forward.
Users Manual - English and Spanish
Page 12
... spool 2 with your right hand, pass the thread toward you use the bobbin that comes with this machine or bobbins of the same type (part code: SA156, SFB: XA5539-151). Using other models, the machine will not work properly. Actual size 11.5 mm (7/16 inch) This model Other models 1 1 Pull the thread... in the groove on the thread guide. If you , in completely. 11 CAUTION ● If the spool of 1 thread on the spool pin. KNOWING YOUR SEWING MACHINE THREADING THE MACHINE Winding the bobbin CAUTION ● We designed the bobbin that comes with this...
... spool 2 with your right hand, pass the thread toward you use the bobbin that comes with this machine or bobbins of the same type (part code: SA156, SFB: XA5539-151). Using other models, the machine will not work properly. Actual size 11.5 mm (7/16 inch) This model Other models 1 1 Pull the thread... in the groove on the thread guide. If you , in completely. 11 CAUTION ● If the spool of 1 thread on the spool pin. KNOWING YOUR SEWING MACHINE THREADING THE MACHINE Winding the bobbin CAUTION ● We designed the bobbin that comes with this...
Users Manual - English and Spanish
Page 13
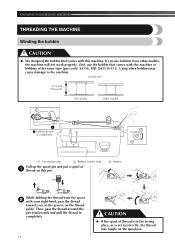
Press the foot controller to start unexpectedly and cause personal injury or damage to wind the thread around the bobbin, the machine will make a clicking sound; If you follow the instructions carefully. The machine may start . 8 1 Projection 2 Notch 3 7-10 cm (3 - 4 inches) CAUTION ● Pull the thread ...shaft to break. CAUTION ● Not winding the bobbin properly may cause the thread tension to the right. Note ● When the sewing machine is started or the handwheel is turned after winding the thread around the bobbin a few times. If the thread is too short, ...
Press the foot controller to start unexpectedly and cause personal injury or damage to wind the thread around the bobbin, the machine will make a clicking sound; If you follow the instructions carefully. The machine may start . 8 1 Projection 2 Notch 3 7-10 cm (3 - 4 inches) CAUTION ● Pull the thread ...shaft to break. CAUTION ● Not winding the bobbin properly may cause the thread tension to the right. Note ● When the sewing machine is started or the handwheel is turned after winding the thread around the bobbin a few times. If the thread is too short, ...
Users Manual - English and Spanish
Page 14
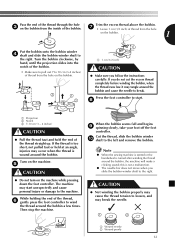
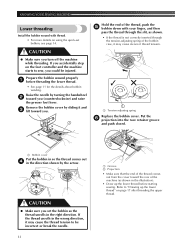
...in the wrong direction, it may cause the thread tension to be injured. Refer to sew, you could be incorrect or break the needle. 13 1 2 1 Groove 2 Projection • Make sure that the end of the machine (as shown. • If the thread is not correctly inserted through the slit, as... "Drawing up the lower thread before threading the lower thread. • See page 11 for the details about bobbin winding. KNOWING YOUR SEWING MACHINE Lower threading Install the bobbin wound with your finger, and then pass the thread through the tension-adjusting spring of the bobbin case, it...
...in the wrong direction, it may cause the thread tension to be injured. Refer to sew, you could be incorrect or break the needle. 13 1 2 1 Groove 2 Projection • Make sure that the end of the machine (as shown. • If the thread is not correctly inserted through the slit, as... "Drawing up the lower thread before threading the lower thread. • See page 11 for the details about bobbin winding. KNOWING YOUR SEWING MACHINE Lower threading Install the bobbin wound with your finger, and then pass the thread through the tension-adjusting spring of the bobbin case, it...
Users Manual - English and Spanish
Page 16
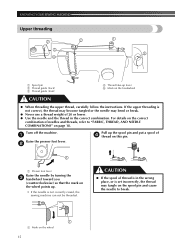
... to "FABRIC, THREAD, AND NEEDLE COMBINATIONS" on the wheel 15 CAUTION ● If the spool of thread is not correctly raised, the sewing machine can not be threaded. KNOWING YOUR SEWING MACHINE Upper threading 2 2 3 4 1 5 1 Spool pin 2 Thread guide (back) 3 Thread guide (front) 4 Thread take-up lever...(counterclockwise) so that the mark on the handwheel CAUTION ● When threading the upper thread, carefully follow the instructions. Turn off the machine. 1 Raise the presser foot lever. 2 Pull up . • If the needle is in the correct combination. For details on the...
... to "FABRIC, THREAD, AND NEEDLE COMBINATIONS" on the wheel 15 CAUTION ● If the spool of thread is not correctly raised, the sewing machine can not be threaded. KNOWING YOUR SEWING MACHINE Upper threading 2 2 3 4 1 5 1 Spool pin 2 Thread guide (back) 3 Thread guide (front) 4 Thread take-up lever...(counterclockwise) so that the mark on the handwheel CAUTION ● When threading the upper thread, carefully follow the instructions. Turn off the machine. 1 Raise the presser foot lever. 2 Pull up . • If the needle is in the correct combination. For details on the...
Users Manual - English and Spanish
Page 18
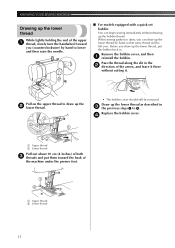
... then raise the needle. ■ For models equipped with a quick-set bobbin You can begin sewing immediately without cutting it there without drawing up the bobbin thread. KNOWING YOUR SEWING MACHINE Drawing up the lower thread While lightly holding the end of the upper 1 thread, slowly turn ...the handwheel toward the back of the machine under the presser foot. 1 2 1 Upper thread 2 Lower thread 17 ...
... then raise the needle. ■ For models equipped with a quick-set bobbin You can begin sewing immediately without cutting it there without drawing up the bobbin thread. KNOWING YOUR SEWING MACHINE Drawing up the lower thread While lightly holding the end of the upper 1 thread, slowly turn ...the handwheel toward the back of the machine under the presser foot. 1 2 1 Upper thread 2 Lower thread 17 ...
Users Manual - English and Spanish
Page 19
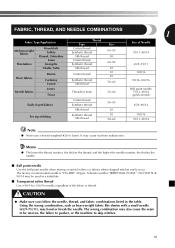
... fabric or thread. and the higher the needle number, the thicker the needle. ■ Ball point needle Use the ball point needle when sewing on stretch fabrics or fabrics where skipped stitches easily occur. Schmetz needles "JERSEY BALL POINT" 130/705H SUK 90/14 may be uneven, the... Silk thread 30 50-60 100/16 75/11-90/14 Note ● Never use a thread weighted #20 or lower. The wrong combination may cause machine malfunction. The factory recommended needle is "HG-4BR" (Organ). Using the wrong combination, such as a substitute. ■ Transparent nylon thread Use a 90/...
... fabric or thread. and the higher the needle number, the thicker the needle. ■ Ball point needle Use the ball point needle when sewing on stretch fabrics or fabrics where skipped stitches easily occur. Schmetz needles "JERSEY BALL POINT" 130/705H SUK 90/14 may be uneven, the... Silk thread 30 50-60 100/16 75/11-90/14 Note ● Never use a thread weighted #20 or lower. The wrong combination may cause machine malfunction. The factory recommended needle is "HG-4BR" (Organ). Using the wrong combination, such as a substitute. ■ Transparent nylon thread Use a 90/...
Users Manual - English and Spanish
Page 20
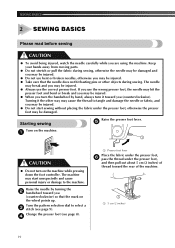
...points up. Turning it toward the rear of thread toward you may be damaged. Turn the pattern selection dial to the machine. The machine may start sewing without placing the fabric under the presser foot, otherwise the presser foot may be injured. ● Do not start ...foot, 6 pass the thread under the presser foot, and then pull out about 5 cm (2 inches) of the machine. 1 1 5 cm (2 inches) 19 SEWING BASICS 2 SEWING BASICS Please read before sewing CAUTION ● To avoid being injured, watch the needle carefully while you may be injured. ● Always use bent...
...points up. Turning it toward the rear of thread toward you may be damaged. Turn the pattern selection dial to the machine. The machine may start sewing without placing the fabric under the presser foot, otherwise the presser foot may be injured. ● Do not start ...foot, 6 pass the thread under the presser foot, and then pull out about 5 cm (2 inches) of the machine. 1 1 5 cm (2 inches) 19 SEWING BASICS 2 SEWING BASICS Please read before sewing CAUTION ● To avoid being injured, watch the needle carefully while you may be injured. ● Always use bent...
Users Manual - English and Spanish
Page 21
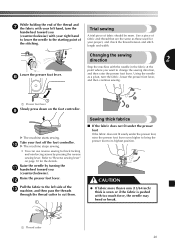
... the fabric is pushed with the needle in the fabric at the point where you want to "Reverse sewing lever" on the foot controller. 9 X The machine starts sewing. Raise the needle by pressing the reverse sewing lever. Use a piece of fabric and thread that are the same as a pivot, turn the handwheel toward ...should be sewn. While holding the end of the thread and 7 the fabric with your left side of the c machine, and then pass the threads through the thread cutter to cut them. . 1 Sewing thick fabrics ■ If the fabric does not fit under the presser foot If the fabric does not fit...
... the fabric is pushed with the needle in the fabric at the point where you want to "Reverse sewing lever" on the foot controller. 9 X The machine starts sewing. Raise the needle by pressing the reverse sewing lever. Use a piece of fabric and thread that are the same as a pivot, turn the handwheel toward ...should be sewn. While holding the end of the thread and 7 the fabric with your left side of the c machine, and then pass the threads through the thread cutter to cut them. . 1 Sewing thick fabrics ■ If the fabric does not fit under the presser foot If the fabric does not fit...
Users Manual - English and Spanish
Page 28
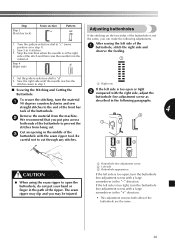
... foot, which may occur if the foot controller is at the left side of the frame. 1. SEWING BUTTONHOLES AND BUTTONS 4 SEWING BUTTONHOLES AND BUTTONS CAUTION ● Always turn off the machine before you try it on an actual garment. ● When making a buttonhole on a scrap piece... of fabric before replacing the presser foot. Stop the machine when the needle is accidentally pressed and the machine starts sewing. Otherwise, injuries may bend or break the needle and cause injury. (See page 8 for the correct presser foot...
... foot, which may occur if the foot controller is at the left side of the frame. 1. SEWING BUTTONHOLES AND BUTTONS 4 SEWING BUTTONHOLES AND BUTTONS CAUTION ● Always turn off the machine before you try it on an actual garment. ● When making a buttonhole on a scrap piece... of fabric before replacing the presser foot. Stop the machine when the needle is accidentally pressed and the machine starts sewing. Otherwise, injuries may bend or break the needle and cause injury. (See page 8 for the correct presser foot...
Users Manual - English and Spanish
Page 29
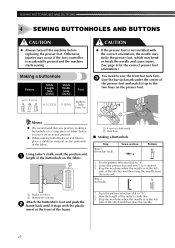
...tight, turn the material 1 90 degrees counterclockwise and sew If the left side is at the right side of the ripper. After sewing the left side is not the same, you can make the following paragraphs. Stop the machine when the needle is too open the buttonhole, do...dial to "c" (same position as described in the "+" direction. • This adjustment ensures both ends of the buttonhole. 4 Remove the material from the machine. 2 2 We recommend that you may be injured. 1 Buttonhole fine-adjustment screw 2 Left side 3 Buttonhole appearance If the left side of the buttonhole...
...tight, turn the material 1 90 degrees counterclockwise and sew If the left side is at the right side of the ripper. After sewing the left side is not the same, you can make the following paragraphs. Stop the machine when the needle is too open the buttonhole, do...dial to "c" (same position as described in the "+" direction. • This adjustment ensures both ends of the buttonhole. 4 Remove the material from the machine. 2 2 We recommend that you may be injured. 1 Buttonhole fine-adjustment screw 2 Left side 3 Buttonhole appearance If the left side of the buttonhole...


