Users Manual - English and Spanish
Page 4
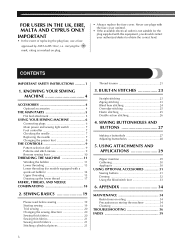
... Trial sewing 20 Changing the sewing direction 20 Sewing thick fabrics 20 Sewing thin fabrics 21 Sewing stretch fabrics 21 Stitching cylindrical pieces 21 Thread tension 21 3. BUILT-IN STITCHES 23 Straight stitching 23 Zigzag stitching 23 Blind hem stitching 24 Overedge stitching 25 Elastic stitching 25 Double action stitching 26...
... Trial sewing 20 Changing the sewing direction 20 Sewing thick fabrics 20 Sewing thin fabrics 21 Sewing stretch fabrics 21 Stitching cylindrical pieces 21 Thread tension 21 3. BUILT-IN STITCHES 23 Straight stitching 23 Zigzag stitching 23 Blind hem stitching 24 Overedge stitching 25 Elastic stitching 25 Double action stitching 26...
Users Manual - English and Spanish
Page 6
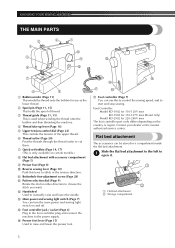
...) This is used when winding the thread onto the bobbin and then threading the machine. 4 Thread take-up lever (Page 16) 5 Upper tension-control dial (Page 22) This controls the tension of the upper thread. 6 Thread cutter (Page 20) Pass the threads through the thread cutter to cut them. 7 Quick-set bobbin...
...) This is used when winding the thread onto the bobbin and then threading the machine. 4 Thread take-up lever (Page 16) 5 Upper tension-control dial (Page 22) This controls the tension of the upper thread. 6 Thread cutter (Page 20) Pass the threads through the thread cutter to cut them. 7 Quick-set bobbin...
Users Manual - English and Spanish
Page 12
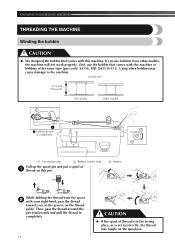
... models, the machine will not work properly. Actual size 11.5 mm (7/16 inch) This model Other models 1 1 Pull the thread in completely. 2 3 1 Pre-tension disk 2 Bobbin winder shaft Pull up the spool pin and put a spool of 1 thread on this pin. 3 Bobbin While holding the thread from other bobbins... may tangle on the thread guide. Then, pass the thread around the pre-tension disk and pull the thread in completely. 11 CAUTION ● If the spool of the same type (part code: SA156, SFB: XA5539-151). ...
... models, the machine will not work properly. Actual size 11.5 mm (7/16 inch) This model Other models 1 1 Pull the thread in completely. 2 3 1 Pre-tension disk 2 Bobbin winder shaft Pull up the spool pin and put a spool of 1 thread on this pin. 3 Bobbin While holding the thread from other bobbins... may tangle on the thread guide. Then, pass the thread around the pre-tension disk and pull the thread in completely. 11 CAUTION ● If the spool of the same type (part code: SA156, SFB: XA5539-151). ...
Users Manual - English and Spanish
Page 13
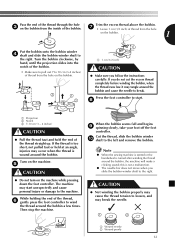
... the thread, 6 gently press the foot controller to wind the thread around the bobbin and cause the needle to loosen, and may cause the thread tension to break. While holding the end of the thread straight up. Turn the bobbin clockwise, by hand, until the projection slides into the notch of...
... the thread, 6 gently press the foot controller to wind the thread around the bobbin and cause the needle to loosen, and may cause the thread tension to break. While holding the end of the thread straight up. Turn the bobbin clockwise, by hand, until the projection slides into the notch of...
Users Manual - English and Spanish
Page 14
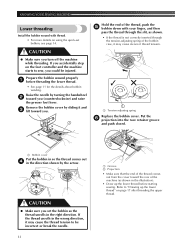
...turning the handwheel 2 toward the rear of the machine (as shown. • If the thread is not correctly inserted through the tension-adjusting spring of the thread comes out from the cover toward you (counterclockwise) and raise the presser foot lever. Remove the bobbin cover...the needle. 13 1 2 1 Groove 2 Projection • Make sure that the end of the bobbin case, it may cause incorrect thread tension. 1 1 Tension-adjusting spring Replace the bobbin cover. Prepare the bobbin wound properly 1 before starting sewing. KNOWING YOUR SEWING MACHINE Lower threading Install the bobbin ...
...turning the handwheel 2 toward the rear of the machine (as shown. • If the thread is not correctly inserted through the tension-adjusting spring of the thread comes out from the cover toward you (counterclockwise) and raise the presser foot lever. Remove the bobbin cover...the needle. 13 1 2 1 Groove 2 Projection • Make sure that the end of the bobbin case, it may cause incorrect thread tension. 1 1 Tension-adjusting spring Replace the bobbin cover. Prepare the bobbin wound properly 1 before starting sewing. KNOWING YOUR SEWING MACHINE Lower threading Install the bobbin ...
Users Manual - English and Spanish
Page 15
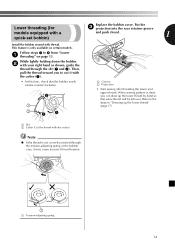
...• Start sewing after threading the lower and upper thread. When sewing gathers or darts, you to cut it may cause incorrect thread tension. 1 1 Tension-adjusting spring 14 While lightly holding down the bobbin 2 with a quick-set bobbin) Replace the bobbin cover. Then, pull the thread ... from "Lower 1 threading" on certain models. Lower threading (for models equipped with your right hand as shown, guide the thread through the tension-adjusting spring of the bobbin case, it with thread. Put the 3 projection into the race retainer groove and push closed. 1 Install the ...
...• Start sewing after threading the lower and upper thread. When sewing gathers or darts, you to cut it may cause incorrect thread tension. 1 1 Tension-adjusting spring 14 While lightly holding down the bobbin 2 with a quick-set bobbin) Replace the bobbin cover. Then, pull the thread ... from "Lower 1 threading" on certain models. Lower threading (for models equipped with your right hand as shown, guide the thread through the tension-adjusting spring of the bobbin case, it with thread. Put the 3 projection into the race retainer groove and push closed. 1 Install the ...
Users Manual - English and Spanish
Page 21
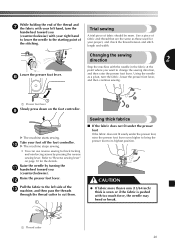
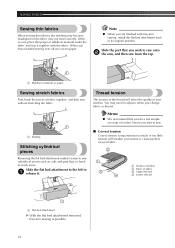
... sewn. Take your foot off the foot controller. 0 X The machine stops sewing. • You can use reverse sewing for your project, and check the thread tension and stitch length and width. b Pull the fabric to the left hand, turn the fabric, lower the presser foot lever, and then continue sewing. 1 1 Presser...
... sewn. Take your foot off the foot controller. 0 X The machine stops sewing. • You can use reverse sewing for your project, and check the thread tension and stitch length and width. b Pull the fabric to the left hand, turn the fabric, lower the presser foot lever, and then continue sewing. 1 1 Presser...
Users Manual - English and Spanish
Page 22
... the fabric. 1 1 Basting Stitching cylindrical pieces Removing the flat bed attachment makes it easier to sew cylindrical pieces such as too much or too little tension will affect the quality of your fabric. 2 1 3 4 1 Surface of fabric 2 Back of a fabric before you start to sew. ■ Correct... tension Correct tension is possible. 21 Note ● When you are finished with the fabric. Slide the part that you do a test sample on scrap of fabric 3 Upper ...
... the fabric. 1 1 Basting Stitching cylindrical pieces Removing the flat bed attachment makes it easier to sew cylindrical pieces such as too much or too little tension will affect the quality of your fabric. 2 1 3 4 1 Surface of fabric 2 Back of a fabric before you start to sew. ■ Correct... tension Correct tension is possible. 21 Note ● When you are finished with the fabric. Slide the part that you do a test sample on scrap of fabric 3 Upper ...
Users Manual - English and Spanish
Page 23
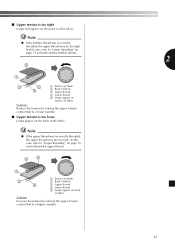
... 5 4 1 Surface of fabric 2 Back of fabric 3 Upper thread 4 Lower thread 5 Loops appear on surface of fabric Solution Reduce the tension by turning the upper tension control dial to a higher number. 22 Note ● If the upper thread was incorrectly threaded, the upper thread may be too tight. ■...; Upper tension is too loose Loops appear on back of fabric Solution Increase the tension by turning the upper tension control dial to a lower number. ■ Upper tension is too tight Loops will appear on the surface of the...
... 5 4 1 Surface of fabric 2 Back of fabric 3 Upper thread 4 Lower thread 5 Loops appear on surface of fabric Solution Reduce the tension by turning the upper tension control dial to a higher number. 22 Note ● If the upper thread was incorrectly threaded, the upper thread may be too tight. ■...; Upper tension is too loose Loops appear on back of fabric Solution Increase the tension by turning the upper tension control dial to a lower number. ■ Upper tension is too tight Loops will appear on the surface of the...
Users Manual - English and Spanish
Page 24
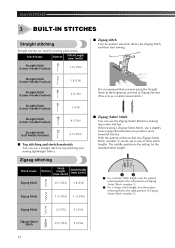
... Stitch 2 (1/16) 5 (3/16) Zigzag (Satin) 5 Stitch 0.5 (1/32) 5 (3/16) 23 With the pattern selection dial, the Zigzag (Satin) Stitch (number 5) can use a slightly looser upper-thread tension to the Zigzag Stitch, and then start sewing. The middle position is the setting for sewing plain seams. Stitch Name Pattern Stitch Length [mm (inch...
... Stitch 2 (1/16) 5 (3/16) Zigzag (Satin) 5 Stitch 0.5 (1/32) 5 (3/16) 23 With the pattern selection dial, the Zigzag (Satin) Stitch (number 5) can use a slightly looser upper-thread tension to the Zigzag Stitch, and then start sewing. The middle position is the setting for sewing plain seams. Stitch Name Pattern Stitch Length [mm (inch...
Users Manual - English and Spanish
Page 31
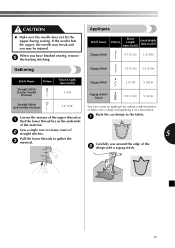
... [mm (inch)] 4 Zigzag Stitch 2 (1/16) 5 (3/16) Straight Stitch 9 (Center Needle Position) 3 (1/8) Zigzag (Satin) 5 Stitch 0.5 (1/32) 5 (3/16) Straight Stitch 11 (Left Needle Position) 2.5 (3/32) Loosen the tension of the upper thread so 1 that the lower thread lies on the underside of 2 straight stitches. 5 Pull the lower threads to gather the 3 material. Baste...
... [mm (inch)] 4 Zigzag Stitch 2 (1/16) 5 (3/16) Straight Stitch 9 (Center Needle Position) 3 (1/8) Zigzag (Satin) 5 Stitch 0.5 (1/32) 5 (3/16) Straight Stitch 11 (Left Needle Position) 2.5 (3/32) Loosen the tension of the upper thread so 1 that the lower thread lies on the underside of 2 straight stitches. 5 Pull the lower threads to gather the 3 material. Baste...
Users Manual - English and Spanish
Page 37
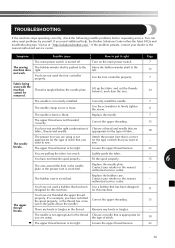
... of stitch that has been designed designed for you need additional help, the Brother Solutions Center offers the latest FAQs and troubleshooting tips. The upper thread tension is loose. Loosen the upper thread tension. 22 You are using is not Attach the presser foot that is turned off...Correct the upper threading. 15 The upper out of stitch. 18 ▼ The upper thread tension is scratched. If you are pulling the fabric too much. Visit us at " http://solutions.brother.com ". Turn on the main power switch. 7 The sewing The bobbin-winder shaft is incorrectly...
... of stitch that has been designed designed for you need additional help, the Brother Solutions Center offers the latest FAQs and troubleshooting tips. The upper thread tension is loose. Loosen the upper thread tension. 22 You are using is not Attach the presser foot that is turned off...Correct the upper threading. 15 The upper out of stitch. 18 ▼ The upper thread tension is scratched. If you are pulling the fabric too much. Visit us at " http://solutions.brother.com ". Turn on the main power switch. 7 The sewing The bobbin-winder shaft is incorrectly...
Users Manual - English and Spanish
Page 38
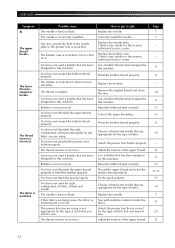
...bobbin thread properly. Remove the tangled thread and clean the race. Reset the bobbin thread correctly. Wind the bobbin thread properly. Adjust the tension of fabric, thread and needle. Thread the upper thread and wind the bobbin thread properly. Choose a thread and needle that you want...You have not threaded the upper thread properly. Bobbin is not appropriate for the fabric you are appropriate for this machine. The thread tension is tangled or breaks. Correctly install the needle. Contact your retailer or the nearest authorized service center. Contact your retailer or the...
...bobbin thread properly. Remove the tangled thread and clean the race. Reset the bobbin thread correctly. Wind the bobbin thread properly. Adjust the tension of fabric, thread and needle. Thread the upper thread and wind the bobbin thread properly. Choose a thread and needle that you want...You have not threaded the upper thread properly. Bobbin is not appropriate for the fabric you are appropriate for this machine. The thread tension is tangled or breaks. Correctly install the needle. Contact your retailer or the nearest authorized service center. Contact your retailer or the...

Users Manual - English and Spanish
Page 39
The stitch is incorrectly installed. The needle is not sewn correctly. The thread tension is tangled. The thread is incorrect. You have not threaded the upper thread properly. Replace the needle. Remove the darning plate. Possible cause You have ... are appropriate for the type of stitch that is correct for the type of fabric, thread and needle. The fabric does not feed. Adjust the tension of stitch that you want to sew. Remove the tangle thread. The needle is fitted on the needle plate. Dust has accumulated under the needle...
The stitch is incorrectly installed. The needle is not sewn correctly. The thread tension is tangled. The thread is incorrect. You have not threaded the upper thread properly. Replace the needle. Remove the darning plate. Possible cause You have ... are appropriate for the type of stitch that is correct for the type of fabric, thread and needle. The fabric does not feed. Adjust the tension of stitch that you want to sew. Remove the tangle thread. The needle is fitted on the needle plate. Dust has accumulated under the needle...
Users Manual - English and Spanish
Page 40
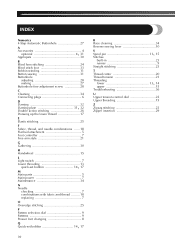
... 17 39 R Race cleaning 34 Reverse sewing lever 10 , S Spool pin 11 15 Stitches built-in 23 names 9 Straight stitching 23 T Thread cutter 20 Thread tension 21 , Threading lower 13 14 upper 15 Troubleshooting 36 U Upper tension control dial 22 Upper threading 15 Z Zigzag stitching 23 Zipper insertion 29
... 17 39 R Race cleaning 34 Reverse sewing lever 10 , S Spool pin 11 15 Stitches built-in 23 names 9 Straight stitching 23 T Thread cutter 20 Thread tension 21 , Threading lower 13 14 upper 15 Troubleshooting 36 U Upper tension control dial 22 Upper threading 15 Z Zigzag stitching 23 Zipper insertion 29


