
Users Manual - English
Page 1
Computerized Embroidery and Sewing Machine Operation Manual Product Code 885-V95/V97 GETTING READY SEWING BASICS UTILITY STITCHES EMBROIDERY APPENDIX Please visit us at http://solutions.brother.com where you can get product support and answers to frequently asked questions (FAQs).
Computerized Embroidery and Sewing Machine Operation Manual Product Code 885-V95/V97 GETTING READY SEWING BASICS UTILITY STITCHES EMBROIDERY APPENDIX Please visit us at http://solutions.brother.com where you can get product support and answers to frequently asked questions (FAQs).
Users Manual - English
Page 3
...be careful not to make any sudden or careless movements, otherwise you are leaving the machine unattended. Do not pull on the cord. • Plug the machine directly into the electrical outlet. 1 Lifting the sewing machine by its handle. DANGER - Do not use an extension cord. • Always ... Introduction Thank you notice anything unusual, such as an odor, heat, discoloration or deformation, stop using the machine immediately and unplug the power cord. • When transporting the sewing machine, be sure to carry it by any other part may injure your back or knees. 4 Always keep your...
...be careful not to make any sudden or careless movements, otherwise you are leaving the machine unattended. Do not pull on the cord. • Plug the machine directly into the electrical outlet. 1 Lifting the sewing machine by its handle. DANGER - Do not use an extension cord. • Always ... Introduction Thank you notice anything unusual, such as an odor, heat, discoloration or deformation, stop using the machine immediately and unplug the power cord. • When transporting the sewing machine, be sure to carry it by any other part may injure your back or knees. 4 Always keep your...
Users Manual - English
Page 4
... direct sunlight and high humidity locations. For additional product information and updates, visit our web site at www.brother.com SAVE THESE INSTRUCTIONS This machine is being used or where oxygen is intended for its intended use as it could cause the needle to break. • Do ... • Do not use bent or damaged needles. • Keep fingers away from all moving parts. Special care is required around the machine needle. • Switch the sewing machine to the symbol "O" position to turn it off when making any assemblies, the presser feet, needle, or other hot objects. • ...
... direct sunlight and high humidity locations. For additional product information and updates, visit our web site at www.brother.com SAVE THESE INSTRUCTIONS This machine is being used or where oxygen is intended for its intended use as it could cause the needle to break. • Do ... • Do not use bent or damaged needles. • Keep fingers away from all moving parts. Special care is required around the machine needle. • Switch the sewing machine to the symbol "O" position to turn it off when making any assemblies, the presser feet, needle, or other hot objects. • ...
Users Manual - English
Page 13
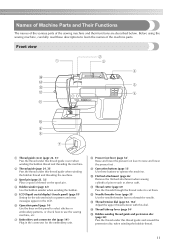
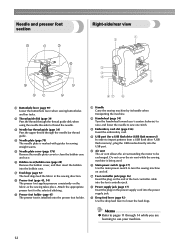
...141) Plug in the LCD. j Flat bed attachment (page 46) Remove the flat bed attachment when sewing cylindrical pieces such as sleeve cuffs. c Spool pin (page 23, 32) Place a spool of the sewing machine and their functions are described below. d Bobbin winder (page 22) Use the bobbin winder when winding... the bobbin. Names of Machine Parts and Their Functions The names of the various parts of thread on this panel...
...141) Plug in the LCD. j Flat bed attachment (page 46) Remove the flat bed attachment when sewing cylindrical pieces such as sleeve cuffs. c Spool pin (page 23, 32) Place a spool of the sewing machine and their functions are described below. d Bobbin winder (page 22) Use the bobbin winder when winding... the bobbin. Names of Machine Parts and Their Functions The names of the various parts of thread on this panel...
Users Manual - English
Page 14
...on and off. b Thread guide disk (page 34) Pass the thread through the thread guide disk when using the needle threader to turn the sewing machine on the end of the foot controller cable into the power supply jack. g Feed dogs (page 92) The feed dogs feed the fabric ...in the sewing direction. a Handle Carry the sewing machine by its handle when transporting the machine. b Handwheel (page 54) Turn the handwheel toward you are learning to pages 11 through the needle bar thread guide...
...on and off. b Thread guide disk (page 34) Pass the thread through the thread guide disk when using the needle threader to turn the sewing machine on the end of the foot controller cable into the power supply jack. g Feed dogs (page 92) The feed dogs feed the fabric ...in the sewing direction. a Handle Carry the sewing machine by its handle when transporting the machine. b Handwheel (page 54) Turn the handwheel toward you are learning to pages 11 through the needle bar thread guide...
Users Manual - English
Page 15
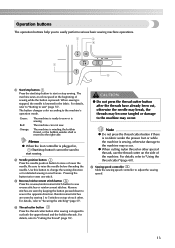
...buttons The operation buttons help you to sew" (page 55). For details, refer to "Starting to easily perform various basic sewing machine operations. Use this button to start or stop button to change the sewing direction or for detailed sewing in the opposite direction. a Start/stop... button Press the start sewing. d Thread cutter button Press the thread cutter...
...buttons The operation buttons help you to sew" (page 55). For details, refer to "Starting to easily perform various basic sewing machine operations. Use this button to start or stop button to change the sewing direction or for detailed sewing in the opposite direction. a Start/stop... button Press the start sewing. d Thread cutter button Press the thread cutter...
Users Manual - English
Page 16
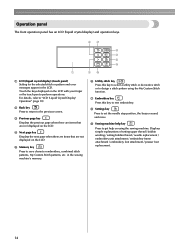
...that are not displayed on the LCD with your finger or the touch pen to sew embroidery. f Utility stitch key Press this key to perform operations. i Sewing machine help key Press to design a stitch pattern using the sewing machine. a LCD (liquid crystal display) (touch panel) Setting for the selected stitch ...or pattern and error messages appear in the sewing machine's memory. For details, refer to the previous screen. Operation panel The front operation panel has an LCD (liquid crystal display) and ...
...that are not displayed on the LCD with your finger or the touch pen to sew embroidery. f Utility stitch key Press this key to perform operations. i Sewing machine help key Press to design a stitch pattern using the sewing machine. a LCD (liquid crystal display) (touch panel) Setting for the selected stitch ...or pattern and error messages appear in the sewing machine's memory. For details, refer to the previous screen. Operation panel The front operation panel has an LCD (liquid crystal display) and ...
Users Manual - English
Page 18
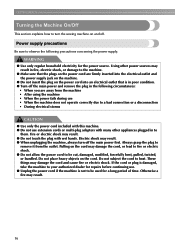
.... ● When unplugging the machine, always turn the sewing machine on the power cord are away from the outlet. Electric shock may result. ● Do not touch the plug with many other appliances plugged in to them. Always grasp the plug to remove it from the machine • After using the machine • When the...
.... ● When unplugging the machine, always turn the sewing machine on the power cord are away from the outlet. Electric shock may result. ● Do not touch the plug with many other appliances plugged in to them. Always grasp the plug to remove it from the machine • After using the machine • When the...
Users Manual - English
Page 19
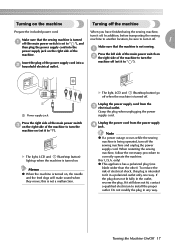
...has a polarized plug (one way. Turning on the machine Turning off the sewing machine and unplug the power supply cord. When you have finished using the sewing machine, Make sure that the machine is turned off when the machine is not sewing. Unplug the power cord from the c electrical outlet..../stop button) go off . Note z If a power outage occurs while the sewing machine is turned turn off the machine Prepare the included power cord. a machine. In addition, before transporting the sewing machine to another location, be sure to turn the Insert the plug of the power supply...
...has a polarized plug (one way. Turning on the machine Turning off the sewing machine and unplug the power supply cord. When you have finished using the sewing machine, Make sure that the machine is turned off when the machine is not sewing. Unplug the power cord from the c electrical outlet..../stop button) go off . Note z If a power outage occurs while the sewing machine is turned turn off the machine Prepare the included power cord. a machine. In addition, before transporting the sewing machine to another location, be sure to turn the Insert the plug of the power supply...
Users Manual - English
Page 20
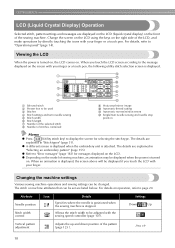
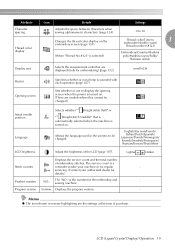
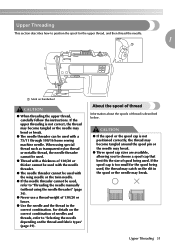
... details are explained in "Stitch types" (page 51). Attribute Needle position Stitch width control Icon Details Specifies where the needle is positioned when the sewing machine is attached. When you touch the LCD with your finger or a touch pen. z Refer to "Error messages" (page 183) for selecting...the power is displayed, the screen above will be displayed if you touch the LCD screen according to page 20. z Depending on the model of sewing machine, an animation may be displayed when the power is displayed. 1 2 3 4 5 a Selected stitch b Presser foot to display the screen for ...
... details are explained in "Stitch types" (page 51). Attribute Needle position Stitch width control Icon Details Specifies where the needle is positioned when the sewing machine is attached. When you touch the LCD with your finger or a touch pen. z Refer to "Error messages" (page 183) for selecting...the power is displayed, the screen above will be displayed if you touch the LCD screen according to page 20. z Depending on the model of sewing machine, an animation may be displayed when the power is displayed. 1 2 3 4 5 a Selected stitch b Presser foot to display the screen for ...
Users Manual - English
Page 21
....#123" is selected) Embroidery/Country/Madeira poly/Madeira rayon/Sulky/ Robison Anton Selects the measurement units that is automatically selected when the machine is the number for the embroidery and sewing machine. English/German/French/ Italian/Dutch/Spanish/ Japanese/Danish/Norwegian/ Finnish/Swedish/Portuguese/ Russian/Korean/Thai/others LCD brightness Adjust the brightness...
....#123" is selected) Embroidery/Country/Madeira poly/Madeira rayon/Sulky/ Robison Anton Selects the measurement units that is automatically selected when the machine is the number for the embroidery and sewing machine. English/German/French/ Italian/Dutch/Spanish/ Japanese/Danish/Norwegian/ Finnish/Swedish/Portuguese/ Russian/Korean/Thai/others LCD brightness Adjust the brightness...
Users Manual - English
Page 22
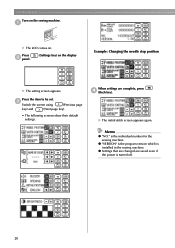
Memo z "NO." a The highlighted display is the individual number for the sewing machine. When settings are saved even if the power is installed in the sewing machine. is the initial setting. X The LCD comes on the display Example: Changing the needle stop position X The setting screen appears. c Switch the screen using (Previous ... the item to be set. Press b panel. (Settings key) on . z "VERSION" is the program version which is turned off. 20 GETTING READY Turn on the sewing machine.
Memo z "NO." a The highlighted display is the individual number for the sewing machine. When settings are saved even if the power is installed in the sewing machine. is the initial setting. X The LCD comes on the display Example: Changing the needle stop position X The setting screen appears. c Switch the screen using (Previous ... the item to be set. Press b panel. (Settings key) on . z "VERSION" is the program version which is turned off. 20 GETTING READY Turn on the sewing machine.
Users Manual - English
Page 23
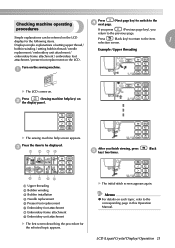
... appears again. c a b cd After you return to the item 1 selection screen. Press (Sewing machine help screen appears. Turn on the LCD. Checking machine operating Press (Next page key) to switch to the corresponding page in this Operation Manual. bobbin ...thread / needle replacement / embroidery unit attachment / Example: Upper threading embroidery frame attachment / embroidery foot attachment / presser foot replacement on the sewing machine. procedures If you press (Previous page key), you finish viewing, press e key) two times. (Back h g fe a Upper threading ...
... appears again. c a b cd After you return to the item 1 selection screen. Press (Sewing machine help screen appears. Turn on the LCD. Checking machine operating Press (Next page key) to switch to the corresponding page in this Operation Manual. bobbin ...thread / needle replacement / embroidery unit attachment / Example: Upper threading embroidery frame attachment / embroidery foot attachment / presser foot replacement on the sewing machine. procedures If you press (Previous page key), you finish viewing, press e key) two times. (Back h g fe a Upper threading ...
Users Manual - English
Page 24
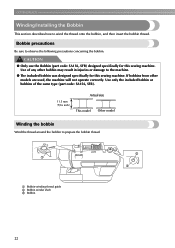
... model Other model Winding the bobbin Wind the thread around the bobbin to the machine. ● The included bobbin was designed specifically for this sewing machine. CAUTION ● Only use the Bobbin (part code: SA156, SFB) designed specifically for this sewing machine. GETTING READY Winding/Installing the Bobbin This section describes how to observe the...
... model Other model Winding the bobbin Wind the thread around the bobbin to the machine. ● The included bobbin was designed specifically for this sewing machine. CAUTION ● Only use the Bobbin (part code: SA156, SFB) designed specifically for this sewing machine. GETTING READY Winding/Installing the Bobbin This section describes how to observe the...
Users Manual - English
Page 25
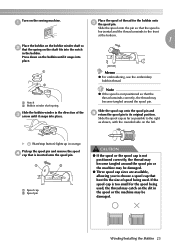
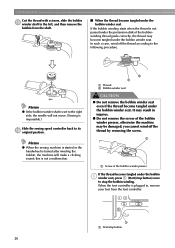
... If the spool is not positioned correctly, the thread may become tangled around the spool pin or the machine may catch on the shaft fits into the notch in orange. a b a Notch b Bobbin winder shaft... spring Slide the bobbin winder in the spool or the machine may become tangled around the spool pin. X (Start/stop button) lights up the spool pin and remove...cap as far as possible to its original position. Press down on the sewing machine. Memo z For embroidering, use the embroidery bobbin thread. a Place the spool of the c arrow ...
... If the spool is not positioned correctly, the thread may become tangled around the spool pin or the machine may catch on the shaft fits into the notch in orange. a b a Notch b Bobbin winder shaft... spring Slide the bobbin winder in the spool or the machine may become tangled around the spool pin. X (Start/stop button) lights up the spool pin and remove...cap as far as possible to its original position. Press down on the sewing machine. Memo z For embroidering, use the embroidery bobbin thread. a Place the spool of the c arrow ...
Users Manual - English
Page 27
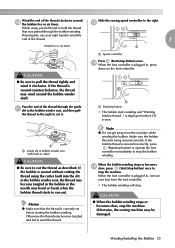
... the bobbin or the needle may become tangled in the bobbin winder seat, and then pull the thread to the right to stop the machine. Make sure the bobbin thread is correctly set before starting the bobbin winding. CAUTION ● When the bobbin winding stops or becomes slow..., the thread may be damaged. a CAUTION ● Be sure to wind the thread. X The bobbin winding will stop button) once. Otherwise, the sewing machine may become tangled and fail to pull the thread tightly and wind it . a Speed controller Press (Start/stop . Otherwise the thread may bend or break...
... the bobbin or the needle may become tangled in the bobbin winder seat, and then pull the thread to the right to stop the machine. Make sure the bobbin thread is correctly set before starting the bobbin winding. CAUTION ● When the bobbin winding stops or becomes slow..., the thread may be damaged. a CAUTION ● Be sure to wind the thread. X The bobbin winding will stop button) once. Otherwise, the sewing machine may become tangled and fail to pull the thread tightly and wind it . a Speed controller Press (Start/stop . Otherwise the thread may bend or break...
Users Manual - English
Page 28
...bobbin a winder seat, press (Start/stop button) once to stop button 26 Memo z When the sewing machine is started or the handwheel is turned after winding the bobbin, the machine will not move. (Sewing is plugged in injuries. ● Do not remove the screw of the bobbin winder presser, otherwise ...the machine may become tangled under the pretension disk of the bobbin winder presser If the ...
...bobbin a winder seat, press (Start/stop button) once to stop button 26 Memo z When the sewing machine is started or the handwheel is turned after winding the bobbin, the machine will not move. (Sewing is plugged in injuries. ● Do not remove the screw of the bobbin winder presser, otherwise ...the machine may become tangled under the pretension disk of the bobbin winder presser If the ...
Users Manual - English
Page 29
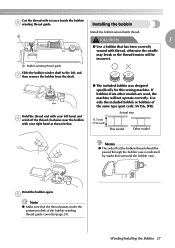
... with thread. If bobbins from the shaft. Hold the thread end with your left , and c then remove the bobbin from other models are used, the machine will be passed through the bobbin case is indicated by marks that the thread passes under the pretension disk of the same type (part code.... a CAUTION 1 ● Use a bobbin that has been correctly wound with your right hand as shown below. ● The included bobbin was designed specifically for this sewing machine. Wind the bobbin again.
... with thread. If bobbins from the shaft. Hold the thread end with your left , and c then remove the bobbin from other models are used, the machine will be passed through the bobbin case is indicated by marks that the thread passes under the pretension disk of the same type (part code.... a CAUTION 1 ● Use a bobbin that has been correctly wound with your right hand as shown below. ● The included bobbin was designed specifically for this sewing machine. Wind the bobbin again.
Users Manual - English
Page 30
... be incorrect. ● Be sure to raise the needle, and then raise the presser foot lever. b a Needle position button b Presser foot lever Turn off the sewing machine. Otherwise, the thread may break or the thread tension will be incorrect. Remove the bobbin cover. b Slide the bobbin cover latch to drop the bobbin...
... be incorrect. ● Be sure to raise the needle, and then raise the presser foot lever. b a Needle position button b Presser foot lever Turn off the sewing machine. Otherwise, the thread may break or the thread tension will be incorrect. Remove the bobbin cover. b Slide the bobbin cover latch to drop the bobbin...
Users Manual - English
Page 33
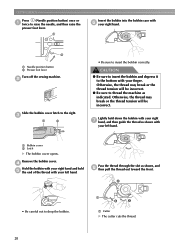
... be used with the wing needle or the twin needle. ● If the needle threader cannot be used with a 75/11 through 100/16 home sewing machine needle. CAUTION ● If the spool or the spool cap is too small for the upper thread, and then thread the needle. 1 a a Mark on the...
... be used with the wing needle or the twin needle. ● If the needle threader cannot be used with a 75/11 through 100/16 home sewing machine needle. CAUTION ● If the spool or the spool cap is too small for the upper thread, and then thread the needle. 1 a a Mark on the...


