Users Manual - English
Page 3
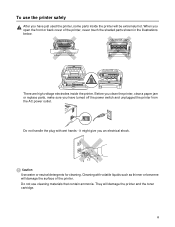
... be extremely hot. Caution Use water or neutral detergents for cleaning. Cleaning with wet hands - Do not use the printer safely After you have just used the printer, some parts inside the printer. Before you clean the printer, clear a paper jam or replace parts, make sure you have turned off the power switch and unplugged the...
... be extremely hot. Caution Use water or neutral detergents for cleaning. Cleaning with wet hands - Do not use the printer safely After you have just used the printer, some parts inside the printer. Before you clean the printer, clear a paper jam or replace parts, make sure you have turned off the power switch and unplugged the...

Users Manual - English
Page 8
...compliance with Part 15 of the FCC Rules. This equipment has been tested and found to radio or television reception, which the receiver is no guarantee that the products Product name: Model number: Product options: Laser Printer HL-5030, 5040, 5050 and HL-5070N HL-50 ...the equipment and receiver. ■ Connect the equipment into an outlet on , the user is subject to Part 15 of Conformity (For USA) Responsible Party: Brother International Corporation 100 Somerset Corporate Boulevard P.O. Important A shielded interface cable should be determined by turning the equipment off and...
...compliance with Part 15 of the FCC Rules. This equipment has been tested and found to radio or television reception, which the receiver is no guarantee that the products Product name: Model number: Product options: Laser Printer HL-5030, 5040, 5050 and HL-5070N HL-50 ...the equipment and receiver. ■ Connect the equipment into an outlet on , the user is subject to Part 15 of Conformity (For USA) Responsible Party: Brother International Corporation 100 Somerset Corporate Boulevard P.O. Important A shielded interface cable should be determined by turning the equipment off and...
Users Manual - English
Page 11
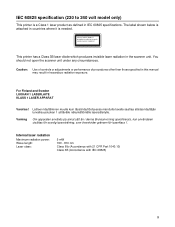
... IEC 60825 specification (220 to 240 volt model only) This printer is needed. CLASS 1LASERP RODUCT APPAREIL Å LASER DE CLASSE 1 LASER KLASSE 1 PRODUKT This printer has a Class 3B laser diode which produces invisible laser radiation in hazardous radiation exposure. The label shown below is attached...osynlig laserstrålning, som överskrider gränsen för laserklass 1. Internal laser radiation Maximum radiation power: Wave length: Laser class: 5 mW 760 - 810 nm Class IIIb (Accordance with 21 CFR Part 1040.10) Class 3B (Accordance with IEC 60825) X You should not open ...
... IEC 60825 specification (220 to 240 volt model only) This printer is needed. CLASS 1LASERP RODUCT APPAREIL Å LASER DE CLASSE 1 LASER KLASSE 1 PRODUKT This printer has a Class 3B laser diode which produces invisible laser radiation in hazardous radiation exposure. The label shown below is attached...osynlig laserstrålning, som överskrider gränsen för laserklass 1. Internal laser radiation Maximum radiation power: Wave length: Laser class: 5 mW 760 - 810 nm Class IIIb (Accordance with 21 CFR Part 1040.10) Class 3B (Accordance with IEC 60825) X You should not open ...
Users Manual - English
Page 17
... ...3-8 Using control panel button 3-8 Using the printer driver ...3-8 Printer Settings ...3-9 Using the control panel button 3-9 Using the printer driver ...3-9 Print fonts (For HL-5040, HL-5050 and HL-5070N 3-10 Using the control panel button 3-10 Using the printer driver (For HL-5040, HL-5050 and HL-5070N 3-10 Network factory default setting (For HL-5070N 3-11 4 Options ...4-1 DIMM ...4-1 Installing additional...
... ...3-8 Using control panel button 3-8 Using the printer driver ...3-8 Printer Settings ...3-9 Using the control panel button 3-9 Using the printer driver ...3-9 Print fonts (For HL-5040, HL-5050 and HL-5070N 3-10 Using the control panel button 3-10 Using the printer driver (For HL-5040, HL-5050 and HL-5070N 3-10 Network factory default setting (For HL-5070N 3-11 4 Options ...4-1 DIMM ...4-1 Installing additional...
Users Manual - English
Page 18
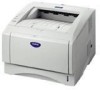
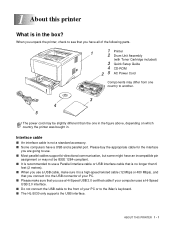
... certified cable if your computer uses a Hi-Speed USB 2.0 interface. ■ Do not connect the USB cable to the front of the following parts. 1 1 Printer 2 Drum Unit Assembly (with Toner Cartridge included) 3 Quick Setup Guide 4 CD-ROM 2 5 AC Power Cord Components may differ from one country... to the iMac's keyboard. ■ The HL-5030 only supports the USB interface. Interface cable ■ An interface cable is in . 1 About this printer What is not a standard accessory. ■ Some computers have a USB and a parallel port. ...
... certified cable if your computer uses a Hi-Speed USB 2.0 interface. ■ Do not connect the USB cable to the front of the following parts. 1 1 Printer 2 Drum Unit Assembly (with Toner Cartridge included) 3 Quick Setup Guide 4 CD-ROM 2 5 AC Power Cord Components may differ from one country... to the iMac's keyboard. ■ The HL-5030 only supports the USB interface. Interface cable ■ An interface cable is in . 1 About this printer What is not a standard accessory. ■ Some computers have a USB and a parallel port. ...
Users Manual - English
Page 99
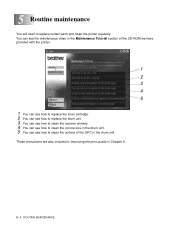
You can see the maintenance video in the Maintenance Tutorial section of the CD-ROM we have provided with the printer. 1 2 3 4 5 1 You can see how to replace the toner cartridge. 2 You can see how to replace the drum unit. 3 You can see how to clean the ...scanner window. 4 You can see how to clean the corona wire in the drum unit. 5 You can see how to replace certain parts and clean the printer regularly. 5 Routine maintenance You will need to clean the surface of the OPC in Chapter 6. 5 - 1 ROUTINE MAINTENANCE These instructions are also included in...
You can see the maintenance video in the Maintenance Tutorial section of the CD-ROM we have provided with the printer. 1 2 3 4 5 1 You can see how to replace the toner cartridge. 2 You can see how to replace the drum unit. 3 You can see how to clean the ...scanner window. 4 You can see how to clean the corona wire in the drum unit. 5 You can see how to replace certain parts and clean the printer regularly. 5 Routine maintenance You will need to clean the surface of the OPC in Chapter 6. 5 - 1 ROUTINE MAINTENANCE These instructions are also included in...
Users Manual - English
Page 104
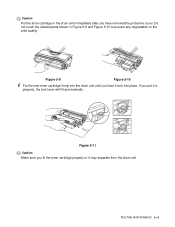
Figure 5-11 Caution Make sure you put it in properly, the lock lever will lift automatically. If you fit the toner cartridge properly or it may separate from the drum unit. Figure 5-9 Figure 5-10 6 Put the new toner cartridge firmly into place. Caution Put the toner cartridge in the drum unit immediately after you hear it lock into the drum unit until you have removed the protective cover. Do not touch the shaded parts shown in Figure 5-9 and Figure 5-10 to prevent any degradation to the print quality. ROUTINE MAINTENANCE 5 - 6
Figure 5-11 Caution Make sure you put it in properly, the lock lever will lift automatically. If you fit the toner cartridge properly or it may separate from the drum unit. Figure 5-9 Figure 5-10 6 Put the new toner cartridge firmly into place. Caution Put the toner cartridge in the drum unit immediately after you hear it lock into the drum unit until you have removed the protective cover. Do not touch the shaded parts shown in Figure 5-9 and Figure 5-10 to prevent any degradation to the print quality. ROUTINE MAINTENANCE 5 - 6
Users Manual - English
Page 111
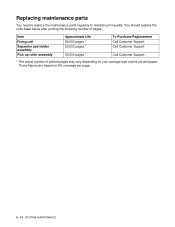
... on your average type of pages. You should replace the units listed below after printing the following number of print job and paper. Replacing maintenance parts You need to replace the maintenance parts regularly to maintain print quality.
... on your average type of pages. You should replace the units listed below after printing the following number of print job and paper. Replacing maintenance parts You need to replace the maintenance parts regularly to maintain print quality.
Users Manual - English
Page 112
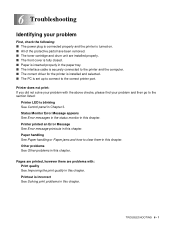
.... 6 Troubleshooting Identifying your problem First, check the following: ■ The power plug is connected properly and the printer is turned on. ■ All of the protective parts have been removed. ■ The toner cartridge and drum unit are problems with the above checks, please find your... problem with : Print quality See Improving the print quality in this chapter. Printer printed an Error Message See Error message printouts...
.... 6 Troubleshooting Identifying your problem First, check the following: ■ The power plug is connected properly and the printer is turned on. ■ All of the protective parts have been removed. ■ The toner cartridge and drum unit are problems with the above checks, please find your... problem with : Print quality See Improving the print quality in this chapter. Printer printed an Error Message See Error message printouts...
Users Manual - English
Page 116
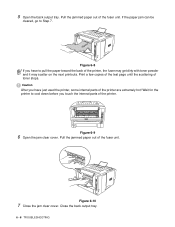
... the stack when you open the front cover or back output tray of the printer, never touch the shaded parts shown in the following steps, you have just used the printer, some parts inside the printer are extremely hot. If the printer still does not start printing automatically, press the Go button. When you add new...
... the stack when you open the front cover or back output tray of the printer, never touch the shaded parts shown in the following steps, you have just used the printer, some parts inside the printer are extremely hot. If the printer still does not start printing automatically, press the Go button. When you add new...
Users Manual - English
Page 119
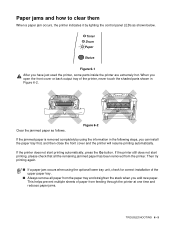
... cover. Close the back output tray. 6 - 8 TROUBLESHOOTING If the paper jam can be cleared, go to cool down before you have just used the printer, some internal parts of toner stops. Pull the jammed paper out of the fuser unit. Print a few copies of the test page until the scattering of the... printer are extremely hot! Figure 6-8 If you touch the internal parts of the printer, the fuser may get dirty with toner powder and it may scatter on the next printouts. 5 Open the back ...
... cover. Close the back output tray. 6 - 8 TROUBLESHOOTING If the paper jam can be cleared, go to cool down before you have just used the printer, some internal parts of toner stops. Pull the jammed paper out of the fuser unit. Print a few copies of the test page until the scattering of the... printer are extremely hot! Figure 6-8 If you touch the internal parts of the printer, the fuser may get dirty with toner powder and it may scatter on the next printouts. 5 Open the back ...
Quick Setup Guide - English
Page 2
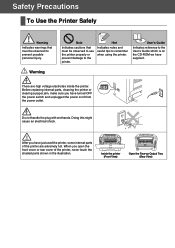
... might cause an electrical shock. Safety Precautions To Use the Printer Safely Warning Indicates warnings that must be observed to use the printer properly or prevent damage to the printer. After you have just used the printer, some internal parts of the printer, never touch the shaded parts shown in the illustration. Do not handle the plug with...
... might cause an electrical shock. Safety Precautions To Use the Printer Safely Warning Indicates warnings that must be observed to use the printer properly or prevent damage to the printer. After you have just used the printer, some internal parts of the printer, never touch the shaded parts shown in the illustration. Do not handle the plug with...
Quick Setup Guide - English
Page 4
... of Conformity (For USA) Responsible Party: Brother International Corporation 100 Somerset Corporate Boulevard P.O. Connect the equipment into an outlet on , the user is connected. - Since radiation emitted inside the printer is subject to the following measures: - Operation is completely confined within protective housings and external covers, the laser beam cannot escape from that to...
... of Conformity (For USA) Responsible Party: Brother International Corporation 100 Somerset Corporate Boulevard P.O. Connect the equipment into an outlet on , the user is connected. - Since radiation emitted inside the printer is subject to the following measures: - Operation is completely confined within protective housings and external covers, the laser beam cannot escape from that to...
Quick Setup Guide - English
Page 5
...the letter "N" or coloured black or blue. CLASS 1LASERP RODUCT APPAREIL Å LASER DE CLASSE 1 LASER KLASSE 1 PRODUKT This printer has a Class 3B laser diode which produces invisible laser radiation in the United States. Laitteen käyttäminen muulla kuin tä... This product complies with IEC 60825) IMPORTANT - MANUFACTURED: Brother Corporation (Asia) Ltd. Internal laser radiation Maximum radiation power: 5 mW Wave length: 760 - 810 nm Laser class: Class IIIb (Accordance with 21 CFR Part 1040.10) Class 3B (Accordance with FDA radiation performance ...
...the letter "N" or coloured black or blue. CLASS 1LASERP RODUCT APPAREIL Å LASER DE CLASSE 1 LASER KLASSE 1 PRODUKT This printer has a Class 3B laser diode which produces invisible laser radiation in the United States. Laitteen käyttäminen muulla kuin tä... This product complies with IEC 60825) IMPORTANT - MANUFACTURED: Brother Corporation (Asia) Ltd. Internal laser radiation Maximum radiation power: 5 mW Wave length: 760 - 810 nm Laser class: Class IIIb (Accordance with 21 CFR Part 1040.10) Class 3B (Accordance with FDA radiation performance ...
Quick Setup Guide - English
Page 10
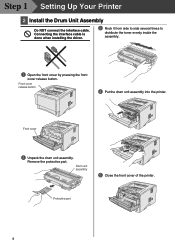
Step 1 Setting Up Your Printer 2 Install the Drum Unit Assembly Do NOT connect the interface cable. Remove the protective part. Protective part 8 Connecting the interface cable is done when installing the driver. 3 Rock it from side to side several times to distribute the toner evenly inside the assembly. 1 Open the front cover by pressing the front cover release button. Drum unit assembly 5 Close the front cover of the printer. Front cover release button 4 Put the drum unit assembly into the printer. Front cover 2 Unpack the drum unit assembly.
Step 1 Setting Up Your Printer 2 Install the Drum Unit Assembly Do NOT connect the interface cable. Remove the protective part. Protective part 8 Connecting the interface cable is done when installing the driver. 3 Rock it from side to side several times to distribute the toner evenly inside the assembly. 1 Open the front cover by pressing the front cover release button. Drum unit assembly 5 Close the front cover of the printer. Front cover release button 4 Put the drum unit assembly into the printer. Front cover 2 Unpack the drum unit assembly.


