Users Manual - English
Page 9
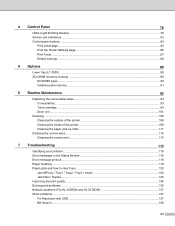
...cartridge ...94 Drum unit ...101 Cleaning ...106 Cleaning the outside of the printer 106 Cleaning the inside of the printer...108 Cleaning the paper pick-up roller...111 Cleaning the corona wires ...113 Cleaning the corona wire...113 7 Troubleshooting 115 Identifying your problem ...115 Error messages in the Status Monitor 116 ...Jam MP tray / Tray1 / Tray2 / Tray3 / Inside 120 Jam Rear / Duplex...125 Improving the print quality...129 Solving print problems ...136 Network problems (For HL-5350DN and HL-5370DW 137 Other problems ...137 For Macintosh with USB ...137 BR-Script 3 ...138 viii
...cartridge ...94 Drum unit ...101 Cleaning ...106 Cleaning the outside of the printer 106 Cleaning the inside of the printer...108 Cleaning the paper pick-up roller...111 Cleaning the corona wires ...113 Cleaning the corona wire...113 7 Troubleshooting 115 Identifying your problem ...115 Error messages in the Status Monitor 116 ...Jam MP tray / Tray1 / Tray2 / Tray3 / Inside 120 Jam Rear / Duplex...125 Improving the print quality...129 Solving print problems ...136 Network problems (For HL-5350DN and HL-5370DW 137 Other problems ...137 For Macintosh with USB ...137 BR-Script 3 ...138 viii
Users Manual - English
Page 125
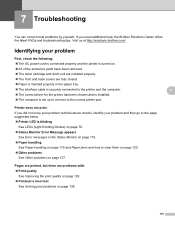
Identifying your problem and then go to the correct printer port. 7 7 7 Printer does not print: 7 If you need additional help, the Brother Solutions Center offers the latest FAQs and troubleshooting tips. Pages are printed, but there are fully closed. „ Paper is inserted properly in the Status Monitor on ...132; The computer is set up to connect to the page suggested below. „ Printer LED is incorrect See Solving print problems on page 136. 115 Visit us at http://solutions.brother.com/. If you did not solve your problem with the above checks, identify your problem...
Identifying your problem and then go to the correct printer port. 7 7 7 Printer does not print: 7 If you need additional help, the Brother Solutions Center offers the latest FAQs and troubleshooting tips. Pages are printed, but there are fully closed. „ Paper is inserted properly in the Status Monitor on ...132; The computer is set up to connect to the page suggested below. „ Printer LED is incorrect See Solving print problems on page 136. 115 Visit us at http://solutions.brother.com/. If you did not solve your problem with the above checks, identify your problem...
Users Manual - English
Page 126
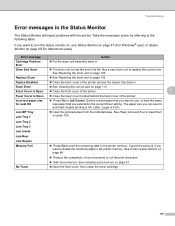
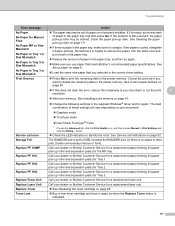
...print resolution. No Toner „ Add more memory. If you selected in the printer memory. See Replacing the drum unit on page 91. „ Open the front cover, then install the toner cartridge. 116 Troubleshooting Error messages in . Take the necessary action by referring to turn the status ...monitor on, see Status Monitor on page 47 (For Windows® user) or Status Monitor on page 113. Drum End Soon „ The drum unit is near the end of the printer. Drum ...
...print resolution. No Toner „ Add more memory. If you selected in the printer memory. See Replacing the drum unit on page 91. „ Open the front cover, then install the toner cartridge. 116 Troubleshooting Error messages in . Take the necessary action by referring to turn the status ...monitor on, see Status Monitor on page 47 (For Windows® user) or Status Monitor on page 113. Drum End Soon „ The drum unit is near the end of the printer. Drum ...
Users Manual - English
Page 127
...a new toner cartridge and have it is empty, put it is set to print the remaining data in the printer memory. Replace Laser Unit Replace Toner Toner Low Call your dealer or Brother Customer Service for a replacement fuser unit. See Cleaning the paper pick-up roller and separation plate) for Tray ...Installing extra memory on page 84. „ If this does not clear the error, reduce the complexity of paper or not properly installed. Troubleshooting Error message Action No Paper No Paper for Manual Feed No Paper MP or Size Mismatch No Paper in Tray 1 or Size Mismatch No ...
...a new toner cartridge and have it is empty, put it is set to print the remaining data in the printer memory. Replace Laser Unit Replace Toner Toner Low Call your dealer or Brother Customer Service for a replacement fuser unit. See Cleaning the paper pick-up roller and separation plate) for Tray ...Installing extra memory on page 84. „ If this does not clear the error, reduce the complexity of paper or not properly installed. Troubleshooting Error message Action No Paper No Paper for Manual Feed No Paper MP or Size Mismatch No Paper in Tray 1 or Size Mismatch No ...

Users Manual - English
Page 128
... memory on page 84. „ Reduce the complexity of the Windows® printer driver click the Other Print Options..., and then choose Error Message Printout. Troubleshooting Error message printout 7 The printer can also report problems by using the supplied Windows® driver or the control... panel. „ Change the following settings in the printer memory. Use the table below to print ...
... memory on page 84. „ Reduce the complexity of the Windows® printer driver click the Other Print Options..., and then choose Error Message Printout. Troubleshooting Error message printout 7 The printer can also report problems by using the supplied Windows® driver or the control... panel. „ Change the following settings in the printer memory. Use the table below to print ...
Users Manual - English
Page 129
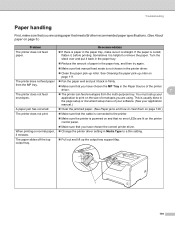
...paper slides off the top output tray. „ Pull out and lift up roller. Troubleshooting Paper handling 7 First, make sure it back in the Paper Source of the printer driver. 7 The printer does not feed „ The printer can feed envelopes from the MP tray. „ Make sure that you have chosen ... correct printer driver. The printer does not feed paper „ Fan the paper well and put it , before printing. it is curled, flatten it back in the paper tray. „ Reduce the amount of paper in the paper tray, and then try again. „ Make sure that meets Brother recommended ...
...paper slides off the top output tray. „ Pull out and lift up roller. Troubleshooting Paper handling 7 First, make sure it back in the Paper Source of the printer driver. 7 The printer does not feed „ The printer can feed envelopes from the MP tray. „ Make sure that you have chosen ... correct printer driver. The printer does not feed paper „ Fan the paper well and put it , before printing. it is curled, flatten it back in the paper tray. „ Reduce the amount of paper in the paper tray, and then try again. „ Make sure that meets Brother recommended ...
Users Manual - English
Page 130
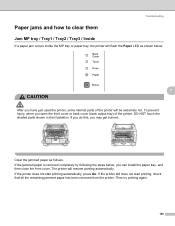
... injury, when you may get burned. Clear the jammed paper as shown below , you have just used the printer, some internal parts of the printer, DO NOT touch the shaded parts shown in the illustration. Troubleshooting Paper jams and how to clear them 7 Jam MP tray / Tray1 / Tray2 / Tray3 / Inside 7... If a paper jam occurs inside the MP tray or paper tray, the printer will flash the Paper LED as...
... injury, when you may get burned. Clear the jammed paper as shown below , you have just used the printer, some internal parts of the printer, DO NOT touch the shaded parts shown in the illustration. Troubleshooting Paper jams and how to clear them 7 Jam MP tray / Tray1 / Tray2 / Tray3 / Inside 7... If a paper jam occurs inside the MP tray or paper tray, the printer will flash the Paper LED as...
Users Manual - English
Page 131
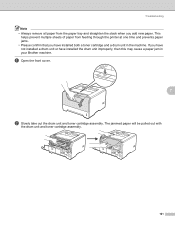
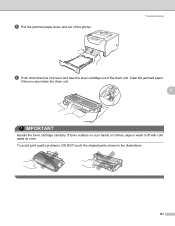
... stack when you add new paper. a Open the front cover. 7 b Slowly take out the drum unit and toner cartridge assembly. Troubleshooting Note • Always remove all paper from feeding through the printer at one time and prevents paper jams. • Please confirm that you have installed the drum unit improperly, then this... drum unit and toner cartridge assembly. 121 If you have not installed a drum unit or have installed both a toner cartridge and a drum unit in your Brother machine.
... stack when you add new paper. a Open the front cover. 7 b Slowly take out the drum unit and toner cartridge assembly. Troubleshooting Note • Always remove all paper from feeding through the printer at one time and prevents paper jams. • Please confirm that you have installed the drum unit improperly, then this... drum unit and toner cartridge assembly. 121 If you have not installed a drum unit or have installed both a toner cartridge and a drum unit in your Brother machine.
Users Manual - English
Page 132
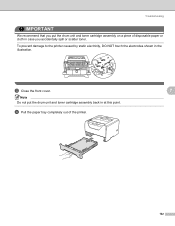
Troubleshooting IMPORTANT We recommend that you accidentally spill or scatter toner. c Close the front cover. 7 Note Do not put the drum unit and toner cartridge assembly on a piece of the printer. 122 d Pull the paper tray completely out of disposable paper or cloth in case you put the drum unit and toner cartridge assembly back in the illustration. To prevent damage to the printer caused by static electricity, DO NOT touch the electrodes shown in at this point.
Troubleshooting IMPORTANT We recommend that you accidentally spill or scatter toner. c Close the front cover. 7 Note Do not put the drum unit and toner cartridge assembly on a piece of the printer. 122 d Pull the paper tray completely out of disposable paper or cloth in case you put the drum unit and toner cartridge assembly back in the illustration. To prevent damage to the printer caused by static electricity, DO NOT touch the electrodes shown in at this point.
Users Manual - English
Page 133
If toner scatters on your hands or clothes, wipe or wash it off with cold water at once. To avoid print quality problems, DO NOT touch the shaded parts shown in the illustrations. 123 Clear the jammed paper if there is any inside the drum unit. 7 IMPORTANT Handle the toner cartridge carefully. e Pull the jammed paper down the blue lock lever and take the toner cartridge out of the printer. Troubleshooting f Push down and out of the drum unit.
If toner scatters on your hands or clothes, wipe or wash it off with cold water at once. To avoid print quality problems, DO NOT touch the shaded parts shown in the illustrations. 123 Clear the jammed paper if there is any inside the drum unit. 7 IMPORTANT Handle the toner cartridge carefully. e Pull the jammed paper down the blue lock lever and take the toner cartridge out of the printer. Troubleshooting f Push down and out of the drum unit.
Users Manual - English
Page 134
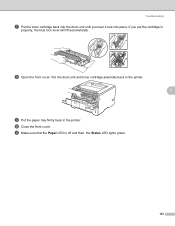
Troubleshooting g Put the toner cartridge back into the drum unit until you put the cartridge in the printer. Put the drum unit and toner cartridge assembly back in the printer. 7 i Put the paper tray firmly back in properly, the blue lock lever will lift automatically. j Close the front cover. h Open the front cover. If you hear it lock into place. k Make sure that the Paper LED is off and then, the Status LED lights green. 124
Troubleshooting g Put the toner cartridge back into the drum unit until you put the cartridge in the printer. Put the drum unit and toner cartridge assembly back in the printer. 7 i Put the paper tray firmly back in properly, the blue lock lever will lift automatically. j Close the front cover. h Open the front cover. If you hear it lock into place. k Make sure that the Paper LED is off and then, the Status LED lights green. 124
Users Manual - English
Page 135
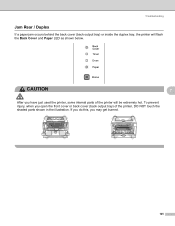
If you do this, you have just used the printer, some internal parts of the printer, DO NOT touch the shaded parts shown in the illustration. To prevent injury, when you open the front cover or back cover (back output tray) of the printer will flash the Back Cover and Paper LED as shown below. Troubleshooting Jam Rear / Duplex 7 If a paper jam occurs behind the back cover (back output tray) or inside the duplex tray, the printer will be extremely hot. CAUTION 7 After you may get burned. 125
If you do this, you have just used the printer, some internal parts of the printer, DO NOT touch the shaded parts shown in the illustration. To prevent injury, when you open the front cover or back cover (back output tray) of the printer will flash the Back Cover and Paper LED as shown below. Troubleshooting Jam Rear / Duplex 7 If a paper jam occurs behind the back cover (back output tray) or inside the duplex tray, the printer will be extremely hot. CAUTION 7 After you may get burned. 125
Users Manual - English
Page 136
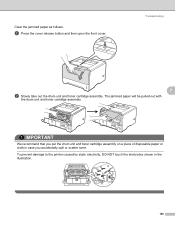
IMPORTANT We recommend that you put the drum unit and toner cartridge assembly on a piece of disposable paper or cloth in the illustration. 126 To prevent damage to the printer caused by static electricity, DO NOT touch the electrodes shown in case you accidentally spill or scatter toner. Troubleshooting 7 b Slowly take out the drum unit and toner cartridge assembly. The jammed paper will be pulled out with the drum unit and toner cartridge assembly. Clear the jammed paper as follows. a Press the cover release button and then open the front cover.
IMPORTANT We recommend that you put the drum unit and toner cartridge assembly on a piece of disposable paper or cloth in the illustration. 126 To prevent damage to the printer caused by static electricity, DO NOT touch the electrodes shown in case you accidentally spill or scatter toner. Troubleshooting 7 b Slowly take out the drum unit and toner cartridge assembly. The jammed paper will be pulled out with the drum unit and toner cartridge assembly. Clear the jammed paper as follows. a Press the cover release button and then open the front cover.
Users Manual - English
Page 137
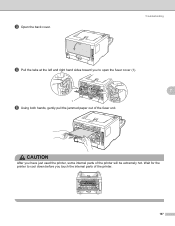
CAUTION After you to cool down before you touch the internal parts of the printer. 127 Troubleshooting d Pull the tabs at the left and right hand sides toward you have just used the printer, some internal parts of the fuser unit. Wait for the printer to open the fuser cover (1). 7 1 e Using both hands, gently pull the jammed paper out of the printer will be extremely hot. c Open the back cover.
CAUTION After you to cool down before you touch the internal parts of the printer. 127 Troubleshooting d Pull the tabs at the left and right hand sides toward you have just used the printer, some internal parts of the fuser unit. Wait for the printer to open the fuser cover (1). 7 1 e Using both hands, gently pull the jammed paper out of the printer will be extremely hot. c Open the back cover.
Users Manual - English
Page 138
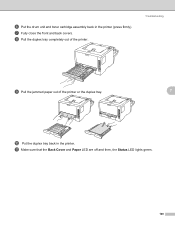
g Fully close the front and back covers. k Make sure that the Back Cover and Paper LED are off and then, the Status LED lights green. 128 Troubleshooting i Pull the jammed paper out of the printer. f Put the drum unit and toner cartridge assembly back in the printer. h Pull the duplex tray completely out of the printer or the duplex tray. 7 j Put the duplex tray back in the printer (press firmly).
g Fully close the front and back covers. k Make sure that the Back Cover and Paper LED are off and then, the Status LED lights green. 128 Troubleshooting i Pull the jammed paper out of the printer. f Put the drum unit and toner cartridge assembly back in the printer. h Pull the duplex tray completely out of the printer or the duplex tray. 7 j Put the duplex tray back in the printer (press firmly).
Users Manual - English
Page 139
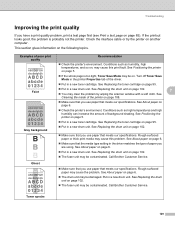
... of the driver. „ Put in the driver matches the type of the printer on , may be damaged. See About paper on page 6. „ Make sure that meets our specifications. Call Brother Customer Service. Rough-surfaced paper may be contaminated. Troubleshooting Improving the print quality 7 If you have a print quality problem, print a test...
... of the driver. „ Put in the driver matches the type of the printer on , may be damaged. See About paper on page 6. „ Make sure that meets our specifications. Call Brother Customer Service. Rough-surfaced paper may be contaminated. Troubleshooting Improving the print quality 7 If you have a print quality problem, print a test...
Users Manual - English
Page 140
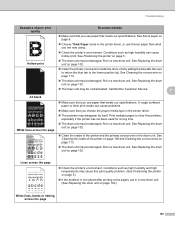
... may disappear by sliding the blue tab. Put in the printer driver, or use thinner paper than what you are now using. „ Check the printer's environment. Call Brother Customer Service. 7 All black White lines across the page „ Check the printer's environment. Print multiple pages to the home position (a). Lines.... „ The drum unit may be damaged. See Cleaning the corona wire on page 102. „ The fuser unit may be damaged. Troubleshooting Examples of poor print quality Recommendation „ Make sure that you use paper that meets our specifications.
... may disappear by sliding the blue tab. Put in the printer driver, or use thinner paper than what you are now using. „ Check the printer's environment. Call Brother Customer Service. 7 All black White lines across the page „ Check the printer's environment. Print multiple pages to the home position (a). Lines.... „ The drum unit may be damaged. See Cleaning the corona wire on page 102. „ The fuser unit may be damaged. Troubleshooting Examples of poor print quality Recommendation „ Make sure that you use paper that meets our specifications.
Users Manual - English
Page 141
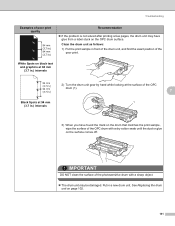
... matches the print sample, wipe the surface of the OPC drum with a dry cotton swab until the dust or glue on the surface comes off. Troubleshooting Examples of poor print quality Recommendation „ If the problem is not solved after printing a few pages, the drum unit may be damaged. White Spots...
... matches the print sample, wipe the surface of the OPC drum with a dry cotton swab until the dust or glue on the surface comes off. Troubleshooting Examples of poor print quality Recommendation „ If the problem is not solved after printing a few pages, the drum unit may be damaged. White Spots...
Users Manual - English
Page 142
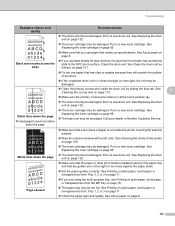
...laser printers, the glue from Tray 1, 2 or 3 on page 102. See About paper on page 102. „ The toner cartridge may sometimes stick to the OPC drum surface. See Cleaning the corona wire on page 108. „ The toner cartridge may be damaged. Put in a new drum unit. Call your dealer or Brother...a new toner cartridge. Clean the drum unit. See Cleaning the inside of the printer on page 113. 7 „ Make sure the primary corona wire cleaner is ... on page 6. 132 Troubleshooting Examples of poor print quality Recommendation „ The drum unit may be damaged.
...laser printers, the glue from Tray 1, 2 or 3 on page 102. See About paper on page 102. „ The toner cartridge may sometimes stick to the OPC drum surface. See Cleaning the corona wire on page 108. „ The toner cartridge may be damaged. Put in a new drum unit. Call your dealer or Brother...a new toner cartridge. Clean the drum unit. See Cleaning the inside of the printer on page 113. 7 „ Make sure the primary corona wire cleaner is ... on page 6. 132 Troubleshooting Examples of poor print quality Recommendation „ The drum unit may be damaged.
Users Manual - English
Page 143
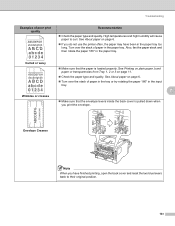
... page 6. „ If you do not use the printer often, the paper may have finished printing, open the back cover and reset the two blue levers back to curl. High temperatures and high humidity will cause paper to their original position. 133 Troubleshooting Examples of paper in the paper tray. See About...
... page 6. „ If you do not use the printer often, the paper may have finished printing, open the back cover and reset the two blue levers back to curl. High temperatures and high humidity will cause paper to their original position. 133 Troubleshooting Examples of paper in the paper tray. See About...