Users Manual - English
Page 7
Toner cartridge ...61 Drum unit ...68 Cleaning ...73 Cleaning the outside of the printer...73 Cleaning the inside of Conformity ...121 vi for your safety ...120 EC Declaration of the printer...74 Cleaning the corona wire...HL-2150N / HL-2170W only) ...110 Print bar codes or expanded characters 110 B Appendix (for Europe and Other Countries) 117 Brother numbers ...117 Important information: regulations ...118 Radio interference (220 to 240 volt model only 118 International ENERGY STAR® Compliance Statement 118 IEC 60825-1 specification (220 to 240 volt model only 118 Internal laser...
Toner cartridge ...61 Drum unit ...68 Cleaning ...73 Cleaning the outside of the printer...73 Cleaning the inside of Conformity ...121 vi for your safety ...120 EC Declaration of the printer...74 Cleaning the corona wire...HL-2150N / HL-2170W only) ...110 Print bar codes or expanded characters 110 B Appendix (for Europe and Other Countries) 117 Brother numbers ...117 Important information: regulations ...118 Radio interference (220 to 240 volt model only 118 International ENERGY STAR® Compliance Statement 118 IEC 60825-1 specification (220 to 240 volt model only 118 Internal laser...
Users Manual - English
Page 9
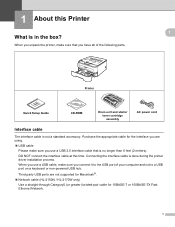
... sure you use a USB cable, make sure you connect it to the USB port of the following parts. 1 1 Printer Quick Setup Guide CD-ROM Drum unit and starter toner cartridge assembly AC power cord Interface cable 1 The interface cable is no longer than 6 feet (2 meters). Purchase the...Ethernet Network. 1 Connecting the interface cable is in the box? Third party USB ports are not supported for Macintosh®. „ Network cable (HL-2150N / HL-2170W only) Use a straight-through Category5 (or greater) twisted-pair cable for the interface you are using. „ USB cable Please make ...
... sure you use a USB cable, make sure you connect it to the USB port of the following parts. 1 1 Printer Quick Setup Guide CD-ROM Drum unit and starter toner cartridge assembly AC power cord Interface cable 1 The interface cable is no longer than 6 feet (2 meters). Purchase the...Ethernet Network. 1 Connecting the interface cable is in the box? Third party USB ports are not supported for Macintosh®. „ Network cable (HL-2150N / HL-2170W only) Use a straight-through Category5 (or greater) twisted-pair cable for the interface you are using. „ USB cable Please make ...
Users Manual - English
Page 43
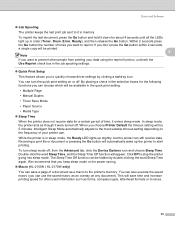
... • Manual Duplex • Toner Save Mode • Paper Source • Media Type „ Sleep Time When the printer does not receive data for power saving. „ Macro (HL-2150N / HL-2170W only) You can save time and increase printing speed for about 4 seconds until all the LEDs light up in... order (Toner, Drum, Error, Ready), and then release the Go button. In sleep mode, the printer acts as an overlay on for a certain...
... • Manual Duplex • Toner Save Mode • Paper Source • Media Type „ Sleep Time When the printer does not receive data for power saving. „ Macro (HL-2150N / HL-2170W only) You can save time and increase printing speed for about 4 seconds until all the LEDs light up in... order (Toner, Drum, Error, Ready), and then release the Go button. In sleep mode, the printer acts as an overlay on for a certain...
Users Manual - English
Page 56
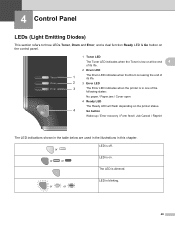
... LED indications shown in the table below are used in the illustrations in one of its life. 2 3 Error LED 3 The Error LED indicates when the printer is in this chapter. LED is blinking. 48 or or LED is off. The LED is dimmed. 4 Control Panel 4 LEDs (Light Emitting Diodes) 4 This ...on the control panel. 1 Toner LED The Toner LED indicates when the Toner is low or at the end 4 of its life. 2 Drum LED 1 The Drum LED indicates when the Drum is nearing the end of the following states: No paper / Paper jam / Cover open 4 Ready LED The Ready LED will flash depending...
... LED indications shown in the table below are used in the illustrations in one of its life. 2 3 Error LED 3 The Error LED indicates when the printer is in this chapter. LED is blinking. 48 or or LED is off. The LED is dimmed. 4 Control Panel 4 LEDs (Light Emitting Diodes) 4 This ...on the control panel. 1 Toner LED The Toner LED indicates when the Toner is low or at the end 4 of its life. 2 Drum LED 1 The Drum LED indicates when the Drum is nearing the end of the following states: No paper / Paper jam / Cover open 4 Ready LED The Ready LED will flash depending...
Users Manual - English
Page 58
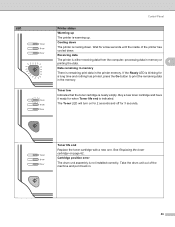
... in memory There is not installed correctly. Receiving data The printer is either receiving data from the computer, processing data in memory or printing the data. 4 Data remaining in the printer memory. The Toner LED will turn on page 62. Take the drum unit out of the machine and put it ready for... a few seconds until the inside of the printer has cooled down. Buy a new toner cartridge and have it back...
... in memory There is not installed correctly. Receiving data The printer is either receiving data from the computer, processing data in memory or printing the data. 4 Data remaining in the printer memory. The Toner LED will turn on page 62. Take the drum unit out of the machine and put it ready for... a few seconds until the inside of the printer has cooled down. Buy a new toner cartridge and have it back...
Users Manual - English
Page 59
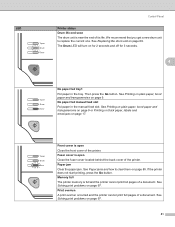
... A print overrun occurred and the printer cannot print full pages of the printer. Memory full The printer memory is near the end of its life. LED Control Panel Printer status Drum life end soon The drum unit is full and the printer cannot print full pages of a document. The Drum LED will turn on page 17....replace the current one. See Solving print problems on page 69. If the printer does not start printing, press the Go button. See Replacing the drum unit on page 97. We recommend that you get a new drum unit to clear them on page 85. Front cover is open Close the front...
... A print overrun occurred and the printer cannot print full pages of the printer. Memory full The printer memory is near the end of its life. LED Control Panel Printer status Drum life end soon The drum unit is full and the printer cannot print full pages of a document. The Drum LED will turn on page 17....replace the current one. See Solving print problems on page 69. If the printer does not start printing, press the Go button. See Replacing the drum unit on page 97. We recommend that you get a new drum unit to clear them on page 85. Front cover is open Close the front...

Users Manual - English
Page 60
Put in a new drum unit. LED Control Panel Printer status Drum error The corona wire needs to be cleaned. See Cleaning the corona wire on page 69. 4 52 See Replacing the drum unit on page 77.
Put in a new drum unit. LED Control Panel Printer status Drum error The corona wire needs to be cleaned. See Cleaning the corona wire on page 69. 4 52 See Replacing the drum unit on page 77.
Users Manual - English
Page 61
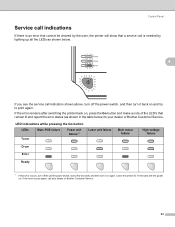
... button LEDs Toner Main PCB failure Fuser unit failure 1 Laser unit failure Main motor failure High voltage failure Drum Error Ready 1 If this error occurs, turn off the power switch, and then turn it back on and try to your dealer or Brother Customer Service. 53 If the error occurs again, call... and make a note of the LED's that a service call is needed by the user, the printer will show that remain lit and report the error status (as shown below ) to print again. Leave the printer for 10 minutes with the power on. Control Panel Service call indications 4 If there is an...
... button LEDs Toner Main PCB failure Fuser unit failure 1 Laser unit failure Main motor failure High voltage failure Drum Error Ready 1 If this error occurs, turn off the power switch, and then turn it back on and try to your dealer or Brother Customer Service. 53 If the error occurs again, call... and make a note of the LED's that a service call is needed by the user, the printer will show that remain lit and report the error status (as shown below ) to print again. Leave the printer for 10 minutes with the power on. Control Panel Service call indications 4 If there is an...
Users Manual - English
Page 64
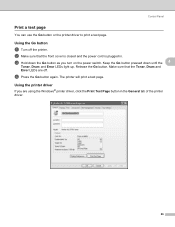
... 4 If you turn on the power switch. b Make sure that the Toner, Drum and Error LEDs are using the Windows® printer driver, click the Print Test Page button in . c Hold down until the 4 Toner, Drum and Error LEDs light up. Make sure that the front cover is closed and the power cord... is plugged in the General tab of the printer driver. 56 Control Panel Print a test page 4 You can use the Go button...
... 4 If you turn on the power switch. b Make sure that the Toner, Drum and Error LEDs are using the Windows® printer driver, click the Print Test Page button in . c Hold down until the 4 Toner, Drum and Error LEDs light up. Make sure that the front cover is closed and the power cord... is plugged in the General tab of the printer driver. 56 Control Panel Print a test page 4 You can use the Go button...
Users Manual - English
Page 66
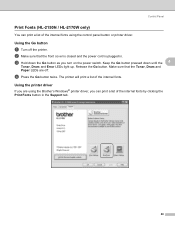
... d Press the Go button twice. c Hold down until the 4 Toner, Drum and Error LEDs light up. Keep the Go button pressed down the Go button as you turn on the power switch. The printer will print a list of the internal fonts by clicking the Print Fonts button in . Using the...58 b Make sure that the Toner, Drum and Paper LEDs are using the control panel button or printer driver. Release the Go button. Control Panel Print Fonts (HL-2150N / HL-2170W only) 4 You can print a list of the internal fonts using the Brother's Windows® printer driver, you can print a list of ...
... d Press the Go button twice. c Hold down until the 4 Toner, Drum and Error LEDs light up. Keep the Go button pressed down the Go button as you turn on the power switch. The printer will print a list of the internal fonts by clicking the Print Fonts button in . Using the...58 b Make sure that the Toner, Drum and Paper LEDs are using the control panel button or printer driver. Release the Go button. Control Panel Print Fonts (HL-2150N / HL-2170W only) 4 You can print a list of the internal fonts using the Brother's Windows® printer driver, you can print a list of ...
Users Manual - English
Page 67
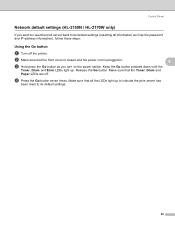
Control Panel Network default settings (HL-2150N / HL-2170W only) 4 If you turn on the power switch. b Make sure that the front cover is closed and the power cord is plugged in. 4 c Hold down until the Toner, Drum and Error LEDs light up to indicate the print server has been reset to its ... the print server back to its default settings. 59 Make sure that all the LEDs light up . Make sure that the Toner, Drum and Paper LEDs are off the printer. Release the Go button. Keep the Go button pressed down the Go button as the password and IP address information), follow these...
Control Panel Network default settings (HL-2150N / HL-2170W only) 4 If you turn on the power switch. b Make sure that the front cover is closed and the power cord is plugged in. 4 c Hold down until the Toner, Drum and Error LEDs light up to indicate the print server has been reset to its ... the print server back to its default settings. 59 Make sure that all the LEDs light up . Make sure that the Toner, Drum and Paper LEDs are off the printer. Release the Go button. Keep the Go button pressed down the Go button as the password and IP address information), follow these...
Users Manual - English
Page 68
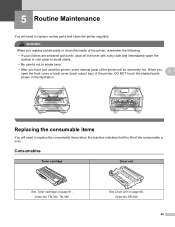
When you have just used the printer, some internal parts of the printer will be extremely hot. Order No. Order No.DR-360 60 5 Routine Maintenance 5 You will need to replace certain parts and clean the printer regularly. Replacing the consumable items 5 You will need to replace the consumable ...back cover (back output tray) of the consumable is over. Consumables 5 Toner cartridge Drum unit See Toner cartridge on page 68. WARNING When you replace certain parts or clean the inside of the printer, remember the following: • If your clothes are smeared with toner, wipe ...
When you have just used the printer, some internal parts of the printer will be extremely hot. Order No. Order No.DR-360 60 5 Routine Maintenance 5 You will need to replace certain parts and clean the printer regularly. Replacing the consumable items 5 You will need to replace the consumable ...back cover (back output tray) of the consumable is over. Consumables 5 Toner cartridge Drum unit See Toner cartridge on page 68. WARNING When you replace certain parts or clean the inside of the printer, remember the following: • If your clothes are smeared with toner, wipe ...

Users Manual - English
Page 70
... use only genuine Brother toner cartridges. See Cleaning on . Routine Maintenance 5 5 Replacing the toner cartridge 5 Note • To ensure high quality printing, we recommend that you clean the printer when you replace the toner cartridge with a new one. a Make sure that the printer is turned on page 73. b Take out the drum unit and...
... use only genuine Brother toner cartridges. See Cleaning on . Routine Maintenance 5 5 Replacing the toner cartridge 5 Note • To ensure high quality printing, we recommend that you clean the printer when you replace the toner cartridge with a new one. a Make sure that the printer is turned on page 73. b Take out the drum unit and...
Users Manual - English
Page 71
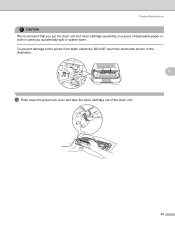
To prevent damage to the printer from static electricity, DO NOT touch the electrodes shown in the illustration. 5 c Push down the green lock lever and take the toner cartridge out of disposable paper or cloth in case you put the drum unit and toner cartridge assembly on a piece of the drum unit. 63 Routine Maintenance CAUTION We recommend that you accidentally spill or scatter toner.
To prevent damage to the printer from static electricity, DO NOT touch the electrodes shown in the illustration. 5 c Push down the green lock lever and take the toner cartridge out of disposable paper or cloth in case you put the drum unit and toner cartridge assembly on a piece of the drum unit. 63 Routine Maintenance CAUTION We recommend that you accidentally spill or scatter toner.
Users Manual - English
Page 73
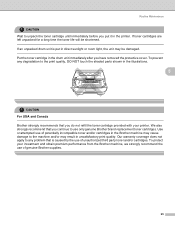
... by the use of unauthorized third party toner and/or cartridges. Put the toner cartridge in the drum unit immediately after you put in direct sunlight or room light, the unit may result in the Brother machine may cause damage to the machine and/or may be shortened. Our warranty coverage does... not apply to the print quality, DO NOT touch the shaded parts shown in the printer. To protect your printer. If toner cartridges are left unpacked for a ...
... by the use of unauthorized third party toner and/or cartridges. Put the toner cartridge in the drum unit immediately after you put in direct sunlight or room light, the unit may result in the Brother machine may cause damage to the machine and/or may be shortened. Our warranty coverage does... not apply to the print quality, DO NOT touch the shaded parts shown in the printer. To protect your printer. If toner cartridges are left unpacked for a ...
Users Manual - English
Page 74
... to a level of using other manufacturer's products with genuine Brother branded toner cartridges. f Put the new toner cartridge firmly into place. CAUTION Make sure that you put it in the toner cartridge properly or it lock into the drum unit until you put in properly, the lock lever will... work with toner of other than genuine Brother branded cartridges with this machine. Routine Maintenance CAUTION For UK and other countries...
... to a level of using other manufacturer's products with genuine Brother branded toner cartridges. f Put the new toner cartridge firmly into place. CAUTION Make sure that you put it in the toner cartridge properly or it lock into the drum unit until you put in properly, the lock lever will... work with toner of other than genuine Brother branded cartridges with this machine. Routine Maintenance CAUTION For UK and other countries...
Users Manual - English
Page 75
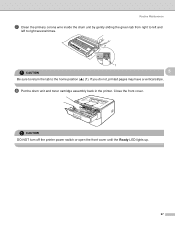
h Put the drum unit and toner cartridge assembly back in the printer. If you do not, printed pages may have a vertical stripe. CAUTION DO NOT turn off the printer power switch or open the front cover until the Ready LED lights up. 67 CAUTION 1 5 Be sure to return the tab to right several times. Routine Maintenance g Clean the primary corona wire inside the drum unit by gently sliding the green tab from right to left and left to the home position (a) (1). Close the front cover.
h Put the drum unit and toner cartridge assembly back in the printer. If you do not, printed pages may have a vertical stripe. CAUTION DO NOT turn off the printer power switch or open the front cover until the Ready LED lights up. 67 CAUTION 1 5 Be sure to return the tab to right several times. Routine Maintenance g Clean the primary corona wire inside the drum unit by gently sliding the green tab from right to left and left to the home position (a) (1). Close the front cover.
Users Manual - English
Page 76
.... Because we cannot guarantee a minimum number of pages per / job. The printer should be used , number of pages that you replace the drum unit with a third-party drum unit may be printed by the use only genuine Brother toner. Routine Maintenance Drum unit 5 A new drum unit can print approximately 12,000 A4 or Letter size single...
.... Because we cannot guarantee a minimum number of pages per / job. The printer should be used , number of pages that you replace the drum unit with a third-party drum unit may be printed by the use only genuine Brother toner. Routine Maintenance Drum unit 5 A new drum unit can print approximately 12,000 A4 or Letter size single...

Users Manual - English
Page 77
... Routine Maintenance Replacing the drum unit 5 CAUTION While removing the drum unit, handle it carefully because it may contain toner. Once all the LEDs light up. When you replace the drum unit with a new one, you replace the drum unit, clean the inside of the printer. Every time you need... to reset the drum counter by completing the following steps: a Make sure that the printer is blinking. Improper Setup Do not reset the drum counter when you only...
... Routine Maintenance Replacing the drum unit 5 CAUTION While removing the drum unit, handle it carefully because it may contain toner. Once all the LEDs light up. When you replace the drum unit with a new one, you replace the drum unit, clean the inside of the printer. Every time you need... to reset the drum counter by completing the following steps: a Make sure that the printer is blinking. Improper Setup Do not reset the drum counter when you only...
Users Manual - English
Page 78
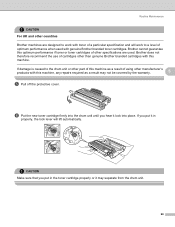
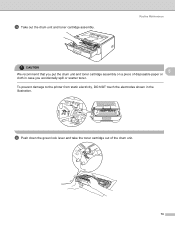
Routine Maintenance CAUTION 5 We recommend that you accidentally spill or scatter toner. d Push down the green lock lever and take the toner cartridge out of disposable paper or cloth in the illustration. c Take out the drum unit and toner cartridge assembly. To prevent damage to the printer from static electricity, DO NOT touch the electrodes shown in case you put the drum unit and toner cartridge assembly on a piece of the drum unit. 70
Routine Maintenance CAUTION 5 We recommend that you accidentally spill or scatter toner. d Push down the green lock lever and take the toner cartridge out of disposable paper or cloth in the illustration. c Take out the drum unit and toner cartridge assembly. To prevent damage to the printer from static electricity, DO NOT touch the electrodes shown in case you put the drum unit and toner cartridge assembly on a piece of the drum unit. 70


