Users Manual - English
Page 6
...-2200w)...4-1 Print server (NC-2100p) (For HL-2040 4-2 5 Routine maintenance 5-1 Replacing the consumable items...5-1 Toner cartridge ...5-2 Toner Low message ...5-2 Toner Life End message ...5-3 Replacing the toner cartridge 5-3 Drum unit ...5-7 Change Drum message...5-7 Replacing the drum unit...5-8 Cleaning ...5-11 Cleaning the outside of the printer 5-11 Cleaning the inside of the printer 5-12 Cleaning the corona wire...5-14 6 Troubleshooting ...6-1 Identifying your...
...-2200w)...4-1 Print server (NC-2100p) (For HL-2040 4-2 5 Routine maintenance 5-1 Replacing the consumable items...5-1 Toner cartridge ...5-2 Toner Low message ...5-2 Toner Life End message ...5-3 Replacing the toner cartridge 5-3 Drum unit ...5-7 Change Drum message...5-7 Replacing the drum unit...5-8 Cleaning ...5-11 Cleaning the outside of the printer 5-11 Cleaning the inside of the printer 5-12 Cleaning the corona wire...5-14 6 Troubleshooting ...6-1 Identifying your...

Users Manual - English
Page 47
... is full and the printer cannot print full pages of a document. If the printer does not start printing, press the Go button. Memory full The printer memory is open Close the back cover of a document. Drum Error The corona wire needs to clear them on page 6-5. See Cleaning the corona wire on... page 6-15. See Paper jams and how to be cleaned. Back cover is open Close the front cover...
... is full and the printer cannot print full pages of a document. If the printer does not start printing, press the Go button. Memory full The printer memory is open Close the back cover of a document. Drum Error The corona wire needs to clear them on page 6-5. See Cleaning the corona wire on... page 6-15. See Paper jams and how to be cleaned. Back cover is open Close the front cover...

Users Manual - English
Page 57
... consumable items regularly. Consumables Toner Cartridge Drum Unit See Toner cartridge on page 5-7. 5 - 1 5 Routine maintenance You will need to replace certain parts and clean the printer regularly. WARNING 5 When you replace certain parts or clean the printer regularly, pay attention to inhale the ...toner. ■ After you open the front cover or back cover of the printer, never touch the shaded parts shown in...
... consumable items regularly. Consumables Toner Cartridge Drum Unit See Toner cartridge on page 5-7. 5 - 1 5 Routine maintenance You will need to replace certain parts and clean the printer regularly. WARNING 5 When you replace certain parts or clean the printer regularly, pay attention to inhale the ...toner. ■ After you open the front cover or back cover of the printer, never touch the shaded parts shown in...

Users Manual - English
Page 59
...Cleaning on page 5-11. 1 Open the front cover of toner or the toner is not evenly distributed inside the cartridge. 5 Replacing the toner cartridge Note • To ensure high quality printing, make sure you replace the toner cartridge. When you want to buy toner cartridges, call the dealer you bought the printer... from or Brother Customer Service. • We recommend that you clean the printer when you use quality Brother toner cartridges. Routine maintenance Toner Life End message If the LED shows the message...
...Cleaning on page 5-11. 1 Open the front cover of toner or the toner is not evenly distributed inside the cartridge. 5 Replacing the toner cartridge Note • To ensure high quality printing, make sure you replace the toner cartridge. When you want to buy toner cartridges, call the dealer you bought the printer... from or Brother Customer Service. • We recommend that you clean the printer when you use quality Brother toner cartridges. Routine maintenance Toner Life End message If the LED shows the message...

Users Manual - English
Page 62
...maintenance 5 8 Put the drum unit and toner cartridge assembly back in the printer. Home position (▲) 5 - 6 If you hear it in the printer. CAUTION Make sure you put it lock into the drum unit until you do not, printed pages may separate from the drum unit. 7 Clean the primary corona wire inside... the drum unit by gently sliding...
...maintenance 5 8 Put the drum unit and toner cartridge assembly back in the printer. Home position (▲) 5 - 6 If you hear it in the printer. CAUTION Make sure you put it lock into the drum unit until you do not, printed pages may separate from the drum unit. 7 Clean the primary corona wire inside... the drum unit by gently sliding...

Users Manual - English
Page 63
... size). Warranty coverage does not apply to 12,000 pages. The printer should clean the inside of the printer. Routine maintenance Drum unit This printer can print up to problems caused by your drum will vary depending on page 5-11. 5 - 7 The actual... number of pages that will be printed by the use only genuine Brother toner. Note • There are many factors that determine the actual drum...
... size). Warranty coverage does not apply to 12,000 pages. The printer should clean the inside of the printer. Routine maintenance Drum unit This printer can print up to problems caused by your drum will vary depending on page 5-11. 5 - 7 The actual... number of pages that will be printed by the use only genuine Brother toner. Note • There are many factors that determine the actual drum...

Users Manual - English
Page 64
... the Go button. IMPROPER SETUP Do not reset the drum counter when you replace the drum unit. See Cleaning on page 5-11. 5 Follow these steps to replace the drum unit. 1 Make sure that you clean the printer when you replace only the toner cartridge. 3 Pull out the drum unit and toner cartridge assembly. 5 - 8 Once all the LEDs...
... the Go button. IMPROPER SETUP Do not reset the drum counter when you replace the drum unit. See Cleaning on page 5-11. 5 Follow these steps to replace the drum unit. 1 Make sure that you clean the printer when you replace only the toner cartridge. 3 Pull out the drum unit and toner cartridge assembly. 5 - 8 Once all the LEDs...

Users Manual - English
Page 67
... drum unit, make sure you clean the inside of the printer with volatile liquids such as follows: 1 Turn off the printer power switch and unplug the printer from the AC power outlet. 2 Pull the paper tray completely out of the printer. 5 - 11 Cleaning with a dry, lint-free cloth. 5 Cleaning the outside of the printer CAUTION • Use neutral detergents. Clean...
... drum unit, make sure you clean the inside of the printer with volatile liquids such as follows: 1 Turn off the printer power switch and unplug the printer from the AC power outlet. 2 Pull the paper tray completely out of the printer. 5 - 11 Cleaning with a dry, lint-free cloth. 5 Cleaning the outside of the printer CAUTION • Use neutral detergents. Clean...
Users Manual - English
Page 70
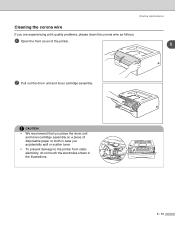
Routine maintenance Cleaning the corona wire If you are experiencing print quality problems, please clean the corona wire as follows: 1 Open the front cover of disposable paper or cloth in the illustrations. 5 - 14 CAUTION • We recommend that you accidentally spill or scatter toner. • To prevent damage to the printer from static electricity, do not touch the electrodes shown in case you place the drum unit and toner cartridge assembly on a piece of the printer. 5 2 Pull out the drum unit and toner cartridge assembly.
Routine maintenance Cleaning the corona wire If you are experiencing print quality problems, please clean the corona wire as follows: 1 Open the front cover of disposable paper or cloth in the illustrations. 5 - 14 CAUTION • We recommend that you accidentally spill or scatter toner. • To prevent damage to the printer from static electricity, do not touch the electrodes shown in case you place the drum unit and toner cartridge assembly on a piece of the printer. 5 2 Pull out the drum unit and toner cartridge assembly.

Users Manual - English
Page 71
3 Clean the primary corona wire inside the drum unit by gently sliding the blue tab from right to left and left to the home position (▲) before you do not, printed pages may have a vertical stripe. 4 Put the drum unit and toner cartridge assembly back in the printer. Close the front cover of the printer. Routine maintenance 5 Home position (▲) 5 - 15 Return the tab to right several times. If you put the drum unit back in the printer.
3 Clean the primary corona wire inside the drum unit by gently sliding the blue tab from right to left and left to the home position (▲) before you do not, printed pages may have a vertical stripe. 4 Put the drum unit and toner cartridge assembly back in the printer. Close the front cover of the printer. Routine maintenance 5 Home position (▲) 5 - 15 Return the tab to right several times. If you put the drum unit back in the printer.

Users Manual - English
Page 73
...area. Sometimes it back in the paper tray. ■ Reduce the amount of the printer. ■ Press the Go button to replace the current one. See Replacing the drum unit on page 5-8. ■ See Cleaning the corona wire on page 3-7. ■ Reduce the print resolution or reduce the ...the printer. ■ Close the back cover of paper in the printer, see Cancel printing on page 5-14. ■ Check the LED indication to AUTO by using the supplied Windows® driver or Remote Printer Console program. ■ Change the following table for the error message that meets Brother's ...
...area. Sometimes it back in the paper tray. ■ Reduce the amount of the printer. ■ Press the Go button to replace the current one. See Replacing the drum unit on page 5-8. ■ See Cleaning the corona wire on page 3-7. ■ Reduce the print resolution or reduce the ...the printer. ■ Close the back cover of paper in the printer, see Cancel printing on page 5-14. ■ Check the LED indication to AUTO by using the supplied Windows® driver or Remote Printer Console program. ■ Change the following table for the error message that meets Brother's ...
Users Manual - English
Page 82
...meets our specifications. high temperatures and high humidity can increase the amount of paper can I use ? See Positioning the printer on page 1-3. ■ Clean the primary corona wire inside the drum unit by sliding the blue tab. See What kind of paper can I use ? Put in the... printer driver. See Positioning the printer on page 6 1-3. ■ Use a new toner cartridge. See Replacing the drum unit on page 5-14. ■ The drum unit may be damaged. See Cleaning the corona wire on page 5-8. on page 5-3 ■ Use ...
...meets our specifications. high temperatures and high humidity can increase the amount of paper can I use ? See Positioning the printer on page 1-3. ■ Clean the primary corona wire inside the drum unit by sliding the blue tab. See What kind of paper can I use ? Put in the... printer driver. See Positioning the printer on page 6 1-3. ■ Use a new toner cartridge. See Replacing the drum unit on page 5-14. ■ The drum unit may be damaged. See Cleaning the corona wire on page 5-8. on page 5-3 ■ Use ...
Users Manual - English
Page 83
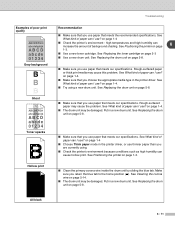
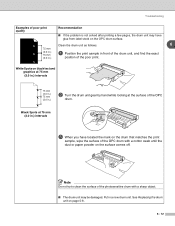
... matches the print sample, wipe the surface of the OPC drum with a sharp object. ■ The drum unit may have glue from label stock on the OPC drum surface. Note Do not try to clean the surface of the poor print. Clean the drum unit as follows: 6 75 mm (3.0 in.) 75 mm (3.0 in.) ...1 Position the print sample in a new drum unit. See Replacing the drum unit on the surface comes off. Put...
... matches the print sample, wipe the surface of the OPC drum with a sharp object. ■ The drum unit may have glue from label stock on the OPC drum surface. Note Do not try to clean the surface of the poor print. Clean the drum unit as follows: 6 75 mm (3.0 in.) 75 mm (3.0 in.) ...1 Position the print sample in a new drum unit. See Replacing the drum unit on the surface comes off. Put...
Users Manual - English
Page 84
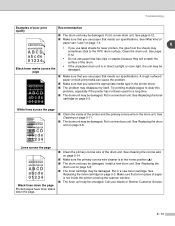
... 6 • If you use label sheets for laser printers, the glue from the sheets may sometimes stick to clear this problem, especially if the printer has not been used for a long time. ■ The drum unit may be damaged. Call your dealer or Brother Customer Service. on page 5-8. ■ The toner ... that you select the appropriate media type in direct sunlight or room light, the unit may be damaged. See Cleaning the corona wire on page 5-3. Put in a new drum unit. See Replacing the toner cartridge on page 5-8. See Replacing the toner cartridge on page 5-14 ABCDEFGH abcdefghijk ...
... 6 • If you use label sheets for laser printers, the glue from the sheets may sometimes stick to clear this problem, especially if the printer has not been used for a long time. ■ The drum unit may be damaged. Call your dealer or Brother Customer Service. on page 5-8. ■ The toner ... that you select the appropriate media type in direct sunlight or room light, the unit may be damaged. See Cleaning the corona wire on page 5-3. Put in a new drum unit. See Replacing the toner cartridge on page 5-8. See Replacing the toner cartridge on page 5-14 ABCDEFGH abcdefghijk ...
Users Manual - English
Page 108
...Brother Solutions Center 2-1 C Cancel printing 3-7 Carton contents 1-1 Cartridge position error 3-3 Character sets A-9 Cleaning 5-11 Control panel 3-1, A-3 Control panel button 3-7 Corona wire 5-6, 5-14, 5-15 D Device options 2-6 Dimensions A-4 Driver Deployment Wizard 2-16 Drum A-4 Drum Error 3-4 Drum life end soon 3-3 Drum...NC-2100p 4-2 NC-2200w 4-1 Network 2-16 Network connectivity A-2 Network Print Software 2-16 No paper 3-3, 3-4 O OPC drum 6-12 P Paper 1-4, A-6 Paper handling A-3 Paper jams 3-4, 6-5 Plain paper 1-5 Power supply 1-3 Print media 1-4 Print overrun...
...Brother Solutions Center 2-1 C Cancel printing 3-7 Carton contents 1-1 Cartridge position error 3-3 Character sets A-9 Cleaning 5-11 Control panel 3-1, A-3 Control panel button 3-7 Corona wire 5-6, 5-14, 5-15 D Device options 2-6 Dimensions A-4 Driver Deployment Wizard 2-16 Drum A-4 Drum Error 3-4 Drum life end soon 3-3 Drum...NC-2100p 4-2 NC-2200w 4-1 Network 2-16 Network connectivity A-2 Network Print Software 2-16 No paper 3-3, 3-4 O OPC drum 6-12 P Paper 1-4, A-6 Paper handling A-3 Paper jams 3-4, 6-5 Plain paper 1-5 Power supply 1-3 Print media 1-4 Print overrun...


