
Users Manual - English
Page 2
... by or near children. 2. WARNING - Keep ventilation openings of lint, dust, and loose cloth. 5. Keep fingers away from the accumulation of the machine free from all instructions before cleaning. Do not operate where aerosol (spray) products are being administered. 8. To unplug, grasp the plug, not the ...cord, and carefully remove from the electrical outlet immediately after using and before using this manual. 3. SAVE THESE INSTRUCTIONS This machine is used by pulling on the cord. This product should never be used or where oxygen is not working properly, if it has...
... by or near children. 2. WARNING - Keep ventilation openings of lint, dust, and loose cloth. 5. Keep fingers away from the accumulation of the machine free from all instructions before cleaning. Do not operate where aerosol (spray) products are being administered. 8. To unplug, grasp the plug, not the ...cord, and carefully remove from the electrical outlet immediately after using and before using this manual. 3. SAVE THESE INSTRUCTIONS This machine is used by pulling on the cord. This product should never be used or where oxygen is not working properly, if it has...

Users Manual - English
Page 3
... terminal which is coloured brown must be connected to replace the fuse cover. - FOR USERS IN THE UK, EIRE, MALTA AND CYPRUS ONLY If this machine is fitted with a three-pin non-rewireable BS plug, then please read the following code: Blue Neutral Brown Live As the colours of the wiring...
... terminal which is coloured brown must be connected to replace the fuse cover. - FOR USERS IN THE UK, EIRE, MALTA AND CYPRUS ONLY If this machine is fitted with a three-pin non-rewireable BS plug, then please read the following code: Blue Neutral Brown Live As the colours of the wiring...

Users Manual - English
Page 4
...: • after each use • when a power failure occurs during use extension cords. 5. Always be used. 3. Use caution in this machine. 4. To fully enjoy all the features, we suggest that specifications and external appearance are subject to change for this instruction manual.) For a longer ...In the event a malfunction occurs or adjustment is required, first follow the instructions outlined in order to avoid dropping or hitting the machine or AC adapter. Do not touch the thread cartridge or design frame while embroidering. 2. Do not remove the embroidery design cassette from...
...: • after each use • when a power failure occurs during use extension cords. 5. Always be used. 3. Use caution in this machine. 4. To fully enjoy all the features, we suggest that specifications and external appearance are subject to change for this instruction manual.) For a longer ...In the event a malfunction occurs or adjustment is required, first follow the instructions outlined in order to avoid dropping or hitting the machine or AC adapter. Do not touch the thread cartridge or design frame while embroidering. 2. Do not remove the embroidery design cassette from...
Users Manual - English
Page 5
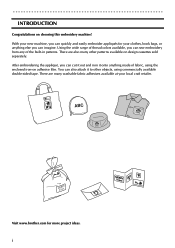
... thread colors available, you can imagine. There are also many washable fabric adhesives available at your new machine, you can sew embroidery from any of fabric, using commercially available double-sided tape. i Visit www.brother.com for your clothes, book bags, or anything made of the built-in patterns. G G G G G G G G G G G G G G G G G G G G G G G G G G G G G G G G G G G G G G G G G G G G G G G G G G G G G G G G G INTRODUCTION ...You can also attach it onto anything else you can cut it out and iron it to other patterns available on choosing this embroidery machine!
... thread colors available, you can imagine. There are also many washable fabric adhesives available at your new machine, you can sew embroidery from any of fabric, using commercially available double-sided tape. i Visit www.brother.com for your clothes, book bags, or anything made of the built-in patterns. G G G G G G G G G G G G G G G G G G G G G G G G G G G G G G G G G G G G G G G G G G G G G G G G G G G G G G G G G INTRODUCTION ...You can also attach it onto anything else you can cut it out and iron it to other patterns available on choosing this embroidery machine!
Users Manual - English
Page 6
... 2 Chapter 3 Chapter 4 1Contents Chapter 1 Before You Start 1 Unpacking 1 Supplies ...2 Basic supplies ...2 Optional supplies...2 Important parts 3 Machine ...3 Operation keys ...3 LCD display ...4 Design frame ...4 Thread cartridge...4 Useful vocabulary 5 Chapter 2 Overview and Patterns 7 Overview 7 Types ...Embroidered Appliqu 9 Making an embroidered appliqué from a one-point pattern 9 Step 1 Getting ready 9 Step 2 Starting up the machine 11 Step 3 Selecting the pattern 11 Step 4 Inserting the thread cartridge and design frame 13 Step 5 Embroidering the appliqu 17 Step ...
... 2 Chapter 3 Chapter 4 1Contents Chapter 1 Before You Start 1 Unpacking 1 Supplies ...2 Basic supplies ...2 Optional supplies...2 Important parts 3 Machine ...3 Operation keys ...3 LCD display ...4 Design frame ...4 Thread cartridge...4 Useful vocabulary 5 Chapter 2 Overview and Patterns 7 Overview 7 Types ...Embroidered Appliqu 9 Making an embroidered appliqué from a one-point pattern 9 Step 1 Getting ready 9 Step 2 Starting up the machine 11 Step 3 Selecting the pattern 11 Step 4 Inserting the thread cartridge and design frame 13 Step 5 Embroidering the appliqu 17 Step ...
Users Manual - English
Page 7
... pattern 37 Checking the text in a saved pattern 39 Editing the text in a saved pattern 40 Stopping and continuing embroidering 41 Continuing embroidering after your machine is turned off 43 Removing the design frame 44 Pulling the thread end out of the cartridge 45 Changing the contrast of the LCD display...
... pattern 37 Checking the text in a saved pattern 39 Editing the text in a saved pattern 40 Stopping and continuing embroidering 41 Continuing embroidering after your machine is turned off 43 Removing the design frame 44 Pulling the thread end out of the cartridge 45 Changing the contrast of the LCD display...
Users Manual - English
Page 8
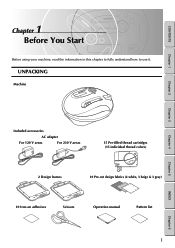
CONTENTS Chapter 1 1 Chapter 1Before You Start Before using your machine, read the information in this chapter to fully understand how to use it. UNPACKING Machine Chapter 2 Chapter 3 Chapter 4 Chapter 5 Included accessories AC adapter For 120 V areas For 230 V areas 15 Pre-filled thread cartridges (15 individual thread colors) 2 Design frames 10 Pre-cut design fabrics (4 white, 3 beige & 3 gray) 10 Iron-on adhesives Scissors Operation manual Pattern list 1 INDEX Chapter 6
CONTENTS Chapter 1 1 Chapter 1Before You Start Before using your machine, read the information in this chapter to fully understand how to use it. UNPACKING Machine Chapter 2 Chapter 3 Chapter 4 Chapter 5 Included accessories AC adapter For 120 V areas For 230 V areas 15 Pre-filled thread cartridges (15 individual thread colors) 2 Design frames 10 Pre-cut design fabrics (4 white, 3 beige & 3 gray) 10 Iron-on adhesives Scissors Operation manual Pattern list 1 INDEX Chapter 6
Users Manual - English
Page 9
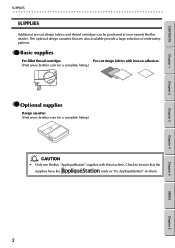
... G G G G G G G G G G G G G G G G G G G G G G G G G G G G G G G G G G G G G G G G G G G G G G G G G G G G G G G G G SUPPLIES Additional pre-cut design fabrics with this machine. GG Basic supplies Pre-filled thread cartridges Pre-cut design fabrics and thread cartridges can be sure that are also available provide a large selection of embroidery patterns. Check to be purchased at your nearest Brother retailer. Chapter 3 Chapter 4 Chapter 5 INDEX Chapter 6 2 The optional...
... G G G G G G G G G G G G G G G G G G G G G G G G G G G G G G G G G G G G G G G G G G G G G G G G G G G G G G G G G SUPPLIES Additional pre-cut design fabrics with this machine. GG Basic supplies Pre-filled thread cartridges Pre-cut design fabrics and thread cartridges can be sure that are also available provide a large selection of embroidery patterns. Check to be purchased at your nearest Brother retailer. Chapter 3 Chapter 4 Chapter 5 INDEX Chapter 6 2 The optional...
Users Manual - English
Page 10
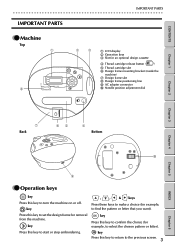
... keys to make a choice (for an optional design cassette 4 Thread cartridge release button ( ) 5 Thread cartridge slot 6 Design frame mounting bracket (inside the machine) 7 Design frame slot 8 Design frame positioning line 9 AC adapter connector 0 Needle position adjustment dial Chapter 1 Chapter 2 Chapter 3 Chapter 4 Chapter 5 7 ...Back 85 4 Bottom 0 9 GG Operation keys key Press this key to turn the machine on or off. Press this key to return to the previous screen. 3 INDEX Chapter 6 key Press this key to start or stop ...
... keys to make a choice (for an optional design cassette 4 Thread cartridge release button ( ) 5 Thread cartridge slot 6 Design frame mounting bracket (inside the machine) 7 Design frame slot 8 Design frame positioning line 9 AC adapter connector 0 Needle position adjustment dial Chapter 1 Chapter 2 Chapter 3 Chapter 4 Chapter 5 7 ...Back 85 4 Bottom 0 9 GG Operation keys key Press this key to turn the machine on or off. Press this key to return to the previous screen. 3 INDEX Chapter 6 key Press this key to start or stop ...
Users Manual - English
Page 12
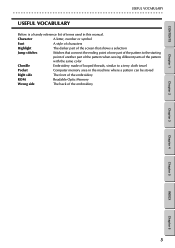
... of the embroidery Chapter 1 Chapter 2 Chapter 3 Chapter 4 Chapter 5 INDEX Chapter 6 5 CONTENTS USEFUL VOCABULARY G G G G G G G G G G G G G G G G G G G G G G G G G G G G G G G G G G G G G G G G G G G G G G G G G G G G G G G G G USEFUL VOCABULARY Below is a handy reference list of terms used in the machine where a pattern can be stored Right side The front of the embroidery ROM Readable Optic Memory Wrong side The back of looped threads, similar to...
... of the embroidery Chapter 1 Chapter 2 Chapter 3 Chapter 4 Chapter 5 INDEX Chapter 6 5 CONTENTS USEFUL VOCABULARY G G G G G G G G G G G G G G G G G G G G G G G G G G G G G G G G G G G G G G G G G G G G G G G G G G G G G G G G G USEFUL VOCABULARY Below is a handy reference list of terms used in the machine where a pattern can be stored Right side The front of the embroidery ROM Readable Optic Memory Wrong side The back of looped threads, similar to...
Users Manual - English
Page 14
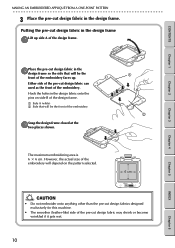
... secure the threads in the appliqué fabric. 0 Cut off any extra threads, and then cut design fabric in the design frame. 3 Start up this machine. 4 Use the operation keys to your favorite garment. Place the pre-cut out the appliqué in Chapter 3 Making an Embroidered Appliqué.
... secure the threads in the appliqué fabric. 0 Cut off any extra threads, and then cut design fabric in the design frame. 3 Start up this machine. 4 Use the operation keys to your favorite garment. Place the pre-cut out the appliqué in Chapter 3 Making an Embroidered Appliqué.
Users Manual - English
Page 15
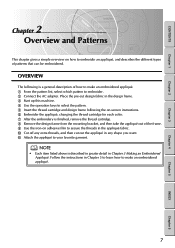
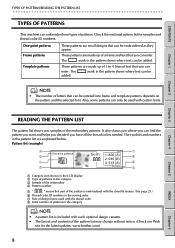
...icon shown in the LCD display 2 Type of the pattern is included with certain fonts. Check the enclosed pattern list for the latest updates: www.brother.com) 8 INDEX Chapter 6 These patterns are made up of a frame and text that part of patterns in the pattern list are small designs... Template patterns These patterns are explained below. The added. CONTENTS Chapter 1 TYPES OF PATTERNS/READING THE PATTERN LIST G G G G G G G G G G G G G G G G G G G G G G G G G G G G G G G G G G G G G G G G G G G G G G G G G G G G G G G G G TYPES OF PATTERNS This machine can enter.
...icon shown in the LCD display 2 Type of the pattern is included with certain fonts. Check the enclosed pattern list for the latest updates: www.brother.com) 8 INDEX Chapter 6 These patterns are made up of a frame and text that part of patterns in the pattern list are small designs... Template patterns These patterns are explained below. The added. CONTENTS Chapter 1 TYPES OF PATTERNS/READING THE PATTERN LIST G G G G G G G G G G G G G G G G G G G G G G G G G G G G G G G G G G G G G G G G G G G G G G G G G G G G G G G G G TYPES OF PATTERNS This machine can enter.
Users Manual - English
Page 16
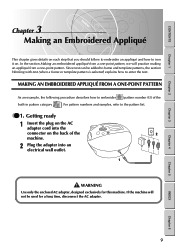
... APPLIQUÉ FROM A ONE-POINT PATTERN As an example, the following procedure describes how to embroider (pattern number 03) of the 2 machine. 2 Plug the adapter into the connector on . GG 1. Chapter 4 Chapter 5 INDEX Chapter 6 9 Since text can be used for this... machine. If the machine will practice making an appliqué from a one-point pattern. CONTENTS Chapter 1 Chapter 2 Chapter 3 3 Chapter 3Making an Embroidered Appliqué This ...
... APPLIQUÉ FROM A ONE-POINT PATTERN As an example, the following procedure describes how to embroider (pattern number 03) of the 2 machine. 2 Plug the adapter into the connector on . GG 1. Chapter 4 Chapter 5 INDEX Chapter 6 9 Since text can be used for this... machine. If the machine will practice making an appliqué from a one-point pattern. CONTENTS Chapter 1 Chapter 2 Chapter 3 3 Chapter 3Making an Embroidered Appliqué This ...
Users Manual - English
Page 17
... pattern selected. 1 2 Chapter 3 Chapter 4 Chapter 5 INDEX Chapter 6 CAUTION • Do not embroider onto anything other than the pre-cut design fabrics designed exclusively for this machine. • The smoother (leather-like) side of the embroidery 3Snap the design frame closed at the two places shown. Hook the holes in the design...
... pattern selected. 1 2 Chapter 3 Chapter 4 Chapter 5 INDEX Chapter 6 CAUTION • Do not embroider onto anything other than the pre-cut design fabrics designed exclusively for this machine. • The smoother (leather-like) side of the embroidery 3Snap the design frame closed at the two places shown. Hook the holes in the design...
Users Manual - English
Page 18
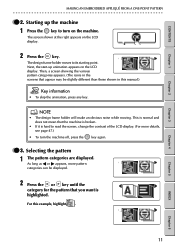
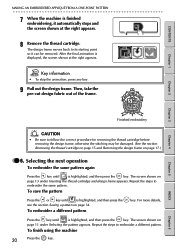
...the LCD display. 2 Press the key. As long as ᮤ or ᮣ appears, more details, see page 47.) • To turn on the machine. For this manual.) Key information • To skip the animation, press any key. Selecting the pattern 1 The pattern categories are displayed. NOTE • The... design frame holder will make an obvious noise while moving. This is normal and does not mean that the machine is broken. • If it is highlighted. The screen shown at the right appears on the LCD display. CONTENTS Chapter 1 Chapter 2 MAKING...
...the LCD display. 2 Press the key. As long as ᮤ or ᮣ appears, more details, see page 47.) • To turn on the machine. For this manual.) Key information • To skip the animation, press any key. Selecting the pattern 1 The pattern categories are displayed. NOTE • The... design frame holder will make an obvious noise while moving. This is normal and does not mean that the machine is broken. • If it is highlighted. The screen shown at the right appears on the LCD display. CONTENTS Chapter 1 Chapter 2 MAKING...
Users Manual - English
Page 23
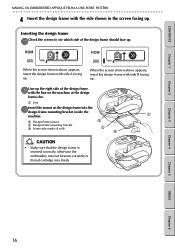
... frame with the side shown in the screen facing up . When the screen shown above appears, insert the design frame with the line on the machine at the design frame slot. 1 Line 3Insert the mount on the design frame into the design frame mounting bracket inside the... 1 machine. 2 Design frame mount 3 Design frame mounting bracket 4 Frame side marks (A or B) 3 2 4 CAUTION • Make sure that the design frame is inserted correctly, otherwise the embroidery ...
... frame with the side shown in the screen facing up . When the screen shown above appears, insert the design frame with the line on the machine at the design frame slot. 1 Line 3Insert the mount on the design frame into the design frame mounting bracket inside the... 1 machine. 2 Design frame mount 3 Design frame mounting bracket 4 Frame side marks (A or B) 3 2 4 CAUTION • Make sure that the design frame is inserted correctly, otherwise the embroidery ...
Users Manual - English
Page 24
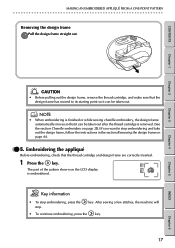
.... Embroidering the appliqué Before embroidering, check that it can be taken out after the thread cartridge is embroidered. key. After sewing a few stitches, the machine will • To continue embroidering, press the key. 17 INDEX Chapter 6 GG 5. Key information • To stop embroidering, press the stop embroidering and take out...
.... Embroidering the appliqué Before embroidering, check that it can be taken out after the thread cartridge is embroidered. key. After sewing a few stitches, the machine will • To continue embroidering, press the key. 17 INDEX Chapter 6 GG 5. Key information • To stop embroidering, press the stop embroidering and take out...
Users Manual - English
Page 25
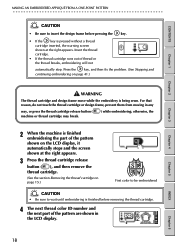
...page 15.) First color to be embroidered CAUTION • Be sure to wait until embroidering is being sewn. otherwise, the 2 When the machine is finished embroidering the part of the pattern shown on page 41.) WARNING The thread cartridge and design frame move while the embroidery is ...thread cartridge. • If the thread cartridge runs out of the pattern are shown in any way, or press the thread cartridge release button ( machine or thread cartridge may break. ) while embroidering; Press the key, and then fix the problem. (See Stopping and continuing embroidering on the LCD...
...page 15.) First color to be embroidered CAUTION • Be sure to wait until embroidering is being sewn. otherwise, the 2 When the machine is finished embroidering the part of the pattern shown on page 41.) WARNING The thread cartridge and design frame move while the embroidery is ...thread cartridge. • If the thread cartridge runs out of the pattern are shown in any way, or press the thread cartridge release button ( machine or thread cartridge may break. ) while embroidering; Press the key, and then fix the problem. (See Stopping and continuing embroidering on the LCD...
Users Manual - English
Page 27
... MAKING AN EMBROIDERED APPLIQUÉ FROM A ONE-POINT PATTERN G G G G G G G G G G G G G G G G G G G G G G G G G G G G G G G G G G G G G G G G G G G G G G G G G G G G G G G G G 7 When the machine is finished embroidering, it can be damaged. (See the section Removing the thread cartridge on page 15 and Removing the design frame on page 13... under Selecting the pattern appears. To finish using the machine 20 Press the key. The design frame moves back to embroider a different pattern. Chapter 1 Chapter 2 Chapter 3 ...
... MAKING AN EMBROIDERED APPLIQUÉ FROM A ONE-POINT PATTERN G G G G G G G G G G G G G G G G G G G G G G G G G G G G G G G G G G G G G G G G G G G G G G G G G G G G G G G G G 7 When the machine is finished embroidering, it can be damaged. (See the section Removing the thread cartridge on page 15 and Removing the design frame on page 13... under Selecting the pattern appears. To finish using the machine 20 Press the key. The design frame moves back to embroider a different pattern. Chapter 1 Chapter 2 Chapter 3 ...
Users Manual - English
Page 30
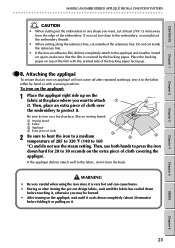
... the embroidery in any shape you want to attach 1 it from the edge of the embroidery. Do not cut outside of the film with a sewing machine. Place the backing paper on the fabric at least 3/16" (5 mm) away from the back. To iron on the appliqué: 1 Place the appliqué...
... the embroidery in any shape you want to attach 1 it from the edge of the embroidery. Do not cut outside of the film with a sewing machine. Place the backing paper on the fabric at least 3/16" (5 mm) away from the back. To iron on the appliqué: 1 Place the appliqué...

