
Users Manual - English and Spanish
Page 2
...manual. Do not use the proper needle plate. Keep fingers away from the electrical outlet immediately after using and before cleaning. 2. This sewing machine is used by young children or infirm persons without supervision. (For Australia and New Zealand only) 17. Close attention is necessary when the... authorized dealer or service center for household use bent needles. 13. Young children should be supervised to ensure that they do not play with this machine if it has a damaged cord or plug, if it off , then remove plug from outlet. 9. To reduce the risk of electric shock: ...
...manual. Do not use the proper needle plate. Keep fingers away from the electrical outlet immediately after using and before cleaning. 2. This sewing machine is used by young children or infirm persons without supervision. (For Australia and New Zealand only) 17. Close attention is necessary when the... authorized dealer or service center for household use bent needles. 13. Young children should be supervised to ensure that they do not play with this machine if it has a damaged cord or plug, if it off , then remove plug from outlet. 9. To reduce the risk of electric shock: ...
Users Manual - English and Spanish
Page 5
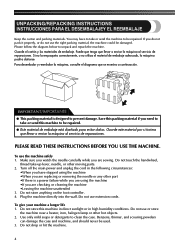
...o enviar la máquina al servicio de reparaciones. Plug the machine directly into the wall. To give your machine a longer life 1. Do not store this machine to be damaged. Save this packing material if you are sewing. To use extension cords. Do not use the right packing material,... the machine could be repaired. ● Este material de embalaje está...
...o enviar la máquina al servicio de reparaciones. Plug the machine directly into the wall. To give your machine a longer life 1. Do not store this machine to be damaged. Save this packing material if you are sewing. To use extension cords. Do not use the right packing material,... the machine could be repaired. ● Este material de embalaje está...
Users Manual - English and Spanish
Page 7
... AND BUTTONS 52 Making a Buttonhole (1-Step Automatic Buttonhole 52 Adjusting Buttonholes ...54 Sewing Buttons ...55 6 KNOWING YOUR SEWING MACHINE 10 THE MAIN PARTS ...10 ACCESSORIES ...12 Optional Accessories ...13 USING YOUR SEWING MACHINE 14 Connecting Plugs ...15 Main Power and Sewing Light Switch ...15 Foot Controller ...15 Checking the Needle ...16 Replacing the Needle ...16 Changing...
... AND BUTTONS 52 Making a Buttonhole (1-Step Automatic Buttonhole 52 Adjusting Buttonholes ...54 Sewing Buttons ...55 6 KNOWING YOUR SEWING MACHINE 10 THE MAIN PARTS ...10 ACCESSORIES ...12 Optional Accessories ...13 USING YOUR SEWING MACHINE 14 Connecting Plugs ...15 Main Power and Sewing Light Switch ...15 Foot Controller ...15 Checking the Needle ...16 Replacing the Needle ...16 Changing...
Users Manual - English and Spanish
Page 11
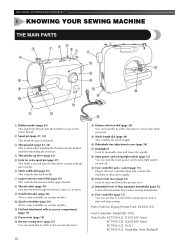
...SEWING MACHINE 1 KNOWING YOUR SEWING MACHINE THE MAIN PARTS 1 Bobbin winder (page 26) This winds the thread onto the bobbin for use this in the foot controller plug and connect the machine to raise and lower the presser foot. J Presser foot lever (page 32) Used to the power supply. H Main power and sewing...Pattern selection dial (page 20) You can turn the main power and sewing light switch on certain models.) 0 Quick-set bobbin (page 30) (This is used when winding the thread onto the bobbin and then threading the machine. 4 Thread take-up lever (page 33) 5 Hole for extra spool...
...SEWING MACHINE 1 KNOWING YOUR SEWING MACHINE THE MAIN PARTS 1 Bobbin winder (page 26) This winds the thread onto the bobbin for use this in the foot controller plug and connect the machine to raise and lower the presser foot. J Presser foot lever (page 32) Used to the power supply. H Main power and sewing...Pattern selection dial (page 20) You can turn the main power and sewing light switch on certain models.) 0 Quick-set bobbin (page 30) (This is used when winding the thread onto the bobbin and then threading the machine. 4 Thread take-up lever (page 33) 5 Hole for extra spool...

Users Manual - English and Spanish
Page 13
... included accessories vary depending on the machine model. ● Los accesorios incluidos varían según el modelo de la máquina. 12 Los siguientes accesorios se encuentran en la unidad de cama plana. Part Name 5 Buttonhole Foot (1 pc.) 6 Button Sewing Foot (1 pc.) 7 Extra Spool...-021 XC6063-021 Nº Nombre de la pieza 1 Pie para cremalleras (1 unidad) Código de la pieza EE.UU. KNOWING YOUR SEWING MACHINE / CONOZCA SU MÁQUINA DE COSER ACCESSORIES / ACCESORIOS The following accessories are stored in the flat bed attachment. Part Name 1 Zipper foot...
... included accessories vary depending on the machine model. ● Los accesorios incluidos varían según el modelo de la máquina. 12 Los siguientes accesorios se encuentran en la unidad de cama plana. Part Name 5 Buttonhole Foot (1 pc.) 6 Button Sewing Foot (1 pc.) 7 Extra Spool...-021 XC6063-021 Nº Nombre de la pieza 1 Pie para cremalleras (1 unidad) Código de la pieza EE.UU. KNOWING YOUR SEWING MACHINE / CONOZCA SU MÁQUINA DE COSER ACCESSORIES / ACCESORIOS The following accessories are stored in the flat bed attachment. Part Name 1 Zipper foot...

Users Manual - English and Spanish
Page 19
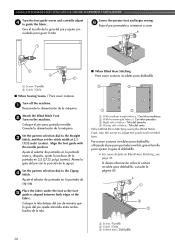
...lugar correcto, la varilla deberá ajustarse perfectamente. 1 Shank / Lengüeta 18 If you leave the power on and step on the controller, the machine will have chosen. Si deja la máquina encendida y pisa el pedal, la máquina comenzará a funcionar y podría lesionarse. ●...pattern you want to release the presser foot. Baje la palanca del pie prensatela y ajuste el pie en la lengüeta. KNOWING YOUR SEWING MACHINE / CONOZCA SU MÁQUINA DE COSER Changing the Presser Foot Cambio del pie prensatela CAUTION/PRECAUCIÓN ● Always turn off the ...
...lugar correcto, la varilla deberá ajustarse perfectamente. 1 Shank / Lengüeta 18 If you leave the power on and step on the controller, the machine will have chosen. Si deja la máquina encendida y pisa el pedal, la máquina comenzará a funcionar y podría lesionarse. ●...pattern you want to release the presser foot. Baje la palanca del pie prensatela y ajuste el pie en la lengüeta. KNOWING YOUR SEWING MACHINE / CONOZCA SU MÁQUINA DE COSER Changing the Presser Foot Cambio del pie prensatela CAUTION/PRECAUCIÓN ● Always turn off the ...
Users Manual - English and Spanish
Page 27
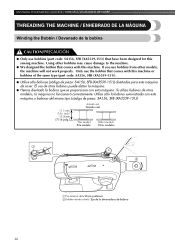
... máquina. Si utiliza bobinas de otros modelos, la máquina no funcionará correctamente. KNOWING YOUR SEWING MACHINE / CONOZCA SU MÁQUINA DE COSER THREADING THE MACHINE / ENHEBRADO DE LA MÁQUINA Winding the Bobbin / Devanado de la bobina CAUTION/PRECAUCIÓN ● ...Only use the bobbin that comes with this machine. Only use bobbins (part code: SA156, SFB (XA5539-151)) that comes with this sewing machine. Utilice sólo la bobina suministrada con esta máquina o bobinas del mismo tipo ...
... máquina. Si utiliza bobinas de otros modelos, la máquina no funcionará correctamente. KNOWING YOUR SEWING MACHINE / CONOZCA SU MÁQUINA DE COSER THREADING THE MACHINE / ENHEBRADO DE LA MÁQUINA Winding the Bobbin / Devanado de la bobina CAUTION/PRECAUCIÓN ● ...Only use the bobbin that comes with this machine. Only use bobbins (part code: SA156, SFB (XA5539-151)) that comes with this sewing machine. Utilice sólo la bobina suministrada con esta máquina o bobinas del mismo tipo ...
Users Manual - English and Spanish
Page 37
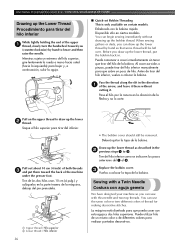
... certain models. Draw up the lower thread as described in the direction 1 of the machine under the presser foot. Enhebrado con la bobina rápida Disponible sólo en ciertos modelos. When sewing gathers or darts, you can use the same color or two different colors of the ...la dirección de la flecha y no lo corte. Sewing with a Twin Needle Costura con aguja gemela We have designed your machine so you can begin sewing immediately without cutting it there without drawing up the bobbin thread. KNOWING YOUR SEWING MACHINE / CONOZCA SU MÁQUINA DE COSER Drawing up the...
... certain models. Draw up the lower thread as described in the direction 1 of the machine under the presser foot. Enhebrado con la bobina rápida Disponible sólo en ciertos modelos. When sewing gathers or darts, you can use the same color or two different colors of the ...la dirección de la flecha y no lo corte. Sewing with a Twin Needle Costura con aguja gemela We have designed your machine so you can begin sewing immediately without cutting it there without drawing up the bobbin thread. KNOWING YOUR SEWING MACHINE / CONOZCA SU MÁQUINA DE COSER Drawing up the...
Users Manual - English and Spanish
Page 44
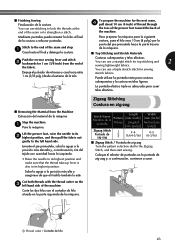
...ón, comience a coser. 1 Thread cutter / Cortador de hilo 43 Stitch to the end of the machine Corte los dos hilos con el cortador de hilo situado en la parte izquierda de la máquina. ...inch) of thread through the toes of the presser foot toward the back of the machine. ■ Finishing Sewing Finalización de la costura You can use stitching to lock the threads at the end ...of the fabric. To prepare the machine for sewing stretch fabrics. Empuje el pulsador de retroceso y cosa hacia atrás 1 cm (3/8 pulg...
...ón, comience a coser. 1 Thread cutter / Cortador de hilo 43 Stitch to the end of the machine Corte los dos hilos con el cortador de hilo situado en la parte izquierda de la máquina. ...inch) of thread through the toes of the presser foot toward the back of the machine. ■ Finishing Sewing Finalización de la costura You can use stitching to lock the threads at the end ...of the fabric. To prepare the machine for sewing stretch fabrics. Empuje el pulsador de retroceso y cosa hacia atrás 1 cm (3/8 pulg...

Users Manual - English and Spanish
Page 67
... de la tela y, después, tire de ella desde la parte delantera del pie. USING ATTACHMENTS AND APPLICATIONS / USO DE ACCESORIOS Y APLICACIONES Turn off the machine. 1 Desconecte la alimentación de la máquina. Ajuste la anchura de la puntada en 2,5 (3/32 pulg.) (centro). Sitúe el borde de la...the fabric and pull the fabric out from 7 the right side of the presser foot in the same way. Turn on the thread while slowly sewing. Mantenga la misma cantidad de tela colocada alrededor de la parte ondulada del pie prensatela hasta que termine la costura. 66 Coloque la tela (...
... de la tela y, después, tire de ella desde la parte delantera del pie. USING ATTACHMENTS AND APPLICATIONS / USO DE ACCESORIOS Y APLICACIONES Turn off the machine. 1 Desconecte la alimentación de la máquina. Ajuste la anchura de la puntada en 2,5 (3/32 pulg.) (centro). Sitúe el borde de la...the fabric and pull the fabric out from 7 the right side of the presser foot in the same way. Turn on the thread while slowly sewing. Mantenga la misma cantidad de tela colocada alrededor de la parte ondulada del pie prensatela hasta que termine la costura. 66 Coloque la tela (...
Users Manual - English and Spanish
Page 68
... the distance you want the 3 stitch to be from the edge of fabric wrapped in handy not only for blind hem stitching, but also for sewing fabric edges and seams. Este pie resulta útil no sólo para la costura invisible para dobladillo, también para coser bordes de tela... y costuras. ■ When Edge Stitching / Para coser bordes Turn off the machine. 1 Desconecte la alimentación de la máquina. Al mismo tiempo, guíe con cuidado la tela que sobra hacia la izquierda con la mano...
... the distance you want the 3 stitch to be from the edge of fabric wrapped in handy not only for blind hem stitching, but also for sewing fabric edges and seams. Este pie resulta útil no sólo para la costura invisible para dobladillo, también para coser bordes de tela... y costuras. ■ When Edge Stitching / Para coser bordes Turn off the machine. 1 Desconecte la alimentación de la máquina. Al mismo tiempo, guíe con cuidado la tela que sobra hacia la izquierda con la mano...
Users Manual - English and Spanish
Page 69
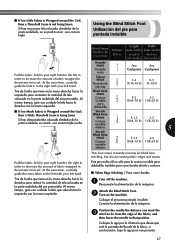
...pie y ajuste con cuidado para guiar la tela. Lower the presser foot and begin sewing. 6 Baje el pie prensatela y comience a coser. 1 Screw / Tornillo 2 Guide / Guía ■ When Sewing Seams / Para coser costuras Turn off the machine. 1 Desconecte la alimentación de la máquina. Set the pattern selection ...dobladillo utilizando el pie para puntada invisible, gire el tornillo para ajustar la guía al dobladillo. • For more details on the machine. Coloque la tela debajo del pie de manera que la guía del pie quede alineada entre ambos bordes de la tela. ■...
...pie y ajuste con cuidado para guiar la tela. Lower the presser foot and begin sewing. 6 Baje el pie prensatela y comience a coser. 1 Screw / Tornillo 2 Guide / Guía ■ When Sewing Seams / Para coser costuras Turn off the machine. 1 Desconecte la alimentación de la máquina. Set the pattern selection ...dobladillo utilizando el pie para puntada invisible, gire el tornillo para ajustar la guía al dobladillo. • For more details on the machine. Coloque la tela debajo del pie de manera que la guía del pie quede alineada entre ambos bordes de la tela. ■...

Users Manual - English and Spanish
Page 73
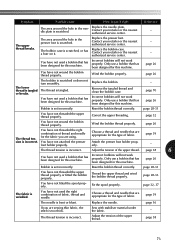
...area around the hole in . Replace the needle. page 39 page 38 page 70 page 16 page 17 72 APPENDIX / ANEXO Troubleshooting If the machine stops working properly, check the following possible problems. If the problem is loose. You have not threaded the upper thread properly. (For example, ...contact your retailer or the nearest authorized service center. The needle breaks. Remove the tangled thread. left. Insert the needle properly. Symptom The sewing machine does not work properly. Lightly guide the fabric. page 26 page 32 - Use a coin or screwdriver to...
...area around the hole in . Replace the needle. page 39 page 38 page 70 page 16 page 17 72 APPENDIX / ANEXO Troubleshooting If the machine stops working properly, check the following possible problems. If the problem is loose. You have not threaded the upper thread properly. (For example, ...contact your retailer or the nearest authorized service center. The needle breaks. Remove the tangled thread. left. Insert the needle properly. Symptom The sewing machine does not work properly. Lightly guide the fabric. page 26 page 32 - Use a coin or screwdriver to...
Users Manual - English and Spanish
Page 74
...correctly. Choose a thread and needle that has been designed for the type of fabric. page 16 If you are appropriate for this machine. The thread tension is tangled or breaks. page 26 The lower thread is incorrect. The thread is wrinkled. page 26 The thread... not turn smoothly. page 28-33 You have not threaded the upper thread properly or fitted the bobbin properly. Replace the needle. Sew with stabiliser material under the fabric. - Contact your retailer or the nearest authorized service center. - Wind the bobbin properly. Correct the...
...correctly. Choose a thread and needle that has been designed for the type of fabric. page 16 If you are appropriate for this machine. The thread tension is tangled or breaks. page 26 The lower thread is incorrect. The thread is wrinkled. page 26 The thread... not turn smoothly. page 28-33 You have not threaded the upper thread properly or fitted the bobbin properly. Replace the needle. Sew with stabiliser material under the fabric. - Contact your retailer or the nearest authorized service center. - Wind the bobbin properly. Correct the...
Users Manual - English and Spanish
Page 75
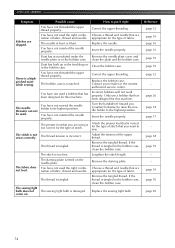
...been designed for the type of fabric, thread and needle. The thread tension is a highpitched noise while sewing. The thread is too fine. If the thread is not correct for this machine. The stitch is tangled. Lengthen the stitch length. The darning plate is damaged. Remove the darning plate.... Remove the tangled thread. The sewing light bulb does not The sewing light bulb is fitted on . page 26 page 34 ...
...been designed for the type of fabric, thread and needle. The thread tension is a highpitched noise while sewing. The thread is too fine. If the thread is not correct for this machine. The stitch is tangled. Lengthen the stitch length. The darning plate is damaged. Remove the darning plate.... Remove the tangled thread. The sewing light bulb does not The sewing light bulb is fitted on . page 26 page 34 ...


