

Users Manual - English and Spanish
Page 4
... threading (for models equipped with a quick-set bobbin 16 Upper threading 17 Using the needle threader (for models equipped with a twin needle (Option 25 Thread tension 27 3. USING ATTACHMENTS AND APPLICATIONS 38 Zipper insertion 38 Gathering 39 Darning 39 Appliqués 39 OPTIONAL ACCESSORIES 40 Using the walking foot 40 Using...
... threading (for models equipped with a quick-set bobbin 16 Upper threading 17 Using the needle threader (for models equipped with a twin needle (Option 25 Thread tension 27 3. USING ATTACHMENTS AND APPLICATIONS 38 Zipper insertion 38 Gathering 39 Darning 39 Appliqués 39 OPTIONAL ACCESSORIES 40 Using the walking foot 40 Using...
Users Manual - English and Spanish
Page 6
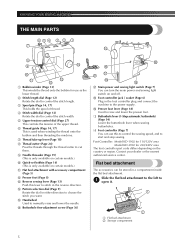
..., 17) This holds the spool of thread. 4 Stitch width dial (Page 12) Rotate the dial to control the stitch width. 5 Upper tension-control dial (Page 27) This controls the tension of the upper thread. 6 Thread guide (Page 14, 17) This is used when winding the thread onto the bobbin and then threading...
..., 17) This holds the spool of thread. 4 Stitch width dial (Page 12) Rotate the dial to control the stitch width. 5 Upper tension-control dial (Page 27) This controls the tension of the upper thread. 6 Thread guide (Page 14, 17) This is used when winding the thread onto the bobbin and then threading...

Users Manual - English and Spanish
Page 15
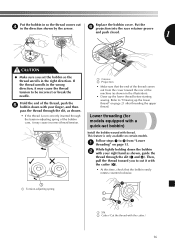
..., until the spring on the shaft slides into the notch of the bobbin. 1 Spring on the spool pin. 1 1 Pull the thread in completely. 1 2 3 1 Pre-tension disk 2 Bobbin winder shaft 3 Bobbin Pull up . Put the bobbin onto the bobbin winder 4 shaft and slide the bobbin winder shaft to 10 cm (3-4 inches... too short, not pulled taut or held at an angle, injuries may occur when the thread is wound around the pre-tension disk and pull the thread in completely. 3 1 2 1 1 Pre-tension disk CAUTION ● If the spool of thread is in the wrong place, or is set incorrectly, the thread may...
..., until the spring on the shaft slides into the notch of the bobbin. 1 Spring on the spool pin. 1 1 Pull the thread in completely. 1 2 3 1 Pre-tension disk 2 Bobbin winder shaft 3 Bobbin Pull up . Put the bobbin onto the bobbin winder 4 shaft and slide the bobbin winder shaft to 10 cm (3-4 inches... too short, not pulled taut or held at an angle, injuries may occur when the thread is wound around the pre-tension disk and pull the thread in completely. 3 1 2 1 1 Pre-tension disk CAUTION ● If the spool of thread is in the wrong place, or is set incorrectly, the thread may...

Users Manual - English and Spanish
Page 16
... before threading the lower thread. • See page 13 for the details about bobbin winding. Raise the needle by sliding it may cause the thread tension to the right. 1 Bobbin cover 15 Then stop the machine. CAUTION ● Not winding the bobbin properly may tangle around the bobbin a few times...
... before threading the lower thread. • See page 13 for the details about bobbin winding. Raise the needle by sliding it may cause the thread tension to the right. 1 Bobbin cover 15 Then stop the machine. CAUTION ● Not winding the bobbin properly may tangle around the bobbin a few times...
Users Manual - English and Spanish
Page 17
... closed. 1 12 CAUTION ● Make sure you to "Drawing up the lower thread before starting sewing. Refer to cut it may cause the thread tension to 4 from the cover toward you set bobbin) Install the bobbin wound with your finger, and then pass the thread through the slit, as shown...2 Cutter (Cut the thread with the cutter.) 16 Follow steps 1 to be incorrect or break the needle. This feature is not correctly inserted through the tension-adjusting spring of the thread, push the 5 bobbin down the bobbin 2 with thread. Put the bobbin in so the thread comes out 4 in the ...
... closed. 1 12 CAUTION ● Make sure you to "Drawing up the lower thread before starting sewing. Refer to cut it may cause the thread tension to 4 from the cover toward you set bobbin) Install the bobbin wound with your finger, and then pass the thread through the slit, as shown...2 Cutter (Cut the thread with the cutter.) 16 Follow steps 1 to be incorrect or break the needle. This feature is not correctly inserted through the tension-adjusting spring of the thread, push the 5 bobbin down the bobbin 2 with thread. Put the bobbin in so the thread comes out 4 in the ...
Users Manual - English and Spanish
Page 18
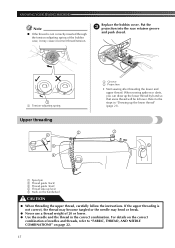
...; If the thread is not correct, the thread may become tangled or the needle may cause incorrect thread tension. Put the 3 projection into the race retainer groove and push closed. 12 1 1 Tension-adjusting spring Upper threading 2 2 3 4 1 Groove 2 Projection • Start sewing after threading the... lower and upper thread. If the upper threading is not correctly inserted through the tension-adjusting spring of the bobbin case, it may bend or break. ● Never use a thread weight of needles and threads, refer to the...
...; If the thread is not correct, the thread may become tangled or the needle may cause incorrect thread tension. Put the 3 projection into the race retainer groove and push closed. 12 1 1 Tension-adjusting spring Upper threading 2 2 3 4 1 Groove 2 Projection • Start sewing after threading the... lower and upper thread. If the upper threading is not correctly inserted through the tension-adjusting spring of the bobbin case, it may bend or break. ● Never use a thread weight of needles and threads, refer to the...

Users Manual - English and Spanish
Page 25
Take your project, and check the thread tension and stitch length and width. b Pull the fabric to the left hand, turn the fabric, lower the presser foot lever, and then continue sewing. 1 1 Presser ...
Take your project, and check the thread tension and stitch length and width. b Pull the fabric to the left hand, turn the fabric, lower the presser foot lever, and then continue sewing. 1 1 Presser ...

Users Manual - English and Spanish
Page 28
... before you start to adjust it when you do a test sample on surface of fabric Solution Increase the tension by turning the upper tension control dial to a higher number. SEWING BASICS Thread tension The tension of the thread will affect the quality of your fabric. 2 1 3 4 1 Surface of fabric 2... Back of fabric 3 Upper thread 4 Lower thread ■ Upper tension is too tight Loops will appear on the surface of the fabric. ■ Upper tension is important as too much or too little tension will weaken your seams or cause puckers on your stitches. You may need to...
... before you start to adjust it when you do a test sample on surface of fabric Solution Increase the tension by turning the upper tension control dial to a higher number. SEWING BASICS Thread tension The tension of the thread will affect the quality of your fabric. 2 1 3 4 1 Surface of fabric 2... Back of fabric 3 Upper thread 4 Lower thread ■ Upper tension is too tight Loops will appear on the surface of the fabric. ■ Upper tension is important as too much or too little tension will weaken your seams or cause puckers on your stitches. You may need to...

Users Manual - English and Spanish
Page 31
... sewn along the bias, with your hands, so that the needle slightly catches the fold of 2 and behind the presser foot. 30 Adjust the thread tension so that it is explained below. ■ Mending Place the reinforcement fabric under the presser foot so 2 that it will be used to sew a picot...
... sewn along the bias, with your hands, so that the needle slightly catches the fold of 2 and behind the presser foot. 30 Adjust the thread tension so that it is explained below. ■ Mending Place the reinforcement fabric under the presser foot so 2 that it will be used to sew a picot...

Users Manual - English and Spanish
Page 40
... assembly and then lower the presser foot lever. USING ATTACHMENTS AND APPLICATIONS Gathering Stitch Name Straight Stitch Pattern 2 Stitch Length [mm (inch)] 4 (3/16) Loosen the tension of the upper thread so 1 that the lower thread lies on the underside of 2 straight stitches. Repeat this motion until the darn section 6 is filled...
... assembly and then lower the presser foot lever. USING ATTACHMENTS AND APPLICATIONS Gathering Stitch Name Straight Stitch Pattern 2 Stitch Length [mm (inch)] 4 (3/16) Loosen the tension of the upper thread so 1 that the lower thread lies on the underside of 2 straight stitches. Repeat this motion until the darn section 6 is filled...
Users Manual - English and Spanish
Page 48
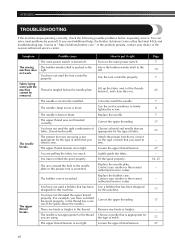
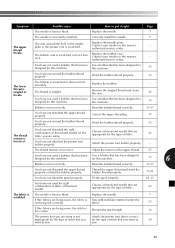
.... Correctly install the needle. Use the oval screwdriver to the left. Correct the upper threading. Loosen the upper thread tension. Visit us at " http://solutions.brother.com ". You have not used the right combination of stitch. The needle is turned off. You have not used ...the foot controller properly. The upper-thread tension is scratched. Loosen the upper thread tension. Contact your dealer or the nearest authorized ...
.... Correctly install the needle. Use the oval screwdriver to the left. Correct the upper threading. Loosen the upper thread tension. Visit us at " http://solutions.brother.com ". You have not used the right combination of stitch. The needle is turned off. You have not used ...the foot controller properly. The upper-thread tension is scratched. Loosen the upper thread tension. Contact your dealer or the nearest authorized ...
Users Manual - English and Spanish
Page 49
...the presser foot is tangled or breaks. thread is scratched. The thread is Sew with stabilizer material under the not being fed correctly. Adjust the tension of the upper thread. 27 You have not used the right combination of fabric, thread and needle. Fit the spool properly. 18, 25 You... stitch length. 12 The presser foot you are using is not Attach the presser foot that you are appropriate for the type of fabric. 22 tension is too coarse. Replace the needle. 7 wrinkled. You have not used a bobbin that has been Use a bobbin that has been designed for designed...
...the presser foot is tangled or breaks. thread is scratched. The thread is Sew with stabilizer material under the not being fed correctly. Adjust the tension of the upper thread. 27 You have not used the right combination of fabric, thread and needle. Fit the spool properly. 18, 25 You... stitch length. 12 The presser foot you are using is not Attach the presser foot that you are appropriate for the type of fabric. 22 tension is too coarse. Replace the needle. 7 wrinkled. You have not used a bobbin that has been Use a bobbin that has been designed for designed...

Users Manual - English and Spanish
Page 50
...) so that you want to sew. Remove the darning plate. The needle has not been raised to put it right Adjust the tension of fabric. The thread tension is bent or blunt. The darning plate is tangled, for the type of the upper thread. The thread is fitted on the wheel...7 45 19 7 - 27 45 - - 22 45 38 49 Attach the presser foot that is not appropriate for the type of stitch. Possible cause The thread tension is tangled in the bobbin case. Replace the needle. Remove the tangle thread. Choose a thread and needle that are using is correct for the type...
...) so that you want to sew. Remove the darning plate. The needle has not been raised to put it right Adjust the tension of fabric. The thread tension is bent or blunt. The darning plate is tangled, for the type of the upper thread. The thread is fitted on the wheel...7 45 19 7 - 27 45 - - 22 45 38 49 Attach the presser foot that is not appropriate for the type of stitch. Possible cause The thread tension is tangled in the bobbin case. Replace the needle. Remove the tangle thread. Choose a thread and needle that are using is correct for the type...

Users Manual - English and Spanish
Page 51
... extra 26 Stitch length dial 12 Stitch width dial 12 Stitches built-in 28 names 10 Straight stitching 28 Stretch stitching 9 T Thread cutter 24 Thread tension 27 , Threading lower 15 16 needle threader 19 twin needle 26 upper 17 Triple zigzag stretch stitching 33 Troubleshooting 47 , Twin needle attaching 8 25 sewing...
... extra 26 Stitch length dial 12 Stitch width dial 12 Stitches built-in 28 names 10 Straight stitching 28 Stretch stitching 9 T Thread cutter 24 Thread tension 27 , Threading lower 15 16 needle threader 19 twin needle 26 upper 17 Triple zigzag stretch stitching 33 Troubleshooting 47 , Twin needle attaching 8 25 sewing...


