

Thread Tensions - English
Page 3
... inside the knob, is even with the step inside the knob where the screw threads start . Pre-tensioners !" What are they for individual needle tail lengths. !" How do you have to turn at a time. Adjust by turning the knob until the top of the knob is flush...them ? If you adjust them ? If the tails are they for the troublesome needle or change out the needle. • How do you adjust them ? For bobbin thread showing on the machine head. !" What are they for individual needle tail lengths during trims. !" At install, after bobbin has been cleaned and ...
... inside the knob, is even with the step inside the knob where the screw threads start . Pre-tensioners !" What are they for individual needle tail lengths. !" How do you have to turn at a time. Adjust by turning the knob until the top of the knob is flush...them ? If you adjust them ? If the tails are they for the troublesome needle or change out the needle. • How do you adjust them ? For bobbin thread showing on the machine head. !" What are they for individual needle tail lengths during trims. !" At install, after bobbin has been cleaned and ...
Rotary Hook Scratches - English
Page 1
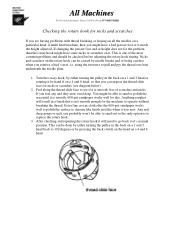
... back to pull and pry the thread out from underneath the needle plate. 1. If you probably won't be done by either turning the pulley in the back on a 1 and 3 head or rotating it by pressing the back switch on the head on a 4 and 6 head, so that is not smooth enough for the machine to... Free 1-877-4BROTHER Checking the rotary hook for nicks and scratches If you are having problems with thread breaking or fraying on all the needles on a particular head, if multi head machine, then you can inspect the thread slide face for nicks or scratches (see if it is one of scratches and nicks.
... back to pull and pry the thread out from underneath the needle plate. 1. If you probably won't be done by either turning the pulley in the back on a 1 and 3 head or rotating it by pressing the back switch on the head on a 4 and 6 head, so that is not smooth enough for the machine to... Free 1-877-4BROTHER Checking the rotary hook for nicks and scratches If you are having problems with thread breaking or fraying on all the needles on a particular head, if multi head machine, then you can inspect the thread slide face for nicks or scratches (see if it is one of scratches and nicks.
Tubular to Cap - English
Page 1
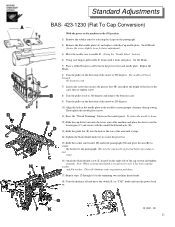
...(J) located on the right side of the arm until it locks into place. Then tighten the needle plate screws. 11) Press the "Thread Trimming" button on the control panel. Repeat All Heads. 6) Turn the pulley in the ON position. 1) Remove the tubular arms by releasing the ...heads heads. 18) Turn the machine off and move the switch (L) to the machine in the direction of the machine and place the driver over the locator pins (C) and secure with the Cap needle plate. This will lower through 16 for later adjustment). 3) Move the needle case to 200 degrees. Standard Adjustments BAS- 423...
...(J) located on the right side of the arm until it locks into place. Then tighten the needle plate screws. 11) Press the "Thread Trimming" button on the control panel. Repeat All Heads. 6) Turn the pulley in the ON position. 1) Remove the tubular arms by releasing the ...heads heads. 18) Turn the machine off and move the switch (L) to the machine in the direction of the machine and place the driver over the locator pins (C) and secure with the Cap needle plate. This will lower through 16 for later adjustment). 3) Move the needle case to 200 degrees. Standard Adjustments BAS- 423...
Cap to Tubular - English
Page 1
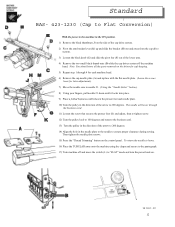
Standard BAS- 423-1230 (Cap to Flat Conversion) With the power to ensure proper clearance during sewing. The needle will lower through 4 for each machine head. 6) Remove the cap needle plate (A) and replace with the flat needle plate. (Leave the screws loose for safe keeping. 5) Repeat step 1 through the business ...16) Place the TUBULAR arms onto the machine using the clasps and secure to the pantograph. 17) Turn machine off the machine head. Then tighten the needle plate screws. 15) Press the "Thread Trimming" button on . Note: You should store all the parts removed on the driver...
Standard BAS- 423-1230 (Cap to Flat Conversion) With the power to ensure proper clearance during sewing. The needle will lower through 4 for each machine head. 6) Remove the cap needle plate (A) and replace with the flat needle plate. (Leave the screws loose for safe keeping. 5) Repeat step 1 through the business ...16) Place the TUBULAR arms onto the machine using the clasps and secure to the pantograph. 17) Turn machine off the machine head. Then tighten the needle plate screws. 15) Press the "Thread Trimming" button on . Note: You should store all the parts removed on the driver...


