User Guide
Page 6
...this Product (including but not limited to damage resulting from use of non Brother®-brand parts and Consumable and Accessory Items); (4)Consumable and Accessory Items that you purchased is...the original purchase date. • Accompanying Consumable and Accessories Items have a one-stage warranty: 90 days from Brother and/or alteration/removal of the serial number). For the name of ... site at 1-800-284-4329 or a Brother Authorized Service Center within the U.S. Brother® Three-Year Limited Warranty and Exchange Service For DCP-8020 and DCP-8025D (USA only) Who is covered: •...
...this Product (including but not limited to damage resulting from use of non Brother®-brand parts and Consumable and Accessory Items); (4)Consumable and Accessory Items that you purchased is...the original purchase date. • Accompanying Consumable and Accessories Items have a one-stage warranty: 90 days from Brother and/or alteration/removal of the serial number). For the name of ... site at 1-800-284-4329 or a Brother Authorized Service Center within the U.S. Brother® Three-Year Limited Warranty and Exchange Service For DCP-8020 and DCP-8025D (USA only) Who is covered: •...
User Guide
Page 7
... returned to you freight prepaid or made available for you . Brother reserves the right to supply a refurbished or remanufactured replacement Machine and/or accompanying Consumable and Accessory Item(s) and use refurbished parts provided such refurbished parts conform to the manufacturer's specifications for new product/parts. DCP LIMITED WARRANTY (USA) v The foregoing are not covered by...
... returned to you freight prepaid or made available for you . Brother reserves the right to supply a refurbished or remanufactured replacement Machine and/or accompanying Consumable and Accessory Item(s) and use refurbished parts provided such refurbished parts conform to the manufacturer's specifications for new product/parts. DCP LIMITED WARRANTY (USA) v The foregoing are not covered by...
User Guide
Page 9
... laser products: Failure to remove the Toner Cartridge (and Toner Drum Unit on applicable models) during shipping will cause severe damage to the DCP/Facsimile and will VOID your warranty. (Refer to your Proof of Purchase in the form of a Sales Receipt. Neither Brother ... LIMITED WARRANTY (Canada only) Pursuant to this limited warranty of 1 year from the date of purchase for labour and parts, Brother International Corporation (Canada) Ltd. ("Brother"), or its Authorized Service Centers, Distributors, Dealers, Agents or employees, shall create another warranty or modify this warranty. No...
... laser products: Failure to remove the Toner Cartridge (and Toner Drum Unit on applicable models) during shipping will cause severe damage to the DCP/Facsimile and will VOID your warranty. (Refer to your Proof of Purchase in the form of a Sales Receipt. Neither Brother ... LIMITED WARRANTY (Canada only) Pursuant to this limited warranty of 1 year from the date of purchase for labour and parts, Brother International Corporation (Canada) Ltd. ("Brother"), or its Authorized Service Centers, Distributors, Dealers, Agents or employees, shall create another warranty or modify this warranty. No...

User Guide
Page 10
...have unplugged the power cord from the power outlet. To prevent injuries, be careful not to put your hands on the edge of the DCP under the document cover. viii To prevent injuries, be careful not to put your fingers in the area shown in the illustration. Before you ... Save these instructions for later reference. Doing this might cause an electrical shock. Safety precautions To use the DCP, some internal parts are high voltage electrodes inside the DCP. Do not handle the plug with wet hands. To prevent injuries, be careful not to put your fingers in the area shown in...
...have unplugged the power cord from the power outlet. To prevent injuries, be careful not to put your hands on the edge of the DCP under the document cover. viii To prevent injuries, be careful not to put your fingers in the area shown in the illustration. Before you ... Save these instructions for later reference. Doing this might cause an electrical shock. Safety precautions To use the DCP, some internal parts are high voltage electrodes inside the DCP. Do not handle the plug with wet hands. To prevent injuries, be careful not to put your fingers in the area shown in...

User Guide
Page 13
...Introduction 1-1 Using this Guide 1-1 Finding information 1-1 Symbols used in this Guide 1-1 On-line Registration (USA and Canada 1-2 DCP part names and operations 1-3 Control panel overview 1-6 Status LED indications 1-8 Inserting originals for copying (and scanning 1-10 Using the ADF... paper or other media in the manual feed tray (For DCP-8020 2-7 To load paper or other media in the multi-purpose tray (MP tray) (For DCP-8025D 2-9 To use Automatic Duplexing for copy and print operations (For DCP-8025D 2-11 3 On-screen programming 3-1 User-friendly programming 3-1...
...Introduction 1-1 Using this Guide 1-1 Finding information 1-1 Symbols used in this Guide 1-1 On-line Registration (USA and Canada 1-2 DCP part names and operations 1-3 Control panel overview 1-6 Status LED indications 1-8 Inserting originals for copying (and scanning 1-10 Using the ADF... paper or other media in the manual feed tray (For DCP-8020 2-7 To load paper or other media in the multi-purpose tray (MP tray) (For DCP-8025D 2-9 To use Automatic Duplexing for copy and print operations (For DCP-8025D 2-11 3 On-screen programming 3-1 User-friendly programming 3-1...
User Guide
Page 23
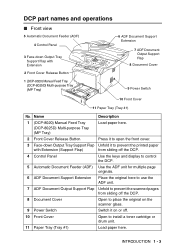
...DCP part names and operations ■ Front view 5 Automatic Document Feeder (ADF) 4 Control Panel 3 Face-down Output Tray Support Flap Unfold it on the scanner glass. 9 Power Switch Switch it to install a toner cartridge or drum unit. 11 Paper Tray (Tray #1) Load paper here. Name Description 1 (DCP-8020) Manual Feed Tray (DCP-8025D...off. 10 Front Cover Open to prevent the printed paper with Extension 2 Front Cover Release Button 1 (DCP-8020) Manual Feed Tray (DCP-8025D) Multi-purpose Tray (MP Tray) 6 ADF Document Support Extension 7 ADF Document Output Support Flap 8 ...
...DCP part names and operations ■ Front view 5 Automatic Document Feeder (ADF) 4 Control Panel 3 Face-down Output Tray Support Flap Unfold it on the scanner glass. 9 Power Switch Switch it to install a toner cartridge or drum unit. 11 Paper Tray (Tray #1) Load paper here. Name Description 1 (DCP-8020) Manual Feed Tray (DCP-8025D...off. 10 Front Cover Open to prevent the printed paper with Extension 2 Front Cover Release Button 1 (DCP-8020) Manual Feed Tray (DCP-8025D) Multi-purpose Tray (MP Tray) 6 ADF Document Support Extension 7 ADF Document Output Support Flap 8 ...
User Guide
Page 34
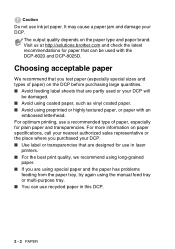
... Visit us at http://solutions.brother.com and check the latest recommendations ...DCP. ■ Use label or transparencies that are partly used or your nearest authorized sales representative or the place where you are designed for plain paper and transparencies. Caution Do not use recycled paper in laser...DCP. The output quality depends on the DCP before purchasing large quantities. ■ Avoid feeding label sheets that are using special paper and the paper has problems feeding from the paper tray, try again using preprinted or highly textured paper, or paper with the DCP-8020 and DCP-8025D...
... Visit us at http://solutions.brother.com and check the latest recommendations ...DCP. ■ Use label or transparencies that are partly used or your nearest authorized sales representative or the place where you are designed for plain paper and transparencies. Caution Do not use recycled paper in laser...DCP. The output quality depends on the DCP before purchasing large quantities. ■ Avoid feeding label sheets that are using special paper and the paper has problems feeding from the paper tray, try again using preprinted or highly textured paper, or paper with the DCP-8020 and DCP-8025D...

User Guide
Page 185
Click on Link Preferences and select the destination Application from the OCR pull down list if another OCR application from the scroll menu on you system. You can also choose another is installed as part of the PaperPort 8.0 application. ScanSoft® TextBridge® is installed on the left. OCR: Select the destination word processing application program from the File Type pull down list. Select the File Type from the pull down list. USING THE WINDOWS®-BASED BROTHER SMARTUI CONTROL CENTER (FOR WINDOWS® XP) 10 - 30
Click on Link Preferences and select the destination Application from the OCR pull down list if another OCR application from the scroll menu on you system. You can also choose another is installed as part of the PaperPort 8.0 application. ScanSoft® TextBridge® is installed on the left. OCR: Select the destination word processing application program from the File Type pull down list. Select the File Type from the pull down list. USING THE WINDOWS®-BASED BROTHER SMARTUI CONTROL CENTER (FOR WINDOWS® XP) 10 - 30

User Guide
Page 218
...and can be determined by turning the equipment off and on, the user is encouraged to try to correct the interference by one or more of the following two conditions: (1) This device may not cause harmful interference, and (2) this equipment does cause ...13 Important information Federal Communications Commission (FCC) Declaration of Conformity (USA only) Responsible Party: Brother International Corporation 100 Somerset Corporate Boulevard Bridgewater, NJ 08807-0911 USA TEL: (908) 704-1700 declares, that the products Product Name: DCP-8020, DCP-8025D comply with Part 15 of the FCC Rules.
...and can be determined by turning the equipment off and on, the user is encouraged to try to correct the interference by one or more of the following two conditions: (1) This device may not cause harmful interference, and (2) this equipment does cause ...13 Important information Federal Communications Commission (FCC) Declaration of Conformity (USA only) Responsible Party: Brother International Corporation 100 Somerset Corporate Boulevard Bridgewater, NJ 08807-0911 USA TEL: (908) 704-1700 declares, that the products Product Name: DCP-8020, DCP-8025D comply with Part 15 of the FCC Rules.

User Guide
Page 222
Internal laser radiation Max. WARNING Changes or modifications not expressly approved by Brother Industries, Ltd. Radiation Power Wave Length Laser Class 5 mW 760 - 810 nm Class IIIb (Accordance with 21 CFR Part 1040.10) 13 - 5 IMPORTANT INFORMATION may void the user's authority to operate the equipment.
Internal laser radiation Max. WARNING Changes or modifications not expressly approved by Brother Industries, Ltd. Radiation Power Wave Length Laser Class 5 mW 760 - 810 nm Class IIIb (Accordance with 21 CFR Part 1040.10) 13 - 5 IMPORTANT INFORMATION may void the user's authority to operate the equipment.

User Guide
Page 224
... basement. ■ Use only the power cord indicated in this product through cabinet slots, since they may touch dangerous voltage points or short out parts resulting in performance, indicating a need for service. 15 To protect your warranty. 13 Never push objects of any kind on page i.) 14 Unplug... this product from the wall outlet and refer servicing to a Brother Authorized Service Center under the following : ■ Do not use this product near appliances that are followed. Never spill liquid of any kind ...
... basement. ■ Use only the power cord indicated in this product through cabinet slots, since they may touch dangerous voltage points or short out parts resulting in performance, indicating a need for service. 15 To protect your warranty. 13 Never push objects of any kind on page i.) 14 Unplug... this product from the wall outlet and refer servicing to a Brother Authorized Service Center under the following : ■ Do not use this product near appliances that are followed. Never spill liquid of any kind ...

User Guide
Page 230
... in this section. HOT! This helps prevent multiple sheets of the upper paper tray. ■ Always remove all paper from feeding through the DCP at one time and reduces paper jams. 14 - 5 TROUBLESHOOTING AND ROUTINE MAINTENANCE Paper jams To clear paper jams, please follow the steps in the following... tray unit, check for correct installation of paper from the paper tray and straighten the stack when you have just used the DCP, some parts inside the DCP are extremely hot. Front view Back view Clear the jammed paper as follows. HOT! WARNING After you add new paper.
... in this section. HOT! This helps prevent multiple sheets of the upper paper tray. ■ Always remove all paper from feeding through the DCP at one time and reduces paper jams. 14 - 5 TROUBLESHOOTING AND ROUTINE MAINTENANCE Paper jams To clear paper jams, please follow the steps in the following... tray unit, check for correct installation of paper from the paper tray and straighten the stack when you have just used the DCP, some parts inside the DCP are extremely hot. Front view Back view Clear the jammed paper as follows. HOT! WARNING After you add new paper.

User Guide
Page 233
Close the back output tray. TROUBLESHOOTING AND ROUTINE MAINTENANCE 14 - 8 Pull the jammed paper out of the DCP are extremely HOT! WARNING After you touch the internal parts of the DCP. Wait for the DCP to cool down before you have just used the DCP, some internal parts of the fuser unit. Jam Clear Cover (Fuser Cover) 7 Close the jam clear cover. HOT! Back view 6 Open the jam clear cover (fuser cover).
Close the back output tray. TROUBLESHOOTING AND ROUTINE MAINTENANCE 14 - 8 Pull the jammed paper out of the DCP are extremely HOT! WARNING After you touch the internal parts of the DCP. Wait for the DCP to cool down before you have just used the DCP, some internal parts of the fuser unit. Jam Clear Cover (Fuser Cover) 7 Close the jam clear cover. HOT! Back view 6 Open the jam clear cover (fuser cover).
User Guide
Page 245
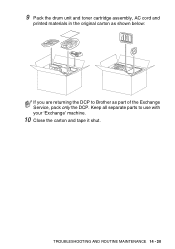
9 Pack the drum unit and toner cartridge assembly, AC cord and printed materials in the original carton as shown below: If you are returning the DCP to use with your 'Exchange' machine. 10 Close the carton and tape it shut. TROUBLESHOOTING AND ROUTINE MAINTENANCE 14 - 20 Keep all separate parts to Brother as part of the Exchange Service, pack only the DCP.
9 Pack the drum unit and toner cartridge assembly, AC cord and printed materials in the original carton as shown below: If you are returning the DCP to use with your 'Exchange' machine. 10 Close the carton and tape it shut. TROUBLESHOOTING AND ROUTINE MAINTENANCE 14 - 20 Keep all separate parts to Brother as part of the Exchange Service, pack only the DCP.

User Guide
Page 247
...after you open the front cover. 2 Remove the drum unit and toner cartridge assembly. When you have used the DCP, some internal parts of the DCP, never touch the shaded parts shown in the diagram below. It may crack the panel. ■ Do not use isopropyl alcohol to remove dirt ...from the control panel. Laser Scanner Window TROUBLESHOOTING AND ROUTINE MAINTENANCE 14 - 22 Do not use isoproply alcohol. Front view ...
...after you open the front cover. 2 Remove the drum unit and toner cartridge assembly. When you have used the DCP, some internal parts of the DCP, never touch the shaded parts shown in the diagram below. It may crack the panel. ■ Do not use isopropyl alcohol to remove dirt ...from the control panel. Laser Scanner Window TROUBLESHOOTING AND ROUTINE MAINTENANCE 14 - 22 Do not use isoproply alcohol. Front view ...

User Guide
Page 250
How to replace the toner cartridge WARNING Just after you use the DCP, some internal parts of the machine will be extremely HOT! HOT! 1 Open the front cover and pull out the drum unit. 14 - 25 TROUBLESHOOTING AND ROUTINE MAINTENANCE So, never touch the shaded parts shown in the illustration.
How to replace the toner cartridge WARNING Just after you use the DCP, some internal parts of the machine will be extremely HOT! HOT! 1 Open the front cover and pull out the drum unit. 14 - 25 TROUBLESHOOTING AND ROUTINE MAINTENANCE So, never touch the shaded parts shown in the illustration.

User Guide
Page 256
HOT! Follow these steps to avoid scattering toner. 14 - 31 TROUBLESHOOTING AND ROUTINE MAINTENANCE Place it on a drop cloth or disposable paper to replace the drum unit: 1 Press the cover release button and then open the front cover. 2 Remove the old drum unit and toner cartridge assembly. So please be careful. WARNING Just after you have used the DCP, some internal parts of the DCP are extremely HOT!
HOT! Follow these steps to avoid scattering toner. 14 - 31 TROUBLESHOOTING AND ROUTINE MAINTENANCE Place it on a drop cloth or disposable paper to replace the drum unit: 1 Press the cover release button and then open the front cover. 2 Remove the old drum unit and toner cartridge assembly. So please be careful. WARNING Just after you have used the DCP, some internal parts of the DCP are extremely HOT!


