

Users Manual - English
Page 2
... of motor 4 Opening and closing the front cover 4 Operating 5 4116, Changing light bulb Motor 5 6 Threading 7 Preparation 7 How to use thread spool cap 7 How to use net 7 Threading overlooper 8 Threading underlooper 9 Threading right needle 10 Threading left needle 11 Test-sewing 12 Chaining-off 12 Ratio Chart of Sewing Material... 17 Instruction for differential feed mechanism 18 Sewing 20 To start sewing 20 To remove work 20 If threads break during sewing 20 To sew thick material 21 Presser foot pressure 21 Fault-finding 22 Stitch Selection 23...
... of motor 4 Opening and closing the front cover 4 Operating 5 4116, Changing light bulb Motor 5 6 Threading 7 Preparation 7 How to use thread spool cap 7 How to use net 7 Threading overlooper 8 Threading underlooper 9 Threading right needle 10 Threading left needle 11 Test-sewing 12 Chaining-off 12 Ratio Chart of Sewing Material... 17 Instruction for differential feed mechanism 18 Sewing 20 To start sewing 20 To remove work 20 If threads break during sewing 20 To sew thick material 21 Presser foot pressure 21 Fault-finding 22 Stitch Selection 23...

Users Manual - English
Page 3
Names of parts and their functions TImeed holder Randle Prawns LOW/6W use !keel pin Reel support -\\ Thread tdctop - Upper thread tension d'• Upper thread tension dial 4 Presser foot lifting levet N.- as ------- •ei d• • -- &SID Needle • --UPPP brads presser foot / it faatesisi gape COSH / Spool stand ..." Pulley Lover Inc/ tension dla. L___Lower thread tenion dial .R_e._n.t.c.o.v-erMaterial slick Moto (for overlook stitch) - . - I I ..
Names of parts and their functions TImeed holder Randle Prawns LOW/6W use !keel pin Reel support -\\ Thread tdctop - Upper thread tension d'• Upper thread tension dial 4 Presser foot lifting levet N.- as ------- •ei d• • -- &SID Needle • --UPPP brads presser foot / it faatesisi gape COSH / Spool stand ..." Pulley Lover Inc/ tension dla. L___Lower thread tenion dial .R_e._n.t.c.o.v-erMaterial slick Moto (for overlook stitch) - . - I I ..

Users Manual - English
Page 4
Accessories • Soft cover Rolled Hemming Stitch Attachment G.) (Rolled hemming stitch presser foot) (Rolled hemming stitch needle plate) -)j Cleaning brush Accessory bag Tweezers IP& Net 4 pcs Thread spool cap 4 pcs Screw driver wrracs Needle set: #14 Standard needle: 2 pcs. #11 Ball point needle: 2 pcs. - 2- Hexagonal wrench
Accessories • Soft cover Rolled Hemming Stitch Attachment G.) (Rolled hemming stitch presser foot) (Rolled hemming stitch needle plate) -)j Cleaning brush Accessory bag Tweezers IP& Net 4 pcs Thread spool cap 4 pcs Screw driver wrracs Needle set: #14 Standard needle: 2 pcs. #11 Ball point needle: 2 pcs. - 2- Hexagonal wrench

Users Manual - English
Page 6
Note: When sewing, ensure that the front cover is necessary to the counter-clockwise direction of arrow), as opposed to open the front cover. Turning direction of motor Pulley *The motor of this machine turns in a clockwise direction (direction of an ordinary domestic sewing machine. Opening and closing the front cover When threading, it is closed. - 4-
Note: When sewing, ensure that the front cover is necessary to the counter-clockwise direction of arrow), as opposed to open the front cover. Turning direction of motor Pulley *The motor of this machine turns in a clockwise direction (direction of an ordinary domestic sewing machine. Opening and closing the front cover When threading, it is closed. - 4-

Users Manual - English
Page 8
... motor is quite fast compared to the normal operating speed of 300 to adversely affect its performance. tr Continuous operation of no significance. CAUTION WHEN THREADING, REPLACING NEEDLE, OR WHEN MACHINE IS NOT IN USE, IT IS RECOMMENDED THAT THE ELECTRIC SUPPLY PLUG IS DISCONNECTED TO AVOID ANY POSSIBLE HAZARDS. 1 - 6- NOTES...
... motor is quite fast compared to the normal operating speed of 300 to adversely affect its performance. tr Continuous operation of no significance. CAUTION WHEN THREADING, REPLACING NEEDLE, OR WHEN MACHINE IS NOT IN USE, IT IS RECOMMENDED THAT THE ELECTRIC SUPPLY PLUG IS DISCONNECTED TO AVOID ANY POSSIBLE HAZARDS. 1 - 6- NOTES...

Users Manual - English
Page 9
... spool pin right up and set it by the positioning stopper at the joint of the upper and lower sections of the spool, see illustration. Thread Thread tension discs Adapt the net to the shape of the pin. How to use net If you are right above the reel support. 47...$ Thread holder, Correct position Incorrect position 1 I t Reel pin How to use thread spool cap When you cover the spool with the net supplied to the right. Make sure that the...
... spool pin right up and set it by the positioning stopper at the joint of the upper and lower sections of the spool, see illustration. Thread Thread tension discs Adapt the net to the shape of the pin. How to use net If you are right above the reel support. 47...$ Thread holder, Correct position Incorrect position 1 I t Reel pin How to use thread spool cap When you cover the spool with the net supplied to the right. Make sure that the...

Users Manual - English
Page 10
THREADING Threading overlooper * Run the thread in the sequence illustrated. This may be caused by turning the pulley, remove the underlooper thread from the looper. If this happens, lower the overlooper by the underlooper thread getting caught on the overlooper. Soo 0 O 0 oq 0 0 O • 0• 1 .OO oe C., 6.1 - 8 -- oCC) oCCI O 8 8 0110 0•0 Pull the thread about 15 cm (6 inches) from overlooper and re-thread the overlooper. NOTE overlooper thread breaks during sewing.
THREADING Threading overlooper * Run the thread in the sequence illustrated. This may be caused by turning the pulley, remove the underlooper thread from the looper. If this happens, lower the overlooper by the underlooper thread getting caught on the overlooper. Soo 0 O 0 oq 0 0 O • 0• 1 .OO oe C., 6.1 - 8 -- oCC) oCCI O 8 8 0110 0•0 Pull the thread about 15 cm (6 inches) from overlooper and re-thread the overlooper. NOTE overlooper thread breaks during sewing.

Users Manual - English
Page 11
... the needles. Then re-thread the underlooper. Before re-threading the underlooper, cut and remove thread from the looper. •oo 0o 0 0010 ao Thread tension discs 0 0 NOTE If underlooper thread breaks during sewing. The machine will not operate properly if threading is done exactly as diagrammed above. IP Threading underlooper * Run the thread in the sequence illustrated...
... the needles. Then re-thread the underlooper. Before re-threading the underlooper, cut and remove thread from the looper. •oo 0o 0 0010 ao Thread tension discs 0 0 NOTE If underlooper thread breaks during sewing. The machine will not operate properly if threading is done exactly as diagrammed above. IP Threading underlooper * Run the thread in the sequence illustrated...

Users Manual - English
Page 12
Threading right needle * Run the thread in the sequence illustrated. 8 8 0 o=1 O1= O o O O OO 0 8l 8 O O OO 0 - 10 - CAUTION Thread the needles after threading of underlooper and overlooper.
Threading right needle * Run the thread in the sequence illustrated. 8 8 0 o=1 O1= O o O O OO 0 8l 8 O O OO 0 - 10 - CAUTION Thread the needles after threading of underlooper and overlooper.

Users Manual - English
Page 13
Threading left needle M546/M546D * Run the thread in the sequence illustrated. 0 JO94 0 8 8 ocm OL o O 0 0000 Jo 0 8 lu 8 et O 10 Kim O O 0
Threading left needle M546/M546D * Run the thread in the sequence illustrated. 0 JO94 0 8 8 ocm OL o O 0 0000 Jo 0 8 lu 8 et O 10 Kim O O 0

Users Manual - English
Page 14
... your left hand, turn the pulley slowly a few times in a clockwise direction with your right hand, and observe how the threads entwine themselves into a chain automatically. Chaining-off * After test-sewing, hold the foot control depressed slightly and chain off will entwine themselves before starting sewing. ...
... your left hand, turn the pulley slowly a few times in a clockwise direction with your right hand, and observe how the threads entwine themselves into a chain automatically. Chaining-off * After test-sewing, hold the foot control depressed slightly and chain off will entwine themselves before starting sewing. ...

Users Manual - English
Page 15
... 2.0-3.0 Smaller than 2.0 2.5-3.5 3.0-4.0 Spun : #80 Cotton : #80.100 Silk : #80.100 TE x 1 D(#B11x) 1 (#9 or #11) Needle thread Tetron : #80 Nylon : #80 Looper thread Tetron : #80 Nylon : #80 Wooly nyron thread TE x 1 (#11) DB x 1 (#9 or #11) Spun : #60.80 Cotton : 450.80 Silk : #50.80 Nylon : #50.80 Tetron : #50.80 TE x 1 (#11 or #14...
... 2.0-3.0 Smaller than 2.0 2.5-3.5 3.0-4.0 Spun : #80 Cotton : #80.100 Silk : #80.100 TE x 1 D(#B11x) 1 (#9 or #11) Needle thread Tetron : #80 Nylon : #80 Looper thread Tetron : #80 Nylon : #80 Wooly nyron thread TE x 1 (#11) DB x 1 (#9 or #11) Spun : #60.80 Cotton : 450.80 Silk : #50.80 Nylon : #50.80 Tetron : #50.80 TE x 1 (#11 or #14...
Users Manual - English
Page 16
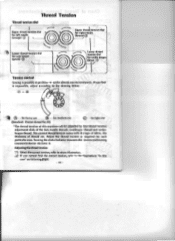
... and turning counterclockwise slackens it impossible, adjust according to the illustrations "In this machine can be adjusted by four thread tension adjustment dials of the two needle threads, overlooper thread and underlooper thread. Adjusting the thread tension (1) Select the correct tension, refer to above illustration, (2) If you find the correct tension, refer to the drawing...
... and turning counterclockwise slackens it impossible, adjust according to the illustrations "In this machine can be adjusted by four thread tension adjustment dials of the two needle threads, overlooper thread and underlooper thread. Adjusting the thread tension (1) Select the correct tension, refer to above illustration, (2) If you find the correct tension, refer to the drawing...

Users Manual - English
Page 17
... thread is tight. Underlooper thread is slack. Reverse Left needle thread Left needle thread is slack. Chart of Thread Tension Adjustment In this case... Overlooper thread is slack. f , s. . 14 .., - 15 - Underlooper thread is tight. Right needle thread is slack. Surface Reverse Right needle / thread Right needle thread is slack. .r Left needle thread is tigh Surface Reverse Underlooper thread r ooper thread Surface Reverse Underlooper thread...
... thread is tight. Underlooper thread is slack. Reverse Left needle thread Left needle thread is slack. Chart of Thread Tension Adjustment In this case... Overlooper thread is slack. f , s. . 14 .., - 15 - Underlooper thread is tight. Right needle thread is slack. Surface Reverse Right needle / thread Right needle thread is slack. .r Left needle thread is tigh Surface Reverse Underlooper thread r ooper thread Surface Reverse Underlooper thread...

Users Manual - English
Page 18
...) Slacken right needle thread (brown) Slacken overlooper thread (green) Tighten underlooper thread (blue) Tighten overlooper thread (green) Slacken underlooper thread (blue) Tighten underlooper thread (blue) Tighten overlooper thread (green) Correct thread tension NOTE Order of thread tension adjustment When you adjust the thread tension, do it in the following order; 1) Left needle thread 2) Right needle thread 3) Overlooper thread 4) Underlooper thread This is the easiest...
...) Slacken right needle thread (brown) Slacken overlooper thread (green) Tighten underlooper thread (blue) Tighten overlooper thread (green) Slacken underlooper thread (blue) Tighten underlooper thread (blue) Tighten overlooper thread (green) Correct thread tension NOTE Order of thread tension adjustment When you adjust the thread tension, do it in the following order; 1) Left needle thread 2) Right needle thread 3) Overlooper thread 4) Underlooper thread This is the easiest...
Users Manual - English
Page 22
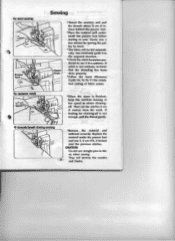
...sewing. - 20 - If stitch is not uniform, re-check that the threading has been done properly. * Follow the Seam Allowance Guide (3/8, 1/2, 5/8, 1") for chaining-off . r off is not enough, pull the thread gently. (1 If threads break during sewing * Remove the material and rethread correctly. Slowly sew a... few stitches by turning the pulley by hand. *The fabric will destroy the needles and blades. c25 Upper blade *Thread the machine and pull the threads about 15 cm (6 inches) behind the presser foot. * Place the material well underneath the presser foot before starting to...
...sewing. - 20 - If stitch is not uniform, re-check that the threading has been done properly. * Follow the Seam Allowance Guide (3/8, 1/2, 5/8, 1") for chaining-off . r off is not enough, pull the thread gently. (1 If threads break during sewing * Remove the material and rethread correctly. Slowly sew a... few stitches by turning the pulley by hand. *The fabric will destroy the needles and blades. c25 Upper blade *Thread the machine and pull the threads about 15 cm (6 inches) behind the presser foot. * Place the material well underneath the presser foot before starting to...

Users Manual - English
Page 23
... break and skip stitches. (3) Blunt blades will not cut a clean seam, and also cause the fabric to facilitate sewing curves. (2) Slacken the thread tension, but remember that if the tension is necessary except when sewing very heavy or very light materials. Then, start sewing. * Do not lift the ...
... break and skip stitches. (3) Blunt blades will not cut a clean seam, and also cause the fabric to facilitate sewing curves. (2) Slacken the thread tension, but remember that if the tension is necessary except when sewing very heavy or very light materials. Then, start sewing. * Do not lift the ...

Users Manual - English
Page 24
... in the absence of basic adjustments. Fit needles correctly. (See page 3.) 3. and remove tangled thread. 3. Skipped stitches. 1. Improper threading. Check spool pin, thread holders, etc. Improper threading. Fabric 1. Fit needles correctly. (See page 3.) 5. Trouble Cause Remedy 1. Material pulled forcibly. Thread tangled. Thread correctly. (See pages 7-11.) 5. Wrong needle used . adjusted properly. Fault-finding This sewing machine...
... in the absence of basic adjustments. Fit needles correctly. (See page 3.) 3. and remove tangled thread. 3. Skipped stitches. 1. Improper threading. Check spool pin, thread holders, etc. Improper threading. Fabric 1. Fit needles correctly. (See page 3.) 5. Trouble Cause Remedy 1. Material pulled forcibly. Thread tangled. Thread correctly. (See pages 7-11.) 5. Wrong needle used . adjusted properly. Fault-finding This sewing machine...

Users Manual - English
Page 25
...Take off left needle, producing 5 mm seams, which will fit all kinds of stitches in simple steps as follows; 1. Three-thread overlock stitch (2.8 mm/ 3/16 inch) Use three threads and right needle, producing 2.8 nnm, (3/-io inch) seams. Use: For overlock stitching and sewing suits, blouses, slacks, ... can form five kinds of materials. Note: Take off right needle when sewing this overlock stitch. 4. ments. 2. Three-thread overlock stitch (5 mm/ 14/ inch) Use three threads and left needle when sewing this overlock stitch. 3. Narrow/Rolled hemming stitches -23- Four...
...Take off left needle, producing 5 mm seams, which will fit all kinds of stitches in simple steps as follows; 1. Three-thread overlock stitch (2.8 mm/ 3/16 inch) Use three threads and right needle, producing 2.8 nnm, (3/-io inch) seams. Use: For overlock stitching and sewing suits, blouses, slacks, ... can form five kinds of materials. Note: Take off right needle when sewing this overlock stitch. 4. ments. 2. Three-thread overlock stitch (5 mm/ 14/ inch) Use three threads and left needle when sewing this overlock stitch. 3. Narrow/Rolled hemming stitches -23- Four...

Users Manual - English
Page 26
.... (B) Remove present needle plate and replace with rolled hemming plate. (C) When applying rolled hemming presser foot, make certain that the spring on materials/threads, thread tension may vary slightly. Those stitches are useful to its highest position by turning the pulley. (3) Push the button (noted by arrow). (4) Remove... presser foot holder. - 24 - It is placed directly in front of the round bar of the presser foot holder. How to adjust thread tensions as illustrated and remove from back. NOTE: In case the narrow hemming foot does not snap on the presser foot holder, just push...
.... (B) Remove present needle plate and replace with rolled hemming plate. (C) When applying rolled hemming presser foot, make certain that the spring on materials/threads, thread tension may vary slightly. Those stitches are useful to its highest position by turning the pulley. (3) Push the button (noted by arrow). (4) Remove... presser foot holder. - 24 - It is placed directly in front of the round bar of the presser foot holder. How to adjust thread tensions as illustrated and remove from back. NOTE: In case the narrow hemming foot does not snap on the presser foot holder, just push...


