

Users Manual - English
Page 1
.... Please read the following instructions carefully so that your new sewing machine will give you very much for purchasing an Overlock sewing machine. Thank you complete sewing enjoyment for sewing all kinds of mm and cm into inches is handled correctly. But, however excellent this sewing machine may be other than satisfied with its perfect and beautiful stitches...
.... Please read the following instructions carefully so that your new sewing machine will give you very much for purchasing an Overlock sewing machine. Thank you complete sewing enjoyment for sewing all kinds of mm and cm into inches is handled correctly. But, however excellent this sewing machine may be other than satisfied with its perfect and beautiful stitches...

Users Manual - English
Page 2
... 13 Thread Tension 14 Chart of thread tension adjustment 15 Sewing Pitch 17 Instruction for differential feed mechanism 18 Sewing 20 To start sewing 20 To remove work 20 If threads break during sewing 20 To sew thick material 21 Presser foot pressure 21 Fault-finding 22 Stitch... Selection 23 How to use rolled hemming stitch attachment 24 Replacing the Blades 27 Oiling 28 Machine Specification...
... 13 Thread Tension 14 Chart of thread tension adjustment 15 Sewing Pitch 17 Instruction for differential feed mechanism 18 Sewing 20 To start sewing 20 To remove work 20 If threads break during sewing 20 To sew thick material 21 Presser foot pressure 21 Fault-finding 22 Stitch... Selection 23 How to use rolled hemming stitch attachment 24 Replacing the Blades 27 Oiling 28 Machine Specification...

Users Manual - English
Page 5
.... (2) Hold the needle with the hexagonal wrench and remove the needle. To fit the needle (1) Turn the pulley until the needle is mounted on these machines. TE x 1 (#14) is raised to use the golden needle (DBx1 KN#11) in the correct position. NOTE: It is set screw with its long ...grooved side to avoid dropping it. Needle se screw Needle bar 0 *When the needles are inserted correctly, the right needle should be used on the machines. To remove the needle (1) Turn the pulley clockwise by hand to the front and insert it as far as the needle stop. (3) Tighten the needle...
.... (2) Hold the needle with the hexagonal wrench and remove the needle. To fit the needle (1) Turn the pulley until the needle is mounted on these machines. TE x 1 (#14) is raised to use the golden needle (DBx1 KN#11) in the correct position. NOTE: It is set screw with its long ...grooved side to avoid dropping it. Needle se screw Needle bar 0 *When the needles are inserted correctly, the right needle should be used on the machines. To remove the needle (1) Turn the pulley clockwise by hand to the front and insert it as far as the needle stop. (3) Tighten the needle...

Users Manual - English
Page 6
Turning direction of motor Pulley *The motor of this machine turns in a clockwise direction (direction of an ordinary domestic sewing machine. Opening and closing the front cover When threading, it is closed. - 4- Note: When sewing, ensure that the front cover is necessary to the counter-clockwise direction of arrow), as opposed to open the front cover.
Turning direction of motor Pulley *The motor of this machine turns in a clockwise direction (direction of an ordinary domestic sewing machine. Opening and closing the front cover When threading, it is closed. - 4- Note: When sewing, ensure that the front cover is necessary to the counter-clockwise direction of arrow), as opposed to open the front cover.

Users Manual - English
Page 8
...to the normal operating speed of 300 to 800 stitches per minute, which is running, sparks can be noted that the motor of the sewing machine will heat the motor and foot i^ control a little, but not enough to adversely affect its performance. These sparks are produced by ... THAT THE ELECTRIC SUPPLY PLUG IS DISCONNECTED TO AVOID ANY POSSIBLE HAZARDS. 1 - 6- tr Continuous operation of this sewing machine is 1,500 stitches per minute for the ordinary foot-operated sewing machine. It should be seen through the ventilating hole in the motor bracket on the side opposite the pulley.
...to the normal operating speed of 300 to 800 stitches per minute, which is running, sparks can be noted that the motor of the sewing machine will heat the motor and foot i^ control a little, but not enough to adversely affect its performance. These sparks are produced by ... THAT THE ELECTRIC SUPPLY PLUG IS DISCONNECTED TO AVOID ANY POSSIBLE HAZARDS. 1 - 6- tr Continuous operation of this sewing machine is 1,500 stitches per minute for the ordinary foot-operated sewing machine. It should be seen through the ventilating hole in the motor bracket on the side opposite the pulley.

Users Manual - English
Page 11
...threading the underlooper, cut and remove thread from the looper. •oo 0o 0 0010 ao Thread tension discs 0 0 NOTE If underlooper thread breaks during sewing. IP Threading underlooper * Run the thread in the sequence illustrated. 0 O oC:=I • 8 0 oCC.1 oCC)oa•-o O 0•0 Pull... the thread about 15 cm (6 inches) from both of thread. - 9 - The machine will not operate properly if threading is done exactly as diagrammed above. Make sure that re-threading is not accurate. Then re-thread the underlooper...
...threading the underlooper, cut and remove thread from the looper. •oo 0o 0 0010 ao Thread tension discs 0 0 NOTE If underlooper thread breaks during sewing. IP Threading underlooper * Run the thread in the sequence illustrated. 0 O oC:=I • 8 0 oCC.1 oCC)oa•-o O 0•0 Pull... the thread about 15 cm (6 inches) from both of thread. - 9 - The machine will not operate properly if threading is done exactly as diagrammed above. Make sure that re-threading is not accurate. Then re-thread the underlooper...
Users Manual - English
Page 16
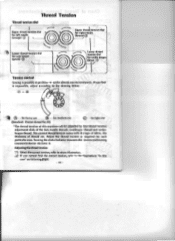
... tension, refer to the drawing below. If you cannot find it . Adjust the thread tension as required for under looper (blue) C4) Tension control Sewing is possible at position "4" under almost any circumstances. Thread Tension Thread tension dial Upper thread tension dial for light use *The thread tension of this... thread and underlooper thread. Turning the dials clockwise increases the tension and turning counterclockwise slackens it impossible, adjust according to the illustrations "In this machine can be adjusted by four thread tension adjustment dials of thread etc.
... tension, refer to the drawing below. If you cannot find it . Adjust the thread tension as required for under looper (blue) C4) Tension control Sewing is possible at position "4" under almost any circumstances. Thread Tension Thread tension dial Upper thread tension dial for light use *The thread tension of this... thread and underlooper thread. Turning the dials clockwise increases the tension and turning counterclockwise slackens it impossible, adjust according to the illustrations "In this machine can be adjusted by four thread tension adjustment dials of thread etc.
Users Manual - English
Page 22
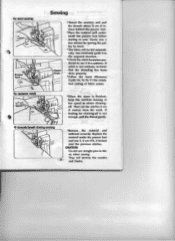
...correctly. If feeding for consistent cutting of fabric seams. To remove work . They will be fed automatically. c25 Upper blade *Thread the machine and pull the threads about 15 cm (6 inches) behind the presser foot. * Place the material well underneath the presser foot before starting... to obtain chaining- r off is finished, keep the machine running at low speed to sew. Slowly sew a few stitches by turning the pulley by hand. *The fabric will destroy the needles and blades. To start...
...correctly. If feeding for consistent cutting of fabric seams. To remove work . They will be fed automatically. c25 Upper blade *Thread the machine and pull the threads about 15 cm (6 inches) behind the presser foot. * Place the material well underneath the presser foot before starting... to obtain chaining- r off is finished, keep the machine running at low speed to sew. Slowly sew a few stitches by turning the pulley by hand. *The fabric will destroy the needles and blades. To start...

Users Manual - English
Page 23
...pressure to prevent material from puckering and to facilitate sewing curves. (2) Slacken the thread tension, but remember that if the tension is too slack this machine has already been adjusted to a pressure suitable to pucker. Usually, when sewing very light materials, the presser foot pressure should be... slack and when sewing very heavy materials, it touches the front of the presser...
...pressure to prevent material from puckering and to facilitate sewing curves. (2) Slacken the thread tension, but remember that if the tension is too slack this machine has already been adjusted to a pressure suitable to pucker. Usually, when sewing very light materials, the presser foot pressure should be... slack and when sewing very heavy materials, it touches the front of the presser...

Users Manual - English
Page 24
... the following chart indicates faults which may develop in the absence of basic adjustments. Do not press or pull material too hard when sewing. 3. feed. Replace with new needle. 2. Needle incorrectly fitted. Improper threading Thread correctly. or thread tangled. (See pages 7-11.... (See pages 14-16.) 2. Improper threading. Material pulled forcibly. Thread tension too puckered. Fault-finding This sewing machine is designed for trouble-free operation. See pages 14-16 "Thread tension". 4. Needles incorrectly fitted. Trouble Cause Remedy...
... the following chart indicates faults which may develop in the absence of basic adjustments. Do not press or pull material too hard when sewing. 3. feed. Replace with new needle. 2. Needle incorrectly fitted. Improper threading Thread correctly. or thread tangled. (See pages 7-11.... (See pages 14-16.) 2. Improper threading. Material pulled forcibly. Thread tension too puckered. Fault-finding This sewing machine is designed for trouble-free operation. See pages 14-16 "Thread tension". 4. Needles incorrectly fitted. Trouble Cause Remedy...

Users Manual - English
Page 25
...simple steps as follows; 1. Four-thread overlock stitch Use all kinds )73 of materials, especially knitted ones. Stitch selection These sewing machines can form five kinds of materials. ments. 2. Use: Ideal for producing four-thread overlock stitches, which will neatly fit ...all the four threads and two needles for sewing knitted gar- Use: For overlock stitching and sewing suits, blouses, slacks, etc. Three-thread overlock stitch (2.8 mm/ 3/16 inch) Use three threads and right ...
...simple steps as follows; 1. Four-thread overlock stitch Use all kinds )73 of materials, especially knitted ones. Stitch selection These sewing machines can form five kinds of materials. ments. 2. Use: Ideal for producing four-thread overlock stitches, which will neatly fit ...all the four threads and two needles for sewing knitted gar- Use: For overlock stitching and sewing suits, blouses, slacks, etc. Three-thread overlock stitch (2.8 mm/ 3/16 inch) Use three threads and right ...
Users Manual - English
Page 30
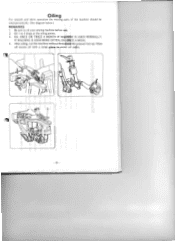
IF MACHINE IS USED MORE OFTEN, OIL ONCE A WEEK. 4. Wipe off excess oil with a scrap piece to oil your sewing machine before use. 2. OIL ONCE OR TWICE A MONTH IF MACHINE IS USED NORMALLY. Be sure to avoid oil stains. 0 3 - 28 - After oiling, run the machine without thread and the presser foot up. Oil 1 to 2 drops at the oiling points. 3. Oiling For smooth and silent operation the moving parts of the machine should be oiled periodically. (See diagram below.) REMARKS: 1.
IF MACHINE IS USED MORE OFTEN, OIL ONCE A WEEK. 4. Wipe off excess oil with a scrap piece to oil your sewing machine before use. 2. OIL ONCE OR TWICE A MONTH IF MACHINE IS USED NORMALLY. Be sure to avoid oil stains. 0 3 - 28 - After oiling, run the machine without thread and the presser foot up. Oil 1 to 2 drops at the oiling points. 3. Oiling For smooth and silent operation the moving parts of the machine should be oiled periodically. (See diagram below.) REMARKS: 1.

Users Manual - English
Page 31
Machine Specification Model No. 634D Needle set Use Light to 14/ inch) Lower blade Needle bar stroke 25 mm (1 inch) Light bulb Presser foot free presser type Presser foot life 1.0 mm (1/4 inch) Needle TE x 1, DB x 1 No. of needles and threads Three/Four threads convertible Two needles or single needle Machine net weight 7.0 kgs. Sewing speed 1,500 stitches per minute Ball point #11: 2 pcs. Bight size 2.8 mm and 5.0 mm (34/ 6 to 1/4 inch) Upper blade krt Stitch length (pitch) 2 mm to 5 mm CA to heavy weight materials Standard #14: 2 pcs.
Machine Specification Model No. 634D Needle set Use Light to 14/ inch) Lower blade Needle bar stroke 25 mm (1 inch) Light bulb Presser foot free presser type Presser foot life 1.0 mm (1/4 inch) Needle TE x 1, DB x 1 No. of needles and threads Three/Four threads convertible Two needles or single needle Machine net weight 7.0 kgs. Sewing speed 1,500 stitches per minute Ball point #11: 2 pcs. Bight size 2.8 mm and 5.0 mm (34/ 6 to 1/4 inch) Upper blade krt Stitch length (pitch) 2 mm to 5 mm CA to heavy weight materials Standard #14: 2 pcs.


