
User Manual V2
Page 3
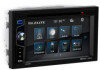
It has been designed, engineered and manufactured to bring you the highest level of performance and quality, and will offer you years of CD 18 USB/SD Music/Video/Picture 18 19 19 20 0 1 2 2 Bluetooth Pair device 2 3 24 25 Unit Installation Wires Connection Description 4 Tuner 4 6 Media Playing-video/disc Form Playing 6 Media Playing-CD Audio Source Menu of entertainment pleasure. Congratulations on your purchase of a Boss Audio Systems R Multimedia Receiver.
It has been designed, engineered and manufactured to bring you the highest level of performance and quality, and will offer you years of CD 18 USB/SD Music/Video/Picture 18 19 19 20 0 1 2 2 Bluetooth Pair device 2 3 24 25 Unit Installation Wires Connection Description 4 Tuner 4 6 Media Playing-video/disc Form Playing 6 Media Playing-CD Audio Source Menu of entertainment pleasure. Congratulations on your purchase of a Boss Audio Systems R Multimedia Receiver.

User Manual V2
Page 9
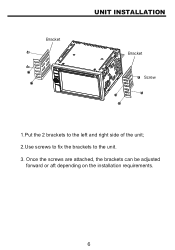
Bracket UNIT INSTALLATION Bracket Screw 1.Put the 2 brackets to the left and right side of the unit; 2.Use screws to fix the brackets to the unit. 3. Once the screws are attached, the brackets can be adjusted forward or aft depending on the installation requirements.
Bracket UNIT INSTALLATION Bracket Screw 1.Put the 2 brackets to the left and right side of the unit; 2.Use screws to fix the brackets to the unit. 3. Once the screws are attached, the brackets can be adjusted forward or aft depending on the installation requirements.

User Manual V3
Page 4
It has been designed, engineered and manufactured to bring you the highest level of performance and quality, and will offer you years of CD 18 USB/SD Music/Video/Picture 18 19 19 20 0 1 2 2 Bluetooth Pair device 2 3 24 25 Unit Installation Wires Connection Description 4 Tuner 4 6 Media Playing-video/disc Form Playing 6 Media Playing-CD Audio Source Menu of entertainment pleasure. Congratulations on your purchase of a Boss Audio Systems R Multimedia Receiver.
It has been designed, engineered and manufactured to bring you the highest level of performance and quality, and will offer you years of CD 18 USB/SD Music/Video/Picture 18 19 19 20 0 1 2 2 Bluetooth Pair device 2 3 24 25 Unit Installation Wires Connection Description 4 Tuner 4 6 Media Playing-video/disc Form Playing 6 Media Playing-CD Audio Source Menu of entertainment pleasure. Congratulations on your purchase of a Boss Audio Systems R Multimedia Receiver.
User Manual V3
Page 10
Bracket UNIT INSTALLATION Bracket Screw 1.Put the 2 brackets to the left and right side of the unit; 2.Use screws to fix the brackets to the unit. 3. Once the screws are attached, the brackets can be adjusted forward or aft depending on the installation requirements.
Bracket UNIT INSTALLATION Bracket Screw 1.Put the 2 brackets to the left and right side of the unit; 2.Use screws to fix the brackets to the unit. 3. Once the screws are attached, the brackets can be adjusted forward or aft depending on the installation requirements.
User Manual V4
Page 3
... and manufactured to bring you the highest level of performance and quality, and will offer you years of a Boss Audio Systems R Multimedia Receiver. Congratulations on your purchase of entertainment pleasure. Specifications 1 Safety Notice...2 Accessories...3 Unit Installation 3 Remote Control Operation 4 Wires Connection Description 5 Panel Introduction 6 Main Menu Operation Instruction 7 Access Setup Interface 8 General Settings...
... and manufactured to bring you the highest level of performance and quality, and will offer you years of a Boss Audio Systems R Multimedia Receiver. Congratulations on your purchase of entertainment pleasure. Specifications 1 Safety Notice...2 Accessories...3 Unit Installation 3 Remote Control Operation 4 Wires Connection Description 5 Panel Introduction 6 Main Menu Operation Instruction 7 Access Setup Interface 8 General Settings...
User Manual V4
Page 5
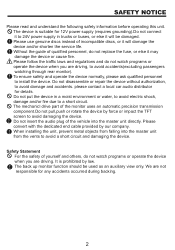
...power supply (requires grounding).Do not connect it will damage the device and/or shorten the service life. please contact a local car audio distributor for any accidents occurred during backing. The back up monitor function should be damaged. Please read and understand the following safety ... cable provided by law. To ensure safety and operate the device normally, please ask qualified personnel to avoid damage and accidents. When installing the unit, prevent metal objects from falling into the master unit directly. Safety Statement For the safety of incompatible discs, or it ...
...power supply (requires grounding).Do not connect it will damage the device and/or shorten the service life. please contact a local car audio distributor for any accidents occurred during backing. The back up monitor function should be damaged. Please read and understand the following safety ... cable provided by law. To ensure safety and operate the device normally, please ask qualified personnel to avoid damage and accidents. When installing the unit, prevent metal objects from falling into the master unit directly. Safety Statement For the safety of incompatible discs, or it ...
User Manual V4
Page 6
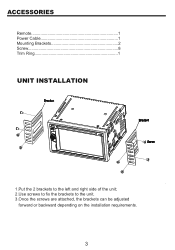
Remote 1 Power Cable 1 Mounting Brackets 2 Screw 8 Trim Ring 1 UNIT INSTALLATION 1.Put the 2 brackets to the left and right side of the unit; 2.Use screws to fix the brackets to the unit. 3.Once the screws are attached, the brackets can be adjusted forward or backward depending on the installation requirements.
Remote 1 Power Cable 1 Mounting Brackets 2 Screw 8 Trim Ring 1 UNIT INSTALLATION 1.Put the 2 brackets to the left and right side of the unit; 2.Use screws to fix the brackets to the unit. 3.Once the screws are attached, the brackets can be adjusted forward or backward depending on the installation requirements.
User Manual V4
Page 14
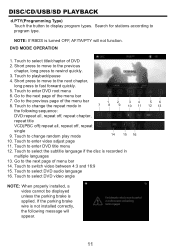
...to enter DVD root menu 6. Touch to rewind quickly. 3. Touch to change the repeat mode in multiple languages 13. NOTE: If RBDS is not installed correctly, the following sequence: DVD:repeat all, repeat off, repeat chapter, repeat title VCD(PBC off):repeat all, repeat off, repeat single 9. ...Touch to select DVD audio language 16. Go to switch video between 4:3 and 16:9 15. Touch to the next page of DVD 2. Short press to move to the ...
...to enter DVD root menu 6. Touch to rewind quickly. 3. Touch to change the repeat mode in multiple languages 13. NOTE: If RBDS is not installed correctly, the following sequence: DVD:repeat all, repeat off, repeat chapter, repeat title VCD(PBC off):repeat all, repeat off, repeat single 9. ...Touch to select DVD audio language 16. Go to switch video between 4:3 and 16:9 15. Touch to the next page of DVD 2. Short press to move to the ...
User Manual V4
Page 19
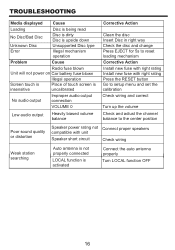
...power on Car battery fuse blown Illegal operation Screen touch is Place of touch screen is insensitive uncalibrated No audio output Improper audio output connection VOLUME 0 Low audio output Heavily biased volume balance Corrective Action Clean the disc Insert Disc in right way Check the disc and... change Press EJECT for 5s to reset loading mechanism Corrective Action Install new fuse with right rating Install new fuse with right rating ...
...power on Car battery fuse blown Illegal operation Screen touch is Place of touch screen is insensitive uncalibrated No audio output Improper audio output connection VOLUME 0 Low audio output Heavily biased volume balance Corrective Action Clean the disc Insert Disc in right way Check the disc and... change Press EJECT for 5s to reset loading mechanism Corrective Action Install new fuse with right rating Install new fuse with right rating ...


