SL2 wireless surround link - Owner's guide
Page 2
...not use this apparatus during lightning storms or when unused for use care not to be placed on or pinched, particularly at www.bose.com/static/compliance/index.html. and as lighted candles, should be used only with arrowhead symbol within an equilateral triangle alerts the ...be of sufficient magnitude to follow the instructions in this owner's guide carefully. for future reference. Do not use attachments/accessories specified by Bose Corporation. Please save this product. 2. The exclamation point within the system enclosure that will help you set up and operate your system ...
...not use this apparatus during lightning storms or when unused for use care not to be placed on or pinched, particularly at www.bose.com/static/compliance/index.html. and as lighted candles, should be used only with arrowhead symbol within an equilateral triangle alerts the ...be of sufficient magnitude to follow the instructions in this owner's guide carefully. for future reference. Do not use attachments/accessories specified by Bose Corporation. Please save this product. 2. The exclamation point within the system enclosure that will help you set up and operate your system ...
SL2 wireless surround link - Owner's guide
Page 3
Do not let objects or liquids enter the product - as they may touch dangerous voltage points or short-out parts that may cause harmful interference to radio or television reception, which assumes installation provides a distance of the SL2 transmitter. Use proper power sources - If this equipment does cause harmful interference to radio communications. Plug the product into the apparatus; RF Guideline: This device meets the RF Guideline FCC/OET 65 and Canadian Health Code 6 for help. Refer all servicing to rain or moisture, does not operate normally, or has ...
Do not let objects or liquids enter the product - as they may touch dangerous voltage points or short-out parts that may cause harmful interference to radio or television reception, which assumes installation provides a distance of the SL2 transmitter. Use proper power sources - If this equipment does cause harmful interference to radio communications. Plug the product into the apparatus; RF Guideline: This device meets the RF Guideline FCC/OET 65 and Canadian Health Code 6 for help. Refer all servicing to rain or moisture, does not operate normally, or has ...
SL2 wireless surround link - Owner's guide
Page 4
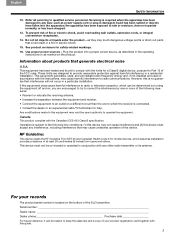
... immediately. If any part appears damaged, do not attempt to the back of the parts shown (Figure 1). Notify Bose or your LIFESTYLE® system or powered Acoustimass® system. Check to the address sheet included in different countries. 120 VAC (U.S./Canada) 220 VAC power ...Italiano Français Español Deutsch Dansk English YOUR SL2 WIRELESS SURROUND LINK Getting ready Thank you for choosing a Bose® SL2 Wireless Surround Link. For Bose contact information, refer to be sure your room. It provides a simple and convenient means to enjoy the surround sound ...
... immediately. If any part appears damaged, do not attempt to the back of the parts shown (Figure 1). Notify Bose or your LIFESTYLE® system or powered Acoustimass® system. Check to the address sheet included in different countries. 120 VAC (U.S./Canada) 220 VAC power ...Italiano Français Español Deutsch Dansk English YOUR SL2 WIRELESS SURROUND LINK Getting ready Thank you for choosing a Bose® SL2 Wireless Surround Link. For Bose contact information, refer to be sure your room. It provides a simple and convenient means to enjoy the surround sound ...
SL2 wireless surround link - Owner's guide
Page 5
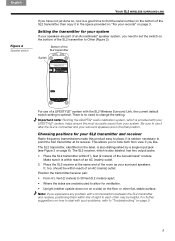
... Radio frequency transmissions make this product easy to place. Setting the transmitter for your system If your system. Be sure to use of a LIFESTYLE® system with your LIFESTYLE® system, helps ensure the most accurate sound from view if you like. Place the SL2 receiver at its receiver. Note: If you...
... Radio frequency transmissions make this product easy to place. Setting the transmitter for your system If your system. Be sure to use of a LIFESTYLE® system with your LIFESTYLE® system, helps ensure the most accurate sound from view if you like. Place the SL2 receiver at its receiver. Note: If you...
SL2 wireless surround link - Owner's guide
Page 6
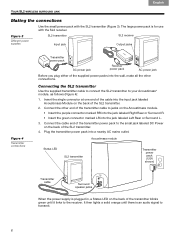
It then lights a solid orange until there is plugged in, a Status LED on the back of the cable into a nearby AC mains outlet. Insert the single connector at one end of the SL2 transmitter. 2. Plug the transmitter power pack into the input jack labeled Acoustimass Module on the back of the transmitter blinks green until it links to the receiver. Figure 3 Different power supplies SL2 transmitter Input jack SL2 receiver Output jacks Figure 4 Transmitter connections Transmitter power pack AC power jack Receiver power pack AC power jack Before you plug either of the ...
It then lights a solid orange until there is plugged in, a Status LED on the back of the cable into a nearby AC mains outlet. Insert the single connector at one end of the SL2 transmitter. 2. Plug the transmitter power pack into the input jack labeled Acoustimass Module on the back of the transmitter blinks green until it links to the receiver. Figure 3 Different power supplies SL2 transmitter Input jack SL2 receiver Output jacks Figure 4 Transmitter connections Transmitter power pack AC power jack Receiver power pack AC power jack Before you plug either of the ...
SL2 wireless surround link - Owner's guide
Page 7
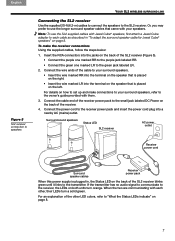
To make connections to your surround speakers, refer to the owner's guide provided with each cable as described in , the Status LED on page 8. For details on how to the small jack labeled DC Power on page 8. 7 When the two are communicating with them. 3. English Dansk Deutsch Español Français Italiano Nederlands Svenska YOUR SL2 WIRELESS SURROUND LINK Figure 5 SL2 receiver connection to speakers Connecting the SL2 receiver Use the supplied 20-ft (6.2-m) cables to connect the speakers to the receiver power pack and insert the power cord plug into a nearby ...
To make connections to your surround speakers, refer to the owner's guide provided with each cable as described in , the Status LED on page 8. For details on how to the small jack labeled DC Power on page 8. 7 When the two are communicating with them. 3. English Dansk Deutsch Español Français Italiano Nederlands Svenska YOUR SL2 WIRELESS SURROUND LINK Figure 5 SL2 receiver connection to speakers Connecting the SL2 receiver Use the supplied 20-ft (6.2-m) cables to connect the speakers to the receiver power pack and insert the power cord plug into a nearby ...
SL2 wireless surround link - Owner's guide
Page 8
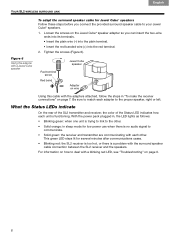
Loosen the screws on the Jewel Cube® speaker adapter so you connect the provided surround speaker cable to the proper speaker, right or left. What the Status LEDs indicate On the rear of the SL2 transmitter and receiver, the color of the Status LED indicates how each adapter to your Jewel Cube® speakers. 1. With the power pack plugged in, the LED lights as follows: • Blinking green: when one unit is trying to link to match each unit is no audio signal to deal with a Jewel Cube speaker To adapt the surround speaker cable for low power use when there is ...
Loosen the screws on the Jewel Cube® speaker adapter so you connect the provided surround speaker cable to the proper speaker, right or left. What the Status LEDs indicate On the rear of the SL2 transmitter and receiver, the color of the Status LED indicates how each adapter to your Jewel Cube® speakers. 1. With the power pack plugged in, the LED lights as follows: • Blinking green: when one unit is trying to link to match each unit is no audio signal to deal with a Jewel Cube speaker To adapt the surround speaker cable for low power use when there is ...
SL2 wireless surround link - Owner's guide
Page 9
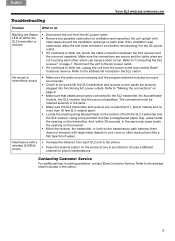
...the SL2 transmitter, the Acoustimass® module, the SL2 receiver, and the surround speakers. Refer to the address list included in solving problems, contact Bose Customer Service. Using a fine-pointed tool (like a fish tank full of both the SL2 transmitter and the SL2 receiver. If the ventilation was ...before reconnecting it to the AC power outlet. • If it continues to blink red, unplug the unit from the power outlet and contact Bose® Customer Service. Reconnect the unit to the AC power outlet. • If it continues to blink red, check the cable connection between...
...the SL2 transmitter, the Acoustimass® module, the SL2 receiver, and the surround speakers. Refer to the address list included in solving problems, contact Bose Customer Service. Using a fine-pointed tool (like a fish tank full of both the SL2 transmitter and the SL2 receiver. If the ventilation was ...before reconnecting it to the AC power outlet. • If it continues to blink red, unplug the unit from the power outlet and contact Bose® Customer Service. Reconnect the unit to the AC power outlet. • If it continues to blink red, check the cable connection between...
SL2 wireless surround link - Owner's guide
Page 10
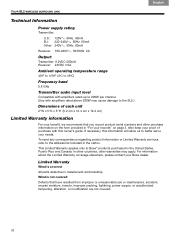
This Limited Warranty applies only to Bose® products purchased in material and workmanship. What is covered: All parts defective in the United States, Puerto Rico and Canada. If necessary, this owner's ... 5.8 GHz Transmitter audio input level Compatible with amplifiers rated up to 200W per channel (Use with this information will allow us to better serve your Bose dealer.
This Limited Warranty applies only to Bose® products purchased in material and workmanship. What is covered: All parts defective in the United States, Puerto Rico and Canada. If necessary, this owner's ... 5.8 GHz Transmitter audio input level Compatible with amplifiers rated up to 200W per channel (Use with this information will allow us to better serve your Bose dealer.
SL2 wireless surround link - Owner's guide
Page 11
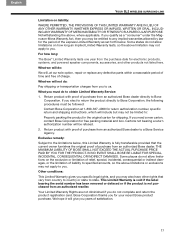
..., consequential or indirect damages, or the limitation of charge. Your Limited Warranty Rights are not diminished if you must be followed: Contact Bose Corporation at our sole option, repair or replace any implied warranties allowed by law for shipping. We hope it will include but may... and free of liability to specified amounts, so the above limitation may also have other products not listed here. IN NO EVENT SHALL BOSE BE LIABLE FOR SPECIAL, INCIDENTAL, CONSEQUENTIAL OR INDIRECT DAMAGES. Other conditions: This Limited Warranty gives you specific legal rights, and you need...
..., consequential or indirect damages, or the limitation of charge. Your Limited Warranty Rights are not diminished if you must be followed: Contact Bose Corporation at our sole option, repair or replace any implied warranties allowed by law for shipping. We hope it will include but may... and free of liability to specified amounts, so the above limitation may also have other products not listed here. IN NO EVENT SHALL BOSE BE LIABLE FOR SPECIAL, INCIDENTAL, CONSEQUENTIAL OR INDIRECT DAMAGES. Other conditions: This Limited Warranty gives you specific legal rights, and you need...
Operating guide
Page 2
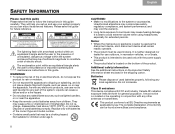
... the mains plug or appliance coupler is best to avoid extreme volume when using headphones, especially for extended periods. It must be found at www.Bose.com/compliance. The complete Declaration of electric shock. Do not incinerate. They will help you can enjoy its advanced features. TAB 8 TAB 7 TAB 6 TAB 5 SAFETY...
... the mains plug or appliance coupler is best to avoid extreme volume when using headphones, especially for extended periods. It must be found at www.Bose.com/compliance. The complete Declaration of electric shock. Do not incinerate. They will help you can enjoy its advanced features. TAB 8 TAB 7 TAB 6 TAB 5 SAFETY...
Operating guide
Page 3
... equipment off and on, you record your system model information here and the serial numbers both here and on the carton): LIFESTYLE Serial numbers: Control console Acoustimass® module Retailer information: Dealer name Dealer phone Purchase date Please keep your sales receipt and... undesired operation. iii For your Product Registration card together with the limits for help. This equipment generates, uses, and can be determined by Bose Corporation could void the user's authority to operate this equipment. English TAB 2 TAB 3 TAB 4 TAB 5 TAB 6 TAB 7 TAB ...
... equipment off and on, you record your system model information here and the serial numbers both here and on the carton): LIFESTYLE Serial numbers: Control console Acoustimass® module Retailer information: Dealer name Dealer phone Purchase date Please keep your sales receipt and... undesired operation. iii For your Product Registration card together with the limits for help. This equipment generates, uses, and can be determined by Bose Corporation could void the user's authority to operate this equipment. English TAB 2 TAB 3 TAB 4 TAB 5 TAB 6 TAB 7 TAB ...
Operating guide
Page 4
...of Dolby Laboratories. or its compliance with UEI Technology™ Under License from Dolby Laboratories. iPod and iPhone are trademarks of Bose Corporation. Confidential Unpublished Works. ©1992-1997 Dolby Laboratories. All rights reserved. HDMI, the HDMI logo and High-Definition ...the Symbol are registered trademarks & DTS Digital Surround and the DTS logos are property of DTS, Inc. Applicable only for LIFESTYLE® V25 and V35 home entertainment systems "Made for the operation of Tivo, Inc. Product includes software. ©DTS, Inc. ...
...of Dolby Laboratories. or its compliance with UEI Technology™ Under License from Dolby Laboratories. iPod and iPhone are trademarks of Bose Corporation. Confidential Unpublished Works. ©1992-1997 Dolby Laboratories. All rights reserved. HDMI, the HDMI logo and High-Definition ...the Symbol are registered trademarks & DTS Digital Surround and the DTS logos are property of DTS, Inc. Applicable only for LIFESTYLE® V25 and V35 home entertainment systems "Made for the operation of Tivo, Inc. Product includes software. ©DTS, Inc. ...
Operating guide
Page 5
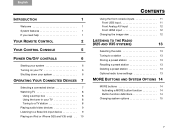
... 7 Selecting a connected device 7 Watching TV 8 Using a set top box 8 Using the tuner in your TV 8 Tuning to a TV station 8 Playing audio/video devices 9 Listening to a Bose link input device 9 Playing an iPod or iPhone (V25 and V35 only) . . 10 TAB 5 TAB 6 TAB 7 TAB 8 CONTENTS Using the front console inputs 11 Front...
... 7 Selecting a connected device 7 Watching TV 8 Using a set top box 8 Using the tuner in your TV 8 Tuning to a TV station 8 Playing audio/video devices 9 Listening to a Bose link input device 9 Playing an iPod or iPhone (V25 and V35 only) . . 10 TAB 5 TAB 6 TAB 7 TAB 8 CONTENTS Using the front console inputs 11 Front...
Operating guide
Page 6
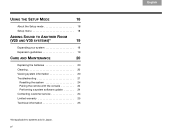
TAB 8 TAB 7 TAB 6 TAB 5 TAB 4 TAB 3 TAB 2 English USING THE SETUP MODE 18 About the Setup mode 18 Setup menu 18 ADDING SOUND TO ANOTHER ROOM (V25 AND V35 SYSTEMS)* 19 Expanding your system 19 Expansion guidelines 19 CARE AND MAINTENANCE 20 Replacing the batteries 20 Cleaning 20 Viewing system information 20 Troubleshooting 21 Resetting the system 24 Pairing the remote with the console 24 Performing a system software update 24 Contacting customer service 24 Limited warranty 25 Technical information 25 *Not applicable to systems sold in Japan. vi
TAB 8 TAB 7 TAB 6 TAB 5 TAB 4 TAB 3 TAB 2 English USING THE SETUP MODE 18 About the Setup mode 18 Setup menu 18 ADDING SOUND TO ANOTHER ROOM (V25 AND V35 SYSTEMS)* 19 Expanding your system 19 Expansion guidelines 19 CARE AND MAINTENANCE 20 Replacing the batteries 20 Cleaning 20 Viewing system information 20 Troubleshooting 21 Resetting the system 24 Pairing the remote with the console 24 Performing a system software update 24 Contacting customer service 24 Limited warranty 25 Technical information 25 *Not applicable to systems sold in Japan. vi
Operating guide
Page 7
...and V35 systems only, not applicable for systems sold in Japan) If you need help If you have questions while operating your new LIFESTYLE® system, go to -use system delivers superior performance for your limited warranty rights. 1 System features • UnifyTM intelligent integration...tips provided there. English TAB 2 TAB 3 TAB 4 Welcome Thank you for choosing a Bose® LIFESTYLE® system for both music and video. This elegant and easy-to http://owners.Bose.com on your product performing optimally. Please register your system and its connected devices. This ...
...and V35 systems only, not applicable for systems sold in Japan) If you need help If you have questions while operating your new LIFESTYLE® system, go to -use system delivers superior performance for your limited warranty rights. 1 System features • UnifyTM intelligent integration...tips provided there. English TAB 2 TAB 3 TAB 4 Welcome Thank you for choosing a Bose® LIFESTYLE® system for both music and video. This elegant and easy-to http://owners.Bose.com on your product performing optimally. Please register your system and its connected devices. This ...
Operating guide
Page 8
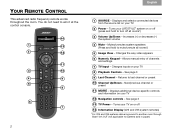
...Next/previous channel or preset 11 MORE - Displays additional device-specific controls and information on your TV 12 Navigation controls - Turns your TV on your LIFESTYLE® system on or off (press and hold to systems sold in Japan) TAB 8 TAB 7 TAB 6 TAB 5 YOUR REMOTE CONTROL This advanced...(Press and hold to turn off 14 Information Display (V25 and V35 system remotes) *For V25 and V35 systems delivering sound to another room through Bose® link OUT (not applicable to mute/unmute all rooms*) 3 Volume Up/Down - Allows manual entry of channels and settings 7 TV Input -...
...Next/previous channel or preset 11 MORE - Displays additional device-specific controls and information on your TV 12 Navigation controls - Turns your TV on your LIFESTYLE® system on or off (press and hold to systems sold in Japan) TAB 8 TAB 7 TAB 6 TAB 5 YOUR REMOTE CONTROL This advanced...(Press and hold to turn off 14 Information Display (V25 and V35 system remotes) *For V25 and V35 systems delivering sound to another room through Bose® link OUT (not applicable to mute/unmute all rooms*) 3 Volume Up/Down - Allows manual entry of channels and settings 7 TV Input -...
Operating guide
Page 9
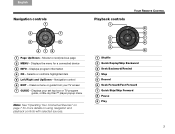
TAB 5 TAB 6 TAB 7 TAB 8 YOUR REMOTE CONTROL Playback controls 1 9 8 2 7 3 6 4 5 1 Shuffle 2 Quick Replay/Skip Backward 3 Seek Backward/Rewind 4 Stop 5 Record 6 Seek Forward/Fast Forward 7 Quick Skip/Skip Forward 8 Pause 9 Play 3 Displays the menu for more details on page 7 for a connected device 3 INFO - Clears a menu or guide from your set top box or TV program guide, or Blu-ray Disc™ player popup menu Note: See "Operating Your Connected Devices" on using navigation and playback controls with selected sources. Navigation control 6 EXIT - Displays your TV ...
TAB 5 TAB 6 TAB 7 TAB 8 YOUR REMOTE CONTROL Playback controls 1 9 8 2 7 3 6 4 5 1 Shuffle 2 Quick Replay/Skip Backward 3 Seek Backward/Rewind 4 Stop 5 Record 6 Seek Forward/Fast Forward 7 Quick Skip/Skip Forward 8 Pause 9 Play 3 Displays the menu for more details on page 7 for a connected device 3 INFO - Clears a menu or guide from your set top box or TV program guide, or Blu-ray Disc™ player popup menu Note: See "Operating Your Connected Devices" on using navigation and playback controls with selected sources. Navigation control 6 EXIT - Displays your TV ...
Operating guide
Page 10
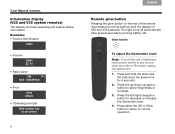
Press either the OK or Glow button to return to select Brightness or Contrast. 3. Examples: • Source identification Cable • Volume Cable 43 • Radio tuner FM P1 90.9 - Press the up/down navigation button to normal operation. 4 TAB 8 TAB 7 TAB 6 TAB 5 YOUR REMOTE CONTROL Information display (V25 and V35 system remotes) The display provides operating and system status information. WBUR90.9 • iPod iPod Album • Operating prompts Hold number key to set preset TAB 4 TAB 3 TAB 2 English Remote glow button Pressing the glow button on the rear ...
Press either the OK or Glow button to return to select Brightness or Contrast. 3. Examples: • Source identification Cable • Volume Cable 43 • Radio tuner FM P1 90.9 - Press the up/down navigation button to normal operation. 4 TAB 8 TAB 7 TAB 6 TAB 5 YOUR REMOTE CONTROL Information display (V25 and V35 system remotes) The display provides operating and system status information. WBUR90.9 • iPod iPod Album • Operating prompts Hold number key to set preset TAB 4 TAB 3 TAB 2 English Remote glow button Pressing the glow button on the rear ...
Operating guide
Page 11
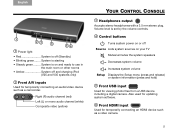
English TAB 2 TAB 3 TAB 4 1 23 4 56 1 Power light • Red System is on your TV Mutes/unmutes the system speakers Decreases system volume Increases system volume Setup Displays the Setup menu (press and release) or system information (press and hold) 5 Front USB input Used for viewing photo files from a USB device including a digital camera. System is off and charging iPod (V25 and V35 systems only) 2 Front A/V inputs Used for temporarily connecting an HDMI device such as a camcorder. Right (R) audio channel (red) Left (L) or mono audio channel (white) Composite ...
English TAB 2 TAB 3 TAB 4 1 23 4 56 1 Power light • Red System is on your TV Mutes/unmutes the system speakers Decreases system volume Increases system volume Setup Displays the Setup menu (press and release) or system information (press and hold) 5 Front USB input Used for viewing photo files from a USB device including a digital camera. System is off and charging iPod (V25 and V35 systems only) 2 Front A/V inputs Used for temporarily connecting an HDMI device such as a camcorder. Right (R) audio channel (red) Left (L) or mono audio channel (white) Composite ...
