Operating guide
Page 6
TAB 8 TAB 7 TAB 6 TAB 5 TAB 4 TAB 3 TAB 2 English USING THE SETUP MODE 18 About the Setup mode 18 Setup menu 18 ADDING SOUND TO ANOTHER ROOM (V25 AND V35 SYSTEMS)* 19 Expanding your system 19 Expansion guidelines 19 CARE AND MAINTENANCE 20 Replacing the batteries 20 Cleaning 20 Viewing system information 20 Troubleshooting 21 Resetting the system 24 Pairing the remote with the console 24 Performing a system software update 24 Contacting customer service 24 Limited warranty 25 Technical information 25 *Not applicable to systems sold in Japan. vi
TAB 8 TAB 7 TAB 6 TAB 5 TAB 4 TAB 3 TAB 2 English USING THE SETUP MODE 18 About the Setup mode 18 Setup menu 18 ADDING SOUND TO ANOTHER ROOM (V25 AND V35 SYSTEMS)* 19 Expanding your system 19 Expansion guidelines 19 CARE AND MAINTENANCE 20 Replacing the batteries 20 Cleaning 20 Viewing system information 20 Troubleshooting 21 Resetting the system 24 Pairing the remote with the console 24 Performing a system software update 24 Contacting customer service 24 Limited warranty 25 Technical information 25 *Not applicable to systems sold in Japan. vi
Operating guide
Page 7
...of system software updates to send you information about new products and special offers from Bose. It also allows us to keep your product performing optimally. Please follow the instructions on page 21. Failure to register. By now you should have questions while operating your new LIFESTYLE® ...system, go to http://owners.Bose.com on the Internet for your room • RF remote control • HDMI connectivity • Video up-conversion to...
...of system software updates to send you information about new products and special offers from Bose. It also allows us to keep your product performing optimally. Please follow the instructions on page 21. Failure to register. By now you should have questions while operating your new LIFESTYLE® ...system, go to http://owners.Bose.com on the Internet for your room • RF remote control • HDMI connectivity • Video up-conversion to...
Operating guide
Page 11
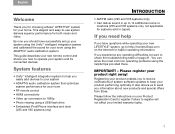
... and charging iPod (V25 and V35 systems only) 2 Front A/V inputs Used for temporarily connecting an audio/video device such as a video camera. 5 Also used for updating system software. 6 Front HDMI input Used for temporarily connecting an HDMI device such as a camcorder. English TAB 2 TAB 3 TAB 4 1 23 4 56 1 Power light • Red System...
... and charging iPod (V25 and V35 systems only) 2 Front A/V inputs Used for temporarily connecting an audio/video device such as a video camera. 5 Also used for updating system software. 6 Front HDMI input Used for temporarily connecting an HDMI device such as a camcorder. English TAB 2 TAB 3 TAB 4 1 23 4 56 1 Power light • Red System...
Operating guide
Page 24
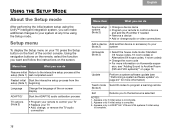
...only if initial setup is complete. 18 sion, see "Adding Sound to Another Room (V25 and V35 systems)*" on page 19 Update Perform a system software update (see "Performing a system software update" on page 24" for more information on the screen. TAB 8 TAB 7 TAB 6 TAB 5 USING THE SETUP MODE About ... setup process at any time using the Unify™ intelligent integration system, you to the last source selected NOTES: 1. Appears only in LIFESTYLE® V25 and V35 systems if initial setup is complete. 3. Appears only if initial setup is incomplete. 2. Setup menu To display ...
...only if initial setup is complete. 18 sion, see "Adding Sound to Another Room (V25 and V35 systems)*" on page 19 Update Perform a system software update (see "Performing a system software update" on page 24" for more information on the screen. TAB 8 TAB 7 TAB 6 TAB 5 USING THE SETUP MODE About ... setup process at any time using the Unify™ intelligent integration system, you to the last source selected NOTES: 1. Appears only in LIFESTYLE® V25 and V35 systems if initial setup is complete. 3. Appears only if initial setup is incomplete. 2. Setup menu To display ...
Operating guide
Page 27
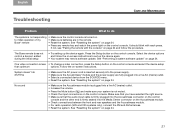
See "Performing a system software update" on -screen instructions. Follow the on page 24. If not,...the SOURCE menu. • Reset the system. System doesn't do The system is not responding to initial operation of my Bose® remote • Make sure the control console is turned on. • Make sure batteries are fully plugged into a... Setup button on the control console. The Bose remote does not control a device I added during the initial setup • Try setting up the device again. • Your system may need a software update. See "Resetting the system" on page ...
See "Performing a system software update" on -screen instructions. Follow the on page 24. If not,...the SOURCE menu. • Reset the system. System doesn't do The system is not responding to initial operation of my Bose® remote • Make sure the control console is turned on. • Make sure batteries are fully plugged into a... Setup button on the control console. The Bose remote does not control a device I added during the initial setup • Try setting up the device again. • Your system may need a software update. See "Resetting the system" on page ...
Operating guide
Page 30
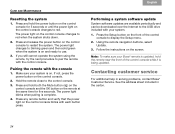
...5 seconds or until the power light on the control console to red when the system shuts down. 2. Make sure your Bose® remote is updated, hold the remote near the front of the control console to pair the remote with each button press. The power light ...and ready to red. The power light on the control console for five seconds. TAB 4 TAB 3 TAB 2 English Performing a system software update System software updates are available periodically and can be downloaded over the Internet to the control console. 3. Press and hold the power button on the control console...
...5 seconds or until the power light on the control console to red when the system shuts down. 2. Make sure your Bose® remote is updated, hold the remote near the front of the control console to pair the remote with each button press. The power light ...and ready to red. The power light on the control console for five seconds. TAB 4 TAB 3 TAB 2 English Performing a system software update System software updates are available periodically and can be downloaded over the Internet to the control console. 3. Press and hold the power button on the control console...

