
The Bose® Lifestyle® amplifier - Owner's guide
Page 3
... damaged in any way: such as marked on the product and in the owner's guide. 4. Plug the product into a proper power source, as described in the operating .... 18. Read these instructions - Do not use attachments/accessories specified by Bose® Corporation. Unplug this product from overheating, put it from the wall outlet before...may expose you . 15. To prevent risk of the polarized or grounding-type plug. Do not install external antennas near water or moisture - Important Safety Instructions 1. Keep these instructions - and as radiators...
... damaged in any way: such as marked on the product and in the owner's guide. 4. Plug the product into a proper power source, as described in the operating .... 18. Read these instructions - Do not use attachments/accessories specified by Bose® Corporation. Unplug this product from overheating, put it from the wall outlet before...may expose you . 15. To prevent risk of the polarized or grounding-type plug. Do not install external antennas near water or moisture - Important Safety Instructions 1. Keep these instructions - and as radiators...

The Bose® Lifestyle® amplifier - Owner's guide
Page 7
...Figure 4), remove the rubber feet and use the amplifier in a damp location. It is installed on a shelf, or in a bookcase, or inside an entertainment center, maintain 2.0 inches (5.0 cm...Figure 2) on all electrical equipment, it generates some heat. • DO NOT use the existing guide holes in the amplifier's enclosure. AM262840_00_V.pdf January 4, 2002 5 Figure 2 Required clearance... unit. Setting Up Your Lifestyle® Stereo Amplifier Selecting a location for your Lifestyle® stereo amplifier Select a location for your Lifestyle® stereo amplifi...
...Figure 4), remove the rubber feet and use the amplifier in a damp location. It is installed on a shelf, or in a bookcase, or inside an entertainment center, maintain 2.0 inches (5.0 cm...Figure 2) on all electrical equipment, it generates some heat. • DO NOT use the existing guide holes in the amplifier's enclosure. AM262840_00_V.pdf January 4, 2002 5 Figure 2 Required clearance... unit. Setting Up Your Lifestyle® Stereo Amplifier Selecting a location for your Lifestyle® stereo amplifier Select a location for your Lifestyle® stereo amplifi...

The Bose® Lifestyle® amplifier - Owner's guide
Page 18
...correct phone numbers. Do not use caulking, apply it only after installing the Lifestyle® stereo amplifier, follow the guidelines below. Troubleshooting If you do Neither speaker plays...64257;er, use a silicone caulking material, such as needed. Protecting outdoor wiring Although some Bose® speakers are designed and tested to stand up to outdoor weather conditions, the bare ...See "Connecting speakers to your Lifestyle® stereo amplifier" on . • Make sure the plugs are inserted fully and the outlets are in your system owner's guide. You may become dusty over ...
...correct phone numbers. Do not use caulking, apply it only after installing the Lifestyle® stereo amplifier, follow the guidelines below. Troubleshooting If you do Neither speaker plays...64257;er, use a silicone caulking material, such as needed. Protecting outdoor wiring Although some Bose® speakers are designed and tested to stand up to outdoor weather conditions, the bare ...See "Connecting speakers to your Lifestyle® stereo amplifier" on . • Make sure the plugs are inserted fully and the outlets are in your system owner's guide. You may become dusty over ...

Owner's guide
Page 3
...to try to correct the interference by one to which can radiate radio frequency energy and, if not installed and used , use this equipment. Refer all instructions. 5. Servicing is required when the apparatus has ...will not occur in a wet basement, near a bathtub, washbowl, kitchen sink, laundry tub, in a particular installation. Please call Bose to be determined by the manufacturer or sold with the limits for a Class B digital device, pursuant to Part... provide reasonable protection against harmful interference in the owner's guide. 4. as directed by the manufacturer. 12.
...to try to correct the interference by one to which can radiate radio frequency energy and, if not installed and used , use this equipment. Refer all instructions. 5. Servicing is required when the apparatus has ...will not occur in a wet basement, near a bathtub, washbowl, kitchen sink, laundry tub, in a particular installation. Please call Bose to be determined by the manufacturer or sold with the limits for a Class B digital device, pursuant to Part... provide reasonable protection against harmful interference in the owner's guide. 4. as directed by the manufacturer. 12.

Owner's guide
Page 20
... 4. Press the TV button on page 33. 1. Select Remote Control Setup and press Enter. 6. Press TV Power Power on your LIFESTYLE® system Installation Guide for connecting an external component. If you can program it to operate your brand of VCR using its remote control. Press the TV... system settings menu. An infrared (IR) emitter is 18 October 30, 2001 AM259776_01_V.pdf See the "Remote control setup submenu" on the LIFESTYLE® remote control. 3. Turn on again when pressing the TV Power button. Select System Setup and press Enter. 5. TV 8. Select ...
... 4. Press the TV button on page 33. 1. Select Remote Control Setup and press Enter. 6. Press TV Power Power on your LIFESTYLE® system Installation Guide for connecting an external component. If you can program it to operate your brand of VCR using its remote control. Press the TV... system settings menu. An infrared (IR) emitter is 18 October 30, 2001 AM259776_01_V.pdf See the "Remote control setup submenu" on the LIFESTYLE® remote control. 3. Turn on again when pressing the TV Power button. Select System Setup and press Enter. 5. TV 8. Select ...

Installation guide
Page 3
...Reference 23 Using alternate system connections 23 To play VCR audio (not TV audio) through your system 23 To play 4 Symbols used in this guide 4 System Installation 5 Getting started 5 Cables and accessories 6 Placing your speakers 7 Left and right front speaker placement 7 Center speaker placement 8 Surround speaker placement...27 Using digital audio connections 27 Using optical digital audio connections 27 Connecting the optional IR emitter cable 28 Accessories 28 Warranty 28 Contacting customer service 28 Technical information 29 3 AM259777_02_V.pdf • April 23, 2002
...Reference 23 Using alternate system connections 23 To play VCR audio (not TV audio) through your system 23 To play 4 Symbols used in this guide 4 System Installation 5 Getting started 5 Cables and accessories 6 Placing your speakers 7 Left and right front speaker placement 7 Center speaker placement 8 Surround speaker placement...27 Using digital audio connections 27 Using optical digital audio connections 27 Connecting the optional IR emitter cable 28 Accessories 28 Warranty 28 Contacting customer service 28 Technical information 29 3 AM259777_02_V.pdf • April 23, 2002
Installation guide
Page 4
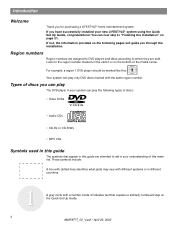
...marked with a number inside it indicates text that appear in this guide The symbols that explains a similarly numbered step on the bottom of this : Your system can now skip to "Finishing the installation" on the following types of discs: • Video DVDs •...different systems or in your new LIFESTYLE® system using the Quick Set Up Guide, congratulations! Look for purchasing a LIFESTYLE® home entertainment system. If you through the installation. You can play the following pages will guide you have successfully installed your understanding of the media ...
...marked with a number inside it indicates text that appear in this guide The symbols that explains a similarly numbered step on the bottom of this : Your system can now skip to "Finishing the installation" on the following types of discs: • Video DVDs •...different systems or in your new LIFESTYLE® system using the Quick Set Up Guide, congratulations! Look for purchasing a LIFESTYLE® home entertainment system. If you through the installation. You can play the following pages will guide you have successfully installed your understanding of the media ...
Installation guide
Page 9
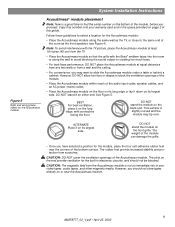
...: The magnetic field from a wall and the ceiling. • For convenience, you proceed. System Installation Instructions Figure 5 Right and wrong placements for the Acoustimass module Acoustimass® module placement Note: Now is a... 18 inches (45 cm) from scratches. CAUTION: DO NOT cover the ventilation openings of this guide. DO NOT stand the module on the back end. Follow these guidelines to select a location ... want to the same end of the bottom surface. Note: To avoid interference with the Bose® emblem faces into the room or along the same wall as the TV, or ...
...: The magnetic field from a wall and the ceiling. • For convenience, you proceed. System Installation Instructions Figure 5 Right and wrong placements for the Acoustimass module Acoustimass® module placement Note: Now is a... 18 inches (45 cm) from scratches. CAUTION: DO NOT cover the ventilation openings of this guide. DO NOT stand the module on the back end. Follow these guidelines to select a location ... want to the same end of the bottom surface. Note: To avoid interference with the Bose® emblem faces into the room or along the same wall as the TV, or ...
Installation guide
Page 10
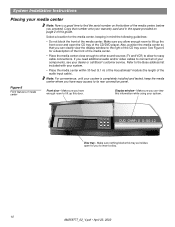
... Placing your media center Note: Now is completely installed and tested, keep the media center where you to lift up ... Do not block the front of the media center, before you need additional audio and/or video cables to the Bose address list included with your system. • Place the media center within 30 feet (9.1 m) of the Acoustimass®...; module (the length of this information while using your dealer or call Bose® customer service. Make sure you can view this guide. Copy that you can clearly view the display window to the right of the media ...
... Placing your media center Note: Now is completely installed and tested, keep the media center where you to lift up ... Do not block the front of the media center, before you need additional audio and/or video cables to the Bose address list included with your system. • Place the media center within 30 feet (9.1 m) of the Acoustimass®...; module (the length of this information while using your dealer or call Bose® customer service. Make sure you can view this guide. Copy that you can clearly view the display window to the right of the media ...
Installation guide
Page 16
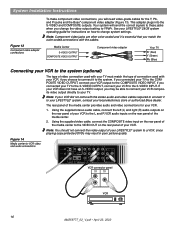
... VIDEO OUTPUTS VCR connector panel AUDIO OUT VIDEO OUT R L VCR 16 AM259777_02_V.pdf • April 23, 2002 See your LIFESTYLE® 28/35 system operating guide for instructions on the rear panel of the media center to the S-VIDEO INPUT. If you connected your TV to the S-VIDEO...on how to change the video output setting to your local electronics store or authorized Bose dealer. Note: If your VCR. The rear panel of connection used with the cables. System Installation Instructions Figure 13 Component video adapter connections To make component video connections, you will ...
... VIDEO OUTPUTS VCR connector panel AUDIO OUT VIDEO OUT R L VCR 16 AM259777_02_V.pdf • April 23, 2002 See your LIFESTYLE® 28/35 system operating guide for instructions on the rear panel of the media center to the S-VIDEO INPUT. If you connected your TV to the S-VIDEO...on how to change the video output setting to your local electronics store or authorized Bose dealer. Note: If your VCR. The rear panel of connection used with the cables. System Installation Instructions Figure 13 Component video adapter connections To make component video connections, you will ...

Installation guide
Page 18
... these steps. 1. Wait until your system is operating and you can also lower the volume of TV TV on or off detector" in your LIFESTYLE® Operating Guide. Use the on-screen menus in your TV to select "Internal Speakers: Off" (your on separately each time it is needed , when another video... is on /off detector Mounting the detector using those devises you listen to TV sound through your LIFESTYLE® system, the speakers in your TV should not be different). Figure 16 TV on/off detector installed on your TV Back of your TV to its lowest setting. Plug the connector on the...
... these steps. 1. Wait until your system is operating and you can also lower the volume of TV TV on or off detector" in your LIFESTYLE® Operating Guide. Use the on-screen menus in your TV to select "Internal Speakers: Off" (your on separately each time it is needed , when another video... is on /off detector Mounting the detector using those devises you listen to TV sound through your LIFESTYLE® system, the speakers in your TV should not be different). Figure 16 TV on/off detector installed on your TV Back of your TV to its lowest setting. Plug the connector on the...

Installation guide
Page 20
...prevent conflicts with other LIFESTYLE® music systems. Figure 20 Remote control battery installation Four (4) AAA (IEC-LR3) batteries + Battery ++ compartment + cover 20 AM259777_02_V.pdf • April 23, 2002 See your Operating Guide for information on the remote and... snap it closed. Find the polarity markings (+ and -) inside the compartment and install the four batteries accordingly. Replace the batteries when the remote control stops...
...prevent conflicts with other LIFESTYLE® music systems. Figure 20 Remote control battery installation Four (4) AAA (IEC-LR3) batteries + Battery ++ compartment + cover 20 AM259777_02_V.pdf • April 23, 2002 See your Operating Guide for information on the remote and... snap it closed. Find the polarity markings (+ and -) inside the compartment and install the four batteries accordingly. Replace the batteries when the remote control stops...


