Installation guide
Page 6
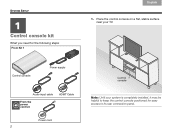
Control console Power supply Audio input cable From the power cord kit HDMI® Cable Power cord 2 Control console Note: Until your TV. Place the control console on a flat, stable surface near your system is completely installed, it may be helpful to keep the control console positioned for the following steps: From Kit 1 TAB 5 TAB 4 TAB 3 TAB 2 English 1. TAB 8 TAB 7 SYSTEM SETUP TAB 6 11 Control console kit What you need for easy access to its rear connection panel.
Control console Power supply Audio input cable From the power cord kit HDMI® Cable Power cord 2 Control console Note: Until your TV. Place the control console on a flat, stable surface near your system is completely installed, it may be helpful to keep the control console positioned for the following steps: From Kit 1 TAB 5 TAB 4 TAB 3 TAB 2 English 1. TAB 8 TAB 7 SYSTEM SETUP TAB 6 11 Control console kit What you need for easy access to its rear connection panel.
Installation guide
Page 7
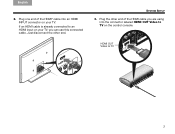
Just disconnect the other end of the HDMI® cable into the connector labeled HDMI OUT Video to TV on your TV, you are using into an HDMI INPUT connector on the control console. HDMI OUT Video to an HDMI input on your TV. TAB 5 TAB 6 TAB 7 TAB 8 SYSTEM SETUP 3. Plug the other end. If an HDMI cable is already connected to TV 3 English TAB 2 TAB 3 TAB 4 2. Plug one end of the HDMI cable you can use this connected cable.
Just disconnect the other end of the HDMI® cable into the connector labeled HDMI OUT Video to TV on your TV, you are using into an HDMI INPUT connector on the control console. HDMI OUT Video to an HDMI input on your TV. TAB 5 TAB 6 TAB 7 TAB 8 SYSTEM SETUP 3. Plug the other end. If an HDMI cable is already connected to TV 3 English TAB 2 TAB 3 TAB 4 2. Plug one end of the HDMI cable you can use this connected cable.

Installation guide
Page 16
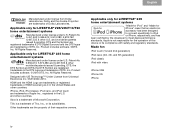
... Bose Corporation. TAB 8 TAB 7 TAB 6 TAB 5 SYSTEM SETUP Applying rubber feet When placing the Acoustimass® module on bare floors, you can attach the included rubber feet to the bottom of your system setup. See the address sheet included in your system operating guide. HDMI and the HDMI ... remote or a connection error, you can reactivate the interactive setup mode at any problems, see the troubleshooting table in solving problems, contact Bose® Customer Service. For help in your floor. iPod and iPhone are placing the center speaker on a smooth surface like glass or ...
... Bose Corporation. TAB 8 TAB 7 TAB 6 TAB 5 SYSTEM SETUP Applying rubber feet When placing the Acoustimass® module on bare floors, you can attach the included rubber feet to the bottom of your system setup. See the address sheet included in your system operating guide. HDMI and the HDMI ... remote or a connection error, you can reactivate the interactive setup mode at any problems, see the troubleshooting table in solving problems, contact Bose® Customer Service. For help in your floor. iPod and iPhone are placing the center speaker on a smooth surface like glass or ...
Owner's guide
Page 4
... a trademark of this device or its subsidiaries. Apple is a trademark of Apple Inc., registered in the United States and other countries. Made for LIFESTYLE® 235 home entertainment systems Manufactured under license under U.S. Patent #'s: 5,451,942; 5,956,674; 5,974,380; 5,978,762; 6,487,535 & other...logos are trademarks of DTS, Inc. HDMI and the HDMI Logo are trademarks of Tivo, Inc., or its compliance with safety and regulatory standards. Applicable only for LIFESTYLE® 235 home entertainment systems "Made for iPod" and "Made for LIFESTYLE® V25/V35/T10/T20 home ...
... a trademark of this device or its subsidiaries. Apple is a trademark of Apple Inc., registered in the United States and other countries. Made for LIFESTYLE® 235 home entertainment systems Manufactured under license under U.S. Patent #'s: 5,451,942; 5,956,674; 5,974,380; 5,978,762; 6,487,535 & other...logos are trademarks of DTS, Inc. HDMI and the HDMI Logo are trademarks of Tivo, Inc., or its compliance with safety and regulatory standards. Applicable only for LIFESTYLE® 235 home entertainment systems "Made for iPod" and "Made for LIFESTYLE® V25/V35/T10/T20 home ...
Owner's guide
Page 6
... a set-top box 8 Using the tuner in your TV 8 Tuning to a TV station 8 Playing audio/video devices 9 Listening to a Bose link input device 9 Playing an iPod or iPhone mobile digital device (on 235, V35, and V25 systems only 10 Using the front console inputs 11 Front USB input 11 Front Analog A/V input...
... a set-top box 8 Using the tuner in your TV 8 Tuning to a TV station 8 Playing audio/video devices 9 Listening to a Bose link input device 9 Playing an iPod or iPhone mobile digital device (on 235, V35, and V25 systems only 10 Using the front console inputs 11 Front USB input 11 Front Analog A/V input...
Owner's guide
Page 9
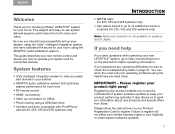
...HDMI® connectivity • Video up to 14 additional rooms or locations (for 235, V35 and V25 systems only) Note: Multi-room operation is not available on systems sold in Japan. System features • Unify intelligent integration system to help If you for choosing a Bose® LIFESTYLE... 8 INTRODUCTION • AM/FM radio (for 235, V35 and V25 systems only) • Can deliver sound in up -conversion to 1080p • Photo viewing using the UnifyTM intelligent integration system, and have questions while operating your new LIFESTYLE® system, go to -use system delivers ...
...HDMI® connectivity • Video up to 14 additional rooms or locations (for 235, V35 and V25 systems only) Note: Multi-room operation is not available on systems sold in Japan. System features • Unify intelligent integration system to help If you for choosing a Bose® LIFESTYLE... 8 INTRODUCTION • AM/FM radio (for 235, V35 and V25 systems only) • Can deliver sound in up -conversion to 1080p • Photo viewing using the UnifyTM intelligent integration system, and have questions while operating your new LIFESTYLE® system, go to -use system delivers ...
Owner's guide
Page 13
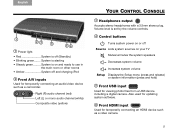
... video (yellow) TAB 5 TAB 6 TAB 7 TAB 8 YOUR CONTROL CONSOLE 3 Headphones output Accepts stereo headphones with a 3.5mm stereo plug. Also used for updating system software. 6 Front HDMI input Used for temporarily connecting an audio/video device such as a video camera. 5 System is off (Standby) • Blinking green........ English TAB 2 TAB 3 TAB 4 1 23... room or other rooms • Amber System off Source Lists system sources on or off and charging iPod 2 Front A/V inputs Used for temporarily connecting an HDMI device such as a camcorder.
... video (yellow) TAB 5 TAB 6 TAB 7 TAB 8 YOUR CONTROL CONSOLE 3 Headphones output Accepts stereo headphones with a 3.5mm stereo plug. Also used for updating system software. 6 Front HDMI input Used for temporarily connecting an audio/video device such as a video camera. 5 System is off (Standby) • Blinking green........ English TAB 2 TAB 3 TAB 4 1 23... room or other rooms • Amber System off Source Lists system sources on or off and charging iPod 2 Front A/V inputs Used for temporarily connecting an HDMI device such as a camcorder.
Owner's guide
Page 15
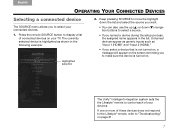
...( ) or down ( ) navigation buttons to control each of connected devices on page 21. 7 The UnifyTM intelligent integration system sets the the Lifestyle® remote to select a source. • If you named a device during the setup process, the assigned name appears in the following example:... Highlighted selection 2. The currently selected device is highlighted as "Input 1 (HDMI)" and "Input 2 (HDMI)." • If you select a device that is not turned on, a message will appear on the screen reminding you to select ...
...( ) or down ( ) navigation buttons to control each of connected devices on page 21. 7 The UnifyTM intelligent integration system sets the the Lifestyle® remote to select a source. • If you named a device during the setup process, the assigned name appears in the following example:... Highlighted selection 2. The currently selected device is highlighted as "Input 1 (HDMI)" and "Input 2 (HDMI)." • If you select a device that is not turned on, a message will appear on the screen reminding you to select ...

Owner's guide
Page 19
...a folder displays its contents. TAB 5 TAB 6 TAB 7 TAB 8 OPERATING YOUR CONNECTED DEVICES Use the following controls for temporarily connecting devices such as A/V (Front), USB, and HDMI (Front) only when a device is highlighted) Up nine items Down nine items EXIT Exit slideshow and return to browsing folders Play slideshow of highlighted folder...TAB 2 TAB 3 TAB 4 Using the front console inputs The front of the list on the left followed by single image files. Front USB input Your LIFESTYLE® system can display photo files (.jpg or .jpeg format only) from a USB storage device.
...a folder displays its contents. TAB 5 TAB 6 TAB 7 TAB 8 OPERATING YOUR CONNECTED DEVICES Use the following controls for temporarily connecting devices such as A/V (Front), USB, and HDMI (Front) only when a device is highlighted) Up nine items Down nine items EXIT Exit slideshow and return to browsing folders Play slideshow of highlighted folder...TAB 2 TAB 3 TAB 4 Using the front console inputs The front of the list on the left followed by single image files. Front USB input Your LIFESTYLE® system can display photo files (.jpg or .jpeg format only) from a USB storage device.
Owner's guide
Page 20
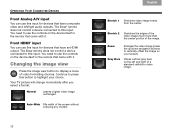
...this input. Stretch 2 Stretches the edges of the video image much more than the center portion of the screen without cropping any content. The Bose® remote does not control a device connected to use the controls on the device itself or the remote that came with it . You ...unchanged. TAB 8 TAB 7 TAB 6 TAB 5 OPERATING YOUR CONNECTED DEVICES Front Analog A/V input You can use this input for devices that have an HDMI output. Front HDMI® input You can use this button to display a menu of video formatting choices. Changing the image view Press the image view button to...
...this input. Stretch 2 Stretches the edges of the video image much more than the center portion of the screen without cropping any content. The Bose® remote does not control a device connected to use the controls on the device itself or the remote that came with it . You ...unchanged. TAB 8 TAB 7 TAB 6 TAB 5 OPERATING YOUR CONNECTED DEVICES Front Analog A/V input You can use this input for devices that have an HDMI output. Front HDMI® input You can use this button to display a menu of video formatting choices. Changing the image view Press the image view button to...
Owner's guide
Page 25
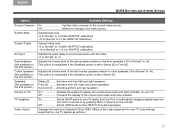
...Normal* to +8). Off Prevents the display of the front center speakers relative to other speakers (-8 to Normal* to +6). Off Sends HDMI audio to the current video source. English TAB 2 TAB 3 TAB 4 TAB 5 TAB 6 TAB 7 TAB 8 MORE BUTTONS ...System Bass System Treble A/V Sync Rear Speakers (Not available on the 235 system.) Center Speakers (Not available on the 235 system.) Speakers (Not available on the 235 system.) Volume on the remote). This option is unavailable if the ...Speakers Video Output Available Settings On Applies video overscan to the LIFESTYLE® system speakers.
...Normal* to +8). Off Prevents the display of the front center speakers relative to other speakers (-8 to Normal* to +6). Off Sends HDMI audio to the current video source. English TAB 2 TAB 3 TAB 4 TAB 5 TAB 6 TAB 7 TAB 8 MORE BUTTONS ...System Bass System Treble A/V Sync Rear Speakers (Not available on the 235 system.) Center Speakers (Not available on the 235 system.) Speakers (Not available on the 235 system.) Volume on the remote). This option is unavailable if the ...Speakers Video Output Available Settings On Applies video overscan to the LIFESTYLE® system speakers.
Owner's guide
Page 27
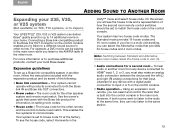
... TAB 6 TAB 7 TAB 8 ADDING SOUND TO ANOTHER ROOM Expanding your 235, V35, or V25 system (Not available on T20, T10 systems, or in Japan.) Your LIFESTYLE® 235, V35 or V25 system can deliver Bose® quality sound in up a Bose link-compatible system in the Unify™ menu and select house code.... The house code for any device connected to HDMI® input 1, 2, or 3, you must match...
... TAB 6 TAB 7 TAB 8 ADDING SOUND TO ANOTHER ROOM Expanding your 235, V35, or V25 system (Not available on T20, T10 systems, or in Japan.) Your LIFESTYLE® 235, V35 or V25 system can deliver Bose® quality sound in up a Bose link-compatible system in the Unify™ menu and select house code.... The house code for any device connected to HDMI® input 1, 2, or 3, you must match...

