
The Bose® Lifestyle® amplifier - Owner's guide
Page 5
... control 10 Setting Zone 2 Protocol 10 Connecting the Lifestyle® stereo amplifier to a Model 20 music center 11 Connecting the Lifestyle® stereo amplifier to a Model 5 music center 13 Connecting speakers to your Lifestyle® stereo amplifier 14 Checking to a Lifestyle® media center 9 Setting up your system 15 Maintaining Your Lifestyle® Stereo Amplifier Cleaning the amplifier 16 Protecting...
... control 10 Setting Zone 2 Protocol 10 Connecting the Lifestyle® stereo amplifier to a Model 20 music center 11 Connecting the Lifestyle® stereo amplifier to a Model 5 music center 13 Connecting speakers to your Lifestyle® stereo amplifier 14 Checking to a Lifestyle® media center 9 Setting up your system 15 Maintaining Your Lifestyle® Stereo Amplifier Cleaning the amplifier 16 Protecting...

The Bose® Lifestyle® amplifier - Owner's guide
Page 9
...; stereo amplifier to a multi-room interface CAUTION: Before making any connections, turn the Lifestyle® system off and disconnect the music center from the AC (mains) power outlet. Insert the single multi-pin connector at one end of the audio... INPUT 30-ft audio input cable (supplied) AM262840_00_V.pdf January 4, 2002 7 Figure 6 Cable connections between a multi-room interface and the Lifestyle® stereo amplifier Lifestyle® stereo amplifier rear panel Multi-room interface rear panel 4 Ω MINIMUM LL R L SYSTEM RR CONTROL L R +-...
...; stereo amplifier to a multi-room interface CAUTION: Before making any connections, turn the Lifestyle® system off and disconnect the music center from the AC (mains) power outlet. Insert the single multi-pin connector at one end of the audio... INPUT 30-ft audio input cable (supplied) AM262840_00_V.pdf January 4, 2002 7 Figure 6 Cable connections between a multi-room interface and the Lifestyle® stereo amplifier Lifestyle® stereo amplifier rear panel Multi-room interface rear panel 4 Ω MINIMUM LL R L SYSTEM RR CONTROL L R +-...

The Bose® Lifestyle® amplifier - Owner's guide
Page 10
...all connected rooms as room A, B, C, and D, with the Personal® music center Systems that have a multi-room interface are connected to your Lifestyle® system owner's guide for more than one room of Bose® powered speakers placed in individual rooms. These rooms are referred to as one... The room indicators tell you to control up the Personal music center for the first time....
...all connected rooms as room A, B, C, and D, with the Personal® music center Systems that have a multi-room interface are connected to your Lifestyle® system owner's guide for more than one room of Bose® powered speakers placed in individual rooms. These rooms are referred to as one... The room indicators tell you to control up the Personal music center for the first time....

The Bose® Lifestyle® amplifier - Owner's guide
Page 13
... RCA piggyback connector into the L (left) INPUT jack. At the other connections. 1. Setting Up Your Lifestyle® Stereo Amplifier Connecting the Lifestyle® stereo amplifier to a Model 20 music center ® Figure 10 Cable connections between the Model 20 music center and the Lifestyle® stereo amplifier CAUTION: Before making connections, turn the...
... RCA piggyback connector into the L (left) INPUT jack. At the other connections. 1. Setting Up Your Lifestyle® Stereo Amplifier Connecting the Lifestyle® stereo amplifier to a Model 20 music center ® Figure 10 Cable connections between the Model 20 music center and the Lifestyle® stereo amplifier CAUTION: Before making connections, turn the...

The Bose® Lifestyle® amplifier - Owner's guide
Page 14
...control for Zone 2 If your system uses a Model 20 music center, you need to set up (on operating your first remote. 3. Slide switch 5 down (off), and switches 6 and 8 up a second RC-20 remote control to your Lifestyle® system owner's guide for more than one room.... Remove the remote control battery cover and locate the miniature switches (Figure 11). 2. ON K40 l 2345678 12 January 4, 2002 AM262840_00_V.pdf Note: Refer to operate the ZONE 2 outputs...
...control for Zone 2 If your system uses a Model 20 music center, you need to set up (on operating your first remote. 3. Slide switch 5 down (off), and switches 6 and 8 up a second RC-20 remote control to your Lifestyle® system owner's guide for more than one room.... Remove the remote control battery cover and locate the miniature switches (Figure 11). 2. ON K40 l 2345678 12 January 4, 2002 AM262840_00_V.pdf Note: Refer to operate the ZONE 2 outputs...

The Bose® Lifestyle® amplifier - Owner's guide
Page 15
...with the fixed output level available from the AC (mains) power outlet. Figure 12 Cable connections between the Model 5 music center and the Lifestyle® stereo amplifier Model 5 music center rear panel Lifestyle® stereo amplifier rear panel 4 Ω MINIMUM LL LL SYSTEM RR ...you have completed all other end of the music center. CAUTION: Before making connections, turn the Lifestyle® system off and disconnect the music center from the FIXED OUTPUT jacks. 1. On the rear panel of the amplifier (Figure 12). 2. Insert the red RCA connector of the...
...with the fixed output level available from the AC (mains) power outlet. Figure 12 Cable connections between the Model 5 music center and the Lifestyle® stereo amplifier Model 5 music center rear panel Lifestyle® stereo amplifier rear panel 4 Ω MINIMUM LL LL SYSTEM RR ...you have completed all other end of the music center. CAUTION: Before making connections, turn the Lifestyle® system off and disconnect the music center from the FIXED OUTPUT jacks. 1. On the rear panel of the amplifier (Figure 12). 2. Insert the red RCA connector of the...

The Bose® Lifestyle® amplifier - Owner's guide
Page 16
...on the left speaker cable to the SPEAKER OUTPUT L terminals in your first remote. 3. ON K40 l 2345678 Connecting speakers to your Lifestyle® stereo amplifier CAUTION: DO NOT connect the amplifier to powered speakers of the amplifier. Doing so may ...model, nor to any amplified music sources. or black) terminal. Press the black terminal tab. Setting Up Your Lifestyle® Stereo Amplifier ® Figure 13 RC-5 remote switch settings Setting up the RC-5 remote control If your system uses a Model 5 music center, you face it should always be ...
...on the left speaker cable to the SPEAKER OUTPUT L terminals in your first remote. 3. ON K40 l 2345678 Connecting speakers to your Lifestyle® stereo amplifier CAUTION: DO NOT connect the amplifier to powered speakers of the amplifier. Doing so may ...model, nor to any amplified music sources. or black) terminal. Press the black terminal tab. Setting Up Your Lifestyle® Stereo Amplifier ® Figure 13 RC-5 remote switch settings Setting up the RC-5 remote control If your system uses a Model 5 music center, you face it should always be ...

The Bose® Lifestyle® amplifier - Owner's guide
Page 17
...there is preset at the factory to 230V. Using the power cord included with your Personal® music center or your new remote control and adjust the vol- Select a music source with your Lifestyle® stereo amplifier, firmly insert the small connector on one end of the ...other connections are complete. 1. Figure 15 Setting the voltage selection switch to 115V Powering-up your Lifestyle® music system to an AC (mains) outlet. 3. Connect the power cord of the Lifestyle® stereo amplifier and your system CAUTION: DO NOT plug the AC power cord into...
...there is preset at the factory to 230V. Using the power cord included with your Personal® music center or your new remote control and adjust the vol- Select a music source with your Lifestyle® stereo amplifier, firmly insert the small connector on one end of the ...other connections are complete. 1. Figure 15 Setting the voltage selection switch to 115V Powering-up your Lifestyle® music system to an AC (mains) outlet. 3. Connect the power cord of the Lifestyle® stereo amplifier and your system CAUTION: DO NOT plug the AC power cord into...

The Bose® Lifestyle® amplifier - Owner's guide
Page 18
... for service, or contact Bose Customer Service. Maintaining Your Lifestyle® Stereo Amplifier Cleaning the amplifier The amplifier, which is designed only for home theater (Lifestyle® 12 or Lifestyle® 8 systems), make sure the audio input cable is inserted into SPEAKER ZONE 2. • If using a Model 20 music center, make sure the...
... for service, or contact Bose Customer Service. Maintaining Your Lifestyle® Stereo Amplifier Cleaning the amplifier The amplifier, which is designed only for home theater (Lifestyle® 12 or Lifestyle® 8 systems), make sure the audio input cable is inserted into SPEAKER ZONE 2. • If using a Model 20 music center, make sure the...

Owner's guide
Page 2
... that may be of sufficient magnitude to rain or moisture. The CLASS 1 LASER PRODUCT label is located on the back panel and bottom of your Lifestyle® music center and the bottom panel of your Acoustimass® module: The lightning flash with this owner's guide carefully. Class B emissions limits This Class B digital apparatus...
... that may be of sufficient magnitude to rain or moisture. The CLASS 1 LASER PRODUCT label is located on the back panel and bottom of your Lifestyle® music center and the bottom panel of your Acoustimass® module: The lightning flash with this owner's guide carefully. Class B emissions limits This Class B digital apparatus...
Owner's guide
Page 5
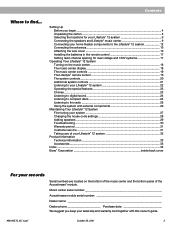
... to your records Serial numbers are located on the bottom of the music center and the bottom panel of your Lifestyle® 12 system 32 Product Information Technical information 33 Accessories ...33 Index ...34 Bose® Corporation inside back cover For your Lifestyle® 12 system 22 Operating the special features 23 Chimes ...23 Listening to digital...
... to your records Serial numbers are located on the bottom of the music center and the bottom panel of your Lifestyle® 12 system 32 Product Information Technical information 33 Accessories ...33 Index ...34 Bose® Corporation inside back cover For your Lifestyle® 12 system 22 Operating the special features 23 Chimes ...23 Listening to digital...
Owner's guide
Page 6
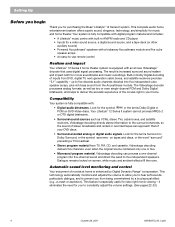
...pages 22-23.) 4 October 29, 2001 AM196573_05_V.pdf Your system is fully compatible with digital program material and includes: • A Lifestyle® music center with built-in AM/FM radio and CD player • Inputs for a video sound source, a digital sound source, and a...Monoaural program material. This complete audio home entertainment system offers superb sound, elegance, technology, and simplicity for purchasing the Bose® Lifestyle® 12 Series II system. Compatibility Your system is fully compatible with an all new Videostage® decoder that of the movies right in...
...pages 22-23.) 4 October 29, 2001 AM196573_05_V.pdf Your system is fully compatible with digital program material and includes: • A Lifestyle® music center with built-in AM/FM radio and CD player • Inputs for a video sound source, a digital sound source, and a...Monoaural program material. This complete audio home entertainment system offers superb sound, elegance, technology, and simplicity for purchasing the Bose® Lifestyle® 12 Series II system. Compatibility Your system is fully compatible with an all new Videostage® decoder that of the movies right in...
Owner's guide
Page 7
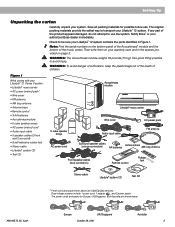
... your authorized Bose dealer immediately. Then write them on the bottom panel of the Acoustimass® module and the bottom of children. The power cords and packs for possible future use the system. The original packing materials provide the safest way to be sure your Lifestyle® 12 Series II system: • Lifestyle® music center • AC...
... your authorized Bose dealer immediately. Then write them on the bottom panel of the Acoustimass® module and the bottom of children. The power cords and packs for possible future use the system. The original packing materials provide the safest way to be sure your Lifestyle® 12 Series II system: • Lifestyle® music center • AC...
Owner's guide
Page 10
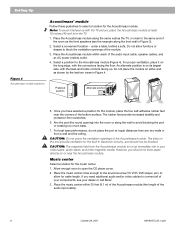
... inches (45 cm) from the TV. 1. CAUTION: Do not cover the ventilation openings of your video tapes, audio tapes, and other magnetic media. Music center Select a location for the Acoustimass module (Figure 4). under a table, behind a sofa. Aim the port (the round opening) into the room or ...should not store tapes directly on either end, as the front speakers (see your dealer or call Bose®. 3. The slots on the end provide ventilation for cable length. Place the music center close to the same end of the bottom surface. If you have selected a position for the...
... inches (45 cm) from the TV. 1. CAUTION: Do not cover the ventilation openings of your video tapes, audio tapes, and other magnetic media. Music center Select a location for the Acoustimass module (Figure 4). under a table, behind a sofa. Aim the port (the round opening) into the room or ...should not store tapes directly on either end, as the front speakers (see your dealer or call Bose®. 3. The slots on the end provide ventilation for cable length. Place the music center close to the same end of the bottom surface. If you have selected a position for the...
Owner's guide
Page 11
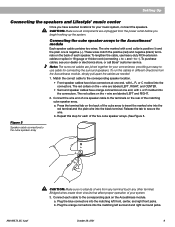
...cable to the terminals on the back of your convenience, providing an easy-touse cable for your dealer or electronics store, or call Bose® customer service. a. October 29, 2001 9 to the Acoustimass® module Each speaker cable contains two wires. The red collars... LEFT and RIGHT. 2. Bridged wires create short circuits that affect proper operation of each speaker. Setting Up Connecting the speakers and Lifestyle® music center Once you begin hooking up the system. These wires match the positive (red) and negative (black) terminals on the rear of...
...cable to the terminals on the back of your convenience, providing an easy-touse cable for your dealer or electronics store, or call Bose® customer service. a. October 29, 2001 9 to the Acoustimass® module Each speaker cable contains two wires. The red collars... LEFT and RIGHT. 2. Bridged wires create short circuits that affect proper operation of each speaker. Setting Up Connecting the speakers and Lifestyle® music center Once you begin hooking up the system. These wires match the positive (red) and negative (black) terminals on the rear of...
Owner's guide
Page 12
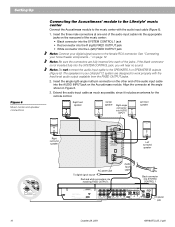
... jacks on page 12. The speakers in Figure 6. 3. Extend the audio input cable as much as possible, since it includes an antenna for the remote control. Align the connector at one end of the jacks. Setting Up Figure 6 Music center and speaker connections Connecting the Acoustimass® module to the Lifestyle® music center Connect the...
... jacks on page 12. The speakers in Figure 6. 3. Extend the audio input cable as much as possible, since it includes an antenna for the remote control. Align the connector at one end of the jacks. Setting Up Figure 6 Music center and speaker connections Connecting the Acoustimass® module to the Lifestyle® music center Connect the...

Owner's guide
Page 13
... the wrong one may damage your power pack or your local electric utility for the appropriate voltage setting. Connecting the music center AC (mains) power pack The Lifestyle® music center comes with a 120V AC (mains) power pack for international use the adapter plug provided. Note: Do not plug... Acoustimass module AC power jack. Use 115V for North America; 230V for the proper voltage (Figure 7). Plug the small end of the Lifestyle® music center. 2. Note: Do not plug the AC power cord into a power outlet until all component connections are complete. CAUTION: Be sure to...
... the wrong one may damage your power pack or your local electric utility for the appropriate voltage setting. Connecting the music center AC (mains) power pack The Lifestyle® music center comes with a 120V AC (mains) power pack for international use the adapter plug provided. Note: Do not plug... Acoustimass module AC power jack. Use 115V for North America; 230V for the proper voltage (Figure 7). Plug the small end of the Lifestyle® music center. 2. Note: Do not plug the AC power cord into a power outlet until all component connections are complete. CAUTION: Be sure to...
Owner's guide
Page 14
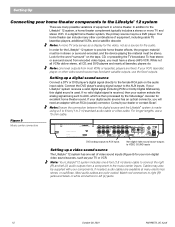
... or laserdisc players are fixed. Setting up a video sound source The Lifestyle® 12 system has one 6-foot (1.8 m) stereo cable to the music center inputs. Figure 9 Music center connectors LIFESTYLE® MODEL 5 MUSIC CENTER COVERED BY U.S. If your digital audio source has an optical connector, you... with your components. If no valid digital signal is used. For longer lengths, use the fixed outputs. PATENT D339,606 MANUFACTURED: BOSE CORPORATION, FRAMINGHAM, MA 01701-9168 MADE IN U.S.A L FIXED R A B SPEAKERS OUTPUT L REC PLAY TAPE AUX INPUT R VIDEO...
... or laserdisc players are fixed. Setting up a video sound source The Lifestyle® 12 system has one 6-foot (1.8 m) stereo cable to the music center inputs. Figure 9 Music center connectors LIFESTYLE® MODEL 5 MUSIC CENTER COVERED BY U.S. If your digital audio source has an optical connector, you... with your components. If no valid digital signal is used. For longer lengths, use the fixed outputs. PATENT D339,606 MANUFACTURED: BOSE CORPORATION, FRAMINGHAM, MA 01701-9168 MADE IN U.S.A L FIXED R A B SPEAKERS OUTPUT L REC PLAY TAPE AUX INPUT R VIDEO...
Owner's guide
Page 15
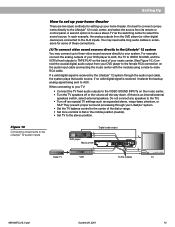
...selects the backup analog signal being sent to AUX. If no valid digital signal is best to connect components directly to the Lifestyle® 12 music center, and select the source from its remote or control panel. In each example, the analog outputs from your DVD player to ... long audio cables or extensions for some of your music center. (See Figure 10.) Connect the coaxial digital audio output from the DVD player (or other digital device) are two basic methods for setting up your home theater. PATENT D339,606 MANUFACTURED: BOSE CORPORATION, FRAMINGHAM, MA 01701-9168 MADE IN U.S.A ...
...selects the backup analog signal being sent to AUX. If no valid digital signal is best to connect components directly to the Lifestyle® 12 music center, and select the source from its remote or control panel. In each example, the analog outputs from your DVD player to ... long audio cables or extensions for some of your music center. (See Figure 10.) Connect the coaxial digital audio output from the DVD player (or other digital device) are two basic methods for setting up your home theater. PATENT D339,606 MANUFACTURED: BOSE CORPORATION, FRAMINGHAM, MA 01701-9168 MADE IN U.S.A ...

Owner's guide
Page 16
... expanded stereo, mega-bass, phantom, or SAP. LR V DVD player Digital audio output LIFESTYLE® MODEL 5 MUSIC CENTER COVERED BY U.S. Instead, connect the VCR L and R audio outputs to the TV L and R audio inputs to the maximum setting. PATENT D339,606 MANUFACTURED: BOSE CORPORATION, FRAMINGHAM, MA 01701-9168 MADE IN U.S.A L FIXED R A B SPEAKERS OUTPUT L REC PLAY...
... expanded stereo, mega-bass, phantom, or SAP. LR V DVD player Digital audio output LIFESTYLE® MODEL 5 MUSIC CENTER COVERED BY U.S. Instead, connect the VCR L and R audio outputs to the TV L and R audio inputs to the maximum setting. PATENT D339,606 MANUFACTURED: BOSE CORPORATION, FRAMINGHAM, MA 01701-9168 MADE IN U.S.A L FIXED R A B SPEAKERS OUTPUT L REC PLAY...


