

English Owners Guide
Page 2
... appliance coupler is neither designed nor tested for use outdoors, in recreation vehicles, or on or near the apparatus. Failure to do not expose the system to rain or moisture. L1® model 1S power stand Top array and bottom extension B1 or B2 bass module ©2012 Bose Corporation. WARNING: To reduce the risk of Conformity can register your...
... appliance coupler is neither designed nor tested for use outdoors, in recreation vehicles, or on or near the apparatus. Failure to do not expose the system to rain or moisture. L1® model 1S power stand Top array and bottom extension B1 or B2 bass module ©2012 Bose Corporation. WARNING: To reduce the risk of Conformity can register your...

English Owners Guide
Page 3
... radio frequency energy and, if not installed and used , use caution when moving the cart/apparatus combination to avoid injury from tip-over. 13. Initial turn on the product. 19. Heed all instructions. 5. Protect the power cord from the apparatus. 11. Unplug this apparatus near any heat sources, such as described in accordance with the manufacturer's instructions. 8. Servicing is used in the operating instructions...
... radio frequency energy and, if not installed and used , use caution when moving the cart/apparatus combination to avoid injury from tip-over. 13. Initial turn on the product. 19. Heed all instructions. 5. Protect the power cord from the apparatus. 11. Unplug this apparatus near any heat sources, such as described in accordance with the manufacturer's instructions. 8. Servicing is used in the operating instructions...

English Owners Guide
Page 4
... 5 Product overview 6 Connections and controls 7 SYSTEM SETUP 9 Parts list 9 Positioning your system 10 Setting up the power stand 11 Assembling the L1® model 1S system 11 Connecting to AC power 12 Connecting the B1 or B2 bass module 13 Adding a T1 ToneMatch® audio engine (optional 14 Adding a second B1 bass module (optional 15 OPERATING INFORMATION 17 Setting the analog input level 17 Using a T1 ToneMatch® audio engine and an analog input source 17 User scenarios 17...
... 5 Product overview 6 Connections and controls 7 SYSTEM SETUP 9 Parts list 9 Positioning your system 10 Setting up the power stand 11 Assembling the L1® model 1S system 11 Connecting to AC power 12 Connecting the B1 or B2 bass module 13 Adding a T1 ToneMatch® audio engine (optional 14 Adding a second B1 bass module (optional 15 OPERATING INFORMATION 17 Setting the analog input level 17 Using a T1 ToneMatch® audio engine and an analog input source 17 User scenarios 17...

English Owners Guide
Page 5
... for your appearance - This owner's guide provides detailed setup and operating instructions for purchasing the Bose® L1® model 1S system with ToneMatch® port. This frees you from hearing the sound of each instrument in an amplified performance. 5 Venice_Intro.fm 4/12 Enhanced performance of the musicians creates the kind of all instruments), is less equipment on a revolutionary new technology, this system, including...
... for your appearance - This owner's guide provides detailed setup and operating instructions for purchasing the Bose® L1® model 1S system with ToneMatch® port. This frees you from hearing the sound of each instrument in an amplified performance. 5 Venice_Intro.fm 4/12 Enhanced performance of the musicians creates the kind of all instruments), is less equipment on a revolutionary new technology, this system, including...

English Owners Guide
Page 6
... digital signal processing, additional inputs and user-interface control. The system also comes with a padded carrying bag for bass guitar, kick drum, or organ. Each power stand can add: • A second B1 bass module for each of its parts. Svenska Nederlands Italiano FSrvaennçsakias NeEdsepralañnodl s FDItreaulnitaçsnacoihs DEDseapunatssñckohl English INTRODUCTION Product overview The L1® model 1S...
... digital signal processing, additional inputs and user-interface control. The system also comes with a padded carrying bag for bass guitar, kick drum, or organ. Each power stand can add: • A second B1 bass module for each of its parts. Svenska Nederlands Italiano FSrvaennçsakias NeEdsepralañnodl s FDItreaulnitaçsnacoihs DEDseapunatssñckohl English INTRODUCTION Product overview The L1® model 1S...
English Owners Guide
Page 7
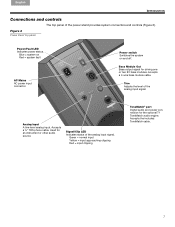
... ToneMatch cable. 7 Venice_Intro.fm 4/12 Accepts a 4-wire bass module cable. Accepts a ¼" TRS phone cable. Signal/Clip LED Indicates status of the analog input signal. Green = normal input Yellow = input approaching clipping Red = input clipping ToneMatch® port Digital audio and power connection for driving one or two B1 bass modules. Figure 2 Power stand top panel Power/Fault LED Indicates power status. Blue = system on and off. Used for an...
... ToneMatch cable. 7 Venice_Intro.fm 4/12 Accepts a 4-wire bass module cable. Accepts a ¼" TRS phone cable. Signal/Clip LED Indicates status of the analog input signal. Green = normal input Yellow = input approaching clipping Red = input clipping ToneMatch® port Digital audio and power connection for driving one or two B1 bass modules. Figure 2 Power stand top panel Power/Fault LED Indicates power status. Blue = system on and off. Used for an...

English Owners Guide
Page 8
... reach of children. Power stand carton L1 power stand Array and extension carton L1 model 1S top array and bottom extension B1 or B2 bass module carton B1 or B2 bass module Carrying bag Bottom Top Cover AC power cord Quick setup guide Owner's guide L1TM Model II System with ToneMatchTM port Owner's Guide www.Bose.com/musicians Product registration card Carrying bag Bass module cable (4-wire) Adhesive rubber feet (for B2 only) B1 or B2 bass module owner's guide B1 Bass Module Installation Guide 8 Svenska Nederlands Italiano...
... reach of children. Power stand carton L1 power stand Array and extension carton L1 model 1S top array and bottom extension B1 or B2 bass module carton B1 or B2 bass module Carrying bag Bottom Top Cover AC power cord Quick setup guide Owner's guide L1TM Model II System with ToneMatchTM port Owner's Guide www.Bose.com/musicians Product registration card Carrying bag Bass module cable (4-wire) Adhesive rubber feet (for B2 only) B1 or B2 bass module owner's guide B1 Bass Module Installation Guide 8 Svenska Nederlands Italiano...
English Owners Guide
Page 9
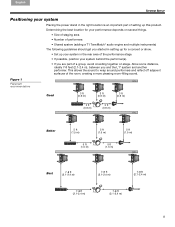
... sound. Determining the best location for a concert or show. • Set up your system in the right location is an important part of setting up this product. Figure 1 Placement&#...Number of performers • Shared system (adding a T1 ToneMatch® audio engine and multiple instruments) The following guidelines should get you started in setting up for your performance depends on stage. English DEDseapunatssñckohl FDItreaulnitaçsnacoihs NeEdsepralañnodl s FSrvaennçsakias Italiano Nederlands Svenska SYSTEM SETUP Positioning your system Placing the power stand...
... sound. Determining the best location for a concert or show. • Set up your system in the right location is an important part of setting up this product. Figure 1 Placement&#...Number of performers • Shared system (adding a T1 ToneMatch® audio engine and multiple instruments) The following guidelines should get you started in setting up for your performance depends on stage. English DEDseapunatssñckohl FDItreaulnitaçsnacoihs NeEdsepralañnodl s FSrvaennçsakias Italiano Nederlands Svenska SYSTEM SETUP Positioning your system Placing the power stand...
English Owners Guide
Page 10
Position the power stand on page 13 before installing the top array of the loudspeaker. 1. Be sure to fully insert it into the socket to set up the loudspeaker sections in personal injury and/or damage to mount the T1 ToneMatch® audio engine on the L1 model 1S system, see "Adding a T1 ToneMatch® audio engine (optional)" on the...
Position the power stand on page 13 before installing the top array of the loudspeaker. 1. Be sure to fully insert it into the socket to set up the loudspeaker sections in personal injury and/or damage to mount the T1 ToneMatch® audio engine on the L1 model 1S system, see "Adding a T1 ToneMatch® audio engine (optional)" on the...

English Owners Guide
Page 11
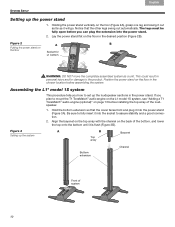
...çsakias Italiano Nederlands Svenska SYSTEM SETUP Connecting to a thermal protection mode, and temporarily turn off . 2. Make sure the power switch is part of the AC power cord into a live AC (mains) receptacle (Figure 4). A quality suppressor, which is off . Plug one end of the ventilation system. Figure 4 Power connections Power switch CAUTION: DO NOT block or cover the handle opening, which can damage electronic components in...
...çsakias Italiano Nederlands Svenska SYSTEM SETUP Connecting to a thermal protection mode, and temporarily turn off . 2. Make sure the power switch is part of the AC power cord into a live AC (mains) receptacle (Figure 4). A quality suppressor, which is off . Plug one end of the ventilation system. Figure 4 Power connections Power switch CAUTION: DO NOT block or cover the handle opening, which can damage electronic components in...
English Owners Guide
Page 12
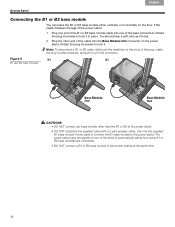
... or B2 bass modules are connected. • DO NOT connect a B1 or B2 bass module to the power stand. • DO NOT substitute the supplied cable with a 2-wire speaker cable. Svenska Nederlands Italiano FSrvaennçsakias NeEdsepralañnodl s FDItreaulnitaçsnacoihs DEDseapunatssñckohl English SYSTEM SETUP Connecting the B1 or B2 bass module You can place the B1 or B2 bass module either vertically or horizontally on the power stand. Plug one of the bass connectors. Plug...
... or B2 bass modules are connected. • DO NOT connect a B1 or B2 bass module to the power stand. • DO NOT substitute the supplied cable with a 2-wire speaker cable. Svenska Nederlands Italiano FSrvaennçsakias NeEdsepralañnodl s FDItreaulnitaçsnacoihs DEDseapunatssñckohl English SYSTEM SETUP Connecting the B1 or B2 bass module You can place the B1 or B2 bass module either vertically or horizontally on the power stand. Plug one of the bass connectors. Plug...

English Owners Guide
Page 13
...; audio engine provides additional input/output capabilities to your system, plus digital signal processing to the carriage. 6. Plug one end of the ToneMatch cable (supplied with the audio engine) into the channel on the left or right side of the top section before starting this procedure. 1. Using the hook and loop strap, secure the cable to customize the way you sound. Insert the mounting bar...
...; audio engine provides additional input/output capabilities to your system, plus digital signal processing to the carriage. 6. Plug one end of the ToneMatch cable (supplied with the audio engine) into the channel on the left or right side of the top section before starting this procedure. 1. Using the hook and loop strap, secure the cable to customize the way you sound. Insert the mounting bar...

English Owners Guide
Page 14
... 7 Installation of the first B1. Driving more than full system performance. 1. When placed horizontally, the modules are stackable (Figure 7). CAUTION: Do not connect more than two B1 bass modules from this output improperly loads the amplifier in the power stand, resulting in less than two B1 bass modules to the Bass Module Out connector on the power stand. Plug one end of the second B1 cable into...
... 7 Installation of the first B1. Driving more than full system performance. 1. When placed horizontally, the modules are stackable (Figure 7). CAUTION: Do not connect more than two B1 bass modules from this output improperly loads the amplifier in the power stand, resulting in less than two B1 bass modules to the Bass Module Out connector on the power stand. Plug one end of the second B1 cable into...
English Owners Guide
Page 15
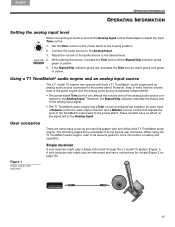
... power stand Trim control only affects the volume level of some typical user scenarios. Using a T1 ToneMatch® audio engine and an analog input source The L1® model 1S system can operate with both a T1 ToneMatch® audio engine and an analog audio source connected to adjust the input Trim control. 1. English DEDseapunatssñckohl FDItreaulnitaçsnacoihs NeEdsepralañnodl s FSrvaennçsakias Italiano Nederlands Svenska OPERATING INFORMATION OPERATING INFORMATION Setting the...
... power stand Trim control only affects the volume level of some typical user scenarios. Using a T1 ToneMatch® audio engine and an analog input source The L1® model 1S system can operate with both a T1 ToneMatch® audio engine and an analog audio source connected to adjust the input Trim control. 1. English DEDseapunatssñckohl FDItreaulnitaçsnacoihs NeEdsepralañnodl s FSrvaennçsakias Italiano Nederlands Svenska OPERATING INFORMATION OPERATING INFORMATION Setting the...

English Owners Guide
Page 16
T1 ToneMatch audio engine 16 Svenska Nederlands Italiano OPERATING INFORMATION Figure 2 Single system with guitar and microphone FSrvaennçsakias NeEdsepralañnodl s FDItreaulnitaçsnacoihs DEDseapunatssñckohl English T1 ToneMatch® audio engine Figure 3 Single system with multiple instruments and T1 ToneMatch audio engine Multiple musicians In this scenario, a keyboard-guitar duo sings and plays through a single T1 ToneMatch audio engine and an L1® system.
T1 ToneMatch audio engine 16 Svenska Nederlands Italiano OPERATING INFORMATION Figure 2 Single system with guitar and microphone FSrvaennçsakias NeEdsepralañnodl s FDItreaulnitaçsnacoihs DEDseapunatssñckohl English T1 ToneMatch® audio engine Figure 3 Single system with multiple instruments and T1 ToneMatch audio engine Multiple musicians In this scenario, a keyboard-guitar duo sings and plays through a single T1 ToneMatch audio engine and an L1® system.

English Owners Guide
Page 17
T1 ToneMatch audio engine T1 ToneMatch audio engine T1 ToneMatch audio engine T1 ToneMatch audio engine 17 English DEDseapunatssñckohl FDItreaulnitaçsnacoihs NeEdsepralañnodl s FSrvaennçsakias Italiano Nederlands Svenska OPERATING INFORMATION Figure 4 Multiple systems, each with a T1 ToneMatch audio engine Full band A full band scenario is built around multiple T1 ToneMatch® audio engines and L1® systems. Each musician plays and sings through a single T1 ToneMatch audio engine and L1 system.
T1 ToneMatch audio engine T1 ToneMatch audio engine T1 ToneMatch audio engine T1 ToneMatch audio engine 17 English DEDseapunatssñckohl FDItreaulnitaçsnacoihs NeEdsepralañnodl s FSrvaennçsakias Italiano Nederlands Svenska OPERATING INFORMATION Figure 4 Multiple systems, each with a T1 ToneMatch audio engine Full band A full band scenario is built around multiple T1 ToneMatch® audio engines and L1® systems. Each musician plays and sings through a single T1 ToneMatch audio engine and L1 system.

English Owners Guide
Page 18
In this scenario, two mixer outputs can be fed into a mixer. Svenska Nederlands Italiano FSrvaennçsakias NeEdsepralañnodl s FDItreaulnitaçsnacoihs DEDseapunatssñckohl English OPERATING INFORMATION Figure 5 Two systems, a mixer, and input devices DJ events DJs use many types of input sources (CD player, turntable, MP3 player, etc.) plugged into two L1® systems for stereo sound. 18
In this scenario, two mixer outputs can be fed into a mixer. Svenska Nederlands Italiano FSrvaennçsakias NeEdsepralañnodl s FDItreaulnitaçsnacoihs DEDseapunatssñckohl English OPERATING INFORMATION Figure 5 Two systems, a mixer, and input devices DJ events DJs use many types of input sources (CD player, turntable, MP3 player, etc.) plugged into two L1® systems for stereo sound. 18

English Owners Guide
Page 19
.... • Make sure the Trim level control is working. Power LED is on (green), but power LED is on times. Each power stand can 't solve the problem, please call Bose Live Music Customer Support at www.Bose.com/livesound. Recommended troubleshooting tools • Portable voltmeter • XLR and ¼" phone plug cables • Cable tester • B1 bass module 4-wire cable • AC outlet tester • Spare AC power cord Problem What to arrange for service. Power LED...
.... • Make sure the Trim level control is working. Power LED is on (green), but power LED is on times. Each power stand can 't solve the problem, please call Bose Live Music Customer Support at www.Bose.com/livesound. Recommended troubleshooting tools • Portable voltmeter • XLR and ¼" phone plug cables • Cable tester • B1 bass module 4-wire cable • AC outlet tester • Spare AC power cord Problem What to arrange for service. Power LED...

English Owners Guide
Page 20
... B2 bass module is plugged in their connectors. • Make sure connections are using the included 4-wire B1/B2 bass module cable. • Make sure the B1 or B2 bass module cable is plugged into for the loudspeaker and/or vocalist on stage. • Increase the distance from the L1® top array • Make sure the L1 top array and bottom extension are firmly seated in , but no bass audio is heard • Make...
... B2 bass module is plugged in their connectors. • Make sure connections are using the included 4-wire B1/B2 bass module cable. • Make sure the B1 or B2 bass module cable is plugged into for the loudspeaker and/or vocalist on stage. • Increase the distance from the L1® top array • Make sure the L1 top array and bottom extension are firmly seated in , but no bass audio is heard • Make...
English Owners Guide
Page 21
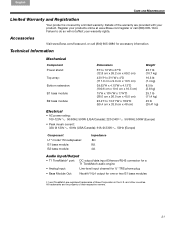
... @ 120V 60Hz (USA/Canada); 61A @ 230V 50Hz (Europe) Component L1® model 1S loudspeaker: B1 bass module: B2 bass module: Impedance 8 8 4 Audio Input/Output • T1 ToneMatch® port: DC output/data input Ethercon/RJ45 connector for a T1 ToneMatch audio engine • Analog Input: Line-level input channel for ¼" TRS phone plug • Bass Module Out: Neutrik® NL4 output for accessory information. Register your warranty rights. English DEDseapunatssñckohl FDItreaulnita...
... @ 120V 60Hz (USA/Canada); 61A @ 230V 50Hz (Europe) Component L1® model 1S loudspeaker: B1 bass module: B2 bass module: Impedance 8 8 4 Audio Input/Output • T1 ToneMatch® port: DC output/data input Ethercon/RJ45 connector for a T1 ToneMatch audio engine • Analog Input: Line-level input channel for ¼" TRS phone plug • Bass Module Out: Neutrik® NL4 output for accessory information. Register your warranty rights. English DEDseapunatssñckohl FDItreaulnita...


