Owner's guide
Page 2
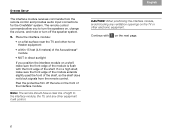
...guide Please take the time to follow the instructions in this owner's guide. ©2009 Bose Corporation. As with any electronic products, use outdoors, in this owner's guide. The exclamation... operating and maintenance instructions in recreation vehicles, or on the system, is incorrectly replaced. The interface module is used only with a battery of this guide for use care not to constitute a risk...Wo CR2032 or DL2032 3-volt lithium battery. CineMate series II remote-Replace only with arrowhead symbol within an equilateral triangle alerts the user to rain or moisture...
...guide Please take the time to follow the instructions in this owner's guide. ©2009 Bose Corporation. As with any electronic products, use outdoors, in this owner's guide. The exclamation... operating and maintenance instructions in recreation vehicles, or on the system, is incorrectly replaced. The interface module is used only with a battery of this guide for use care not to constitute a risk...Wo CR2032 or DL2032 3-volt lithium battery. CineMate series II remote-Replace only with arrowhead symbol within an equilateral triangle alerts the user to rain or moisture...

Owner's guide
Page 3
... Acoustimass® module 7 3 Connecting the interface module 9 4 Connecting the TV audio to the interface module 10 Connecting optical audio 10 Connecting analog audio 11 Turning off the TV internal speakers 11 5 Connecting to a power outlet 12 6 Inserting the CineMate® GS remote batteries . . 14 CONTROLS AND INDICATORS 15 Acoustimass® module bass control 15 CineMate® series II remote control...
... Acoustimass® module 7 3 Connecting the interface module 9 4 Connecting the TV audio to the interface module 10 Connecting optical audio 10 Connecting analog audio 11 Turning off the TV internal speakers 11 5 Connecting to a power outlet 12 6 Inserting the CineMate® GS remote batteries . . 14 CONTROLS AND INDICATORS 15 Acoustimass® module bass control 15 CineMate® series II remote control...
Owner's guide
Page 4
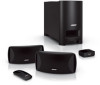
...standing Acoustimass® module for deep bass sound and an interface module that provides simple audio connections to enjoy the full audio impact of this owner's guide 2 In fact, they provide much of the performance of equipment. To help The CineMate system easily connects ...Before you begin Thank you set up your CineMate system, the following items are provided: • Quick Setup Guide • Setup DVD • Detailed instructions in two configurations: • CineMate series II - Setup help you for purchasing the Bose® CineMate® system, which delivers the superb ...
...standing Acoustimass® module for deep bass sound and an interface module that provides simple audio connections to enjoy the full audio impact of this owner's guide 2 In fact, they provide much of the performance of equipment. To help The CineMate system easily connects ...Before you begin Thank you set up your CineMate system, the following items are provided: • Quick Setup Guide • Setup DVD • Detailed instructions in two configurations: • CineMate series II - Setup help you for purchasing the Bose® CineMate® system, which delivers the superb ...
Owner's guide
Page 5
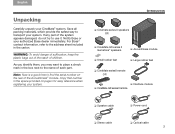
... to find the serial number on page ii for easy reference when registering your authorized Bose dealer immediately. Notify Bose or your system. ❏ Cinemate series II speakers OR ❏ CineMate GS series II Gemstone® speakers ❏ Small rubber feet ❏ Acoustimass module ❏ Large rubber feet ❏ CineMate series II remote OR ❏ Interface module ❏ CineMate GS series II remote ❏ Speaker cable ❏ Power...
... to find the serial number on page ii for easy reference when registering your authorized Bose dealer immediately. Notify Bose or your system. ❏ Cinemate series II speakers OR ❏ CineMate GS series II Gemstone® speakers ❏ Small rubber feet ❏ Acoustimass module ❏ Large rubber feet ❏ CineMate series II remote OR ❏ Interface module ❏ CineMate GS series II remote ❏ Speaker cable ❏ Power...
Owner's guide
Page 6
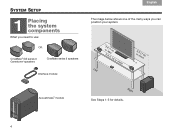
SYSTEM SETUP 1 Placing the system components What you need to use: Svenska Nederlands FItralniaçnaois DEsepuatsñcohl English The image below shows one of the many ways you can position your system. OR CineMate® GS series II Gemstone® speakers CineMate series II speakers Interface module o33rffltet(s(11smm)) or more Left 3 or mft o(1rem) Acoustimass® module Right See Steps 1-5 for details. 4
SYSTEM SETUP 1 Placing the system components What you need to use: Svenska Nederlands FItralniaçnaois DEsepuatsñcohl English The image below shows one of the many ways you can position your system. OR CineMate® GS series II Gemstone® speakers CineMate series II speakers Interface module o33rffltet(s(11smm)) or more Left 3 or mft o(1rem) Acoustimass® module Right See Steps 1-5 for details. 4
Owner's guide
Page 7
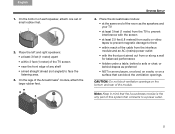
...a surface that connects to prevent interference with the screen • at least 3 feet (1 meter) apart • within reach of the cable from the interface module and an AC (mains) power outlet • with the front port aimed out from audio or video tapes to prevent magnetic damage to face the...wall for balanced performance • hidden under a table, behind a sofa or chair, or behind drapes as preferred • NOT in mind that the Acoustimass module is the only part of this system that can block the ventilation openings. On the bottom of each speaker, attach one set of any shelf...
...a surface that connects to prevent interference with the screen • at least 3 feet (1 meter) apart • within reach of the cable from the interface module and an AC (mains) power outlet • with the front port aimed out from audio or video tapes to prevent magnetic damage to face the...wall for balanced performance • hidden under a table, behind a sofa or chair, or behind drapes as preferred • NOT in mind that the Acoustimass module is the only part of this system that can block the ventilation openings. On the bottom of each speaker, attach one set of any shelf...
Owner's guide
Page 8
...® module • NOT in direct sunlight If you to the interface module, the TV, and any other equipment it will control. CAUTION: When positioning the interface module, avoid ...blocking any ventilation openings on a shelf, make sure the front edge of the module extends slightly past the front of the interface module... a flat surface near the TV and other electronic equipment. Place the interface module: • on the front of the shelf, so the shelf does...
...® module • NOT in direct sunlight If you to the interface module, the TV, and any other equipment it will control. CAUTION: When positioning the interface module, avoid ...blocking any ventilation openings on a shelf, make sure the front edge of the module extends slightly past the front of the interface module... a flat surface near the TV and other electronic equipment. Place the interface module: • on the front of the shelf, so the shelf does...
Owner's guide
Page 11
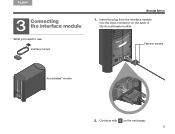
Insert the plug from the interface module into the input connector on the next page. 9 What you need to use: Interface module Fastener screws Acoustimass® module 2. English DEsepuatsñcohl FItralniaçnaois Nederlands Svenska SYSTEM SETUP 3 Connecting the interface module 1. Continue with 4 on the back of the Acoustimass module.
Insert the plug from the interface module into the input connector on the next page. 9 What you need to use: Interface module Fastener screws Acoustimass® module 2. English DEsepuatsñcohl FItralniaçnaois Nederlands Svenska SYSTEM SETUP 3 Connecting the interface module 1. Continue with 4 on the back of the Acoustimass module.
Owner's guide
Page 12
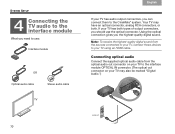
Using the optical connection gives you can connect them to the CineMate® system. Note: To receive the highest-quality digital sound from the optical audio out connector on your TV to the interface module OPTICAL IN connector. (The optical out connector on your TV may have an optical connector..., analog RCA connectors, or both types of output connectors, you should use : Interface module OR If your TV has audio output connectors, you the highest-quality digital sound. If your TV using an HDMI cable. Svenska Nederlands ...
Using the optical connection gives you can connect them to the CineMate® system. Note: To receive the highest-quality digital sound from the optical audio out connector on your TV to the interface module OPTICAL IN connector. (The optical out connector on your TV may have an optical connector..., analog RCA connectors, or both types of output connectors, you should use : Interface module OR If your TV has audio output connectors, you the highest-quality digital sound. If your TV using an HDMI cable. Svenska Nederlands ...
Owner's guide
Page 13
...a SPEAKER ON/OFF switch, set it to the OFF position and adjust the TV volume to about 80% of hearing TV audio through the CineMate® system, the internal speakers in your TV is not equipped with an optical connector, use the fixed connectors for turning off the internal .... 11 When your TV should be used as a second audio input. English DEsepuatsñcohl FItralniaçnaois Nederlands Svenska SYSTEM SETUP Note: The interface module has both fixed (FIX) and variable (VAR) audio output connectors, use the supplied stereo audio cable to connect from your speakers on or off....
...a SPEAKER ON/OFF switch, set it to the OFF position and adjust the TV volume to about 80% of hearing TV audio through the CineMate® system, the internal speakers in your TV is not equipped with an optical connector, use the fixed connectors for turning off the internal .... 11 When your TV should be used as a second audio input. English DEsepuatsñcohl FItralniaçnaois Nederlands Svenska SYSTEM SETUP Note: The interface module has both fixed (FIX) and variable (VAR) audio output connectors, use the supplied stereo audio cable to connect from your speakers on or off....
Owner's guide
Page 15
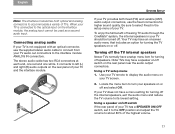
When you connect the CineMate® system to a power source, the green LED on the next page. CAUTION: Bose recommends using a safety agencyapproved surge protector on the interface module flashes. English DEsepuatsñcohl FItralniaçnaois Nederlands Svenska SYSTEM SETUP When you press the remote control On-Off, Volume Up... equipment. Voltage variations and spikes can damage electronic components in any system. 13 Continue with 6 on the front of the interface module flashes for 10 seconds, then extinguishes, indicating that the system has been connected to power.
When you connect the CineMate® system to a power source, the green LED on the next page. CAUTION: Bose recommends using a safety agencyapproved surge protector on the interface module flashes. English DEsepuatsñcohl FItralniaçnaois Nederlands Svenska SYSTEM SETUP When you press the remote control On-Off, Volume Up... equipment. Voltage variations and spikes can damage electronic components in any system. 13 Continue with 6 on the front of the interface module flashes for 10 seconds, then extinguishes, indicating that the system has been connected to power.
Owner's guide
Page 18
... . Press Volume Down to your CineMate series II system. 16 Press Mute again to control the CineMate system When you point the remote control at the interface module and press a button, the green LED on the interface module flashes twice. When maximum volume is reached, the green LED on the interface module flashes. Note: The CineMate series II remote control only operates your...
... . Press Volume Down to your CineMate series II system. 16 Press Mute again to control the CineMate system When you point the remote control at the interface module and press a button, the green LED on the interface module flashes twice. When maximum volume is reached, the green LED on the interface module flashes. Note: The CineMate series II remote control only operates your...
Owner's guide
Page 20
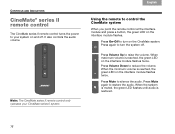
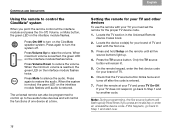
...;cohl English CONTROLS AND INDICATORS Using the remote to control the CineMate® system When you point the remote control at the interface module and press the On-Off, Volume, or Mute button, the green LED on the interface module flashes twice. Press the TV source button. Press and hold ...Setup on the CineMate speaker system. Press On-Off to Step 1 and start with...
...;cohl English CONTROLS AND INDICATORS Using the remote to control the CineMate® system When you point the remote control at the interface module and press the On-Off, Volume, or Mute button, the green LED on the interface module flashes twice. Press the TV source button. Press and hold ...Setup on the CineMate speaker system. Press On-Off to Step 1 and start with...
Owner's guide
Page 21
once for the VCR and once for each one source, such as turning on the front of the interface module will control the basic CineMate speaker functions, such as a VCR/DVD unit, you must first program the remote with a device code for individual device types (TV, CBL, VCR, DVD,... functions, the remote will light. 2. Using the remote to watch TV Note: In order to program the code twice - See "Using the CineMate® GS series II remote control" on your TV and other devices, using the remote control, you can program the combination code into either remote control source. You...
once for the VCR and once for each one source, such as turning on the front of the interface module will control the basic CineMate speaker functions, such as a VCR/DVD unit, you must first program the remote with a device code for individual device types (TV, CBL, VCR, DVD,... functions, the remote will light. 2. Using the remote to watch TV Note: In order to program the code twice - See "Using the CineMate® GS series II remote control" on your TV and other devices, using the remote control, you can program the combination code into either remote control source. You...

Owner's guide
Page 22
...On-Off to turn on the speaker system, changing the volume, and muting or turning off , volume, mute). 20 See "Using the CineMate® GS series II remote control" on your DVD player. 3. Selecting the TV input Press TV•Video to select the correct TV input for the source ... device. 1. DVD source button 4. These inputs are commonly labeled TV, Video 1, Video 2, and AUX on the back of the interface module will always control the basic CineMate speaker functions (on the front of the TV. You can easily switch control from one device to controlling DVD functions, the remote will...
...On-Off to turn on the speaker system, changing the volume, and muting or turning off , volume, mute). 20 See "Using the CineMate® GS series II remote control" on your DVD player. 3. Selecting the TV input Press TV•Video to select the correct TV input for the source ... device. 1. DVD source button 4. These inputs are commonly labeled TV, Video 1, Video 2, and AUX on the back of the interface module will always control the basic CineMate speaker functions (on the front of the TV. You can easily switch control from one device to controlling DVD functions, the remote will...

Owner's guide
Page 28
... the back of your speakers, Acoustimass® module, and interface module with the + and - Insert two AA (IEC-R6) 1.5V batteries, or the equivalent. AA batteries (2) Cleaning your area. 3. Svenska Nederlands FItralniaçnaois DEsepuatsñcohl English CARE AND MAINTENANCE Replacing the CineMate® GS series II remote batteries Replace both batteries. You can clean...
... the back of your speakers, Acoustimass® module, and interface module with the + and - Insert two AA (IEC-R6) 1.5V batteries, or the equivalent. AA batteries (2) Cleaning your area. 3. Svenska Nederlands FItralniaçnaois DEsepuatsñcohl English CARE AND MAINTENANCE Replacing the CineMate® GS series II remote batteries Replace both batteries. You can clean...
Owner's guide
Page 29
The green LED should be in standby). • Make sure the interface module is plugged into an operating AC wall outlet. See your system is a CineMate GS series II, make sure the TV's internal speakers are turned off and the TV volume is turned up. • If using a sound source other source.... the TV input" on the system. • Make sure the CineMate® system is playing source material. 27 The green LED on . If so, press the TV remote control Mute button to unmute it. • Make sure the interface module and speaker cables are both firmly connected to the Acoustimass...
The green LED should be in standby). • Make sure the interface module is plugged into an operating AC wall outlet. See your system is a CineMate GS series II, make sure the TV's internal speakers are turned off and the TV volume is turned up. • If using a sound source other source.... the TV input" on the system. • Make sure the CineMate® system is playing source material. 27 The green LED on . If so, press the TV remote control Mute button to unmute it. • Make sure the interface module and speaker cables are both firmly connected to the Acoustimass...
Owner's guide
Page 30
... no obstructions. • Make sure the protective film is removed from the lens on the front of the interface module. • Check that the source button on the CineMate® GS series II remote flashes when a button is pressed. • Check that the green LED on . • Check ..."Turning off your device and brand in solving problems, contact Bose® Customer Service. CARE AND MAINTENANCE Svenska Nederlands FItralniaçnaois DEsepuatsñcohl English Problem What to the address sheet included with the CineMate system. 28 Sound is distorted • Make sure speaker cables...
... no obstructions. • Make sure the protective film is removed from the lens on the front of the interface module. • Check that the source button on the CineMate® GS series II remote flashes when a button is pressed. • Check that the green LED on . • Check ..."Turning off your device and brand in solving problems, contact Bose® Customer Service. CARE AND MAINTENANCE Svenska Nederlands FItralniaçnaois DEsepuatsñcohl English Problem What to the address sheet included with the CineMate system. 28 Sound is distorted • Make sure speaker cables...


