Owner's guide
Page 3
English DEsepuatsñcohl FItralniaçnaois Nederlands Svenska CONTENTS INTRODUCTION 2 Before you begin 2 For your records 3 Unpacking 4 SETUP 6 1 Placing the system components 6 2 Connecting the speakers to the module 8 3 Connecting the module to the media center . . . . 10 4 Connecting the system video to your TV ... 41 Checking for disc compatibility 42 For DVDs: Setting Parental Control 42 Choosing a password 42 Setting a restriction level 43 Ratings supplied by the MPAA 43 iii
English DEsepuatsñcohl FItralniaçnaois Nederlands Svenska CONTENTS INTRODUCTION 2 Before you begin 2 For your records 3 Unpacking 4 SETUP 6 1 Placing the system components 6 2 Connecting the speakers to the module 8 3 Connecting the module to the media center . . . . 10 4 Connecting the system video to your TV ... 41 Checking for disc compatibility 42 For DVDs: Setting Parental Control 42 Choosing a password 42 Setting a restriction level 43 Ratings supplied by the MPAA 43 iii
Owner's guide
Page 10
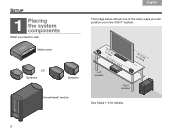
SETUP 1 Placing the system components What you need to use: Svenska Nederlands FItralniaçnaois DEsepuatsñcohl English The image below shows one of the many ways you can position your new 3•2•1® system. Media center OR Speakers Speakers Acoustimass® module o3r'le(1ssm) 3' (1 m) or more Left speaker or3'm(1orme ) Right speaker See Steps 1-6 for details. 6
SETUP 1 Placing the system components What you need to use: Svenska Nederlands FItralniaçnaois DEsepuatsñcohl English The image below shows one of the many ways you can position your new 3•2•1® system. Media center OR Speakers Speakers Acoustimass® module o3r'le(1ssm) 3' (1 m) or more Left speaker or3'm(1orme ) Right speaker See Steps 1-6 for details. 6

Owner's guide
Page 11
... in an enclosure, on a bed, on a sofa, or on a surface that can block the ventilation openings. English DEsepuatsñcohl FItralniaçnaois Nederlands Svenska SETUP 1. Place the left and right speakers: • at least 3 feet (1 meter) from the TV to prevent interference with the screen • several feet (.8 meters) from...
... in an enclosure, on a bed, on a sofa, or on a surface that can block the ventilation openings. English DEsepuatsñcohl FItralniaçnaois Nederlands Svenska SETUP 1. Place the left and right speakers: • at least 3 feet (1 meter) from the TV to prevent interference with the screen • several feet (.8 meters) from...
Owner's guide
Page 12
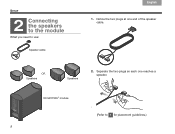
Separate the two plugs so each one end of the speaker cable. Notice the two plugs at one reaches a speaker. Acoustimass® module (Refer to use: 1. Svenska Nederlands FItralniaçnaois DEsepuatsñcohl English SETUP 2 Connecting the speakers to the module What you need to 1 for placement guidelines.) 8 Speaker cable OR Speakers Speakers 2.
Separate the two plugs so each one end of the speaker cable. Notice the two plugs at one reaches a speaker. Acoustimass® module (Refer to use: 1. Svenska Nederlands FItralniaçnaois DEsepuatsñcohl English SETUP 2 Connecting the speakers to the module What you need to 1 for placement guidelines.) 8 Speaker cable OR Speakers Speakers 2.

Owner's guide
Page 13
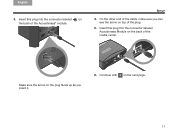
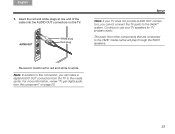
Insert each fastener screw by hand to the right of the Acoustimass® module. Insert the remaining single plug into the connector on the next page. 9 CAUTION: Do not plug the Acoustimass module into the speaker placed to secure the plug. Tighten each plug into the connector labeled SPEAKERS on the back of your TV. 4. Fastener screws 5. Continue with 3 on the proper speaker. The plug marked RIGHT goes into an AC power (mains) outlet until all other components are connected. 6. English DEsepuatsñcohl FItralniaçnaois Nederlands Svenska SETUP 3.
Insert each fastener screw by hand to the right of the Acoustimass® module. Insert the remaining single plug into the connector on the next page. 9 CAUTION: Do not plug the Acoustimass module into the speaker placed to secure the plug. Tighten each plug into the connector labeled SPEAKERS on the back of your TV. 4. Fastener screws 5. Continue with 3 on the proper speaker. The plug marked RIGHT goes into an AC power (mains) outlet until all other components are connected. 6. English DEsepuatsñcohl FItralniaçnaois Nederlands Svenska SETUP 3.

Owner's guide
Page 14
Make sure you can see the arrow on the top of the multi-pin plug at each end of the cable. Arrow Acoustimass® module cable Media center 2. Svenska Nederlands FItralniaçnaois DEsepuatsñcohl English SETUP 3 Connecting the module to use: 1. Acoustimass module 10 Notice the arrow on top before you need to the media center What you insert either end of the Acoustimass module cable.
Make sure you can see the arrow on the top of the multi-pin plug at each end of the cable. Arrow Acoustimass® module cable Media center 2. Svenska Nederlands FItralniaçnaois DEsepuatsñcohl English SETUP 3 Connecting the module to use: 1. Acoustimass module 10 Notice the arrow on top before you need to the media center What you insert either end of the Acoustimass module cable.
Owner's guide
Page 15
English DEsepuatsñcohl FItralniaçnaois Nederlands Svenska SETUP 3. Insert this plug into the connector labeled Acoustimass Module on the next page. 11 Make sure the arrow on the plug faces up as you can see the arrow on the back of the media center. Continue with 4 on the back of the Acoustimass® module. 4. Insert this plug into the connector labeled on top of the plug. 5. On the other end of the cable, make sure you insert it. 6.
English DEsepuatsñcohl FItralniaçnaois Nederlands Svenska SETUP 3. Insert this plug into the connector labeled Acoustimass Module on the next page. 11 Make sure the arrow on the plug faces up as you can see the arrow on the back of the media center. Continue with 4 on the back of the Acoustimass® module. 4. Insert this plug into the connector labeled on top of the plug. 5. On the other end of the cable, make sure you insert it. 6.
Owner's guide
Page 16
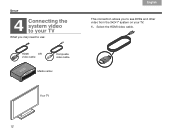
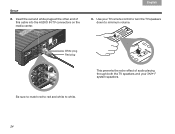
Svenska Nederlands FItralniaçnaois DEsepuatsñcohl English SETUP 4 Connecting the system video to your TV What you may need to use: This connection allows you to see DVDs and other video from the 3•2•1® system on your TV. 1. HDMI OR video cable Composite video cable Media center Your TV 12 Select the HDMI video cable.
Svenska Nederlands FItralniaçnaois DEsepuatsñcohl English SETUP 4 Connecting the system video to your TV What you may need to use: This connection allows you to see DVDs and other video from the 3•2•1® system on your TV. 1. HDMI OR video cable Composite video cable Media center Your TV 12 Select the HDMI video cable.

Owner's guide
Page 17
Follow the directions that are appropriate for VIDEO IN. This may be located on page 15 13 Check to see if your TV has an unused HDMI connector for your TV: TV with HDMI or TV without HDMI on page 14 on the side or rear connector panel of the TV. 3. English DEsepuatsñcohl FItralniaçnaois Nederlands Svenska SETUP 2.
Follow the directions that are appropriate for VIDEO IN. This may be located on page 15 13 Check to see if your TV has an unused HDMI connector for your TV: TV with HDMI or TV without HDMI on page 14 on the side or rear connector panel of the TV. 3. English DEsepuatsñcohl FItralniaçnaois Nederlands Svenska SETUP 2.
Owner's guide
Page 18
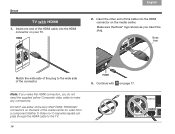
... use either of the two ONLY PASS-THROUGH connectors on the back of the connector. 3. Svenska Nederlands FItralniaçnaois DEsepuatsñcohl English SETUP TV with 5 on page 17. Make sure the Bose® logo shows as you do not need the supplied yellow Composite video cable to the TV. 14... Bose logo Match the wide side of the plug to the wide side of the media center for video from a component.Neither S-Video nor Composite signals ...
... use either of the two ONLY PASS-THROUGH connectors on the back of the connector. 3. Svenska Nederlands FItralniaçnaois DEsepuatsñcohl English SETUP TV with 5 on page 17. Make sure the Bose® logo shows as you do not need the supplied yellow Composite video cable to the TV. 14... Bose logo Match the wide side of the plug to the wide side of the media center for video from a component.Neither S-Video nor Composite signals ...

Owner's guide
Page 19
... TV, it may be in use either S-Video or Component connectors, you need the appropriate cables. English DEsepuatsñcohl FItralniaçnaois Nederlands Svenska SETUP TV without HDMI 1. Plug the Composite video cable into the yellow VIDEO IN connector on page 21. 15 Yellow Yellow Note: There may be other...
... TV, it may be in use either S-Video or Component connectors, you need the appropriate cables. English DEsepuatsñcohl FItralniaçnaois Nederlands Svenska SETUP TV without HDMI 1. Plug the Composite video cable into the yellow VIDEO IN connector on page 21. 15 Yellow Yellow Note: There may be other...

Owner's guide
Page 20
Continue with 5 on the back of the media center. . See "To use the ONLY PASS-THROUGH connector on page 21 for video from another component. a Note: If you make this Composite connection, you can use video pass through" on the media center for further information. 4. Insert the other end into the yellow Composite VIDEO OUT connector on the next page. 16 Svenska Nederlands FItralniaçnaois DEsepuatsñcohl English SETUP 3.
Continue with 5 on the back of the media center. . See "To use the ONLY PASS-THROUGH connector on page 21 for video from another component. a Note: If you make this Composite connection, you can use video pass through" on the media center for further information. 4. Insert the other end into the yellow Composite VIDEO OUT connector on the next page. 16 Svenska Nederlands FItralniaçnaois DEsepuatsñcohl English SETUP 3.
Owner's guide
Page 21
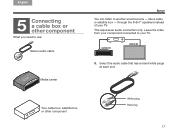
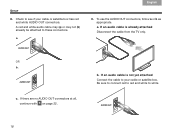
like a cable or satellite box - This requires an audio connection only. Leave the video from your component connected to another sound source - Your cable box, satellite box, or other component What you need to use: You can listen to your TV. Select the audio cable that has red and white plugs at each end. English DEsepuatsñcohl FItralniaçnaois Nederlands Svenska SETUP 5 Connecting a cable box or other component White plug Red plug 17 through the 3•2•1® speakers instead of your TV. Stereo audio cable Media center 5.
like a cable or satellite box - This requires an audio connection only. Leave the video from your component connected to another sound source - Your cable box, satellite box, or other component What you need to use: You can listen to your TV. Select the audio cable that has red and white plugs at each end. English DEsepuatsñcohl FItralniaçnaois Nederlands Svenska SETUP 5 Connecting a cable box or other component White plug Red plug 17 through the 3•2•1® speakers instead of your TV. Stereo audio cable Media center 5.
Owner's guide
Page 22
... are no AUDIO OUT connectors at all, continue with 6 on page 22. b. Check to white. 18 Svenska Nederlands FItralniaçnaois DEsepuatsñcohl English SETUP 6. a. 3. Be sure to connect red to red and white to see if your cable or satellite box.
... are no AUDIO OUT connectors at all, continue with 6 on page 22. b. Check to white. 18 Svenska Nederlands FItralniaçnaois DEsepuatsñcohl English SETUP 6. a. 3. Be sure to connect red to red and white to see if your cable or satellite box.
Owner's guide
Page 23
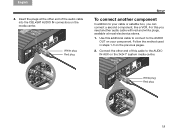
... to the AUDIO IN AUX on the media center. Insert the plugs at most electronics stores. 1. English DEsepuatsñcohl FItralniaçnaois Nederlands Svenska SETUP 4. Use this you can connect a second component, like a VCR. For this additional cable to connect to your component. Follow the method used in steps 1-3 on...
... to the AUDIO IN AUX on the media center. Insert the plugs at most electronics stores. 1. English DEsepuatsñcohl FItralniaçnaois Nederlands Svenska SETUP 4. Use this you can connect a second component, like a VCR. For this additional cable to connect to your component. Follow the method used in steps 1-3 on...
Owner's guide
Page 24
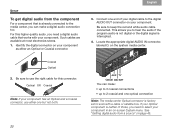
... OR Coaxial Note: If your component. Be sure to use either an Optical or Coaxial connector. 3. Svenska Nederlands FItralniaçnaois DEsepuatsñcohl English SETUP To get digital audio from a source" on the system media center. Connect one end of your digital cable to the digital AUDIO OUT connector on...
... OR Coaxial Note: If your component. Be sure to use either an Optical or Coaxial connector. 3. Svenska Nederlands FItralniaçnaois DEsepuatsñcohl English SETUP To get digital audio from a source" on the system media center. Connect one end of your digital cable to the digital AUDIO OUT connector on...

Owner's guide
Page 25
.... You can make a pass through the media center to your component Video out to the TV. English DEsepuatsñcohl FItralniaçnaois Nederlands Svenska SETUP 5. AND: • You want to connect another composite cable or two S-Video cables, which are available at most electronics stores. DO NOT use one matched...
.... You can make a pass through the media center to your component Video out to the TV. English DEsepuatsñcohl FItralniaçnaois Nederlands Svenska SETUP 5. AND: • You want to connect another composite cable or two S-Video cables, which are available at most electronics stores. DO NOT use one matched...
Owner's guide
Page 26
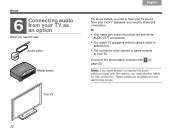
... the audio cable provided with 7 on page 25. These cables are available at most electronics stores. Svenska Nederlands FItralniaçnaois DEsepuatsñcohl English SETUP 6 Connecting audio from your TV as an option What you need to use: Audio cable Media center For some...
... the audio cable provided with 7 on page 25. These cables are available at most electronics stores. Svenska Nederlands FItralniaçnaois DEsepuatsñcohl English SETUP 6 Connecting audio from your TV as an option What you need to use: Audio cable Media center For some...
Owner's guide
Page 27
... page 20. 23 White plug Red plug Note: If your TV speakers for TV program audio. English DEsepuatsñcohl FItralniaçnaois Nederlands Svenska SETUP 1.
... page 20. 23 White plug Red plug Note: If your TV speakers for TV program audio. English DEsepuatsñcohl FItralniaçnaois Nederlands Svenska SETUP 1.
Owner's guide
Page 28
Insert the red and white plugs at the other end of audio playing through both the TV speakers and your TV remote control to turn the TV speakers down to white. Svenska Nederlands FItralniaçnaois DEsepuatsñcohl English SETUP 2. White plug Red plug Be sure to match red to red and white to minimum volume. This prevents the echo effect of this cable into the AUDIO IN TV connectors on the media center. 3. Use your 3•2•1® system speakers. 24
Insert the red and white plugs at the other end of audio playing through both the TV speakers and your TV remote control to turn the TV speakers down to white. Svenska Nederlands FItralniaçnaois DEsepuatsñcohl English SETUP 2. White plug Red plug Be sure to match red to red and white to minimum volume. This prevents the echo effect of this cable into the AUDIO IN TV connectors on the media center. 3. Use your 3•2•1® system speakers. 24


