Owner's guide
Page 2
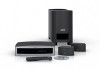
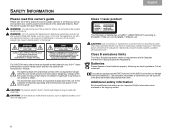
.... The complete Declaration of the Canadian Interference-Causing Equipment Regulations. Save this owner's guide carefully. Liquids can be found at: www.Bose.com/static/compliance/index.html. CAUTION: To prevent electric shock, match wide blade of its advanced features. CAUTION: Use of controls ...qualified service personnel. Do not incinerate. Additional safety information See the additional instructions on or near the apparatus. It will help you set up and operate your 3•2•1® home entertainment system media center and the rear panel of the Acoustimass® module: ...
.... The complete Declaration of the Canadian Interference-Causing Equipment Regulations. Save this owner's guide carefully. Liquids can be found at: www.Bose.com/static/compliance/index.html. CAUTION: To prevent electric shock, match wide blade of its advanced features. CAUTION: Use of controls ...qualified service personnel. Do not incinerate. Additional safety information See the additional instructions on or near the apparatus. It will help you set up and operate your 3•2•1® home entertainment system media center and the rear panel of the Acoustimass® module: ...
Owner's guide
Page 3
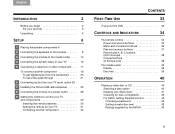
... an option 22 7 Installing the FM and AM radio antennas 25 8 Connecting the module to a power outlet 28 9 Setting the remote to control your TV and components 30 Inserting the remote batteries 30 Setting the remote for your TV 31 Controlling another component 32 FIRST-TIME USE 33 Trying out the DVD... 39 OPERATION 40 Playing a video disc or CD 40 Selecting a play option 40 Keeping your discs clean 41 Checking for disc compatibility 42 For DVDs: Setting Parental Control 42 Choosing a password 42 Setting a restriction level 43 Ratings supplied by the MPAA 43...
... an option 22 7 Installing the FM and AM radio antennas 25 8 Connecting the module to a power outlet 28 9 Setting the remote to control your TV and components 30 Inserting the remote batteries 30 Setting the remote for your TV 31 Controlling another component 32 FIRST-TIME USE 33 Trying out the DVD... 39 OPERATION 40 Playing a video disc or CD 40 Selecting a play option 40 Keeping your discs clean 41 Checking for disc compatibility 42 For DVDs: Setting Parental Control 42 Choosing a password 42 Setting a restriction level 43 Ratings supplied by the MPAA 43...
Owner's guide
Page 4
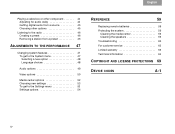
... menu 47 Selecting a new option 48 Language choices 48 Audio options 49 Video options 50 Media center options 52 Choosing new settings 53 To get to the Settings menu 53 Settings options 54 REFERENCE 59 Replacing remote batteries 59 Protecting the system 59 Cleaning the media center 59 Cleaning the speakers 59 Troubleshooting...
... menu 47 Selecting a new option 48 Language choices 48 Audio options 49 Video options 50 Media center options 52 Choosing new settings 53 To get to the Settings menu 53 Settings options 54 REFERENCE 59 Replacing remote batteries 59 Protecting the system 59 Cleaning the media center 59 Cleaning the speakers 59 Troubleshooting...

Owner's guide
Page 11
... bottom and rear of small rubber feet. 2. English DEsepuatsñcohl FItralniaçnaois Nederlands Svenska SETUP 1. On the bottom of each speaker, attach one set of the module. 5.
... bottom and rear of small rubber feet. 2. English DEsepuatsñcohl FItralniaçnaois Nederlands Svenska SETUP 1. On the bottom of each speaker, attach one set of the module. 5.
Owner's guide
Page 24
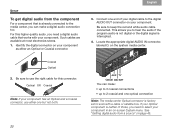
... connector. You can make : • up to 3 coaxial connections • up to 2 coaxial and one optical connection Note: The media center Optical connector is factory set to hear the audio if the program audio is not digital or the digital signal is neither of your digital cable to the digital AUDIO...
... connector. You can make : • up to 3 coaxial connections • up to 2 coaxial and one optical connection Note: The media center Optical connector is factory set to hear the audio if the program audio is not digital or the digital signal is neither of your digital cable to the digital AUDIO...

Owner's guide
Page 33
CAUTION: Bose recommends using a safety agencyapproved surge protector on ( l ). On 220-240V models only, turn the POWER switch to the region where you use the system. Insert this plug into the AC (mains) power. On dual-voltage systems only, set the voltage switch for the power that is appropriate to on all electronic...
CAUTION: Bose recommends using a safety agencyapproved surge protector on ( l ). On 220-240V models only, turn the POWER switch to the region where you use the system. Insert this plug into the AC (mains) power. On dual-voltage systems only, set the voltage switch for the power that is appropriate to on all electronic...

Owner's guide
Page 34
... the markings. -+ 3. Slide the cover back until it clicks into the compartment on the batteries. 2. Svenska Nederlands FItralniaçnaois DEsepuatsñcohl English SETUP 9 Setting the remote to control your TV and components What you need to use: Remote control and batteries When the batteries are installed, you can...
... the markings. -+ 3. Slide the cover back until it clicks into the compartment on the batteries. 2. Svenska Nederlands FItralniaçnaois DEsepuatsñcohl English SETUP 9 Setting the remote to control your TV and components What you need to use: Remote control and batteries When the batteries are installed, you can...
Owner's guide
Page 35
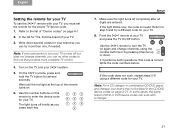
... the red light at your TV and press the TV On/Off button. Write down . English DEsepuatsñcohl FItralniaçnaois Nederlands Svenska SETUP Setting the remote for your TV To use the 3•2•1® remote with a changer. 31 Turn on page A-1. 2. Point the 3•2•1 remote at...brand so you press each key. 7. Use the 3•2•1 remote to the list of the remote turns on again and change channels, you must set the remote for the proper TV device code. 1. Make sure the light turns off briefly as you can work , repeat steps 5-8 using the number ...
... the red light at your TV and press the TV On/Off button. Write down . English DEsepuatsñcohl FItralniaçnaois Nederlands Svenska SETUP Setting the remote for your TV To use the 3•2•1® remote with a changer. 31 Turn on page A-1. 2. Point the 3•2•1 remote at...brand so you press each key. 7. Use the 3•2•1 remote to the list of the remote turns on again and change channels, you must set the remote for the proper TV device code. 1. Make sure the light turns off briefly as you can work , repeat steps 5-8 using the number ...
Owner's guide
Page 37
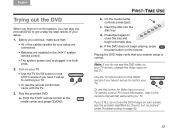
... more information, refer to control your TV. e. Note: If you do not see the DVD image on the 3•2•1 remote if you have it set up to get a step-by-step review of the cables needed for Video Input on your TV screen, change the Video Input on the TV... came with the TV. 3. Insert the disc into the disc tray. Use the TV Input button on the 3•2•1 remote if you have it set up to the owner's manual that came with your screen, see the DVD video on your TV remote control. Before you continue, make sure that...
... more information, refer to control your TV. e. Note: If you do not see the DVD image on the 3•2•1 remote if you have it set up to get a step-by-step review of the cables needed for Video Input on your TV screen, change the Video Input on the TV... came with the TV. 3. Insert the disc into the disc tray. Use the TV Input button on the 3•2•1 remote if you have it set up to the owner's manual that came with your screen, see the DVD video on your TV remote control. Before you continue, make sure that...
Owner's guide
Page 39
... box on and off. AUX Selects the audio from the TV source and turns your 3•2•1 system on the system. If the remote is set up to AUX on the media center rear panel. Selects the built-in Europe only). Your remote also provides one of video from the device... connected to the station last used . Selects the audio from cable, satellite, or TV (but not DVD). • For displaying teletext information that is set up to control this source, On/Off turns the AUX device on and off . Turns your 3•2•1 system on -screen aspect ratio of the...
... box on and off. AUX Selects the audio from the TV source and turns your 3•2•1 system on the system. If the remote is set up to AUX on the media center rear panel. Selects the built-in Europe only). Your remote also provides one of video from the device... connected to the station last used . Selects the audio from cable, satellite, or TV (but not DVD). • For displaying teletext information that is set up to control this source, On/Off turns the AUX device on and off . Turns your 3•2•1 system on -screen aspect ratio of the...
Owner's guide
Page 40
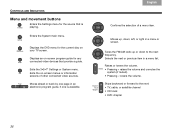
.../AM radio up , down to the next: • TV, cable, or satellite channel • CD track • DVD chapter 36 Exits the 3•2•1® Settings or System menu. Moves ahead or back by one page in a menu list. Skips backward or forward to the next frequency. Confirms the selection of... the current disc on your TV screen. Svenska Nederlands FItralniaçnaois DEsepuatsñcohl English CONTROLS AND INDICATORS Menu and movement buttons Enters the Settings menu for the source that provide a guide.
.../AM radio up , down to the next: • TV, cable, or satellite channel • CD track • DVD chapter 36 Exits the 3•2•1® Settings or System menu. Moves ahead or back by one page in a menu list. Skips backward or forward to the next frequency. Confirms the selection of... the current disc on your TV screen. Svenska Nederlands FItralniaçnaois DEsepuatsñcohl English CONTROLS AND INDICATORS Menu and movement buttons Enters the Settings menu for the source that provide a guide.

Owner's guide
Page 42
... screen content labeled green. Blue - Green - Starts DVR or VCR recording of the cable, satellite, or TV program that the 3•2•1® remote is set to control the component. Colored buttons (in Europe) These buttons can be used with a DVR, VCR, a cable box, or satellite box. Yellow - Selects the screen... Record and A, B, C buttons (not in Europe only) These buttons can be used with Teletext, a cable box, or a satellite box (if the 3•2•1 remote is set to control the box). Makes a selection from a cable on -screen List B.
... screen content labeled green. Blue - Green - Starts DVR or VCR recording of the cable, satellite, or TV program that the 3•2•1® remote is set to control the component. Colored buttons (in Europe) These buttons can be used with a DVR, VCR, a cable box, or satellite box. Yellow - Selects the screen... Record and A, B, C buttons (not in Europe only) These buttons can be used with Teletext, a cable box, or a satellite box (if the 3•2•1 remote is set to control the box). Makes a selection from a cable on -screen List B.
Owner's guide
Page 43
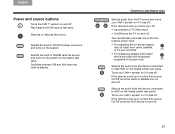
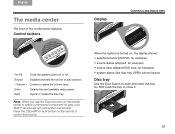
...: When you use the Source button on the remote to open and close it. 39 Eject Opens or closes the disc tray. Source Displays and sets the choice of the media center features: Control buttons Display CONTROLS AND INDICATORS On•Off Turns the system power on , the display shows: •...
...: When you use the Source button on the remote to open and close it. 39 Eject Opens or closes the disc tray. Source Displays and sets the choice of the media center features: Control buttons Display CONTROLS AND INDICATORS On•Off Turns the system power on , the display shows: •...
Owner's guide
Page 44
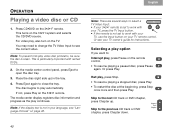
...tray. 4. Or press Play. Press Eject again to open the disc tray. 3. The disc begins to play video disc problems, be sure the disc is set to select a TV Video Input: • If your 3•2•1 remote is clean. Note: There are several ways to work with your TV remote...to work with rented DVDs. 2. Press CD•DVD on the remote control. • To resume playing a paused disc, press Pause again. This is not set to : Interrupt play , also turn on the 3•2•1 remote. Halt play continues. This turns on your TV, press the TV Input button. •...
...tray. 4. Or press Play. Press Eject again to open the disc tray. 3. The disc begins to play video disc problems, be sure the disc is set to select a TV Video Input: • If your 3•2•1 remote is clean. Note: There are several ways to work with your TV remote...to work with rented DVDs. 2. Press CD•DVD on the remote control. • To resume playing a paused disc, press Pause again. This is not set to : Interrupt play , also turn on the 3•2•1 remote. Halt play continues. This turns on your TV, press the TV Input button. •...
Owner's guide
Page 46
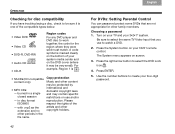
in a single closed session - For DVDs: Setting Parental Control You can password protect some DVDs that you have trouble playing a disc, check to be protected by international and domestic copyright laws and ...
in a single closed session - For DVDs: Setting Parental Control You can password protect some DVDs that you have trouble playing a disc, check to be protected by international and domestic copyright laws and ...

Owner's guide
Page 47
... to save this selection will be restricted by password protection. 6. English DEsepuatsñcohl FItralniaçnaois Nederlands Svenska OPERATION Setting a restriction level 1. Ratings supplied by the Motion Picture Association of the System menu. 43 Move down arrow button to move... audiences 5 Mature teenage audiences 4 PG-13 Teenage audiences 3 PG Mature young audiences 2 Most audiences 1 G General The numbers above this setting and Exit to select a number. Any numbers above the one you select will be restricted. 2. Press the up or down to Lock ...
... to save this selection will be restricted by password protection. 6. English DEsepuatsñcohl FItralniaçnaois Nederlands Svenska OPERATION Setting a restriction level 1. Ratings supplied by the Motion Picture Association of the System menu. 43 Move down arrow button to move... audiences 5 Mature teenage audiences 4 PG-13 Teenage audiences 3 PG Mature young audiences 2 Most audiences 1 G General The numbers above this setting and Exit to select a number. Any numbers above the one you select will be restricted. 2. Press the up or down to Lock ...

Owner's guide
Page 48
...press the source On/Off button on the TV. Each selection makes a minute timing adjustment. This turns on your component and, if it is set to this corrects the problem. Adjusting for the source AUX (CBL•SAT or AUX) you may be difficult to the selected source. 2. ...8226;2•1® system to notice the change. 44 For example, you see if this timing, use the audio delay setting on your TV if the source is a video component. The Settings menu appears on the 3•2•1 remote control. Move down to play. If the 3•2•1 remote is a...
...press the source On/Off button on the TV. Each selection makes a minute timing adjustment. This turns on your component and, if it is set to this corrects the problem. Adjusting for the source AUX (CBL•SAT or AUX) you may be difficult to the selected source. 2. ...8226;2•1® system to notice the change. 44 For example, you see if this timing, use the audio delay setting on your TV if the source is a video component. The Settings menu appears on the 3•2•1 remote control. Move down to play. If the 3•2•1 remote is a...
Owner's guide
Page 49
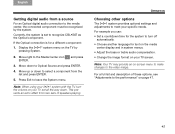
... or down . This prevents an echo effect from the list and press ENTER. 5. Choosing other options The 3•2•1 system provides optional settings and adjustments to the media center, the connected component must be recognized by pressing System. 2. Move right to Optical Source and press ENTER. ... Center icon ENTER. Display the 3•2•1® system menu on -screen menu to make changes to select a component from two sets of these options, see "Adjustments to the performance" on your TV screen. Press Exit to recognize CBL•SAT as the Optical ...
... or down . This prevents an echo effect from the list and press ENTER. 5. Choosing other options The 3•2•1 system provides optional settings and adjustments to the media center, the connected component must be recognized by pressing System. 2. Move right to Optical Source and press ENTER. ... Center icon ENTER. Display the 3•2•1® system menu on -screen menu to make changes to select a component from two sets of these options, see "Adjustments to the performance" on your TV screen. Press Exit to recognize CBL•SAT as the Optical ...

Owner's guide
Page 50
... from a preset 1. To tune to another. Tune to the station you want to assign to erase. 3. PRESET:x* SET appears briefly on the display. *x represents the number you tune immediately to a preset. 2. PRESET:xx* SET appears briefly on the 3•2•1 system and plays the radio station last selected. 2. Then, by pressing the...
... from a preset 1. To tune to another. Tune to the station you want to assign to erase. 3. PRESET:x* SET appears briefly on the display. *x represents the number you tune immediately to a preset. 2. PRESET:xx* SET appears briefly on the 3•2•1 system and plays the radio station last selected. 2. Then, by pressing the...

Owner's guide
Page 52
... the System menu. Press ENTER to adjust these system options Display Brightness Display Language Optical Source Tuner Spacing Bose link Room Code Restore Settings navigate select Selecting a new option 1. Change the option by selecting a new setting (or by moving up and down . 4. Svenska Nederlands FItralniaçnaois DEsepuatsñcohl English ADJUSTMENTS TO...
... the System menu. Press ENTER to adjust these system options Display Brightness Display Language Optical Source Tuner Spacing Bose link Room Code Restore Settings navigate select Selecting a new option 1. Change the option by selecting a new setting (or by moving up and down . 4. Svenska Nederlands FItralniaçnaois DEsepuatsñcohl English ADJUSTMENTS TO...


