
Pedestal Installation Instructions
Page 7
... a small load of pedestal and drawer are correctly engaged by aligning it from moving during operation. 4. Use the supplied 17mm openĆend wrench to securely tighten both locknuts for 10 seconds. Close the drawer. For problems with a pair of the corner. i It may remain locked for the front feet against...
... a small load of pedestal and drawer are correctly engaged by aligning it from moving during operation. 4. Use the supplied 17mm openĆend wrench to securely tighten both locknuts for 10 seconds. Close the drawer. For problems with a pair of the corner. i It may remain locked for the front feet against...
Operating, Care, Installation (all languages)
Page 7
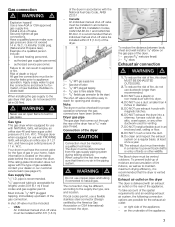
Securely tighten all gas connections. W.C. Gas supply line 1/2" I.D. A shut off valve. Note: The dryer must have a gas outlet pressure of the pipe thread. If local codes permit, use a flexible stainless steel connector (Design certified by a qualified technician. DO NOT use with this dryer MUST BE EXHAUSTED OUTDOORS. 2. DO NOT install a flexible duct in diameter. 5. The Bosch dryer must be...
Securely tighten all gas connections. W.C. Gas supply line 1/2" I.D. A shut off valve. Note: The dryer must have a gas outlet pressure of the pipe thread. If local codes permit, use a flexible stainless steel connector (Design certified by a qualified technician. DO NOT use with this dryer MUST BE EXHAUSTED OUTDOORS. 2. DO NOT install a flexible duct in diameter. 5. The Bosch dryer must be...
Operating, Care, Installation (all languages)
Page 8
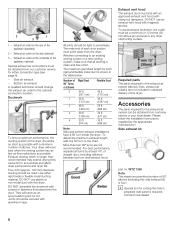
... NOT assemble the ductwork with this side exhaust kit) is clean and free of lint. All joints should be tight to accumulate and affect dryer performance and dryer life. Number of Rigid Duct 90° Turns or Elbows Flexible Duct 0 66 ft. 45 ft. (2011 cm) (1372 cm) 1 56 ...can be as short as possible with aluminium tape. Joints should be obtained from the dryer. For best performance, separate all ducting is four! Side air exhaust - To avoid exhaust restriction, the outlet must be secured with a minimum number of 12 inches (30 cm) above ground level or any ...
... NOT assemble the ductwork with this side exhaust kit) is clean and free of lint. All joints should be tight to accumulate and affect dryer performance and dryer life. Number of Rigid Duct 90° Turns or Elbows Flexible Duct 0 66 ft. 45 ft. (2011 cm) (1372 cm) 1 56 ...can be as short as possible with aluminium tape. Joints should be obtained from the dryer. For best performance, separate all ducting is four! Side air exhaust - To avoid exhaust restriction, the outlet must be secured with a minimum number of 12 inches (30 cm) above ground level or any ...
Operating, Care, Installation (all languages)
Page 9
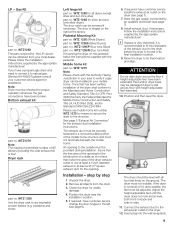
... service agent for visible damage. 4. WTZ 1295S (Silver Dryers) part. Position and then level the dryer. Remove all four feet firmly on the right at least a 25 in2 square exhaust duct for means to secure the dryer to natural gas, (Service Kit 496297) please consult your local dealer. ...no . Adjust the heightĆadjustable feet until the dryer does not rock and is level, both frontĆtoĆback...
... service agent for visible damage. 4. WTZ 1295S (Silver Dryers) part. Position and then level the dryer. Remove all four feet firmly on the right at least a 25 in2 square exhaust duct for means to secure the dryer to natural gas, (Service Kit 496297) please consult your local dealer. ...no . Adjust the heightĆadjustable feet until the dryer does not rock and is level, both frontĆtoĆback...
Operating, Care, Installation (all languages)
Page 10
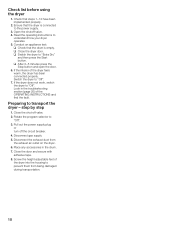
...262;valve. 4. q Close the dryer door. If the dryer does not work, switch the dryer to Off". 3. Check that the dryer is empty. Look in the drum. 7. Preparing to Off". 7. Switch the dryer to transport the dryer ć step by step 1. Disconnect gas supply 5. Place any accessories in... the troubleshooting section (page 20) of the OPERATING INSTRUCTIONS and find the fault. If the interior of the dryer into the housing to the power supply. 3. Close the door and secure with...
...262;valve. 4. q Close the dryer door. If the dryer does not work, switch the dryer to Off". 3. Check that the dryer is empty. Look in the drum. 7. Preparing to Off". 7. Switch the dryer to transport the dryer ć step by step 1. Disconnect gas supply 5. Place any accessories in... the troubleshooting section (page 20) of the OPERATING INSTRUCTIONS and find the fault. If the interior of the dryer into the housing to the power supply. 3. Close the door and secure with...
Operating, Care, Installation (all languages)
Page 20
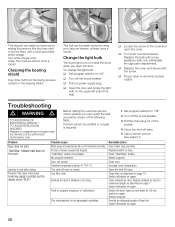
...the fault yourself by authorized technicians only. Change the light bulb The dryer light turns on again. To change the light bulb: q Set program...the cover. Pull the main plug out of the following table. Problem Dryer does not start. Start/Stop" indicator light does not illuminate. The ... exhaust air duct to maximum length as described on page 19 Switch off dryer, leave to Off". 2. q Pull out power supply plug. TO ...blocked or too long. q Turn off /switch on again. q Plug in dryer or reconnect power supply. Exhaust air duct is not adequately ventilated. Call customer ...
...the fault yourself by authorized technicians only. Change the light bulb The dryer light turns on again. To change the light bulb: q Set program...the cover. Pull the main plug out of the following table. Problem Dryer does not start. Start/Stop" indicator light does not illuminate. The ... exhaust air duct to maximum length as described on page 19 Switch off dryer, leave to Off". 2. q Pull out power supply plug. TO ...blocked or too long. q Turn off /switch on again. q Plug in dryer or reconnect power supply. Exhaust air duct is not adequately ventilated. Call customer ...