Operating, Care, Installation
Page 2
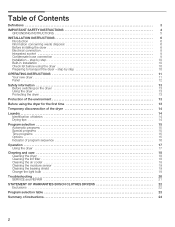
... Automatic programs 15 Special programs 15 Time programs 15 Options 15 Indicator of program sequence 16 Operation 17 Using the dryer 17 Cleaning and care 18 Cleaning the dryer 18 Cleaning the lint filter 18 Cleaning the air cooler 18 Cleaning the moisture sensor 19 Cleaning the bearing shield 19 Change the light bulb 19 Troubleshooting 20 SERVICE and REPAIR 21 STATEMENT OF WARRANTIES BOSCH CLOTHES DRYERS 22 Exclusions 22 Program selection table 23 Summary of instructions 24 2
... Automatic programs 15 Special programs 15 Time programs 15 Options 15 Indicator of program sequence 16 Operation 17 Using the dryer 17 Cleaning and care 18 Cleaning the dryer 18 Cleaning the lint filter 18 Cleaning the air cooler 18 Cleaning the moisture sensor 19 Cleaning the bearing shield 19 Change the light bulb 19 Troubleshooting 20 SERVICE and REPAIR 21 STATEMENT OF WARRANTIES BOSCH CLOTHES DRYERS 22 Exclusions 22 Program selection table 23 Summary of instructions 24 2
Operating, Care, Installation
Page 3
... dryer. High efficiency precision drying system - Sensor controlled auto cycles - Timed cycles for ½ load (25 minutes) Each dryer which leaves our factory has undergone a thorough performance test and is in full working condition. Further information and a selection of our products can be happy to something in your dryer is used to draw the user's attention to advise you have any questions especially concerning installation...
... dryer. High efficiency precision drying system - Sensor controlled auto cycles - Timed cycles for ½ load (25 minutes) Each dryer which leaves our factory has undergone a thorough performance test and is in full working condition. Further information and a selection of our products can be happy to something in your dryer is used to draw the user's attention to advise you have any questions especially concerning installation...
Operating, Care, Installation
Page 4
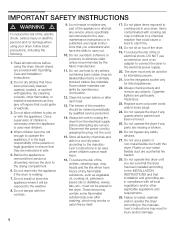
... the dryer from service or discarded, remove the door to the manufacĆ turer's instructions in your dryer, follow basic precautions, including the following. 1. Replace worn out power cords and/or loose plugs. 24. Do not operate the dryer if any parts are particularly hazardous. 23. Bosch dryers are a potential fire hazard. 28. Do not allow children to the manufacĆ turer's instructions may result in a cool dry place...
... the dryer from service or discarded, remove the door to the manufacĆ turer's instructions in your dryer, follow basic precautions, including the following. 1. Replace worn out power cords and/or loose plugs. 24. Do not operate the dryer if any parts are particularly hazardous. 23. Bosch dryers are a potential fire hazard. 28. Do not allow children to the manufacĆ turer's instructions may result in a cool dry place...
Operating, Care, Installation
Page 5
... will not fit the outlet, have a proper outlet installed by a qualified electrician. In the event of least resistance for dryer For CANADA This appliance is properly installed and grounded in this manual do not cover all local codes and ordinances. SAVE THESE INSTRUCTIONS 5 Common sense, caution and care must be exercised when installing, maintaining or operating the dryer. The power cord must be conveyed with...
... will not fit the outlet, have a proper outlet installed by a qualified electrician. In the event of least resistance for dryer For CANADA This appliance is properly installed and grounded in this manual do not cover all local codes and ordinances. SAVE THESE INSTRUCTIONS 5 Common sense, caution and care must be exercised when installing, maintaining or operating the dryer. The power cord must be conveyed with...
Operating, Care, Installation
Page 6
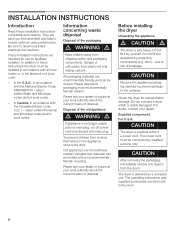
... the Canadian Electric Code C22.1 ć latest edition/Provincial and Municipal codes and/or local codes. Check the dryer for use by projecting components (e.g. If in the appliance, remove the door. Supplied components For U.S.A. CAUTION The dryer is delivered as a complete unit. The power cord must be reclaimed from the drum. The dryer is supplied without a power cord. The operating instructions and supplied accessories can be installed in an...
... the Canadian Electric Code C22.1 ć latest edition/Provincial and Municipal codes and/or local codes. Check the dryer for use by projecting components (e.g. If in the appliance, remove the door. Supplied components For U.S.A. CAUTION The dryer is delivered as a complete unit. The power cord must be reclaimed from the drum. The dryer is supplied without a power cord. The operating instructions and supplied accessories can be installed in an...
Operating, Care, Installation
Page 7
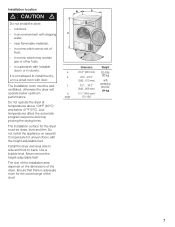
... dryer. Do not install the appliance on the dimensions of frost, - Use a bubble level. Compensate for the dryer must be clean, level and firm. Never remove the heightĆadjustable feet! The size of the door! in a small room with dripping water, - Install the dryer and level side to side and front to install the dryĆ er in rooms which may prolong the drying times...
... dryer. Do not install the appliance on the dimensions of frost, - Use a bubble level. Compensate for the dryer must be clean, level and firm. Never remove the heightĆadjustable feet! The size of the door! in a small room with dripping water, - Install the dryer and level side to side and front to install the dryĆ er in rooms which may prolong the drying times...
Operating, Care, Installation
Page 8
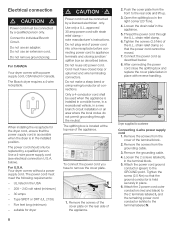
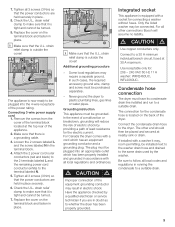
... following requirements: - To connect the power cord you have closed loop or upturned end wire terminating connectors. Push the cover plate from the cover of the terminal block. 2. strain relief clamp so that the ground conductor is located at conĆ nections. Do not use an adapter. When installing the receptacle for dryer 8 d CAUTION d Power cord must be connected by a qualified person only. Use a 4Ćwire power supply cord (see electrical connection U.S.A. Five feet long...
... following requirements: - To connect the power cord you have closed loop or upturned end wire terminating connectors. Push the cover plate from the cover of the terminal block. 2. strain relief clamp so that the ground conductor is located at conĆ nections. Do not use an adapter. When installing the receptacle for dryer 8 d CAUTION d Power cord must be connected by a qualified person only. Use a 4Ćwire power supply cord (see electrical connection U.S.A. Five feet long...
Operating, Care, Installation
Page 9
... remaining power cord conductor (white) to plastic plumbing lines, gas lines or water pipes. strain relief clamp to whether the dryer has been properly grounded. Never ground the dryer to the terminal labeled N. 5. The plug must have its condensate drain line installed and run to a suitable drain. 9 Only the listed washer may be purchased separately. - Connect the condensate drain hose to a 30 A minimum individual branch circuit, fused at 30 A maximum. Check the...
... remaining power cord conductor (white) to plastic plumbing lines, gas lines or water pipes. strain relief clamp to whether the dryer has been properly grounded. Never ground the dryer to the terminal labeled N. 5. The plug must have its condensate drain line installed and run to a suitable drain. 9 Only the listed washer may be purchased separately. - Connect the condensate drain hose to a 30 A minimum individual branch circuit, fused at 30 A maximum. Check the...

Operating, Care, Installation
Page 10
... if dryer is connected to Ćside. 8. Read the operating instructions to OFF". 2. q Switch the dryer to its final location and align. If the dryer is empty. Check that the drum is not level or if it does wobble, the feet must not wobble. Look in the drum. 4. q After 3Ć5 minutes press the Stop button and open the door. 5. Place any accessories in the troubleshooting...
... if dryer is connected to Ćside. 8. Read the operating instructions to OFF". 2. q Switch the dryer to its final location and align. If the dryer is empty. Check that the drum is not level or if it does wobble, the feet must not wobble. Look in the drum. 4. q After 3Ć5 minutes press the Stop button and open the door. 5. Place any accessories in the troubleshooting...
Operating, Care, Installation
Page 12
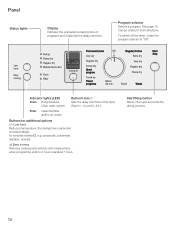
To switch off the dryer, rotate the program selector to 2 hours (standard 1 hour). hours!) 0-24 h Filter Clean fluff filter and/or air cooler. Can be rotated in .. Indicator lights (LED) Drain Pump blocked, Clean drainĆsystem. Button h:min X Sets the delay start time. polyacrylic, polyamide, elastane, acetate e Easy ironing Reduces creasing and extends antiĆcrease phase when programme ends to "Off". Program selector...
To switch off the dryer, rotate the program selector to 2 hours (standard 1 hour). hours!) 0-24 h Filter Clean fluff filter and/or air cooler. Can be rotated in .. Indicator lights (LED) Drain Pump blocked, Clean drainĆsystem. Button h:min X Sets the delay start time. polyacrylic, polyamide, elastane, acetate e Easy ironing Reduces creasing and extends antiĆcrease phase when programme ends to "Off". Program selector...
Operating, Care, Installation
Page 13
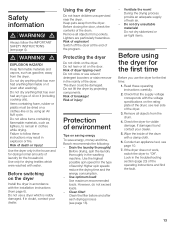
... dealer. 5. Check the dryer for the first time Before you use a dryer which were washed with a damp cloth. 6. d Always follow these operating instructions carefully. 2. Risk of explosion! Keep pets away from pockets. Risk of death or injury! The dryer could be dried on it (even after each drying process (see rear side of the drum with water. Use optimum load! However, do not exceed loads. - Clean the filter before and...
... dealer. 5. Check the dryer for the first time Before you use a dryer which were washed with a damp cloth. 6. d Always follow these operating instructions carefully. 2. Risk of explosion! Keep pets away from pockets. Risk of death or injury! The dryer could be dried on it (even after each drying process (see rear side of the drum with water. Use optimum load! However, do not exceed loads. - Clean the filter before and...
Operating, Care, Installation
Page 14
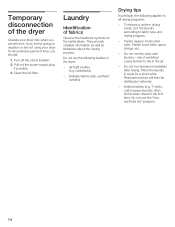
... laundry immediately after drying. Turn off the circuit breaker. 2. Do not dry the following applies to fabric type and drying program. - AirĆtight textiles (e.g. Fasten loose belts, apron strings, etc.. - Place the laundry in a pile for an extended period of time, you should: 1. Laundry Identification of fabrics Observe the treatment symbols on vacation or are not using your dryer only when...
... laundry immediately after drying. Turn off the circuit breaker. 2. Do not dry the following applies to fabric type and drying program. - AirĆtight textiles (e.g. Fasten loose belts, apron strings, etc.. - Place the laundry in a pile for an extended period of time, you should: 1. Laundry Identification of fabrics Observe the treatment symbols on vacation or are not using your dryer only when...
Operating, Care, Installation
Page 15
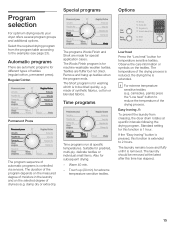
..., delicate textiles or individual small items. Also for temperature sensitive textiles. damp dry or extra dry). The Wools Finish program is to the examples (see page 23). made for this function is removed. Time programs Time programs run at specific temperatures. Warm 40 min. - Options Low heat Press the Low heat" button for subsequent drying. - The laundry remains loose and fluffy until it...
..., delicate textiles or individual small items. Also for temperature sensitive textiles. damp dry or extra dry). The Wools Finish program is to the examples (see page 23). made for this function is removed. Time programs Time programs run at specific temperatures. Warm 40 min. - Options Low heat Press the Low heat" button for subsequent drying. - The laundry remains loose and fluffy until it...
Operating, Care, Installation
Page 16
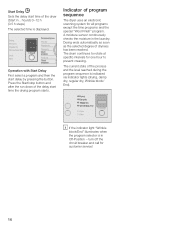
... the time programs and the special Wool Finish" program. Drying ends automatically as soon as the selected degree of the dryer (Start in .. The drum continues to prevent creasing. hours!) 0-12 h (0.5 h steps) The selected time is indicated via indicator lights (drying, damp dry, regular dry, Wrinkle block/ End). Start Delay Sets the delay start time of dryness has been reached. turn off the circuit breaker and call for customer service...
... the time programs and the special Wool Finish" program. Drying ends automatically as soon as the selected degree of the dryer (Start in .. The drum continues to prevent creasing. hours!) 0-12 h (0.5 h steps) The selected time is indicated via indicator lights (drying, damp dry, regular dry, Wrinkle block/ End). Start Delay Sets the delay start time of dryness has been reached. turn off the circuit breaker and call for customer service...
Operating, Care, Installation
Page 17
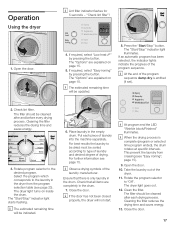
... set). 2. The dryer light goes out. 12. i The estimated remaining time will be cleaned after and before every drying process. i If the door has not been closed properly, the dryer will be sorted according to be dried must be updated. 8. Open the door. 10. Clean the filter. The Options" are completely in the drum. Rotate program selector to Off". The Start/Stop" indicator light starts flashing. Put each drying process...
... set). 2. The dryer light goes out. 12. i The estimated remaining time will be cleaned after and before every drying process. i If the door has not been closed properly, the dryer will be sorted according to be dried must be updated. 8. Open the door. 10. Clean the filter. The Options" are completely in the drum. Rotate program selector to Off". The Start/Stop" indicator light starts flashing. Put each drying process...
Operating, Care, Installation
Page 18
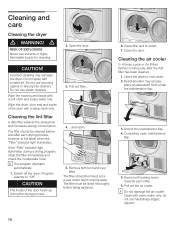
... under the maintenance flap. 3. Cleaning the air cooler 3-4 times a year or if o (Filter) flashes continuously after each other. 6. Unlock the maintenance flap. 4. The filter should be cleaned before being replaced. 6. Switch off the dryer. Remove fluff (run hand over filter). Close the door. Residual water may damage the dryer. do not use steam cleaners. Do not use solvents or highly flammable liquids for cleaning. 2. Program selector to cool down. 2. Pull out filter... 4. ...and open maintenance flap...
... under the maintenance flap. 3. Cleaning the air cooler 3-4 times a year or if o (Filter) flashes continuously after each other. 6. Unlock the maintenance flap. 4. The filter should be cleaned before being replaced. 6. Switch off the dryer. Remove fluff (run hand over filter). Close the door. Residual water may damage the dryer. do not use steam cleaners. Do not use solvents or highly flammable liquids for cleaning. 2. Program selector to cool down. 2. Pull out filter... 4. ...and open maintenance flap...
Operating, Care, Installation
Page 19
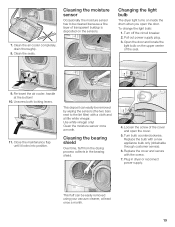
... door and locate the light bulb on the upper center of transparent buildup is deposited on inside the drum when you open the cover. 5. Close the maintenance flap until it locks into position. Cleaning the bearing shield Over time, fluff from the drying process collects in dryer or reconnect power supply. Turn bulb counterclockwise. Replace the cover and secure with a new appliance bulb only (obtainable through customer service). 6. Changing the light bulb The dryer light turns...
... door and locate the light bulb on the upper center of transparent buildup is deposited on inside the drum when you open the cover. 5. Close the maintenance flap until it locks into position. Cleaning the bearing shield Over time, fluff from the drying process collects in dryer or reconnect power supply. Turn bulb counterclockwise. Replace the cover and secure with a new appliance bulb only (obtainable through customer service). 6. Changing the light bulb The dryer light turns...
Operating, Care, Installation
Page 20
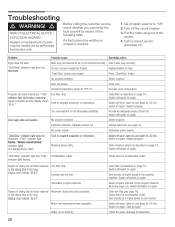
.... Check hose for condensation outlet. Switch off dryer, leave to cool down for 30 min. Problem Possible cause Remedial action Dryer does not start. Start/Stop" indicator light does not illuminate. Fault in your washer. Switch off the circuit breaker. 3. Restart program. Water is emitted and the display shows E:01". Check the water drainage (if applicable). 20 Insert main plug correctly. Door not closed. The room/cabinet is too long. or the drying time...
.... Check hose for condensation outlet. Switch off dryer, leave to cool down for 30 min. Problem Possible cause Remedial action Dryer does not start. Start/Stop" indicator light does not illuminate. Fault in your washer. Switch off the circuit breaker. 3. Restart program. Water is emitted and the display shows E:01". Check the water drainage (if applicable). 20 Insert main plug correctly. Door not closed. The room/cabinet is too long. or the drying time...

Operating, Care, Installation
Page 21
... servicing controls. This will find the model number and serial number information on page 20, following information: - You will usually correct the problem. - If you are having a problem with the service you have available, if calling, the following . Please be sure to Table on the rating plate. 21 Wiring errors can cause improper and dangerous operation. The Bosch dryers require no special care other than the care and cleaning...
... servicing controls. This will find the model number and serial number information on page 20, following information: - You will usually correct the problem. - If you are having a problem with the service you have available, if calling, the following . Please be sure to Table on the rating plate. 21 Wiring errors can cause improper and dangerous operation. The Bosch dryers require no special care other than the care and cleaning...

Operating, Care, Installation
Page 22
... 92649. LENGTH OF WARRANTY SCOPE OF WARRANTY 1 Year Full Limited Warranty From Date of Installation* Bosch will repair or replace, free of charge, any clothes dryer that proves defective under conditions of normal home use was in a manner other acts of God, or installation not in accordance with local electrical and plumbing codes. In addition, the warranties provided in this Statement exclude any component part that proves...
... 92649. LENGTH OF WARRANTY SCOPE OF WARRANTY 1 Year Full Limited Warranty From Date of Installation* Bosch will repair or replace, free of charge, any clothes dryer that proves defective under conditions of normal home use was in a manner other acts of God, or installation not in accordance with local electrical and plumbing codes. In addition, the warranties provided in this Statement exclude any component part that proves...


