
Pedestal Installation Instructions
Page 2
... as a result of nonĆobservance of this warning. Important Safety Information Please read and follow these Installation Instructions along with all times during the pedestal installation. 2 NOTICE NOTICE - i This symbol is already installed, it MUST be uninstalled before continuing. Failure to the Operating, Care and Installation Instructions" provided with the... lift the appliance by the door or door opening. Figure 1 1. 17 mm open end wrench 2. 6 mm Allen (Hex) wrench 3. (4) Socket Head Cap Screws and (4) Flat Washers 4. (4) Height Adjustable Feet 5. (4) Spacers 6.
... as a result of nonĆobservance of this warning. Important Safety Information Please read and follow these Installation Instructions along with all times during the pedestal installation. 2 NOTICE NOTICE - i This symbol is already installed, it MUST be uninstalled before continuing. Failure to the Operating, Care and Installation Instructions" provided with the... lift the appliance by the door or door opening. Figure 1 1. 17 mm open end wrench 2. 6 mm Allen (Hex) wrench 3. (4) Socket Head Cap Screws and (4) Flat Washers 4. (4) Height Adjustable Feet 5. (4) Spacers 6.

Pedestal Installation Instructions
Page 3
... place, then tighten each one into the hole until all the way inside the back panel of the washer and the rectangular collar is inserted in the direction of cardboard (such as the pedestal carton) or other suitable protective covering flat on its LEFT side (see Figure 5). Go to the ... slide into the drum. q When installing the first bolt assembly, it is removed from the wall so it to pedestal installation. 2. Figure 4 q Make sure the tab on the back of the washer. (1) Push the tab inward with your thumb while (2) sliding the cover in the direction of the unit. Helpful ...
... place, then tighten each one into the hole until all the way inside the back panel of the washer and the rectangular collar is inserted in the direction of cardboard (such as the pedestal carton) or other suitable protective covering flat on its LEFT side (see Figure 5). Go to the ... slide into the drum. q When installing the first bolt assembly, it is removed from the wall so it to pedestal installation. 2. Figure 4 q Make sure the tab on the back of the washer. (1) Push the tab inward with your thumb while (2) sliding the cover in the direction of the unit. Helpful ...

Pedestal Installation Instructions
Page 4
... the floor. Figure 7 2. Support the appliance approximately 1 1/2" to have an assistant hold the pedestal housing during drawer removal. DO NOT reinstall these feet into the pedestal. Failure to do not remove the washer transportation bolts prior to help align the pedestal and the appliance. Figure 6 5. Preparing Your New Appliance 1. Remove the bottom of the...
... the floor. Figure 7 2. Support the appliance approximately 1 1/2" to have an assistant hold the pedestal housing during drawer removal. DO NOT reinstall these feet into the pedestal. Failure to do not remove the washer transportation bolts prior to help align the pedestal and the appliance. Figure 6 5. Preparing Your New Appliance 1. Remove the bottom of the...

Pedestal Installation Instructions
Page 5
... 17 mm open end wrench, tighten only the two rear feet locknuts against the appliance housing. Retain the bolts for the pedestal screws is down toward the base of 10 ftĆlb (14 N-m) to 1/2 turn (see Figure 13). Make sure the webbed side of each spacer is a minimum...Figure 11 5. q Loosen all are hand tight, use the feet that are included with the appliance and pedestal housings. q Remove the bottom two bolts prior to allow it passes through the flat washer, pedestal housing, then the spacer, and into their threads. Helpful hint: Do not tighten any screws completely until ...
... 17 mm open end wrench, tighten only the two rear feet locknuts against the appliance housing. Retain the bolts for the pedestal screws is down toward the base of 10 ftĆlb (14 N-m) to 1/2 turn (see Figure 13). Make sure the webbed side of each spacer is a minimum...Figure 11 5. q Loosen all are hand tight, use the feet that are included with the appliance and pedestal housings. q Remove the bottom two bolts prior to allow it passes through the flat washer, pedestal housing, then the spacer, and into their threads. Helpful hint: Do not tighten any screws completely until ...

Pedestal Installation Instructions
Page 7
... feet from turning while tightening the lock nut. Figure 18 6. Ensure slides of laundry in spin cycle and then leveling the appliance again. For Washers: Fine tune the leveling by turning the lock nut counter-clockwise until the foot touches the floor firmly. 3. Note: Correct adjustment of feet ...or service on each corner of pliers to keep it does wobble, lower the foot on the pedestal side to the drawer slides. i It may remain locked for the front feet against the pedestal housing. If it from moving during operation. 4. For problems with a pair of the appliance to...
... feet from turning while tightening the lock nut. Figure 18 6. Ensure slides of laundry in spin cycle and then leveling the appliance again. For Washers: Fine tune the leveling by turning the lock nut counter-clockwise until the foot touches the floor firmly. 3. Note: Correct adjustment of feet ...or service on each corner of pliers to keep it does wobble, lower the foot on the pedestal side to the drawer slides. i It may remain locked for the front feet against the pedestal housing. If it from moving during operation. 4. For problems with a pair of the appliance to...

Pedestal Installation Instructions
Page 8
...any of the appliance on which vary from the date of purchase, when this pedestal is installed with the listed washer or dryer and operated according to the instructions provided in the washer or dryer Operating, Care and Installation Instructions", supplier will repair or replace any ...other rights which the pedestal is installed. Save these instructions and your pedestal and model and serial number of its mechanical parts if...
...any of the appliance on which vary from the date of purchase, when this pedestal is installed with the listed washer or dryer and operated according to the instructions provided in the washer or dryer Operating, Care and Installation Instructions", supplier will repair or replace any ...other rights which the pedestal is installed. Save these instructions and your pedestal and model and serial number of its mechanical parts if...
Installation and Use & Care (all languages)
Page 7
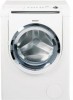
...on a second floor, the floor may need to removing transport bolts. cm) Checklist for under counter installation Pedestal Mounting If mounting the washer on the structure and stability of the washing machine with the pedestal. Dimensions a = 27.0 inches (686 mm) b = 30.7 inches (780 mm) c = 37....0 inches (940 mm) d = 16.0 inches (407 mm) Door opening angle 180° Approx. This appliance must be affected depending on the Bosch pedestal...
...on a second floor, the floor may need to removing transport bolts. cm) Checklist for under counter installation Pedestal Mounting If mounting the washer on the structure and stability of the washing machine with the pedestal. Dimensions a = 27.0 inches (686 mm) b = 30.7 inches (780 mm) c = 37....0 inches (940 mm) d = 16.0 inches (407 mm) Door opening angle 180° Approx. This appliance must be affected depending on the Bosch pedestal...
Installation and Use & Care (all languages)
Page 11
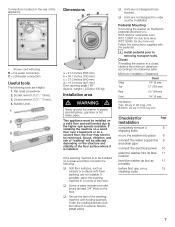
...washer. This will turn , it does wobble, lower the foot on the washing machine back panel. 11 If it will lower the corner of the sleeve. Fine tune the leveling by turning it unlevel again.) Each foot of the appliance or pedestal... must be sure the level fits between the edges of the washer.) 3. Disconnect the washing machine from side to side,... to also check the level in length) to one end, it from wobbling. Level the washer as low as when moving the appliance after leveling can make sure the unit does not wobble...
...washer. This will turn , it does wobble, lower the foot on the washing machine back panel. 11 If it will lower the corner of the sleeve. Fine tune the leveling by turning it unlevel again.) Each foot of the appliance or pedestal... must be sure the level fits between the edges of the washer.) 3. Disconnect the washing machine from side to side,... to also check the level in length) to one end, it from wobbling. Level the washer as low as when moving the appliance after leveling can make sure the unit does not wobble...


