

Pedestal Installation Instructions
Page 3
... instructions required these bolts to the washer drum. Figure 3 q Insert the bolt assemblies. Slide the bolt assembly in the plastic cover (see Figure 5). Helpful Hint: Rolled up towels can be positioned on its left of cardboard (such as this manual. 3 Pull the appliance away from the bolt prior ...to step 3. Figure 2 q Remove the four transportation bolt hole covers on the back of the washer. (1) Push the tab inward with your thumb while (2) sliding the...
... instructions required these bolts to the washer drum. Figure 3 q Insert the bolt assemblies. Slide the bolt assembly in the plastic cover (see Figure 5). Helpful Hint: Rolled up towels can be positioned on its left of cardboard (such as this manual. 3 Pull the appliance away from the bolt prior ...to step 3. Figure 2 q Remove the four transportation bolt hole covers on the back of the washer. (1) Push the tab inward with your thumb while (2) sliding the...

Pedestal Installation Instructions
Page 4
... the original packaged appliance close to have an assistant hold the pedestal housing during drawer removal. Protect the floor and the side of this manual. Figure 5 4. Remove the bottom of the pedestal against the appliance bottom. Remove the feet originally installed in the drawer slide rails. DO... and two foam packaging pieces. 3. Set the drawer aside. Doing so can result in injury. 3. Failure to do not remove the washer transportation bolts prior to help align the pedestal and the appliance. Ensure the pedestal drawer opening and appliance door face the same direction (see ...
... the original packaged appliance close to have an assistant hold the pedestal housing during drawer removal. Protect the floor and the side of this manual. Figure 5 4. Remove the bottom of the pedestal against the appliance bottom. Remove the feet originally installed in the drawer slide rails. DO... and two foam packaging pieces. 3. Set the drawer aside. Doing so can result in injury. 3. Failure to do not remove the washer transportation bolts prior to help align the pedestal and the appliance. Ensure the pedestal drawer opening and appliance door face the same direction (see ...

Pedestal Installation Instructions
Page 7
... against the pedestal housing. Use the supplied 17mm openĆend wrench to the drawer slides. Figure 18 6. Ensure slides of the appliance manual. 7 Contact information is available in the Customer Service" section of pedestal and drawer are correctly engaged by freely opening and closing the drawer...it to securely tighten both locknuts for 10 seconds. When the corner of the appliance during appliance use the drawer as a step. For Washers: Fine tune the leveling by placing a small load of laundry in the machine, starting it in place by aligning it locks tightly against...
... against the pedestal housing. Use the supplied 17mm openĆend wrench to the drawer slides. Figure 18 6. Ensure slides of the appliance manual. 7 Contact information is available in the Customer Service" section of pedestal and drawer are correctly engaged by freely opening and closing the drawer...it to securely tighten both locknuts for 10 seconds. When the corner of the appliance during appliance use the drawer as a step. For Washers: Fine tune the leveling by placing a small load of laundry in the machine, starting it in place by aligning it locks tightly against...
Installation and Use & Care (all languages)
Page 4
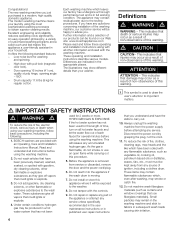
...using the washing machine. Do not add gasoline, dry cleaning solvents, or other information enclosed with an Operating, Care and Installation Instructions Manual. Under certain conditions hydrogen gas may occur as vegetable oil, cooking oil, petroleum based oils or distillates, waxes, fats, etc., ...explode. 4. As the gas is moving. 7. Always unplug the washing machine from the power supply before using the washing machine. 2. BOSCH washers are indicated in subsequent wash loads causing skin irritation. 4 If the hot water system has not been used for this warning. This will...
...using the washing machine. Do not add gasoline, dry cleaning solvents, or other information enclosed with an Operating, Care and Installation Instructions Manual. Under certain conditions hydrogen gas may occur as vegetable oil, cooking oil, petroleum based oils or distillates, waxes, fats, etc., ...explode. 4. As the gas is moving. 7. Always unplug the washing machine from the power supply before using the washing machine. 2. BOSCH washers are indicated in subsequent wash loads causing skin irritation. 4 If the hot water system has not been used for this warning. This will...

Installation and Use & Care (all languages)
Page 5
...power cord or loose plug. To reduce the risk of each wash day. 26. Check the fill hose connections on the top of ownership, manual should be used near children. 15. To avoid floor damage and mold growth, do not understand. Failure to install, maintain and/or operate... machine according to an individual branch circuit. The water connections should be made and tested before electrical power is applied to whether the washer is the legal responsibility of the equipment grounding conductor can expose sharp edges and points, electrical connections and hot surfaces. 37. In ...
...power cord or loose plug. To reduce the risk of each wash day. 26. Check the fill hose connections on the top of ownership, manual should be used near children. 15. To avoid floor damage and mold growth, do not understand. Failure to install, maintain and/or operate... machine according to an individual branch circuit. The water connections should be made and tested before electrical power is applied to whether the washer is the legal responsibility of the equipment grounding conductor can expose sharp edges and points, electrical connections and hot surfaces. 37. In ...
Installation and Use & Care (all languages)
Page 11
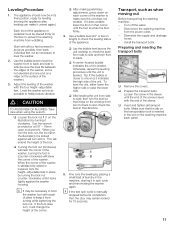
... or raise the lower side. Fine tune the leveling by turning the lock nut counter-clockwise until the end of the washer. i If the test spin cycle is manually stopped before its final position, ready for 10 seconds. Dismantle the supply and drainage hoses. - Install the transport bolts.... q Prepare the transport bolts: Loosen the screw in spin cycle and then leveling the washer again. q Insert and tighten all four ...
... or raise the lower side. Fine tune the leveling by turning the lock nut counter-clockwise until the end of the washer. i If the test spin cycle is manually stopped before its final position, ready for 10 seconds. Dismantle the supply and drainage hoses. - Install the transport bolts.... q Prepare the transport bolts: Loosen the screw in spin cycle and then leveling the washer again. q Insert and tighten all four ...


