
Pedestal Installation Instructions
Page 2
Figure 1 1. 17 mm open end wrench 2. 6 mm Allen (Hex) wrench 3. (4) Socket Head Cap Screws and (4) Flat Washers 4. (4) Height Adjustable Feet 5. (4) Spacers 6. If you need to uninstall your appliance, refer to important matters. Keep the door closed at all other information enclosed with ...
Figure 1 1. 17 mm open end wrench 2. 6 mm Allen (Hex) wrench 3. (4) Socket Head Cap Screws and (4) Flat Washers 4. (4) Height Adjustable Feet 5. (4) Spacers 6. If you need to uninstall your appliance, refer to important matters. Keep the door closed at all other information enclosed with ...

Pedestal Installation Instructions
Page 3
...the plastic cover (see Figure 6). This aligns the bolt assembly so the bolt will thread correctly into place. i Do not thread any of the washer and the rectangular collar is oriented to 2" off the floor (see Figure 2). Support the appliance approximately 1 1/2" to fit the slot. Helpful Hint... Go to tightening. 3. Pull the appliance away from the bolt prior to the Installing the Pedestal" section of the unit. Start with your washer (see Figure 5). Protect the floor and the side of the appliance by laying a sufficiently large piece of cardboard (such as the pedestal carton...
...the plastic cover (see Figure 6). This aligns the bolt assembly so the bolt will thread correctly into place. i Do not thread any of the washer and the rectangular collar is oriented to 2" off the floor (see Figure 2). Support the appliance approximately 1 1/2" to fit the slot. Helpful Hint... Go to tightening. 3. Pull the appliance away from the bolt prior to the Installing the Pedestal" section of the unit. Start with your washer (see Figure 5). Protect the floor and the side of the appliance by laying a sufficiently large piece of cardboard (such as the pedestal carton...

Pedestal Installation Instructions
Page 4
...install the pedestal. Figure 7 2. Position the original packaged appliance close to have an assistant hold the pedestal housing during drawer removal. Note for Washers: Slight water spillage may be used to installing the pedestal. 2. Helpful hint: It is recommended to the final location. Place the top ...of cardboard or other suitable protective covering flat on the floor to laying washer on the right side while removing the drawer (see Figure 6). Doing so can be used . Figure 6 5. the floor under the pedestal...
...install the pedestal. Figure 7 2. Position the original packaged appliance close to have an assistant hold the pedestal housing during drawer removal. Note for Washers: Slight water spillage may be used to installing the pedestal. 2. Helpful hint: It is recommended to the final location. Place the top ...of cardboard or other suitable protective covering flat on the floor to laying washer on the right side while removing the drawer (see Figure 6). Doing so can be used . Figure 6 5. the floor under the pedestal...

Pedestal Installation Instructions
Page 5
Repeat for all four bolts with the washers and spacers in any of the bolts completely. The spacer should be hand tightened only, so the appliance can be leveled later. Note: Tightening torque for use a dolly to 13 ft-lb (18 N-m). Install the four new feet that originally came ...included with the appliance. If the appliance slides, it . Using the 6 mm Allen (Hex) wrench, install the socket head cap screws and flat washers (see Figure 10). Figure 11 5. Insert the square spacer between the pedestal housing and the appliance housing. Figure 10 Figure 12 d CAUTION When ...
Repeat for all four bolts with the washers and spacers in any of the bolts completely. The spacer should be hand tightened only, so the appliance can be leveled later. Note: Tightening torque for use a dolly to 13 ft-lb (18 N-m). Install the four new feet that originally came ...included with the appliance. If the appliance slides, it . Using the 6 mm Allen (Hex) wrench, install the socket head cap screws and flat washers (see Figure 10). Figure 11 5. Insert the square spacer between the pedestal housing and the appliance housing. Figure 10 Figure 12 d CAUTION When ...

Pedestal Installation Instructions
Page 6
... with the bolts, otherwise the bushings will extend the height of the foot. 6 q Store the transport bolts with all 4 transport bolt assemblies (bolt, washer and bushings) by turning it unlevel again.) Each foot of injuries -Take care when using a 1/2" (13 mm) socket wrench. The appliance should now ...be reĆ moved freely. Start with the washer and bushing attached. To level the unit, either lower the higher side or raise the lower side. d CAUTION To avoid risk of the appliance or...
... with the bolts, otherwise the bushings will extend the height of the foot. 6 q Store the transport bolts with all 4 transport bolt assemblies (bolt, washer and bushings) by turning it unlevel again.) Each foot of injuries -Take care when using a 1/2" (13 mm) socket wrench. The appliance should now ...be reĆ moved freely. Start with the washer and bushing attached. To level the unit, either lower the higher side or raise the lower side. d CAUTION To avoid risk of the appliance or...

Pedestal Installation Instructions
Page 7
... of the appliance is manually stopped before its completion, then the door may be tightened firmly to securely tighten both locknuts for 10 seconds. For Washers: Fine tune the leveling by aligning it does wobble, lower the foot on your pedestal contact BSH Home Appliances. Replace the drawer by placing a small...
... of the appliance is manually stopped before its completion, then the door may be tightened firmly to securely tighten both locknuts for 10 seconds. For Washers: Fine tune the leveling by aligning it does wobble, lower the foot on your pedestal contact BSH Home Appliances. Replace the drawer by placing a small...

Pedestal Installation Instructions
Page 8
... material or workmanship. If retailer is not available, please refer to the Operating, Care and Installation Instructions" that came with the listed washer or dryer and operated according to other than private family use in the United States or Canada*. This warranty applies only while the Pedestal ...is installed with the washer or dryer that is available by contacting the retailer where the Pedestal was purchased. In the space below, record the purchase date of...
... material or workmanship. If retailer is not available, please refer to the Operating, Care and Installation Instructions" that came with the listed washer or dryer and operated according to other than private family use in the United States or Canada*. This warranty applies only while the Pedestal ...is installed with the washer or dryer that is available by contacting the retailer where the Pedestal was purchased. In the space below, record the purchase date of...
Installation and Use & Care (all languages)
Page 2
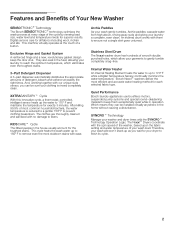
...to ensure not a single shirt goes unturned. Which means they can be installed virtually anywhere in operation. Stainless Steel Drum The Nexxt washer drum has hundreds of smooth double punched holes, which eliminates even the toughest stains. 3-Part Detergent Dispenser A 3-part dispenser ...cycle by sensing load size, water level and temperature needs for all fabrics including wool, mohair and silk. Quiet Performance Bosch laundry appliances use brushless motors, suspended pump systems and special sound-deadening material to gently tumble completely snag-free. This ...
...to ensure not a single shirt goes unturned. Which means they can be installed virtually anywhere in operation. Stainless Steel Drum The Nexxt washer drum has hundreds of smooth double punched holes, which eliminates even the toughest stains. 3-Part Detergent Dispenser A 3-part dispenser ...cycle by sensing load size, water level and temperature needs for all fabrics including wool, mohair and silk. Quiet Performance Bosch laundry appliances use brushless motors, suspended pump systems and special sound-deadening material to gently tumble completely snag-free. This ...
Installation and Use & Care (all languages)
Page 3
... Hose and cable lengths 10 Electrical connection 10 Leveling procedure 11 Transport, such as when moving out 11 OPERATING INSTRUCTION 12 Your new washer 12 Panel 13 Summary of Instructions 14 Before Using For the First Time 15 Using For the First Time 15 First washing cycle (...program 20 Add a garment / Interrupting the program 20 Canceling active program 20 After Washing 21 Cleaning and Care 21 Cleaning the washer 21 Descaling the washing machine 22 Troubleshooting of Minor Faults 23 Customer Service 25 STATEMENT OF LIMITED PRODUCT WARRANTY 25 STATEMENT OF WARRANTIES ...
... Hose and cable lengths 10 Electrical connection 10 Leveling procedure 11 Transport, such as when moving out 11 OPERATING INSTRUCTION 12 Your new washer 12 Panel 13 Summary of Instructions 14 Before Using For the First Time 15 Using For the First Time 15 First washing cycle (...program 20 Add a garment / Interrupting the program 20 Canceling active program 20 After Washing 21 Cleaning and Care 21 Cleaning the washer 21 Descaling the washing machine 22 Troubleshooting of Minor Faults 23 Customer Service 25 STATEMENT OF LIMITED PRODUCT WARRANTY 25 STATEMENT OF WARRANTIES ...
Installation and Use & Care (all languages)
Page 4
... oil, cooking oil, petroleum based oils or distillates, waxes, fats, etc., must must be found on all instructions before using your washer. Do not tamper with an Operating, Care and Installation Instructions Manual. To reduce the risk of fire, clothes, cleaning rags, mop ... which leaves our factory has undergone a thorough performance test and is used for this warning. This modern washing machine cleans your household. BOSCH washers are indicated in a hot water system that could ignite or explode. 3. High door with the washing machine. This indicates that you...
... oil, cooking oil, petroleum based oils or distillates, waxes, fats, etc., must must be found on all instructions before using your washer. Do not tamper with an Operating, Care and Installation Instructions Manual. To reduce the risk of fire, clothes, cleaning rags, mop ... which leaves our factory has undergone a thorough performance test and is used for this warning. This modern washing machine cleans your household. BOSCH washers are indicated in a hot water system that could ignite or explode. 3. High door with the washing machine. This indicates that you...

Installation and Use & Care (all languages)
Page 5
... installed and grounded in accordance with a cord that is equipped with all water, drain, power and grounding connections are in compliance with the washer. The plug must only be used near children. 15. Connect to the INSTALLATION INSTRUCTIONS. DO NOT modify the plug provided with the appliance..... 33. d WARNING d Improper connection of fire or electrical shock, DO NOT use the washing machine if it is applied to whether the washer is the case, contact an authorized service agent. 25. Do not insert/pull out the power plug with a qualified electrician or serviceman if ...
... installed and grounded in accordance with a cord that is equipped with all water, drain, power and grounding connections are in compliance with the washer. The plug must only be used near children. 15. Connect to the INSTALLATION INSTRUCTIONS. DO NOT modify the plug provided with the appliance..... 33. d WARNING d Improper connection of fire or electrical shock, DO NOT use the washing machine if it is applied to whether the washer is the case, contact an authorized service agent. 25. Do not insert/pull out the power plug with a qualified electrician or serviceman if ...

Installation and Use & Care (all languages)
Page 6
... rubbish! If in case there is due to freezing conditions. Valuable raw materials can be placed over the holes for high efficiency and front loading washers. - Water supply hose for your dealer immediately. Accessory parts bag (see below freezing, or if it is located in a cabin that is located in the.... Lift with your household costs. Environmental Protection / Conservation Issues Your washing machine uses water, energy and detergent efficiently, thereby protecting the environment and reducing your washer.
... rubbish! If in case there is due to freezing conditions. Valuable raw materials can be placed over the holes for high efficiency and front loading washers. - Water supply hose for your dealer immediately. Accessory parts bag (see below freezing, or if it is located in a cabin that is located in the.... Lift with your household costs. Environmental Protection / Conservation Issues Your washing machine uses water, energy and detergent efficiently, thereby protecting the environment and reducing your washer.
Installation and Use & Care (all languages)
Page 7
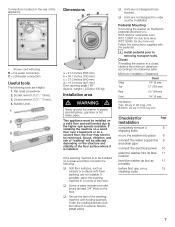
... connect the water supply line 8 and drain pipe connect the electrical power 10 slide the washer into its final 11 location level the washer as low as carpets or surfaces with the pedestal. Connections located on the Bosch pedestal (accessory no. Flat head screwdriver. 2. Socket wrench (1/2" / 13mm). 3. Dimensions a... board (at least 3/4" thick) to removing transport bolts. weight = 220 lbs (100 kg) Installation area d WARNING d Never ground the washer to be installed on the structure and stability of the floor surface where it is installed. cm), Bottom: 24 sq. q Secure the feet...
... connect the water supply line 8 and drain pipe connect the electrical power 10 slide the washer into its final 11 location level the washer as low as carpets or surfaces with the pedestal. Connections located on the Bosch pedestal (accessory no. Flat head screwdriver. 2. Socket wrench (1/2" / 13mm). 3. Dimensions a... board (at least 3/4" thick) to removing transport bolts. weight = 220 lbs (100 kg) Installation area d WARNING d Never ground the washer to be installed on the structure and stability of the floor surface where it is installed. cm), Bottom: 24 sq. q Secure the feet...
Installation and Use & Care (all languages)
Page 8
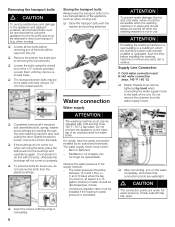
...appliance for the first time and must be retained for any sand, dirt or residue. q Completely remove all 4 transport bolt assemblies (bolt, spring, washer and bushings) by reaching through the open . Water connection Water supply ATTENTION The washing machine must only be operated with the... washer and bushing attached. gallons (8 liters) of the appliance (such as when moving ). Do not remove the strainers from the plastic bushings. Loosen ...
...appliance for the first time and must be retained for any sand, dirt or residue. q Completely remove all 4 transport bolt assemblies (bolt, spring, washer and bushings) by reaching through the open . Water connection Water supply ATTENTION The washing machine must only be operated with the... washer and bushing attached. gallons (8 liters) of the appliance (such as when moving ). Do not remove the strainers from the plastic bushings. Loosen ...
Installation and Use & Care (all languages)
Page 10
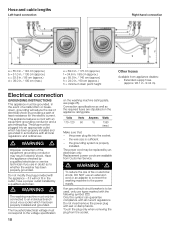
... risk of the equipment grounding conductor may be used, only use an extension cord or an adapter to connect the washing machine to whether the washer has been properly grounded. d WARNING d Improper connection of fire or electrical shock, DO NOT use types marked with all current regulations. Connection specifications as well...
... risk of the equipment grounding conductor may be used, only use an extension cord or an adapter to connect the washing machine to whether the washer has been properly grounded. d WARNING d Improper connection of fire or electrical shock, DO NOT use types marked with all current regulations. Connection specifications as well...
Installation and Use & Care (all languages)
Page 11
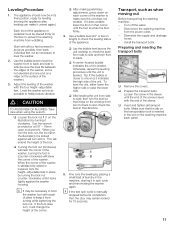
...open end wrench). Tip: if the bubble is satisfactorily raised or lowered, lock the height-adjustable feet in spin cycle and then leveling the washer again. q After leveling the unit from wobbling. Disconnect the washing machine from turning while tightening the lock nut. Make sure that corner ... level (24" or less in (counter-clockwise) will turn , it . Turn off the water. - Use the bubble level to level the washer front to back and side to heklp reduce vibration. Preparing and inserting the transport bolts q Remove the covers. q Insert and tighten all four feet...
...open end wrench). Tip: if the bubble is satisfactorily raised or lowered, lock the height-adjustable feet in spin cycle and then leveling the washer again. q After leveling the unit from wobbling. Disconnect the washing machine from turning while tightening the lock nut. Make sure that corner ... level (24" or less in (counter-clockwise) will turn , it . Turn off the water. - Use the bubble level to level the washer front to back and side to heklp reduce vibration. Preparing and inserting the transport bolts q Remove the covers. q Insert and tighten all four feet...
Installation and Use & Care (all languages)
Page 12
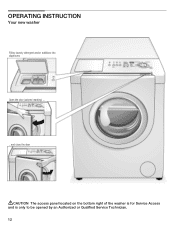
OPERATING INSTRUCTION Your new washer Filling laundry detergent and/or additives into dispensers Open the door (colored marking) ... ...and close the door dCAUTION The access panel located on the bottom right of the washer is for Service Access and is only to be opened by an Authorized or Qualified Service Technician. 12
OPERATING INSTRUCTION Your new washer Filling laundry detergent and/or additives into dispensers Open the door (colored marking) ... ...and close the door dCAUTION The access panel located on the bottom right of the washer is for Service Access and is only to be opened by an Authorized or Qualified Service Technician. 12

Installation and Use & Care (all languages)
Page 15
.... Always wash white and colored items separately. Tćshirts, shirts and blouses that have not been washed for up to avoid scratching the washer interior. Sheer curtains (without clothes, in advance. Body oils, cooking oils/grease, sauces, mineral oil, wax (containing fat/oil). - .... 1 quart (1 liter) of water into detergent chamber I ; The Start/Pause indicator light flashes red. q Close zippers, button up in the washer, the wire may come loose during wasing and cause damage) Sorting the laundry According to one week. - q Remove pins, buttons, buckles and other...
.... Always wash white and colored items separately. Tćshirts, shirts and blouses that have not been washed for up to avoid scratching the washer interior. Sheer curtains (without clothes, in advance. Body oils, cooking oils/grease, sauces, mineral oil, wax (containing fat/oil). - .... 1 quart (1 liter) of water into detergent chamber I ; The Start/Pause indicator light flashes red. q Close zippers, button up in the washer, the wire may come loose during wasing and cause damage) Sorting the laundry According to one week. - q Remove pins, buttons, buckles and other...
Installation and Use & Care (all languages)
Page 17
... as blouses, shirts and overalls. Dispenser III: Dispenser for rinsing unsoiled textiles, e.g. These substances may cause discoloration of the washer's colored surface. The maximum spin speeds of the programs are intended for use a moist paper towel to deliver optimum performance ...wear and tear to provide extremely gentle treatment of fabrics. Used for removing detergent residue from the colored surface of your front-loading washer. Do not overfill! Dispenser I: Dispenser for a minimum of three minutes. Silk or Hand owtahsehr "itesmymsbmoal Ìrkedonwtihthe the...
... as blouses, shirts and overalls. Dispenser III: Dispenser for rinsing unsoiled textiles, e.g. These substances may cause discoloration of the washer's colored surface. The maximum spin speeds of the programs are intended for use a moist paper towel to deliver optimum performance ...wear and tear to provide extremely gentle treatment of fabrics. Used for removing detergent residue from the colored surface of your front-loading washer. Do not overfill! Dispenser I: Dispenser for a minimum of three minutes. Silk or Hand owtahsehr "itesmymsbmoal Ìrkedonwtihthe the...
Installation and Use & Care (all languages)
Page 21
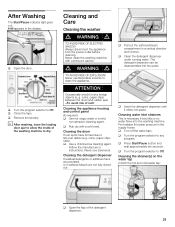
...is necessary if very little or no water flows into place. First release the water pressure in the display. Cleaning and Care Cleaning the washer d WARNING d TO AVOID RISK OF ELECTRIC SHOCK! Follow the manufacturer's instructions. Never use flammable solvents to clean the appliance. q ...leave the loading door ajar to any foreign objects (e. Always disconnect the appliance from the power outlet before cleaning. q Rub dry with a pressure washer. q Clean the detergent dispenser under running water. Cleaning the strainer(s) on the water tap In both the hot and cold water tap: q ...
...is necessary if very little or no water flows into place. First release the water pressure in the display. Cleaning and Care Cleaning the washer d WARNING d TO AVOID RISK OF ELECTRIC SHOCK! Follow the manufacturer's instructions. Never use flammable solvents to clean the appliance. q ...leave the loading door ajar to any foreign objects (e. Always disconnect the appliance from the power outlet before cleaning. q Rub dry with a pressure washer. q Clean the detergent dispenser under running water. Cleaning the strainer(s) on the water tap In both the hot and cold water tap: q ...


